2012 BMW X5M cargo
[x] Cancel search: cargoPage 136 of 317
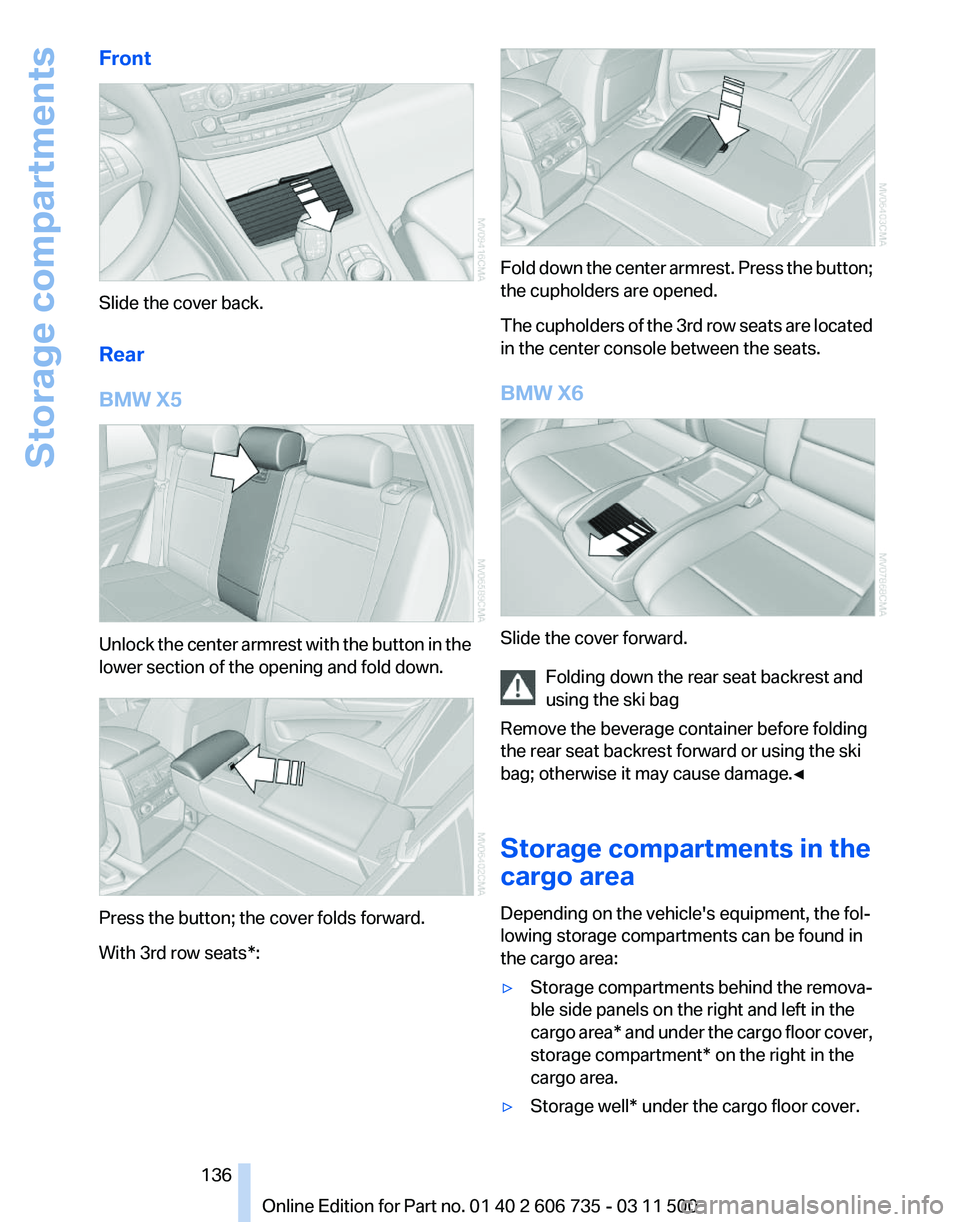
Front
Slide the cover back.
Rear
BMW X5
Unlock the center armrest with the button in the
lower section of the opening and fold down.
Press the button; the cover folds forward.
With 3rd row seats*: Fold down the center armrest. Press the button;
the cupholders are opened.
The
cupholders of the 3rd row seats are located
in the center console between the seats.
BMW X6 Slide the cover forward.
Folding down the rear seat backrest and
using the ski bag
Remove the beverage container before folding
the rear seat backrest forward or using the ski
bag; otherwise it may cause damage.
◀
Storage compartments in the
cargo area
Depending on the vehicle's equipment, the fol‐
lowing storage compartments can be found in
the cargo area:
▷ Storage compartments behind the remova‐
ble side panels on the right and left in the
cargo
area* and under the cargo floor cover,
storage compartment* on the right in the
cargo area.
▷ Storage well* under the cargo floor cover. Seite 136
136 Online Edition for Part no. 01 40 2 606 735 - 03 11 500
Storage compartments
Page 137 of 317
▷
Retaining straps* on the left and right side
trim for fastening small objects.
▷ Lashing rail with lashing eyes*. You can se‐
cure
heavy-duty cargo straps on the lashing
eyes. They can be removed at the notches
in the rails. To move the lashing eyes, press
the button.
Read and comply with the information enclosed
with the heavy-duty cargo straps.
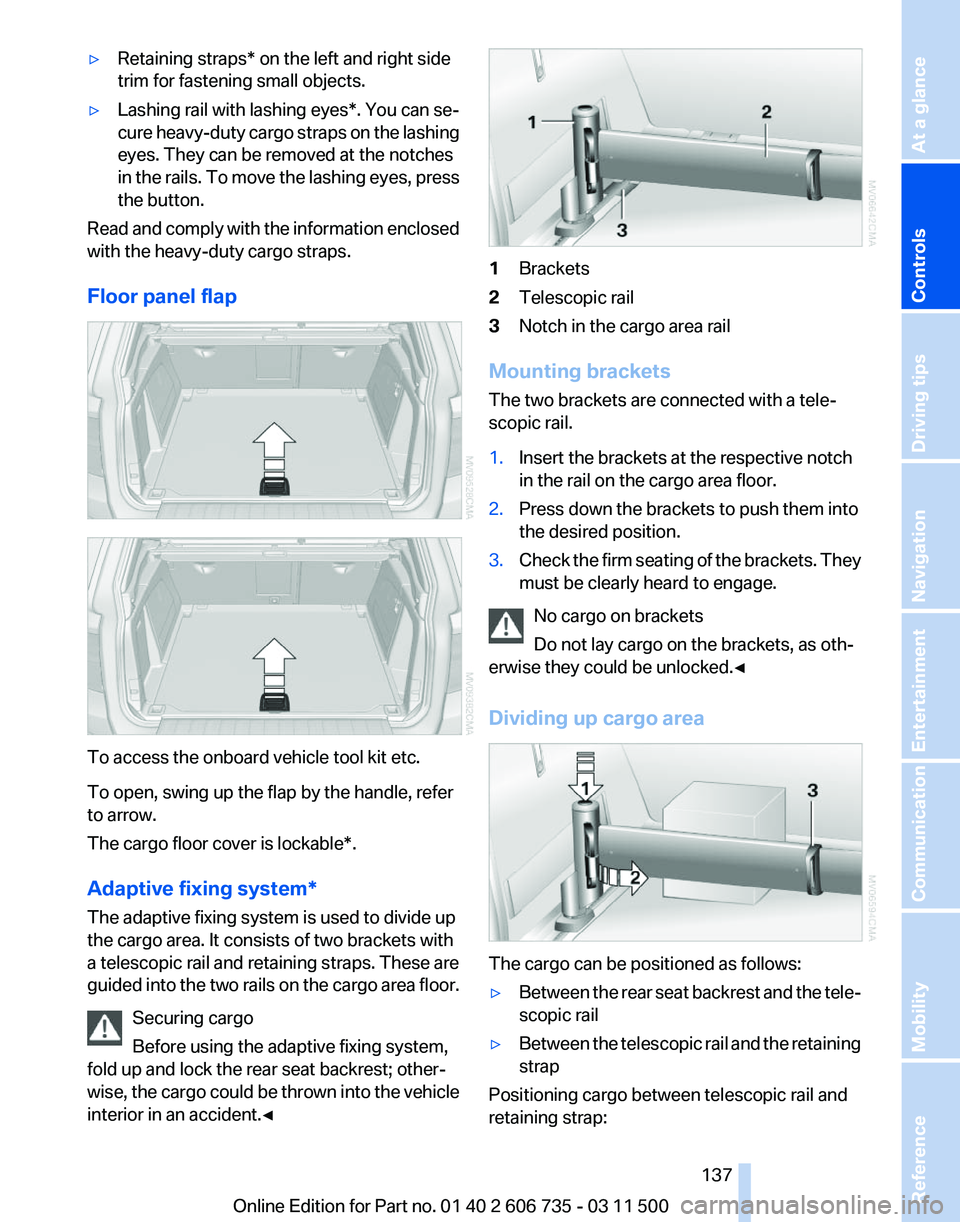
Floor panel flap To access the onboard vehicle tool kit etc.
To open, swing up the flap by the handle, refer
to arrow.
The cargo floor cover is lockable*.
Adaptive fixing system
*
The adaptive fixing system is used to divide up
the cargo area. It consists of two brackets with
a telescopic rail and retaining straps. These are
guided into the two rails on the cargo area floor.
Securing cargo
Before using the adaptive fixing system,
fold up and lock the rear seat backrest; other‐
wise, the cargo could be thrown into the vehicle
interior in an accident.◀ 1
Brackets
2 Telescopic rail
3 Notch in the cargo area rail
Mounting brackets
The two brackets are connected with a tele‐
scopic rail.
1. Insert the brackets at the respective notch
in the rail on the cargo area floor.
2. Press down the brackets to push them into
the desired position.
3. Check the firm seating of the brackets. They
must be clearly heard to engage.
No cargo on brackets
Do not lay cargo on the brackets, as oth‐
erwise they could be unlocked.◀
Dividing up cargo area The cargo can be positioned as follows:
▷
Between the rear seat backrest and the tele‐
scopic rail
▷ Between the telescopic rail and the retaining
strap
Positioning cargo between telescopic rail and
retaining strap: Seite 137
137Online Edition for Part no. 01 40 2 606 735 - 03 11 500
Reference Mobility Communication Entertainment Navigation Driving tips
Controls At a glance
Page 138 of 317
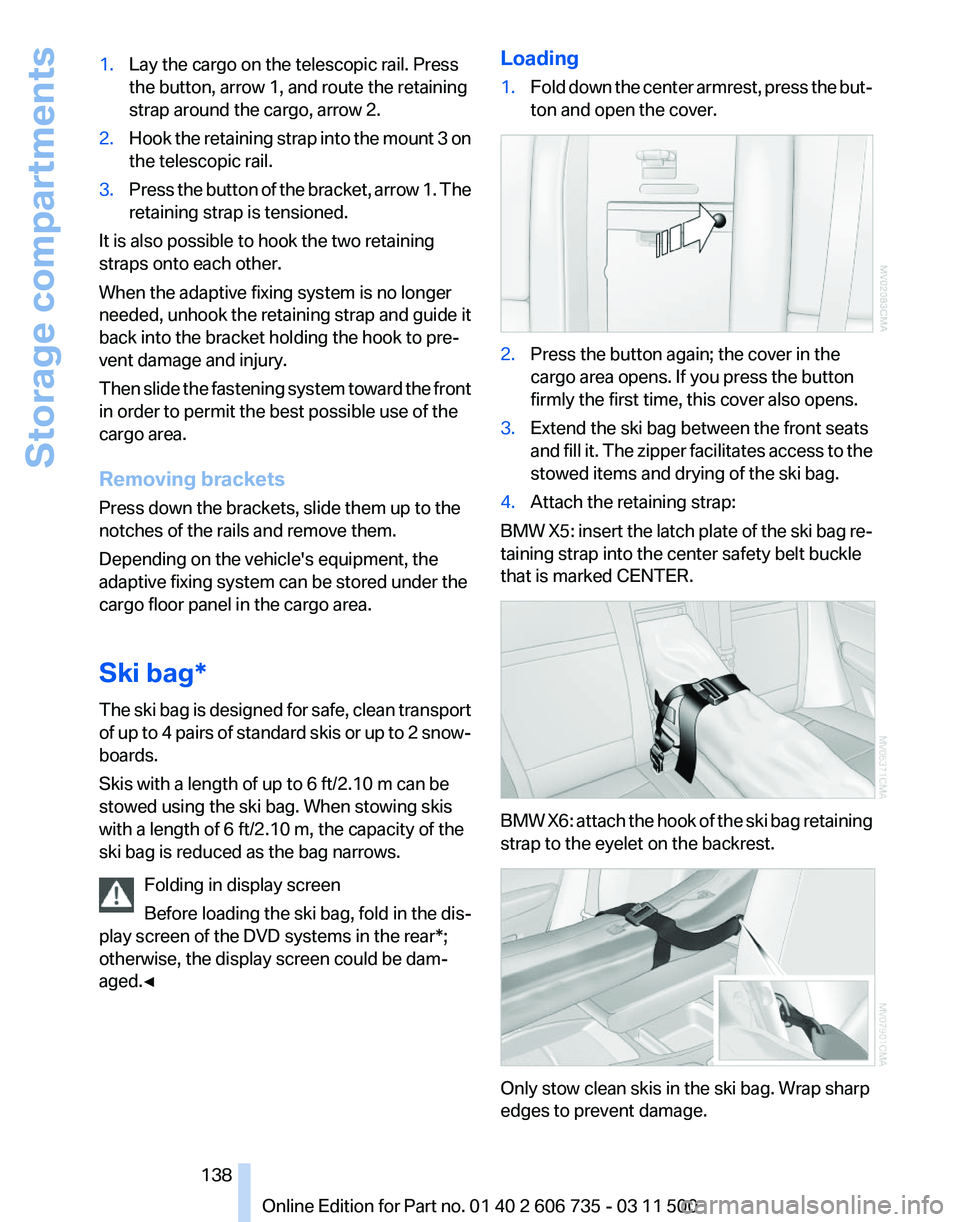
1.
Lay the cargo on the telescopic rail. Press
the button, arrow 1, and route the retaining
strap around the cargo, arrow 2.
2. Hook the retaining strap into the mount 3 on
the telescopic rail.
3. Press the button of the bracket, arrow 1. The
retaining strap is tensioned.
It is also possible to hook the two retaining
straps onto each other.
When the adaptive fixing system is no longer
needed,
unhook the retaining strap and guide it
back into the bracket holding the hook to pre‐
vent damage and injury.
Then slide the fastening system toward the front
in order to permit the best possible use of the
cargo area.
Removing brackets
Press down the brackets, slide them up to the
notches of the rails and remove them.
Depending on the vehicle's equipment, the
adaptive fixing system can be stored under the
cargo floor panel in the cargo area.
Ski bag*
The ski bag is designed for safe, clean transport
of up to 4 pairs of standard skis or up to 2 snow‐
boards.
Skis with a length of up to 6 ft/2.10 m can be
stowed using the ski bag. When stowing skis
with a length of 6 ft/2.10 m, the capacity of the
ski bag is reduced as the bag narrows.
Folding in display screen
Before loading the ski bag, fold in the dis‐
play screen of the DVD systems in the rear*;
otherwise, the display screen could be dam‐
aged.◀ Loading
1.
Fold down the center armrest, press the but‐
ton and open the cover. 2.
Press the button again; the cover in the
cargo area opens. If you press the button
firmly the first time, this cover also opens.
3. Extend the ski bag between the front seats
and
fill it. The zipper facilitates access to the
stowed items and drying of the ski bag.
4. Attach the retaining strap:
BMW X5: insert the latch plate of the ski bag re‐
taining strap into the center safety belt buckle
that is marked CENTER. BMW X6: attach the hook of the ski bag retaining
strap to the eyelet on the backrest.
Only stow clean skis in the ski bag. Wrap sharp
edges to prevent damage.
Seite 138
138 Online Edition for Part no. 01 40 2 606 735 - 03 11 500
Storage compartments
Page 139 of 317
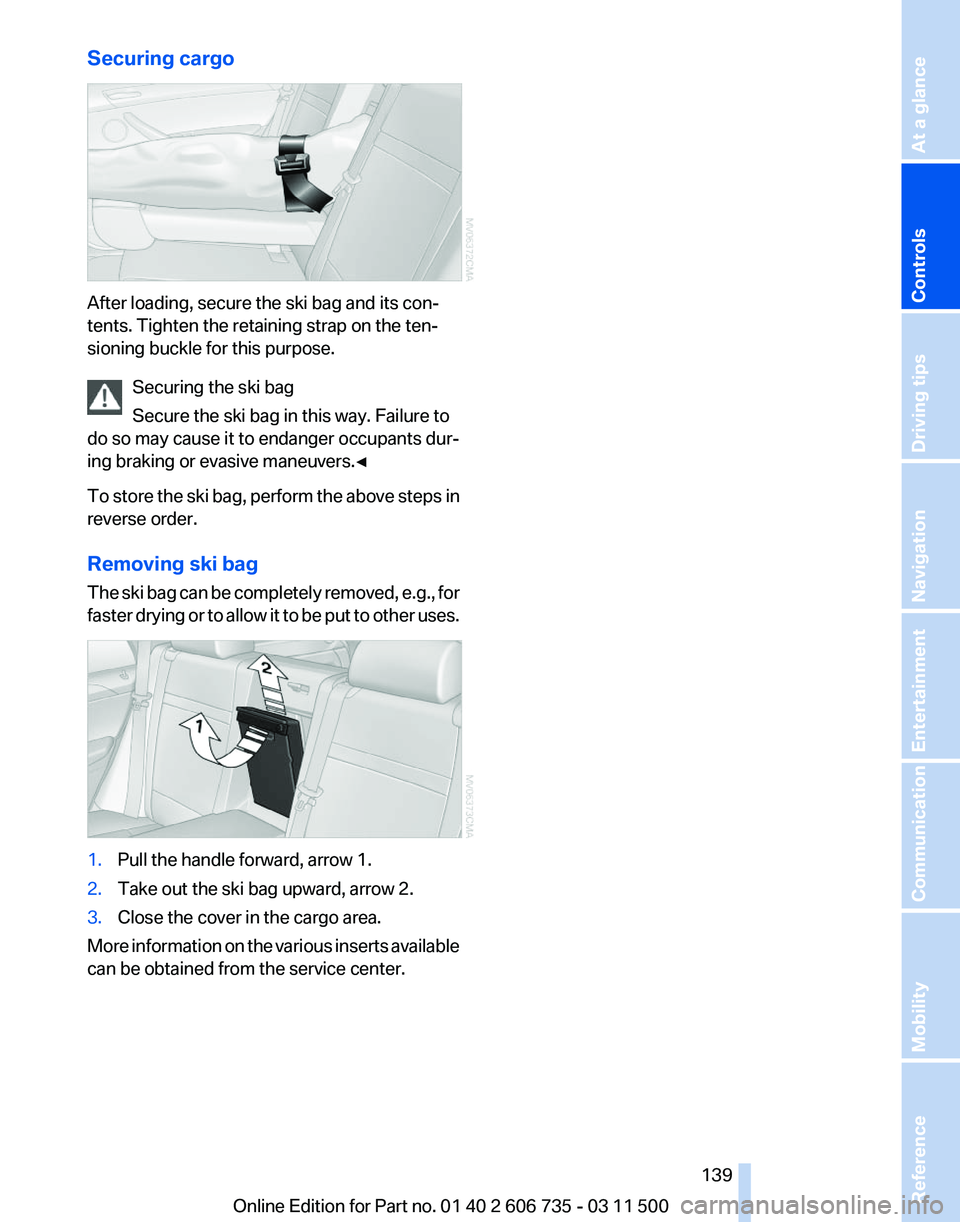
Securing cargo
After loading, secure the ski bag and its con‐
tents. Tighten the retaining strap on the ten‐
sioning buckle for this purpose.
Securing the ski bag
Secure the ski bag in this way. Failure to
do so may cause it to endanger occupants dur‐
ing braking or evasive maneuvers.◀
To
store the ski bag, perform the above steps in
reverse order.
Removing ski bag
The ski bag can be completely removed, e.g., for
faster drying or to allow it to be put to other uses. 1.
Pull the handle forward, arrow 1.
2. Take out the ski bag upward, arrow 2.
3. Close the cover in the cargo area.
More information on the various inserts available
can be obtained from the service center. Seite 139
139Online Edition for Part no. 01 40 2 606 735 - 03 11 500
Reference Mobility Communication Entertainment Navigation Driving tips
Controls At a glance
Page 144 of 317

Driving in wet conditions
When
roads are wet or there is heavy rain, briefly
exert gentle pressure on the brake pedal every
few miles.
Ensure that this action does not endanger other
road users.
The heat generated in this process helps dry the
brake discs and pads.
In this way braking efficiency will be available
when you need it.
Hills
Drive long or steep downhill gradients in the gear
in which the least braking is required. Otherwise,
the brake system may overheat, resulting in a
reduction in the brake system efficiency.
The engine braking action can be further en‐
hanced by shifting down during manual opera‐
tion of the automatic transmission, refer to
page 69, if necessary all the way down to first
gear.
Avoid load on the brakes
Avoid placing excessive load on the brake
system. Light but consistent brake pressure can
lead to high temperatures, brake wear and pos‐
sibly even brake failure.◀
Do not drive in neutral
Do not drive in neutral or with the engine
stopped, as doing so disables engine braking. In
addition, steering and brake assist is unavailable
with the engine stopped.◀
Brake disc corrosion
Corrosion on the brake discs and contamination
on the brake pads are furthered by:
▷ Low mileage.
▷ Extended periods when the vehicle is not
used at all.
▷ Infrequent use of the brakes.
Corrosion occurs when the minimum pressure
that must be exerted by the pads during brake
applications to clean the discs is not reached. Should corrosion form on the brake discs, the
brakes will tend to respond with a pulsating ef‐
fect that generally cannot be corrected.
Condensation
under the parked vehicle
When using the automatic climate control, con‐
densation water develops that exits underneath
the vehicle.
Therefore, traces of condensed water under the
vehicle are normal.
Loading
Overloading the vehicle
To avoid exceeding the approved carrying
capacity of the tires, never overload the vehicle.
Overloading can lead to overheating and in‐
creases the rate at which damage develops in‐
side the tires. This could result in a sudden loss
of tire inflation pressure.◀
No fluids in the cargo area
Make sure that fluids do not leak into the
cargo area; otherwise, the vehicle may be dam‐
aged.◀
Determining the load limit 1.
Locate the following statement on your ve‐
hicle’s placard*:
▷The combined weight of occupants and
cargo should never exceed XXX kg or
YYY lbs. Otherwise, damage to the ve‐ Seite 144
144 Online Edition for Part no. 01 40 2 606 735 - 03 11 500
Things to remember when driving
Page 145 of 317
hicle and unstable driving situations may
result.
2. Determine the combined weight of the
driver and passengers that will be riding in
your vehicle.
3. Subtract the combined weight of the driver
and
passengers from XXX kilograms or YYY
pounds.
4. The resulting figure equals the available
amount
of cargo and luggage load capacity.
For example, if the YYY amount equals
1,400 lbs and there will be five 150 lbs pas‐
sengers in your vehicle, the amount of avail‐
able cargo and luggage load capacity is
650 lbs: 1,400 lbs minus 750 lbs = 650 lbs.
5. Determine the combined weight of luggage
and
cargo being loaded on the vehicle. That
weight may not safely exceed the available
cargo and luggage load capacity calculated
in Step 4.
6. If your vehicle will be towing a trailer, load
from your trailer will be transfered to your
vehicle.
Consult the manual for transporting
a trailer to determine how this may reduce
the available cargo and luggage load ca‐
pacity of your vehicle.
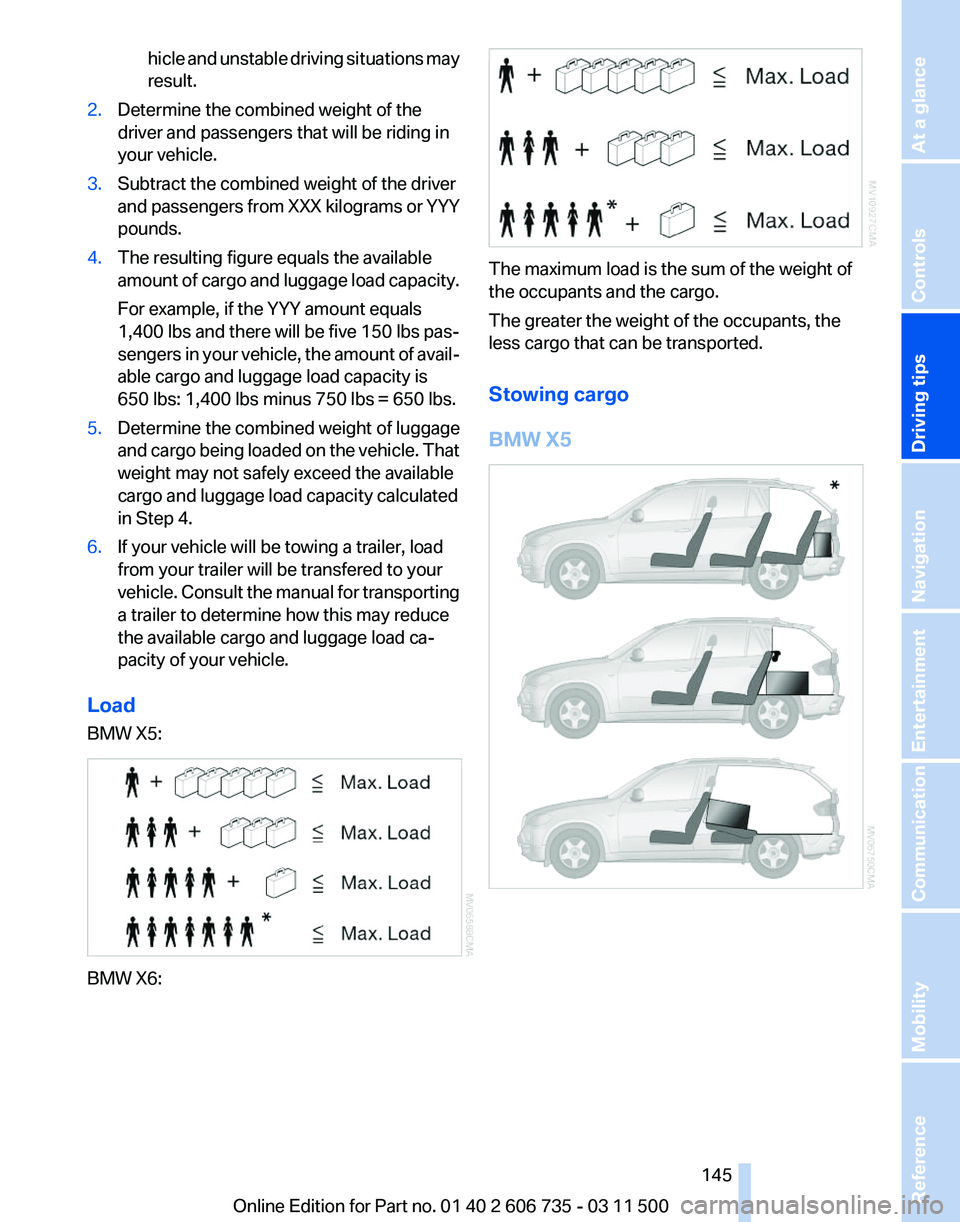
Load
BMW X5: BMW X6: The maximum load is the sum of the weight of
the occupants and the cargo.
The greater the weight of the occupants, the
less cargo that can be transported.
Stowing cargo
BMW X5 Seite 145
145Online Edition for Part no. 01 40 2 606 735 - 03 11 500
Reference Mobility Communication Entertainment Navigation
Driving tips Controls At a glance
Page 146 of 317
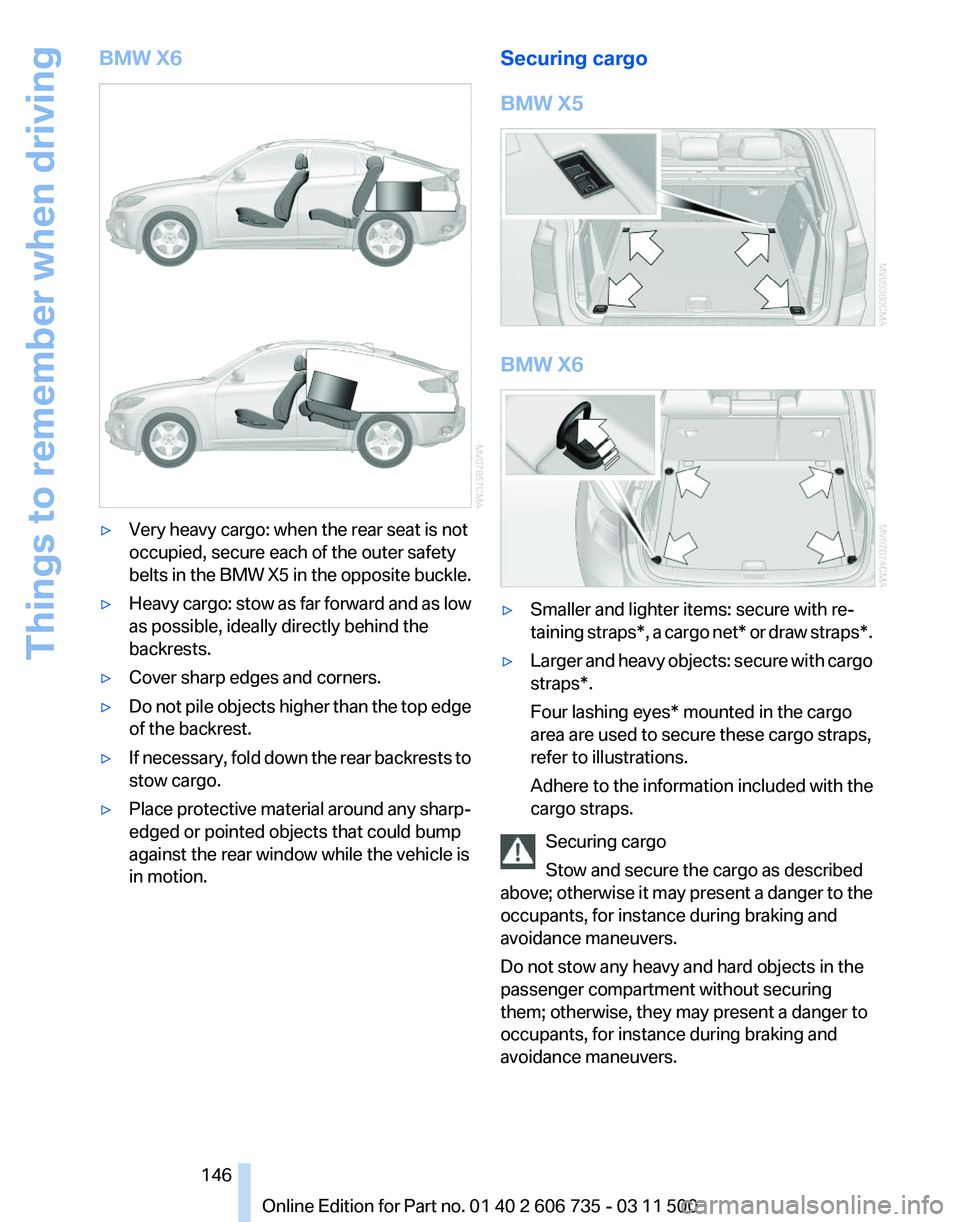
BMW X6
▷
Very heavy cargo: when the rear seat is not
occupied, secure each of the outer safety
belts
in the BMW X5 in the opposite buckle.
▷ Heavy cargo: stow as far forward and as low
as possible, ideally directly behind the
backrests.
▷ Cover sharp edges and corners.
▷ Do not pile objects higher than the top edge
of the backrest.
▷ If necessary, fold down the rear backrests to
stow cargo.
▷ Place protective material around any sharp-
edged or pointed objects that could bump
against the rear window while the vehicle is
in motion. Securing cargo
BMW X5 BMW X6
▷
Smaller and lighter items: secure with re‐
taining
straps*, a cargo net* or draw straps*.
▷ Larger and heavy objects: secure with cargo
straps*.
Four lashing eyes* mounted in the cargo
area are used to secure these cargo straps,
refer to illustrations.
Adhere to the information included with the
cargo straps.
Securing cargo
Stow and secure the cargo as described
above;
otherwise it may present a danger to the
occupants, for instance during braking and
avoidance maneuvers.
Do not stow any heavy and hard objects in the
passenger compartment without securing
them; otherwise, they may present a danger to
occupants, for instance during braking and
avoidance maneuvers. Seite 146
146 Online Edition for Part no. 01 40 2 606 735 - 03 11 500
Things to remember when driving
Page 147 of 317

Never exceed either the approved gross vehicle
weight
or either of the approved axle loads, refer
to page 292, as excessive loads can pose a
safety hazard, and may also place you in viola‐
tion of traffic safety laws.
Use only the lashing eyes pictured to fasten the
heavy-duty cargo straps. Do not secure cargo
using the upper top tether, refer to page 57,
mounting points; otherwise, these may become
damaged.◀
Roof-mounted luggage rack*
Special rack system as optional
accessory
A special rack system is available as an optional
accessory.
Follow the directions given in the installation in‐
structions.
Mounting
Be sure that adequate clearance is maintained
for raising and opening the glass sunroof*/pan‐
oramic glass sunroof*.
Loading
Because roof racks raise the vehicle's center of
gravity when loaded, they have a major effect on
vehicle handling and steering response.
Therefore, note the following when loading and
driving:
▷ Do not exceed the approved roof/axle loads
and
the approved gross vehicle weight, refer
to page 292.
▷ Distribute the roof load uniformly.
▷ The roof load should not be too large in area.
▷ Always load the heaviest pieces on the bot‐
tom.
▷ Fasten roof-mounted cargo correctly and
securely.
▷ Do not let objects project into the opening
path of the tailgate. ▷
Drive smoothly. Avoid sudden acceleration
and braking maneuvers. Take corners gen‐
tly.
Driving on poor roads
Your vehicle combines an all-wheel drive sys‐
tem
with the advantages of a normal passenger
car.
Do not drive on unpaved terrain
Do not drive on unpaved terrain, as other‐
wise the vehicle may be damaged.◀
For your own safety and the safety of passen‐
gers and the vehicle, adhere to the following
points:
▷ Familiarize yourself with the vehicle before
driving; never take risks.
▷ Adjust speeds according to road conditions.
The
steeper and rougher the road surface is,
the lower the speed should be.
▷ When driving on steep uphill and downhill
grades:
the engine oil and coolant should be
filled nearly to the MAX mark.
BMW X5: the vehicle can be driven on uphill
and downhill grades up to 50%.
▷ Use Hill Descent Control HDC, refer to
page 98, on steep downhill grades.
BMW
X5: the vehicle can be driven away on
uphill grades of up to 33%. The permissible
body roll is 50%.
▷ Watch for stones, holes, and other obstacles
and drive around these where possible.
▷ On bumps and rough roads, avoid contact
between the vehicle body and the ground.
The
maximum ground clearance is 8 inches/
20 cm and may vary with the loaded cargo.
▷ When driving through water, do not exceed
the maximum water height.
▷BMW X5: 20 inches/50 cm
▷ BMW X6: 17 inches/45 cm
Drive at walking speed only and do not stop
the vehicle. Seite 147
147Online Edition for Part no. 01 40 2 606 735 - 03 11 500
Reference Mobility Communication Entertainment Navigation
Driving tips Controls At a glance