2012 BMW X5M cargo
[x] Cancel search: cargoPage 148 of 317
▷
After driving through water, press on the
brake pedal several times at low speeds to
dry the brakes.
▷ Depending on the prevailing terrain, activate
Dynamic Traction Control DTC, refer to
page 97, briefly.
▷ When the wheels spin, accelerate to enable
the driving stability control systems to dis‐
tribute the drive force to the individual
wheels.
▷ BMW X5 with M Sport Package*: if the ve‐
hicle is primarily used on poor roads or un‐
paved surfaces, it may be advantageous,
depending on the driving style, to use the
stone
chip guard offered by the service cen‐
ter. This reduces the risk of damage to
painted vehicle components, such as in the
area of the side skirts and wheel arches.
Your service center will be glad to advise
you.
After driving on poor roads
Adhere
to the following points to ensure vehicle
safety:
▷ Remove excessive accumulations of dirt
and mud from the vehicle body.
▷ Clear mud, snow, ice, etc., from the wheels
and tires and check for damage.
Saving fuel
General information
Your vehicle contains advanced technology for
the reduction of fuel consumption and emis‐
sions.
Fuel consumption depends on a number of dif‐
ferent factors.
The implementation of certain measures, driv‐
ing style and regular maintenance, refer to
page 268, can have an influence on fuel con‐
sumption and on the environmental impact.
Remove unnecessary cargo
Additional weight increases fuel consumption. Remove attached parts following use
Remove
unneeded auxiliary mirrors, roof or rear
luggage racks after use.
Attached parts on the vehicle impair the aero‐
dynamics and increase the fuel consumption.
Closing the windows and glass
sunroof*/panoramic glass sunroof*
Driving with the glass sunroof/panoramic glass
sunroof and windows open results in increased
air resistance and raises fuel consumption.
Check the tire inflation pressure
regularly
Check and, if necessary, correct the tire inflation
pressure, refer to page 252, at least twice a
month and before starting on a long trip.
Low tire inflation pressure increases rolling re‐
sistance and thus raises fuel consumption and
tire wear.
Drive away without delay
Do not wait for the engine to warm up while the
vehicle remains stationary. Start driving right
away, but at moderate engine speeds.
This is the fastest way for the cold engine to
reach its operating temperature.
Look well ahead when driving
Avoid unnecessary acceleration and braking.
By maintaining a suitable distance to the vehicle
driving ahead of you.
Driving smoothly and looking ahead reduces
fuel consumption.
Avoid high engine speeds
Driving at a low engine speed reduces fuel con‐
sumption and minimizes wear.
Use coasting conditions
When approaching a red light, take your foot off
the accelerator and let the vehicle coast to a halt.
On a downhill gradient, take your foot off the ac‐
celerator and let the vehicle roll.
The flow of fuel is interrupted while coasting.
Seite 148
148 Online Edition for Part no. 01 40 2 606 735 - 03 11 500
Things to remember when driving
Page 246 of 317

Refueling
Notes
Switch off the engine before refueling
Always switch off the engine before refu‐
eling; otherwise, fuel cannot be added to the
tank and a message will be displayed.
◀
Observe when handling fuel
▷ Take all precautionary measures and
observe all applicable regulations
when handling fuel.
▷ Do not carry any spare fuel containers in
your vehicle. They can develop a leak and
cause an explosion or cause a fire in the
event of an accident.◀
Fuel cap
Opening
1. Briefly press the rear edge of the fuel filler
flap. 2.
Turn the fuel cap counterclockwise.
3. Place the fuel cap in the bracket attached to
the fuel filler flap.
Closing
1. Fit the fuel cap and turn it clockwise until you
clearly hear a click.
2. Close the fuel filler flap. Do not pinch the retaining strap
Do not pinch the retaining strap attached
to the cap; otherwise, the cap cannot be closed
properly and fuel vapors can escape.◀
A message* is displayed if the cap is loose or
missing.
Manually unlocking fuel filler flap
In the event of a malfunction, the fuel filler flap
can be released manually:
1. Open the right-hand side panel in the cargo
area.
2. Pull the knob with the gas pump symbol. Observe the following when
refueling
When refueling, insert the filler nozzle com‐
pletely into the filler pipe. Lifting up the fuel
pump nozzle during refueling causes:
▷
Premature pump shutoff.
▷ Reduced efficiency in the fuel-vapor recov‐
ery system.
The fuel tank is full when the filler nozzle clicks
off the first time.
Handling fuels
Follow the safety instructions provided at
gas
stations; otherwise, there is a danger of per‐
sonal injury and property damage.◀ Seite 246
246 Online Edition for Part no. 01 40 2 606 735 - 03 11 500
Refueling
Page 270 of 317
Replacing components
Tool kit
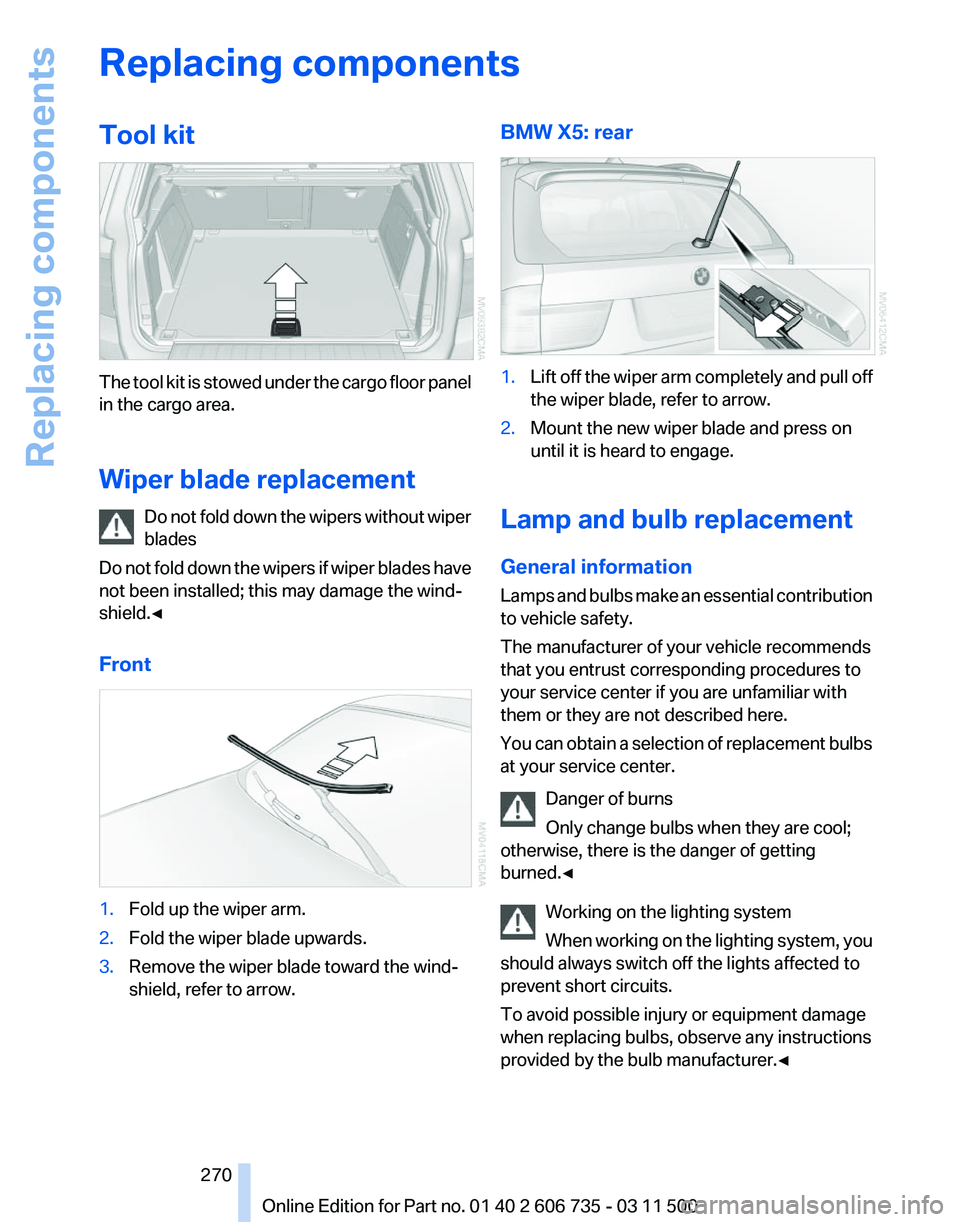
The tool kit is stowed under the cargo floor panel
in the cargo area.
Wiper blade replacement
Do
not fold down the wipers without wiper
blades
Do not fold down the wipers if wiper blades have
not been installed; this may damage the wind‐
shield.◀
Front 1.
Fold up the wiper arm.
2. Fold the wiper blade upwards.
3. Remove the wiper blade toward the wind‐
shield, refer to arrow. BMW X5: rear
1.
Lift off the wiper arm completely and pull off
the wiper blade, refer to arrow.
2. Mount the new wiper blade and press on
until it is heard to engage.
Lamp and bulb replacement
General information
Lamps
and bulbs make an essential contribution
to vehicle safety.
The manufacturer of your vehicle recommends
that you entrust corresponding procedures to
your service center if you are unfamiliar with
them or they are not described here.
You can obtain a selection of replacement bulbs
at your service center.
Danger of burns
Only change bulbs when they are cool;
otherwise, there is the danger of getting
burned.◀
Working on the lighting system
When working on the lighting system, you
should always switch off the lights affected to
prevent short circuits.
To avoid possible injury or equipment damage
when replacing bulbs, observe any instructions
provided by the bulb manufacturer.◀ Seite 270
270 Online Edition for Part no. 01 40 2 606 735 - 03 11 500
Replacing components
Page 272 of 317
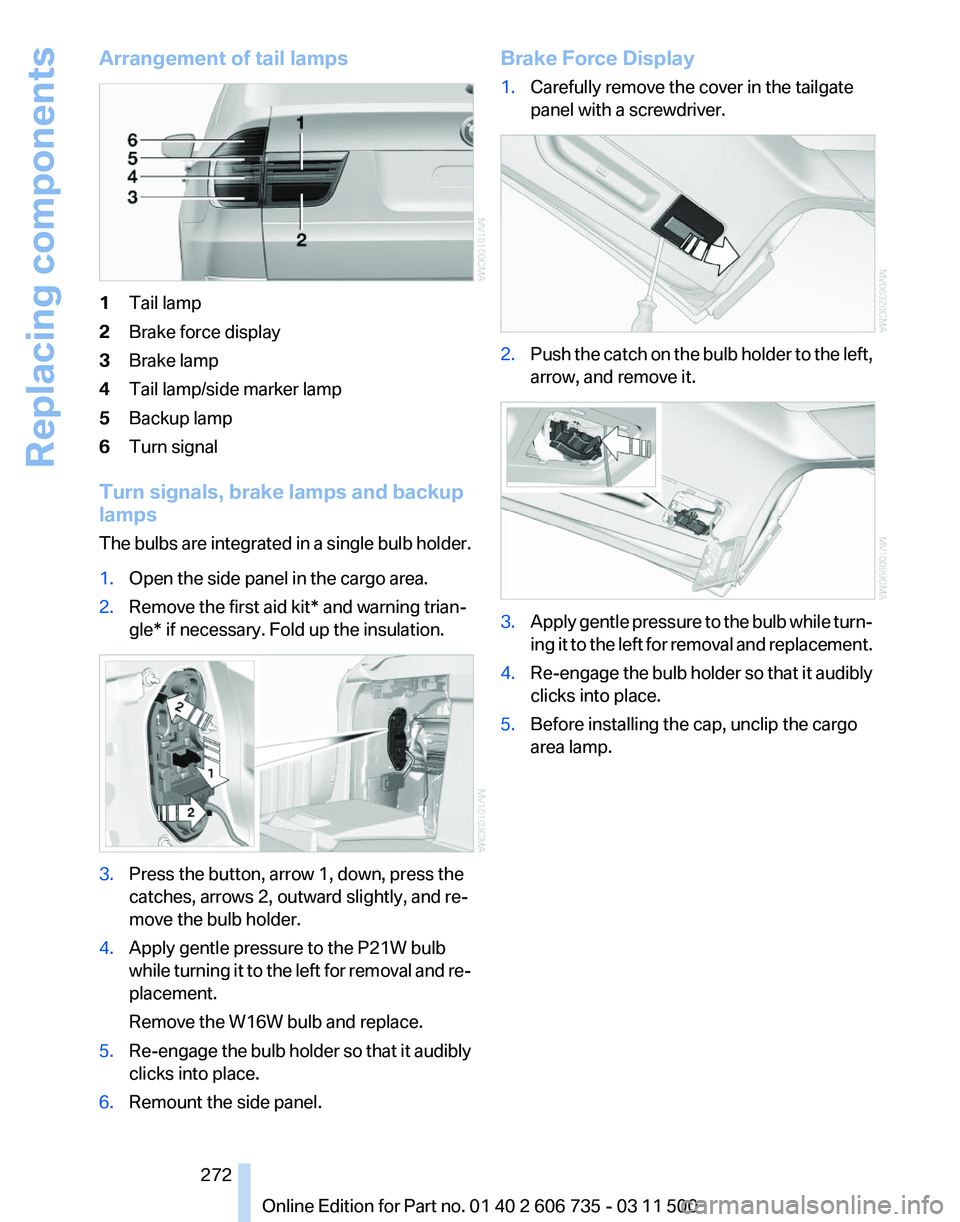
Arrangement of tail lamps
1
Tail lamp
2 Brake force display
3 Brake lamp
4 Tail lamp/side marker lamp
5 Backup lamp
6 Turn signal
Turn signals, brake lamps and backup
lamps
The
bulbs are integrated in a single bulb holder.
1. Open the side panel in the cargo area.
2. Remove the first aid kit* and warning trian‐
gle* if necessary. Fold up the insulation. 3.
Press the button, arrow 1, down, press the
catches, arrows 2, outward slightly, and re‐
move the bulb holder.
4. Apply gentle pressure to the P21W bulb
while
turning it to the left for removal and re‐
placement.
Remove the W16W bulb and replace.
5. Re-engage the bulb holder so that it audibly
clicks into place.
6. Remount the side panel. Brake Force Display
1.
Carefully remove the cover in the tailgate
panel with a screwdriver. 2.
Push the catch on the bulb holder to the left,
arrow, and remove it. 3.
Apply gentle pressure to the bulb while turn‐
ing
it to the left for removal and replacement.
4. Re-engage the bulb holder so that it audibly
clicks into place.
5. Before installing the cap, unclip the cargo
area lamp.
Seite 272
272 Online Edition for Part no. 01 40 2 606 735 - 03 11 500
Replacing components
Page 273 of 317

Then lay the cap on its upper side and close
it, refer to arrow.
6.
Position the cargo area lamp and clip it in,
refer to arrow. License plate lamps
These lamps are made using LED technology.
Contact your service center in the event of a
malfunction.
Center brake lamp
This lamp uses LED technology for operation.
Contact your service center in the event of a
malfunction.
BMW X6: bulb replacement
Xenon headlamps
Because
of the long life of these bulbs, the like‐
lihood of failure is very low. Switching the lamps
on and off frequently shortens their life.
If a bulb fails, switch on the front fog lamps* and
continue the trip with great care. Comply with
local regulations. Do not perform work/bulb replacement on
xenon headlamps
Have
any work on the xenon lighting system, in‐
cluding bulb replacement, performed only by a
service center.
Due to the high voltage present in the system,
there is the danger of fatal injuries if work is car‐
ried out improperly.◀
Parking lamps, roadside parking lamps,
daytime running lights*
35-watt bulb, H8
Wear protective goggles and gloves
Halogen bulbs are pressurized. Therefore,
wear protective goggles and gloves. Otherwise,
there is a danger of injuries if the bulb is acci‐
dentally damaged during replacement.◀
1. Turn the cover to the left and remove. 2.
Left side of vehicle: rotate the bulb holder to
the right, see arrow, and remove.
Right side of vehicle: rotate the bulb holder
to the left and remove. 3.
Disconnect plug and replace bulb.
4. Install in the reverse order. Seite 273
273Online Edition for Part no. 01 40 2 606 735 - 03 11 500
Reference
Mobility Communication Entertainment Navigation Driving tips Controls At a glance
Page 274 of 317
Side marker lamps
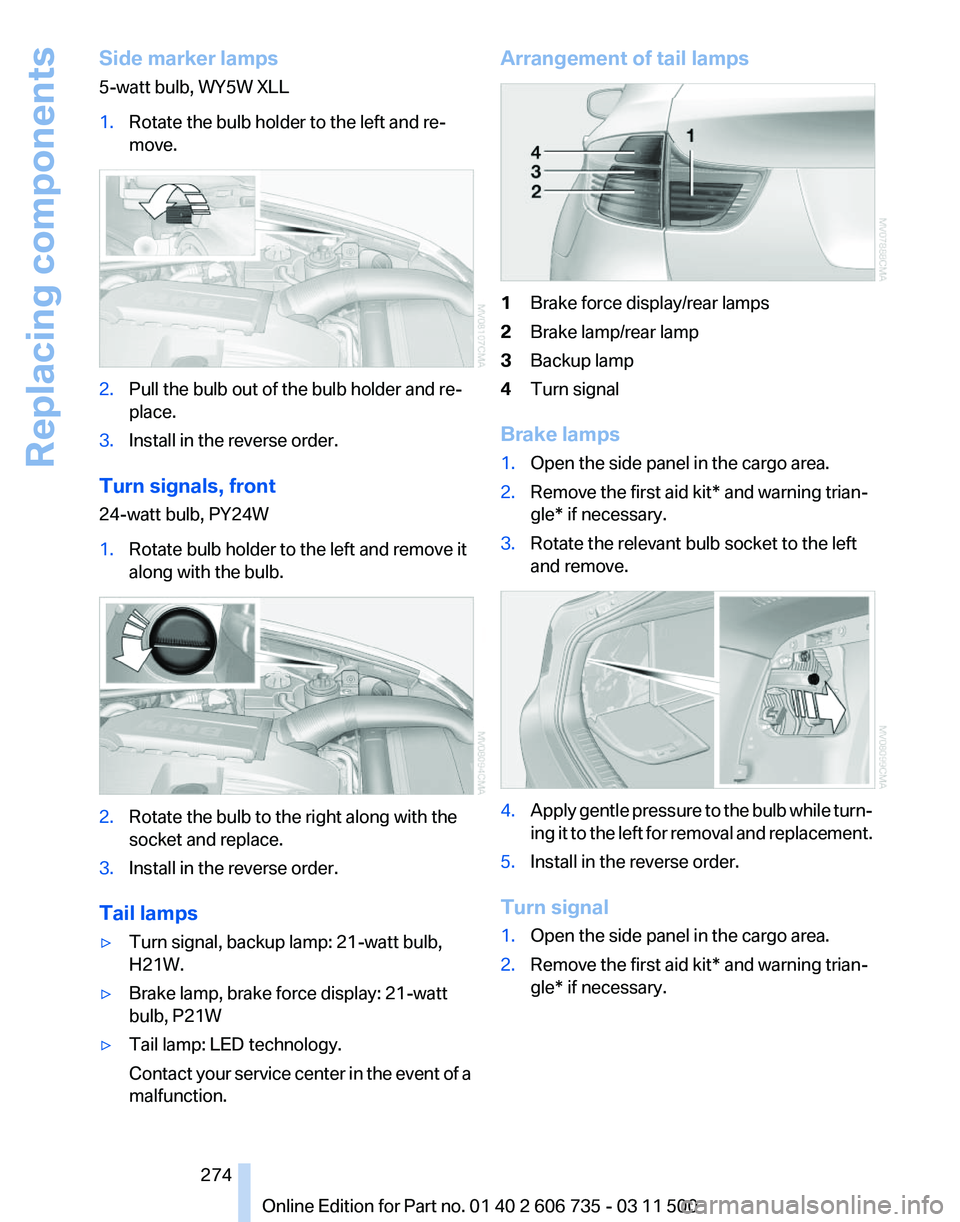
5-watt bulb, WY5W XLL
1.
Rotate the bulb holder to the left and re‐
move. 2.
Pull the bulb out of the bulb holder and re‐
place.
3. Install in the reverse order.
Turn signals, front
24-watt bulb, PY24W
1. Rotate bulb holder to the left and remove it
along with the bulb. 2.
Rotate the bulb to the right along with the
socket and replace.
3. Install in the reverse order.
Tail lamps
▷ Turn signal, backup lamp: 21-watt bulb,
H21W.
▷ Brake lamp, brake force display: 21-watt
bulb, P21W
▷ Tail lamp: LED technology.
Contact
your service center in the event of a
malfunction. Arrangement of tail lamps
1
Brake force display/rear lamps
2 Brake lamp/rear lamp
3 Backup lamp
4 Turn signal
Brake lamps
1. Open the side panel in the cargo area.
2. Remove the first aid kit* and warning trian‐
gle* if necessary.
3. Rotate the relevant bulb socket to the left
and remove. 4.
Apply gentle pressure to the bulb while turn‐
ing
it to the left for removal and replacement.
5. Install in the reverse order.
Turn signal
1. Open the side panel in the cargo area.
2. Remove the first aid kit* and warning trian‐
gle* if necessary.
Seite 274
274 Online Edition for Part no. 01 40 2 606 735 - 03 11 500
Replacing components
Page 275 of 317
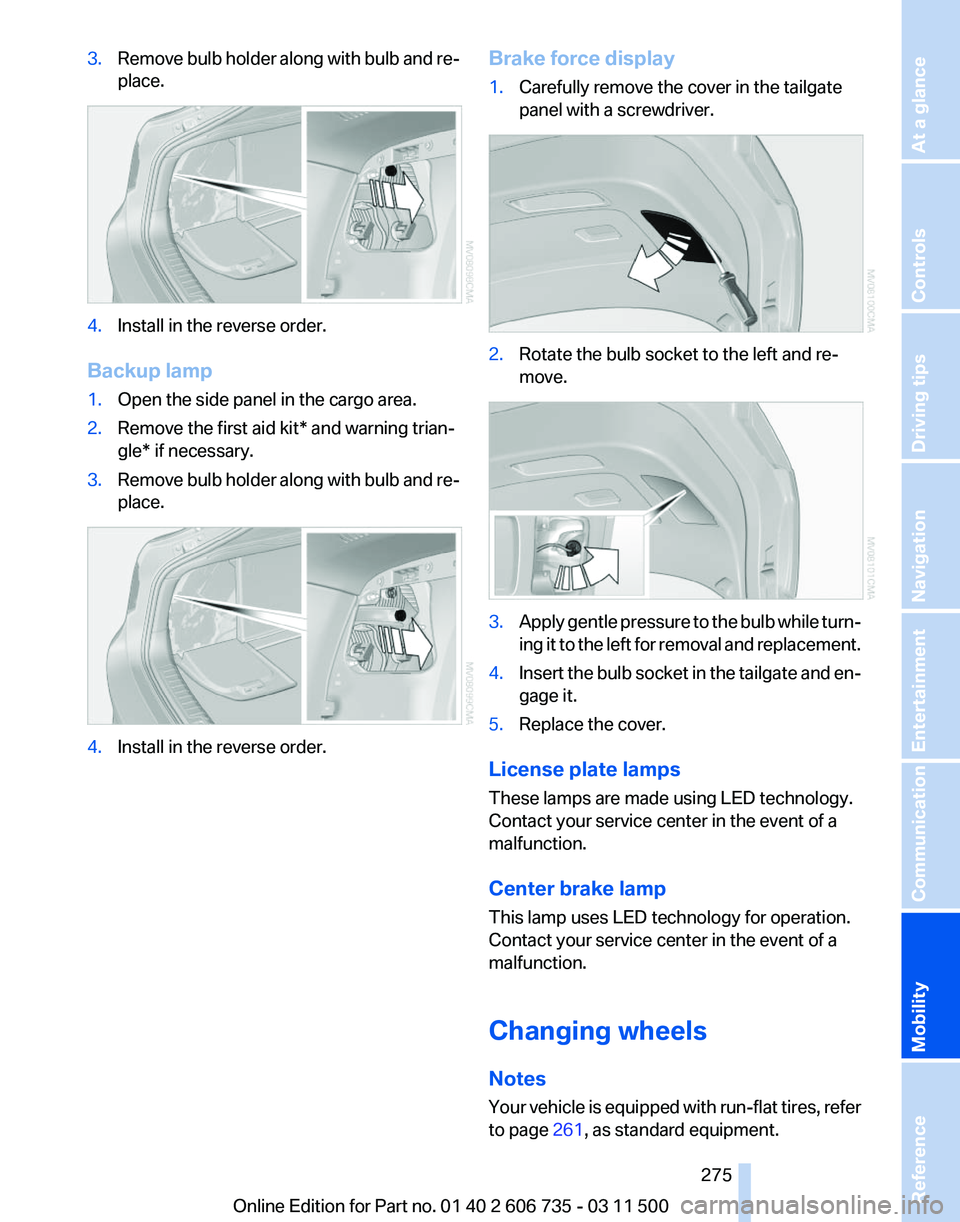
3.
Remove bulb holder along with bulb and re‐
place. 4.
Install in the reverse order.
Backup lamp
1. Open the side panel in the cargo area.
2. Remove the first aid kit* and warning trian‐
gle* if necessary.
3. Remove bulb holder along with bulb and re‐
place. 4.
Install in the reverse order. Brake force display
1.
Carefully remove the cover in the tailgate
panel with a screwdriver. 2.
Rotate the bulb socket to the left and re‐
move. 3.
Apply gentle pressure to the bulb while turn‐
ing
it to the left for removal and replacement.
4. Insert the bulb socket in the tailgate and en‐
gage it.
5. Replace the cover.
License plate lamps
These lamps are made using LED technology.
Contact your service center in the event of a
malfunction.
Center brake lamp
This lamp uses LED technology for operation.
Contact your service center in the event of a
malfunction.
Changing wheels
Notes
Your
vehicle is equipped with run-flat tires, refer
to page 261, as standard equipment.
Seite 275
275Online Edition for Part no. 01 40 2 606 735 - 03 11 500
Reference
Mobility Communication Entertainment Navigation Driving tips Controls At a glance
Page 276 of 317

They do not need to be replaced immediately in
the event of a puncture.
When mounting new tires or changing from
summer
to winter tires or vice versa, use run-flat
tires for your own safety.
BMW X6: do not rotate the front wheels to the
rear or vice versa, as otherwise the handling
characteristics will be negatively affected.
The tools for changing wheels are available as
accessories from your service center.
Jacking points for the vehicle jack The jacking points for the vehicle jack are lo‐
cated in the positions shown.
Compact wheel*
Safety
precautions in the event of a flat tire
or wheel change
Park the vehicle as far as possible from passing
traffic and on solid ground. Switch on the hazard
warning system.
Set the parking brake and engage transmission
position P.
Have all vehicle occupants get out of the vehicle
and ensure that they remain outside the imme‐
diate area in a safe place, such as behind a
guardrail.
If a warning triangle or portable hazard warning
lamp* is required, set it up on the roadside at an
appropriate distance from the rear of the vehicle.
Comply with all safety guidelines and regula‐
tions. Change the wheel only on a level, firm surface
which is not slippery. The vehicle or the jack
could slip to the side if you attempt to raise the
vehicle on a soft or slippery surface such as
snow, ice, tiles, etc.
Position the jack on a firm support surface.
Do not use a wooden block or similar object as
a
support base for the jack, as this would prevent
it from extending to its full support height and
reduce its load-carrying capacity.
To avoid serious or fatal injury: never lie under
the vehicle, and never start the engine while it is
supported by the jack.◀
What you will need
To avoid rattling noises later on, note the posi‐
tions of the tools before removing them, then
return them to their initial positions after com‐
pleting work.
The tools are located in the mount under the
floor panel flap. 1
Vehicle jack*
2 Vehicle jack crank*
3 Lug bolts wrench*
Removing compact wheel
The compact wheel is located in the cargo area
under the floor panel.
Seite 276
276 Online Edition for Part no. 01 40 2 606 735 - 03 11 500
Replacing components