Page 65 of 280

belts and the airbag system only offer
maximum protection when the seatback
is upright and the safety belts are prop
erly positioned on the body . The more
the seatback is reclined, the greater the
risk of personal injury from an incorrect
seating pos it ion and improperly posi
tioned safety belts!
Adjusting the power
seat
Adjustment switches
Ap plies to vehicles: with power driver seat
For an in tuitive operation, the swi tches @
and @ are distinctly shaped and positioned
to reflect their adjustment functions .
Fig. 65 Adjust men t sw it c h es : locat ions on driver 's seat
Push or pull e ither switch in exactly the same
direction you like the corresponding part of
the seat to mov e.
@ Moving the seat forward or backward
@ Adjusting the angle of the seatback and
he ad restraints
© Adjust ing the lumbar support
Seats and storage 63
Power seat adjustment
Applies to vehicles: with power driver seat
The switches can be moved in various direc
tions to allow precise adjustment.
Fig. 66 Sea t cush io n adju stme nt: sw it c h m otions
Push or pull the switch in the same direction
you like the seat cushion to move.
Moving the entire seatback or forward
.,. Push the switch back at the tip or forward
at the rear@c::>
,&..
Adjusting the seat height
.,. To raise the sea t, pull t he switch at both
ends, @
and@ c::> ,&. .
.,. To lower the seat, push the switch down
evenly,
@ and @<=:>,&. .
Tilting the seat cushion back or forward
.,. To tilt ba ck the seat cushion, pull the switch
a t the fron t only, @ c::> ,&. .
.,. Alternatively, push the switch at the rear
only,
@ <=:> ,&. .
.,. To tilt forward the seat cushion, push the
sw itch
at the front only@ Q ,&..
.,. Alternatively, pull the switch at the rear on
ly @
Q ,&. .
A WARNING
-Never adjust the driver's seat while the
vehicle is moving. If you do this whi le the
veh icle is moving, you will be out of posi
tion . Always adjust the driver 's seat
when the vehicle is not mov ing.
- Be careful when adjusting the seat
height. Check to see that no one is in the
way, or serious injury could result!
Page 66 of 280

64 Seats and storage
-Beca use the driver seat can be electrical
ly ad justed with the ign ition key re
moved, never leave children unattended
in the vehicle . Unsupervised use of the
electric seat adjustments may cause seri o us in jury.
Adjusting the seatback
App lies to vehicles: with power driver seat
u-
Fig . 67 Drive r's seat: switc h for seatback adjustment
• Push or pull the top of the switch in the
same direction you like the seatback to tilt
¢fig. 67.
A WARNING
- Never adjust the seatback whi le the vehi
cle is moving. If you adjust your seatback
w hil e the vehicle is mov ing, you wi ll be
o ut of pos ition. Always adjust the seat
back when the vehicle is no t mov ing.
- T o redu ce the r is k of injury in the case of
sudden bra king or accident, front pas
sengers must never ride in a moving ve
hicle with the seatback reclined. Safety
belts and the airbag system only offe r
maximum protection when the seatback
is upright and the safety belts are prop
er ly posit ioned on the body . The more
the seatback is reclined, the greate r the
risk of personal injury from an incorrect
seating posit ion and improperly posi
tioned safety be lts!
Adjusting the lumbar
support
Applies to vehicles: with lumba r support
The lumbar support can be adjusted to fit the
natural curvature of the occupant's spine.
F ig . 68 Driver seat: switc h for lumbar ad justment
Ad justing the curv atur e
.,. Push the front of t he sw itch plate c:> fig . 68
in order to in cr ease the curva ture.
• Push the rear o f the switch plate in order to
decrease the curvature.
A dj usting the height
• Push on the top of the switch p late in order
t o move the s upport higher .
• Push on the bottom of the switch p late in
order to move t he support lower.
A WARNING
-
Never adjust the lumbar support while the
vehicle is moving. If you adjust your seat
while the vehicle is moving, you will be out
of position. Always adjust the lumbar sup
port when the vehicle is not mov ing .
Page 67 of 280

Head restraints
Front head restraints
The head restraints must be properly adjust
ed to the occupants's height to provide opti
mal restraint in combination with the seat re
straints.
Fi g. 69 Driver's s eat head restra int: ad just ing the
heigh t
Raising /lowering the head restraint
s
-d. a, a,
The head restraints on the front seats ca n be
adjusted to prov ide safe suppo rt to head and
neck at the opt imum he ight. When optimally
adj usted, the top of the restra int should be
L eve l w ith the top of the head. If that is not
possible, try to ad just the head restrain t so
that it is as close to th is pos it ion as poss ible
r:=> page 107, Proper adjustment of head re
straints .
.,. To move the head restrai nt up, hold it a t the
s ides with bot h hands a nd slide it upward
un til you feel it click into p lace .
.,. To move the head restraint dow n, press the
button @ and slide the head restraint
downward until you feel it click into p lace
r:=> fig . 69.
Removing the head re straint
.,. Pu ll the head restraint a ll the way up.
.,. Press the re lease butto n@
r:=> fig. 69 and
pull the restraint stra ight up and out of the
seat.
Install ing the head rest raint
.,. Inse rt the rods into the guides and push the
rest raint back in until you hear it click.
Seats and storage 65
Refer to r=> page 10 7 , Proper adjustment of
head restraints
for guidelines on how to ad
j ust the height of the front head restraints to
fit the occupant's body size.
A WARNING
- Driving without head restraints or wit h
head restra ints that a re not proper ly ad
justed increases the risk of ser ious or fa
tal nec k inju ry dramat ica lly.
- Read and heed all WARNI NGS
r:=>page 107 .
(D Tips
Correct ly adjusted head restrai nts and
safety be lts a re an e xtreme ly effect ive
combination of safety features.
Rear head restraints
Fi g. 7 0 Rea r seat: head restra ints
Fig. 7 1 Rear head res tra ints: release
If there is a passenger on the rear center seat
ing pos ition, slide the center head restraint
u pward at least to the next notch.
Adjusting the head restraints .,. To move t he head restra int up, ho ld it at the
sides with both hands and s lide it upwa rd
until you fee l it click into place .
Page 68 of 280

66 Seats and st o rage
• To move the head restraint down, press the
button @c>
fig. 70 and slide the head re
straint downward.
Removing the h ead restraint s
1>
• Fold the backrest forward ¢ page 67.
• Move the head restra int upward as far as it
can go.
• Press the re lease @ c>
fig. 71 with the
screwdriver¢
page 234 and the button @
¢fig. 70. Pull the head restraint out of the
backrest at the same time
c> &_.
Install ing th e head re st ra int s
• Slide the posts on the head restraint down
into the guides until you feel the posts click
into place.
• Press the button @¢
fig. 70 and slide the
head restraint all the way down. You should
not be able to pull the head restra int out of
the backrest.
So that the driver can have a better view to
the rear, the head restraints should be pushed
down completely when the rear seats are not
occ upied.
A WARNING
- Only remove the rear seat head res traints
when necessary in order to install a chi ld
seat . Install the head restraint again im
mediately once the child seat is removed.
Driving without head restraints or with
head restraints that are not properly ad
justed increases the r isk of serious or fa
tal neck injury dramatically.
- Read and heed all WARNINGS
¢page 107.
@ Tips
Correctly adjusted head restraints and
safety belts are an extremely effective combinat io n of safety features.
l) The head restraints cannot be removed from rear
seats with fixed backrests .
Center armrest
The front center armrest con be adjusted to
several positions and contains a storage bin.
F ig . 72 Between the front seats: armrest folded down
Adjusting the armrest
• Push the arm rest down.
• Lift the arm rest slowly unt il it is in a com
fortable position.
Opening the storage bin
• Pull the release button ¢
fig. 72 upward.
A WARNING
-
When folded down, the a rmrest can re
str ict the d river's movement. Whe n driving
i n conditions that may call for qu ick ma
neuvers, fo ld up the armrest. This will a l
l ow you to react more qu ickly to avoid an
accident .
Rear seats
General information
Safe transportation of passengers on the rear
seats requires proper safety precautions.
All passengers on the rear seats mus t be seat
ed in compliance with the safety guide lines
exp lained in
c> poge 113 and r=>poge 122.
The correct seating position is safety critical
for front
and rear seat passengers alike
r=> poge 106. .,,_
Page 69 of 280

_& WARNING
-Vehicle occupants in the front and rear
seats must always be properly restrain
ed .
- Do not let anyone ride in the vehicle
without the head restra ints provided .
Head restraints help reduce injuries .
- Loose items inside the passenger com
partment, can fly forward in a crash or
sudden maneuver and injure occupants.
Always store articles in the luggage com
partment and use the fastening eyes, es
pecially when the rear seatbacks have
been folded down .
- Read and heed and all WARNINGS
r::';> page 106 , Proper seating positions
for passengers in rear seats .
Rear armrest
The armrest contains a storage compartment
and a cupholder for 2 drinks.
F ig . 73 Ce nter of the re ar s eatbe nch : rear armrest fo ld
e d dow n
Folding d own the armre st
.,. Pull the armrest down on the front
¢fig . 73 .
Opening the stor age bin
.,. Pull the handle in front.
Sea ts a nd s to rage 67
Luggage compartment
Increasing the size of the luggage
compartment
To increase the size of the luggage compart
ment, both parts of the seatback can be fold
ed forward, individually or together.
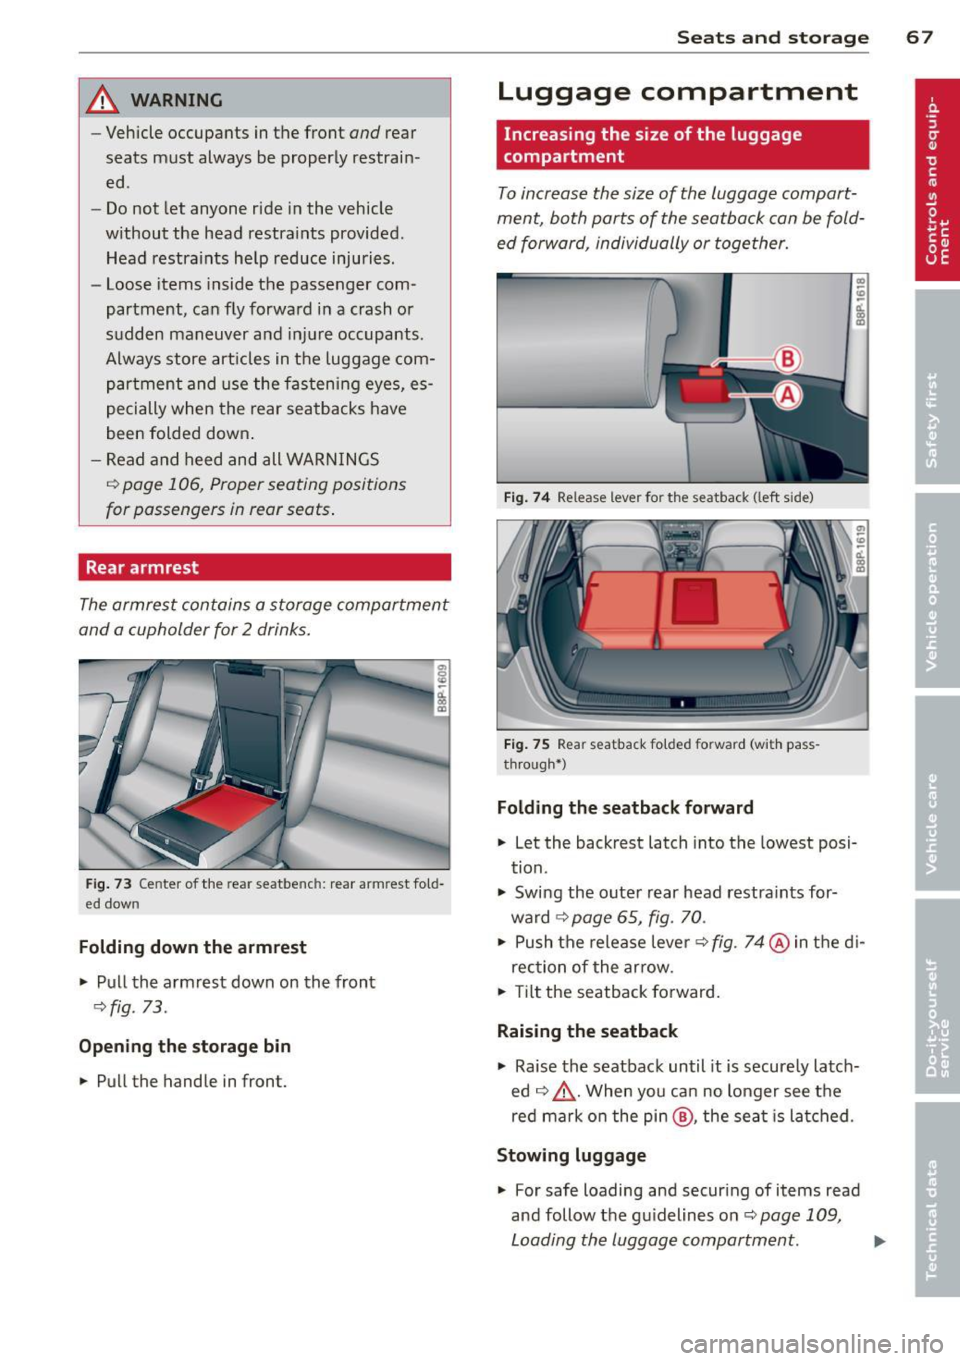
Fig . 7 4 Re lease leve r fo r th e seatbac k (left side)
Fig . 75 Re ar seatback fo lde d fo rw ar d (w it h pa ss
thro ugh• )
Folding th e seatb ack forward
.,. Let the backrest latch into the lowest posi
tion.
.,. Swing the outer rear head restra ints for
ward
¢ page 65, fig . 70 .
.,. Push the release lever¢ fig. 74 @ in the di-
rection of the arrow .
... Tilt the seatback forward.
Rai sing th e se atback
.,. Raise the seatback until it is secure ly latch
ed
c::> &,. . When you ca n no longer see the
red mark on the pin @, the seat is latched .
Stowing luggage
.,. For safe loading and secur ing of items read
and follow the gu idelines on
c::, page 109 ,
Loading the luggage compartment. ..,.
Page 70 of 280

68 Seats and storage
The rear seatback is divided into two seg
ments - one third/two thirds. You can fold
down either or both parts of the seatback .
.&_ WARNING
-
- The backrest must always be securely
latched so that the safety belt of the cen
ter seat ing pos ition can work properly to
help protect the occupant .
- The backrest must be securely latched i n
posit ion so that no items containe .d in
the luggage compartment can slide for
wa rd upo n sudden b rak ing .
- Never allow safety belts to become dam
aged by being caught in doo r or seat
hardware.
- Torn or frayed safety belts can tear and
damaged belt ha rdware can brea k in a
c rash . Inspect the be lts periodica lly .
Belts showing damage to we bbing, bind
ings, b uckles, or retractors must be re
placed.
.&_ WARNING
Always read and heed WA RNINGS c:> .&. in
Loading the luggage comportment on
page 109.
(D Note
- If you move the fro nt seat back when the
r ear seat backrest is fo lded fo rward, yo u
could damage the head restraints on the rear seat.
- When folding the backrest back into
place, make sure the safety be lt does not
get caught, because it can be damaged.
A damaged be lt can fa il to prov ide safe
r est raint.
-
Fastening eyes
The luggage comportment is equipped with
four tie-down eyelets to secure luggage and
other items.
F ig. 7 6 Lugg age compart men t: fas tenin g ey es
.,. Use the fastening eyes to secure your cargo
properly
c:> fig. 76 - arrows -.
.,. Ad here to all safety instructions
<=> page 109, Stowing luggage.
In a co llision, t he laws o f physics mean that
even smaller items that a re loose in the vehi
cle w ill become heavy missiles that can cause
serious injury. Items in the vehicle possess en
ergy wh ich vary with vehicle and t he weight of
the item. The veh icle speed is the most s ignif
icant factor .
For example, in a frontal collision at a speed
of 30 mph (48 km/h), the forces acting on a 10 lbs (4,5 kg) object are about 20 times the
normal weight of the item . This means that
the weight of the item wou ld sudden ly be
about 2 00 lbs (90 kg). You ca n imagine the in
j u ries tha t a 200 lbs (90 kg) item flying free ly
t hr ough the passenger comp artment cou ld
ca use in a co llision like this .
_& WARNING
Weak, damaged or improper straps used
to secure items to fasten ing eyes can fai l
d uring hard braking or in a coll is ion and
cause ser ious personal injury. -
-A lways use s uitable mount ing straps an d
properly secure items to the fasteni ng
eyes in the luggage compartment to help
prevent items from sh ifting or flying for-
~~-~
Page 71 of 280

-When the rear seat backrest is folded
down, always use su itable mounting
straps and properly secure items to the
fastening eyes in the luggage compart
ment to help prevent items from flying
forward into the passenger compart ment.
- Never attach a child safety seat tether
strap to a fastening eye.
Elastic cargo net
App lies to vehicles: with cargo net
The cargo net prevents light objects from
sliding around in the luggage compartment.
Fig . 77 Luggage compartmen t: cargo net
Fig. 78 Luggage compartmen t: ca rgo net attached to
hooks
Securing objects to the luggage
compartment floor with the net
.. Lay out the cargo net in the luggage com
partment .
.. Engage all four hooks into the fastening
eyes
~ fig . 77 .
.. Place objects to be secured
under the net.
Configuring the net to contain small
objects
.. Lay out the cargo net in the luggage com
partment.
Seats and storage 69
.. Engage two hooks into the fastening eyes
@~fig. 78.
.. Pull the net up and secure the eyes © on
the hooks.
.. Put items
into the net.
The bottom of the cargo net can also be hooked to the D-rings in the floor of the rear
compartment and the top to the eyes on the
left and right side trim .
.&_ WARNING
For stre ngth-re lated reasons, the mount
in g hooks can only be used to secure ob
jects weighing 10 lb (5 kg) or less. Heavier
objects will not be adequately secured -
risk of injury!
Mounting hooks
Applies to vehicles: with mounting hooks
Fig. 79 Mounting hooks under the rear pa rce l shelf
The hook prevents lightly loaded bags from
tipping over .
.&_ WARNING
For strength-related reasons, heavy ob
jects must not be hung on the
hooks.
Heavy objects are not adequately secured -
this increases the risk of injury .
Page 72 of 280

70 Seats and storage
Retractable luggage compartment cover
The luggage compartment cover keeps lug
gage o r other objects out of vi ew .
Fi g. 80 Rear lid ope n with luggage compartment cover
Removing the luggage compartment
co ve r
.. Detach the retaining straps¢ fig. 80 at the
rear hatch
(D .
.. Pull the cover@ horizonta lly out of the
mount @in the direct ion of the arrow.
In stall ing the luggage compartment
co ver
.. Push the cover horizonta lly into the mounts
provided¢
fig. B0@on the side panel unti l
the cover seats .
.. Install the retain ing straps in the rear hatch
¢fig . 80 @ ¢_.&. .
&_ WARNING
- T he luggage compartment cover m ust
neve r be i nstalled w ithout being secured
- this c reates an acciden t ha zar d.
- Whe never dr iving, never p lace any hard
o r he avy o bjects on the luggage com
p art ment or allow pets to sit on t he lug
gage compartment cover. They could be
come a hazard to vehicle occupants in
the event of sudden brak ing or in an acci
dent.
{[) Note
Make s ure that the heating wires in the
rea r lid do not get damaged by objects
scraping against them .
(D Tips
-Yo u can use the luggage compartment
cover to store light we ight cloth ing but
do not leave any heavy or sharp objects
in the pockets of the cloth ing.
- Remember that placing clothing on the
luggage compartment cover can block
the driver's vision in the rear view m irror.
Th is also applies espec ially when you
have to transport large objects.
- So that stale air can escape from the ve
hicle be sure not to cover the vent ilation
slot between the rear lid a nd the lug
gage compartment cover installed.
Ski sack
Applies to veh icles : w it h sk i sack
The ski sack allows a maximum of 4 pairs of
skis or 2 snowboards to be carried inside the
vehicle.
Fi g. 81 Sect ion of the rear seat from t he rear: sk i sac k
h atch cover
Fig. 82 Securing the ski sack at th e cente r rear seat
be lt buck le
Loading
.. Open the rea r hatch.
.. Slide the re le ase button fo r the pass
through down (with the cente r armrest)