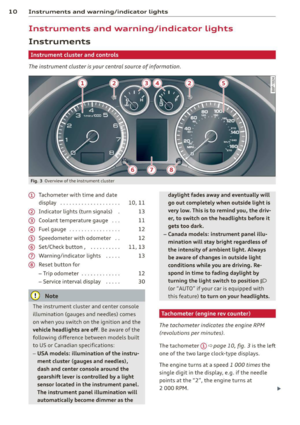
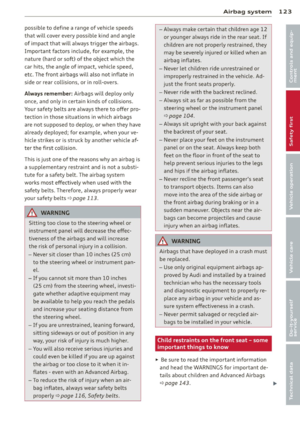
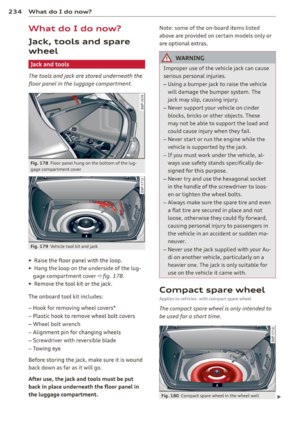
Page 73 of 280

¢ fig. 81 -Arrow-and tilt the pass-through
forward.
~ Remove the sack from the luggage com
partment and unfold it.
~ Place the empty sack in the hatch so that
the end with the zip fastener is in the lug
gage compartment .
~ Load objects from the luggage compart
ment into the ski sack.
Securing
~ Insert the ski sack strap¢ fig. 82@ into
the center seat belt buckle @.
~ With skiing items, place the strap in the
middle between the bindings ¢,&. .
~ Pull the loose end of the strap tight in the
direction of the arrow.
Opening the safety strap buckle
~ Take the long sides of safety strap buckle
between thumb and forefinger¢
fig. 82 @ .
~ Squeeze the buckle and pull it away from
the cargo.
Stowing
~ Raise the pass-through until it is securely
latched. It is secu re when you can no longer
see the red mark on the latch in the luggage
compartment .
~ Carefully fold up the empty (dry) ski sack.
~ Stow the ski sack in the lu ggage compart
ment so that it cannot slide around .
A WARNING
-After loading, the ski sack must be se
cured with the strap.
- The safety strap must fit tightly around
the cargo.
- Make certain that the safety strap lies in
the middle between the bindings of the
ski equipment (refer also to printed mes
sage on the ski sack).
(D Tips
- Place skis with the tips pointing forward,
snowboards and ski poles with tip to the
rear in the ski sack.
Seats and storage 71
-If there are several pai rs of skis in the sk i
sack, make certain that the bindings are
at the same level.
- Be sure not to fold up or sto re the sack
when it is still damp.
Roof rack* installation
First things first
A roof rack can be used to carry additional
luggage on the roof There are two different
roof rack systems .
Separate roof racks are needed for vehicles
without roof rails . Vehicles with standard roof
rails* need add itional cross bars to carry car
go . Both types of add itiona l equipment are
available at your authorized Audi dealer.
~ Always read and follow the instructions pro
vided by the roof rack manufacturer when
the roof rack system must be installed.
If a roof rack or s imilar luggage carrying
equipment is to be installed, please note the
fo llow ing :
Vehicles without roof rails
- Your vehicle has aerodynam ic rain gutters
molded into the roof. That is why only roof
racks specially designed for the roof can be
used . We recommend using roof racks from
the Audi original accessories program .
- These roof racks are the basis for a complete
roof rack system . For safety reasons, some
additional attachments are necessary to
transport luggage, bicycles , surf boards,
skis and small boats safely. A ll these com
ponents are available at your authorized Au
di dea ler .
Vehicle with roof rails
-The vehicle is equipped with integrated roof
railings,
which can be covered into roof rack
by ins tal ling c ross bars . Only install cross
bars specifica lly designed for this vehicle.
- These bars are the basis for a complete roof
rack system . Additional attachments are ..,.
Page 74 of 280

7 2 Seats and storage
necessary to safely trans port luggage,
bicycles, surf boards, skis or small boats.
- All necessary hardware for these systems is
available from yo ur authorized Audi dealer.
When should the roof rack b e removed ?
-Before go ing through an automatic car wash
(it is bes t to ask the car wash opera to r)
- When not in use ( reduce fuel consumpt ion,
reduce wind noise and gua rd against theft)
_& WARNING
- Use of an unapproved roof rack or in cor
rect mo unt ing of an app roved roof rack
can cause the roof rack o r the items car
ried on it to fall
off the roof onto the
road.
- Objects falling from the roof of a ve hicle
can cause a c rash and persona l injury.
- Only mount the system between the markings shown in
r=> page 72, fig . 83
or r=>page 73, fig. 84.
-The roof rack system must be insta lled
exactly according to the instr uctions pro
vided.
(D Note
- Any damage to the veh icle ca used by us
ing roof racks or other types of cross bars
that have not been approved by Audi for
your vehicle, or incorrect roof rack instal
l ation, is not covered by the Warranty.
- Always check the roof rack mount ings
and hardware before each trip and dur i ng a tr ip to make sure eve rything is se
curely tightened . If necessary, retighten
the mount ings and check the ent ire sys
tem from t im e to t im e.
- After mounting a roof rack system, or when you transport objects on the roof
of your veh icle, the height of the v ehicl e
i s n atur ally in creased. Be care ful when
driving u nder low br idges or in pa rk ga
rages for example. This could cause
damage to the veh icle and even the loa d.
Attachment points without roof rails
App lies to vehic les : with out roof rails
The roof rack must be attached only at the lo
cations marked .
Fig . 83 Attac hmen t po ints fo r roof rac k
The attachme nt poin ts r=> fig. 83 @ can only
be seen with the door open .
Introduction
.,. Clean the roof at the contact points for the
roof rack in order to avoid pa int scratches.
.,. Obse rve the identify ing marks on t he roof
rack for front and rear, left and right.
Roof rack front
.,. Open the front doo rs c:> &_ .
.,. Center the front of the roof rack in t he two
stamped marks at the front of the roof
r=> fig. 83 @ , r::!> & .
.,. Hand tighten the mount ing screws for the
feet alternately on the
left and right sides
of the vehicle .
.,. Using the enclosed torque wrench, tighten
the
front mounting screws securely c:> &_ .
Roof rack rear
.,. Open the rea r doors r=> £ .
.,. Place the rear of the roo f rack in the two
stamped marks at the rear of the roof
r=> fig. 83 @, r=> £.
.,. Hand tighten the mounting screws for the
feet alternately on the
left and r ight sides
of the vehicle.
.,. Us ing the enclosed to rque wre nch, t ighten
the
rear mounting screws s ecurely c:> &_ . ..,.
Page 75 of 280

_& WARNING
-Always follow the instructions prov ided
by the roof rack manufacturer.
- When installing the roof rack with the
vehicle doors open, watch out for other
traffic - there is the risk of an accident .
- Make certain that the feet of the roof
rack are sitting exactly in the four stamp
ed marks - otherw ise you risk an acci
dent!
- After you have driven a few miles, and part icularly during long trips, inspect the
attach ing screws to make certain they
are tight.
- Do not make any modification to the roof
rack - you increase the risk of an acci
dent.
Roof rack mounting locations
App lies to vehicles: with roof rails
Roof racks must be installed only at the Loca
tions marked on the roof rails .
Fig . 8 4 Roof ra ils: front and rear mou nting locations
Mounting
The roo f rack syste m mu st be in sta ll ed exact
l y accord ing to th e instru cti ons prov ided.
Mount the front and rear cross bars between
the punched markings on the ins ide of the
roof railings
r::;,fig. 84-arrows- .
(D Note
- The conventional roof rack des ign illus
trated above w il l not f it on vehicles w ith
out roof ra ils. For s afe mounting, these
require a different design of roof rack.
S ea ts a nd s to rage 73
Loading the roof rack
Always distribute the Loads evenly . Make sure
anything on the roof rack is tied down secure
ly.
.. Always distribute the loads on the roof rack
evenly.
.. Always secure items to the roof rack.
The maximum permissible roof weight is
16 5 lb (75 k g). The roof weight is made up of
the weight of the roof rack system and the
weight of the object being transported
.;, page 255.
When using a roof rack system which has a
lower load carrying capacity, you must not use
the total maximum permissible load carry ing
capacity. If th is is the case, you may load the
roof rack system on ly to the maximum capaci
ty specified by the manufacturer of the roof
rack system.
A WARNING
Weak, damaged or improper straps used
to secure items to the roof rack can fail
during hard braking or in a coll is ion and
cause ser ious persona l injury.
-Always use suitable mounting straps and
properly secure items to the properly in
stalled roof rack to help prevent items
from sh ifting or flying forward .
- Items on the roof rack must always be
securely mounted.
- The use of a roof rack can negat ively af
fect the way a veh icle hand les . Cargo
that is large, heavy, bulky, long or flat
will have a greater negat ive influence on
the vehicle's aerodynamics, center of
grav ity and overa ll handling. Always
drive s lowly, avoid sudden braki ng and
maneuvers when transporting cargo on
the roof of your vehicle.
- Never exceed the maxim um permissible
load carrying capacity of the roof of your
vehicle, the permissible axle weights and
the permissible total weight of your vehi- cle
r::;, page 255, Weights. ~
Page 76 of 280

7 4 Seats and storage
- Always drive slowly, avo id sudden brak
ing and maneuvers when transporting
cargo on the roof of your vehicle .
@) For the sake of the environment
Sometimes it may be easier to leave a roof
rack installed even though you are not us
ing it . Due to the increased a ir resistance
your veh icle will unnecessar ily use more
fuel. Remove the roof rack if you are not
going to use it.
Cup holders
Cup holders in the center console
Fi g. 85 Cup ho lders a nd sto rage t ray in th e ce nte r con ·
s o le
Up to two b everages can be placed in the cen
te r console.
A WARNING
Spilled hot liquid can cause an accident
and pe rsonal injury.
-
- Never carry any beverage containers with
hot liquids, such as hot coffee or hot tea,
in the vehicle while it is moving . In case
of an accident, s udde n bra king or other
v ehicl e mov ement, hot liq uid could s pill,
causing s ca ld ing burns . Sp illed hot liq uid
c an also ca use a n accide nt and perso nal
injury.
- Use only soft cu ps in t he cup holder. H ard
c u ps and gla sses can c ause i njur y in an
acc ident.
- N ever use the cup holder or adap ter as an
ashtray- r isk o f fire.
(D Note
Only drink conta iners with lids should be
carr ied in the cupholder. Liquid could spill
out and damage your vehicle's electron ic
equipment or stain the upho lstery, etc ..
(upholder in the rear center armrest
Fig. 86 Rea r ce nter armr est: c upho ld er extend ed
Opening the cup holder
.,. Press bot h spo ts marked with 'i @ ~ fig. 86
q &_ . The holder ex tends .
Adjusting the retain er individually
.,. Press and hold the retai ne r arm @ inwa rd
- ar row -and adj ust i t to fit the cup si ze.
The retainer arm should fit snugly around the cup or can .
The cup ho lder is de signed to secure no mo re
than two cups or can s.
A WARNING
Spi lled ho t liquid can cause an accident
and persona l injury .
-
- Never carry any beverage conta iners w ith
hot liq uids, such as hot coffee o r hot tea,
in th e vehicle while it is moving. In case
of an a cciden t, sudden braking or othe r
ve hicl e movement, hot liquid cou ld spill,
causing scalding burns . Spilled hot liquid
can also cause an acc ident a nd personal
in ju ry.
- Use on ly soft cups in the cu p holde r. Hard
cups and glasses can cause injury in a n
accident.
Page 77 of 280

CD Note
Only drink containers with lids should be
carried in the cupho lder. Liqu id could spill
out and damage your veh icle's e lectronic
equ ipment or sta in the upholstery etc.
Socket
Outlets
The outlet in the front center console and in
the luggage compartment may be used for
12-volt appliances.
Fig. 87 Ce nter conso le, front: 12-vo lt out let
Fig. 88 L uggage compartmen t: 12-vo lt out let
Outlet in the front center console
.. Fold the cover for the outlet down ¢ fig. 87.
.. Plug in appliance to be used.
Outlet in the luggage compartment
.. Tap cover ¢ fig. 88.
.. Plug in appliance to be used.
The outlet may be used for 12-volt appliances
with maximum consumption of up to 100
watts, such as a f lash light, small vacuum
cleane r, etc.
Before you purchase any accessories, always
read and follow the information in
Seats and storage 75
¢ page 261, Additional accessories and parts
replacement.
A WARNING
The outlet plus any appliances plugged in
to it remain functional even if the ignition
is switched off or the ignition key is re
moved. Never leave children inside the ve
h icle w ithout supervision.
CD Note
To avoid damaging the socket, only use
plugs that fit properly.
(y Tips
When the engine is off and accessories are
still plugged in and are on, the vehicle bat
tery can still be drained.
Storage
General overview
There are numerous places to store items in
your vehicle .
Storage in the center arm-i=>page 66
rest
Storage in the rear armrest
Glove compartment (Air
¢page 76
ventilation in the glove compartment*, CD chang-
er*)
Center console
¢page 76
Compartments in the doo r ¢page 77
trims
Storage in the footwell
¢page 77
Compartments in luggage ¢page 77
compartment
Coat hooks
¢page 78
Some of the storage locations are only found
on specif ic vehicle models or are optional
equipment .
Page 78 of 280

76 Seats and storage
& WARNING
-Always remove objects from the instru
ment panel. Any items not put away
could slide around inside the vehicle
while driving or when accelerating or
when applying the brakes or when driv
ing around a corner.
- When you are driving make sure that
anything you may have placed in the cen
ter console or other storage locations
cannot fall out into the footwells. In case
of sudden braking you would not be able
to brake, depress the clutch or acceler
ate.
- Any pieces of clothing that you have
hung up must not interfere with the driv
er's view. The coat hooks are designed
only for lightweight clothing. Never hang
any clothing with hard, pointed or heavy
objects in the pockets on the coat hooks.
During sudden braking or in an accident -
especially if the airbag is deployed -
these objects could injure any passen
gers inside the vehicle .
Glove compartment
The glove compartment is illuminated and
can be locked .
Fig. 89 Glove compar tment
To open glove compartment
"' Pull the handle~ fig. 89 in the direct ion of
the arrow push down lid to th e fully op en
position.
1 ) Not ava ilab le o n veh icl es with Audi N avigat ion Sys
t e m .
To close glove compartment
"' Push the glove compartment lid upward un-
til the lock engages.
The light will illuminate when the parking/
headlights are turned on and the glove com
partment is open.
In the glove compartment lid, you will find a
place to store a pen and a pad of paper .
In the glove compartment, you will find the
CD-changer* for navigation system* . A sepa
rate Owner's Manual is in vehicles that have a
factory-installed CD changer and navigation
system.
A WARNING
To reduce the risk of personal injury in an
accident or sudden stop, always keep the
glove compartment closed while driving.
Ga Storage compartment for small
objects
Applies to vehicles: with storage compartment in center
console
Fig. 90 Cen te r c onso le s torage compar tme nt
"' To open the compartment, press the cover
Cg ~fig. 90.
-
"' To close the compartment, push the drawer
all the way in until it clicks in place.
An additional storage compartment
1> for rela
tively small objects is located in the center
console next to the brake lever.
Page 79 of 280

Compartments in the door trims
There are storage compartments in the door
trims .
Fig. 91 Storage compartment in the door trim
A WARNING
Always read and heed all WARNINGS
c:::> page 139, Important safety instruc
tions on the side airbag system.
Storage net in footwell
Applies to vehicles: with storage net in footwell
There Is a storage net in the passenger's foot
well.
Fig. 92 Storage net in passenger's footwell
(D Tips
Do not keep any sharp or pointed objects
in the storage net -they are a persona l in
jury risk.
S ea ts a nd s to rage 77
Storage net in the seatbacks
Applies to vehicles: wit h storage net in the front seat
backs
There is a storage net behind both front seat
backs.
Fig. 93 Storage net on th e d river's seatback
(D Tips
Do not keep any sharp or pointed objects
i n the storage net -th is increases the risk
of pe rsonal injury.
Side storage in the luggage
compartment
Applies to vehicles: wit h storage net in luggage compart
ment
There is a compartment with a net on the
right side of the luggage compartment.
Fig . 9 4 Side compartment in the luggage compart
ment
The compartment is suitable for holding
small items .
Page 80 of 280
78 Seats and storage
Coat hooks
There is a coat hook above each rear door .
.. ., ' . 'I ., '
Fi g. 9 5 Coa t hook
The coat hooks are located in the headliner
above each rear door.
A WARNING
- Hang clothes in such a way that they do
not impair the driver's vision .
- Th e coat hooks must only be use d for
ligh t weight clothing . Do not leave any
heavy or sharp edged objects in the pock
ets which may interfere with the side cur
tain airbag deployment and can cause
perso na l injury in a cras h.
- Do not use coat hangers for hanging clothing on the coat hooks as this can in
terfere with proper deployment of the side curtain airbags in an accident.
- Do not hang heavy objects on t he coat
hooks, as they could cause persona l in
jury in a sudden stop.