Page 57 of 280
 Windshield wiper
T")
-Automat ic dimming for the m irror only
operates p roperly if the lig ht striking the
i ns ide mirror is not hindered in any way.
Wiper and washer
system
{sf) Windshield wiper
The windshield wiper lever controls both the
windshield wipers and the washer system.
F ig . 57 Wiper lever: w inds hie ld w iper lever positions
The windshield wiper lever c> fig. 57 has the
following positions:
Ql Intermittent wiping (activating rain
senso r)*
.. Move the lever up to position@.
.. Move the interval set sw itch @, to change
t h e interva ls.
Low wiper speed
.. Move the lever up to position@.
High wiper speed
.,. Move the lever up to position @.
One-touch wiping
.. Move the lever to position @, when you
want to w ipe the w indshield
briefly .
Automatic wiper /w asher
.. Pu ll the lever to posit ion ® (toward the
steering wheel) and ho ld.
.. Re lease the lever . The washer stops and the
wipers keep going for about four seconds.
Turning off th e wiper s
.. Move the lever back to position @ .
Clear vi sion 55
The w indshield wipers and washe r only work
whe n the ignition is turned on . If you switch
off the ignition with the w indshie ld w iper lev
er st ill in the interva l wipe position and then
come back a whi le later and drive off, the rai n
senso r will reactivate itsel f after the vehicle
speed has exceeded 4 mph (6 km/h) .
The rain sensor* is only activated with the
wiper lever set to position @. When it starts
to rain, the rain sensor will automat ically acti
vate the intermittent w iping mode.
To reduce the sensitivity of the sensor, move
switch ® down. To increase the sensitivity,
move t he switch up. The h igher you adjust the
sens it ivity, the faster the senso r will react
when it senses mo isture on the windsh ield .
The rain sensor w iper intervals depend on the
sensit ivity sett ing as well as vehicle speed.
D uring brief s tops, wipe r mot io n will adjust in
r elat ion to the amou nt of rain on the w ind
shield .
Automat ic w iper/was her : To eliminate water
drople ts, t he windsh ield wiper pe rforms o ne
afterw ipe ope ra tion after severa l seconds
whi le dr iv ing . You ca n sw itch this f unct ion off
by moving the leve r to posit io n ® within
10 seconds of the afterw ipe operat io n. The af
terwipe function is reactivated the next time
the ignitio n is switch.
When the igni tio n i s tur ned on, the washe r
jets are heated*.
& WARNING ~
- Wiper blades are crucial for safe drivi ng!
On ly when they are in good condit io n are
they able to clear the windows properly
to prov ide uncompromised visib ility.
Worn o r damaged wiper blades are a
safety haza rd
c> page 57, Replacing
front wip er blades!
- The light/rain senso r* is only des igned to
assis t and suppo rt the driver.
It rema ins
e ntire ly th e drive r's respo nsib il ity to
m onitor outside weathe r cond itions and
t o manu ally a ctiv ate the wipe rs as soo n
Page 58 of 280

56 Clear vis ion
as rain or drizz le re duces visibi lity
through th e windshield.
- The windshie ld must not be treated with
water-repe llent materials. They can in
crease glare under poor visibility condi
t ions such as wetness, darkness, or when
the sun is low on the horizon . In addi
t ion, they can cause th e windshield wip
ers to chatter.
(D Note
- In the case of frost, check whether the
windsh ield wiper b lades are frozen to
the windshield. Switching on the wind
shield wipers can damage the wiper
blades!
- Do not use the wipers to clear a frosted
window . U si ng the w ipers as a conven
i en t ice s craper will destroy the wiper
blades .
- Prior to using a car wash, the windshield
wiper system m ust be switched off (lever
i n position 0) . This helps to prevent unin
tentiona l switching on and damage to
the windshie ld wiper system.
(D Tips
- The w indshield wipers are swi tched off
when the ignition is turned off. Activate
the windshie ld wipers after the ignition
i s sw itched back on by mov ing the w ind
shield wiper lever to any pos it ion.
- Worn or dirty windshie ld wiper blades
cause smearing, which can affect the op
eration of the light/rain sensor*. Check
the condition of your windshie ld w iper
blades regularly.
- The rai n sensor is part of the interval
wiping system. Tur ning off the ignition
will a lso deact ivate the rain sensor. To re
activate t he senso r, switch off the inter
val w iping function, then sw itch it ba ck
on aga in.
- Applies to vehicles with lig ht/ rain sen
sor: When the wipers are swi tched on
manu ally and in rain condi tions, the au
tomatic head lights* turn on¢
page 47,
·'t!.-Switching the headlights on and off
or off during the day when the wipers are
no longer operating. The automatic
head lights* funct ion is available in th is
case on ly when the light switch is in the
"A UTO" position¢
page 47, fig. 43.
-Make s ure the washer fluid reservoir in
the engine compartment is topped off
before going on a long trip. Look up
¢
page 211 for check ing and filling the
washer co nta iner .
- The wipers only operate with the hood
completely closed .
is;J Rear window wiper
The wiper lever is also used to operate the
rear window wiper and the automatic wiper/ washer function .
Fig. 5 8 W iper lever: activat ing the rear w indow w iper
and washer
The rear window wiper and the automatic wip
er/washer functions are activated as follows :
Intermittent wiping
.,. Push the wiper leve r forward towards the
dashboard and to the
first position @
¢
fig. 58. The rear w indow wiper will wipe
the window approx. every four seconds .
Automatic wiper /washer function
.,. Push the wiper lever forward to the second
stop,
position (j) , and hold it there for as
long as you want the rear w iper/washer to
operate.
.,. Release the lever again. The wiper will keep
running for approx. four seconds . .,,_
Page 59 of 280

Switching intermittent wiper acti on off
• Pull the lever all the way back to the or igi
nal position.
A WARNING
Wiper blades are crucial for safe driving!
On ly in good condition are they able to
clear the windows properly to provide un
restricted visibility. Worn or frayed wiper
blades are a safety hazard!
r::;, page 5 7,
Replacing front wiper blades
Q) Note
In freezing or near freez ing cond itions:
- Always check t hat the wiper blades are
not frozen to the glass before yo u turn
the wiper on. loosen a wiper blade which i s frozen in p lace before operating the
wipe r to preve nt damage to the wiper
blade o r the w ip er motor .
-
-Do not use the wiper to clear a frosted
window . Using the wipers as a conven
i ent ice sc raper will destroy the w iper
blades .
(D Tips
For better rea rward vision whe n pa rking,
the r ear w indow w ip e r is automat ica lly ac
t iva ted one time when the windshield wip
ers are sw itche d on and reve rse gear is en
gaged.
Service position
Replacing the windshield wiper blades is only
possib le when you move the wiper arms into
the service position. In order to use the wind
shie ld w ipers, the hood must be complete ly
closed . When there is a risk of frost, make
sure that the w iper blades are not frozen to
the windshield .
• Switc h the ignition on .
• Switch the ignition off aga in and move the
wipe r lever
r::;, page 55, fig . 57 from position
0 to 1 within 10 seconds . The w iper arms
now move in to the fie ld of v iew in t he wind
shield .
Clear vision 5 7
The service pos ition can a lso be selected in
the d river information system*
r::;, page 27 .
(D Note
Neve r dr ive y our veh icle w hen the w ind
shield wiper a rms are in the se rvice posi
tion and pulled away from the winds hield.
W hen yo u drive faster than 4 mph (6 km/
h), the wiper arms automatically return
back to the park position and could ca use
paint damage to the eng ine hood!
(D Tips
- Yo u can also turn on t he service posit ion,
for example, if yo u want to p rotect the
w indshield from icing by using a cover.
- The service posit io n moves to
off auto
matically whe n yo u operate the w ind
shield wiper lever, or speed exceeds
4 mph (6 km/h).
Replacing front wiper blades
Wiper blades in good condition help keep the
windshi eld clear .
Fig. 5 9 Unlatching w ipe r blades
®"
Fig. 60 Remov ing w iper blades
Page 60 of 280

58 Clear vis ion
Removing the wiper blade
.. Move the wipers to the service position
c::>page 57.
.. Fo ld the windshield wiper arm away from
the g lass.
.. On the upper end of the wiper arm at the
corrugation, squeeze the plast ic retainer to
gether on both sides in the direction of the
arrow
c::> fig. 59 .
.. Rotate the w iper blade in the direct ion of
the arrow @c::>
fig. 60 away from the w iper
arm.
.. Lift the w iper blade
off in the direc tion of
the arrow @.
Attaching the wiper blade
.. Place the rounded end of the wiper onto the
end of the w iper arm in the
oppo site direc
t ion to the ar row @
c::> fig. 60.
.. Swing the wipe r in the oppo site direct io n to
the arrow @onto the wiper arm.
.. Sq ueeze the corrugation on the w iper until
yo u hear it click in the wiper arm.
.. Fold the wiper arm back onto the wind
shield .
.. Switch the ignition on and move the w iper
lever down briefly . The wiper will move back
to the park pos it ion .
The front wiper b lades measure left s ide
23 .20 in . (S90 mm) and rig ht side 18 .SO in.
(470 mm) i n length,
C lean your wiper blades regu larly with a wind
shie ld washer solution to prevent streaking . If
the blades are very d irty, for example with in
sects, carefu lly clean the blades w ith a sponge
or a soft b rush.
If the wiper b lades beg in to streak the wind
shield, this could be caused by res idue left on
the w indshield by automat ic car washes .
F ill the windsh ield washer container with a
specia l so lution available at your author ized
Aud i deale r to remove the residue .
Be s ure to inspect the condition of your w iper
b lades regularly. For safety reasons, replace
your w iper blades once or twice a year if nee- essa
ry . See yo ur authorized Aud i dea ler for re
placement blades .
A WARNING
-- Clean your w iper blades reg ularly with a
w indshie ld washer so lution to prevent
streaking. If the w iper blades are very
d irty, fo r example with insects , ca refully
clean the wiper blades wi th a sponge or a
soft brus h .
- For your safety , you should replace the
wiper blades onc e or twice a year . Se e
your aut hor ized Audi dealer for replace
men t blad es.
0 Note
-The wiper b lades may only be c hanged
c::> page 57 in the service posit ion! Ot he r
w ise, you risk damag ing the pa int on t he
hood or the w indshie ld wi per mo to r.
- Yo u should not move your veh icle o r
press t he winds hield wiper leve r when
t he wipe r arms are folded away from the
w indshield. The windsh ield wipers wo uld
move back into their or iginal position
and co uld damage the hoo d and wind
shield.
- To help prevent dama ge to the w iper sys
tem, always loosen blades which are fro
zen to the windshield before operating
w ipers.
- To help prevent damage to wiper b lades,
do not use gaso line, kerosene, paint
thinner, or other solvents on o r near the
w iper blades .
- To help prevent damage to the w iper
arms or other components, do not at
tempt to move the wipe rs by hand .
(D Tips
-Commercial hot waxes applied by auto
matic ca r washes affect the cleanability
of the g lass s urface .
- Yo u can also use the service position, for
examp le, if yo u want to p rotect the
w indshield from icing by using a cover. ..,_
Page 61 of 280

-You cannot activate the service position
when the hood is open.
- The front wiper blades a re different
l engths; the blade on the driver's side is
l onger.
Changing the rear wiper blade
F ig . 6 1 Insta lling/re moving wiper blade
Removing the wiper b lade
.. Fo ld the windshield wipe r arm away from
the g lass .
.. Pull the met al surround of the w iper blade
out o f the retaine r in the d irection o f the ar
row
r=> fig. 61. Hold the wiper arm firmly by
the upper end as you do this.
Attaching the wiper blade
.. Adjus t the posi tion of the wipe r blade in the
retainer
r=> fig. 61 (see close up).
.. Press the w iper blade into the retainer. Hold
t h e wiper arm firmly by the upper end as
you do this .
.. Fo ld the wiper arm back onto the glass.
A WARNING
- To avoid streaks, you should clean the
windshield wiper blades regular ly w ith
w indow cleaner. Fo r heavy soiling, for ex
ample, insects, the wipe r blades can also
be cleaned with a sponge or a cloth.
- For safety reasons, the windsh ield wiper
blades sho uld be replaced once or twice
a year .
Clear vision 59
Digital compass
Activating or deactivating the compass
App lies to vehicles: wi th digi tal co mpass
The direction is displayed on the interior rear
view mirror .
Fig. 62 Inside rear v iew mirror : d ig ita l compass act i
vated
.. To activate or deactivate, hold the@ but
ton down unt il the red display appears or
disappears .
The dig ital compass only works w ith the igni
tion turned on. The directions are displayed as
initials :
N (North), NE (Northeast), E (East),
SE (So utheast), S (South), SW (Southwest),
W (West), NW (Northwest) .
(0 Tips
To avoid inaccurate d irect io ns, do not al
l ow any remote contro ls, electr ica l sys
tems, o r metal parts close to the mir ror.
Page 62 of 280

60 Clear vis ion
Setting the magnetic deflection zone
A ppl ies to vehicles: with digital compass
The correct magnetic deflection zone must be
set in order to display the directions correctly.
©
Fig. 63 North America: magnet ic def lect ion zone
boundaries
• Hold the@~ page 59, fig. 62 button down
u ntil the number of the set magnetic deflec
tion zone appears on the interior rear view
mirror .
• Adjust the magnetic deflection zone by re
peatedly pressing on the @button. The set
mode automatically deactivates after a few
seconds .
Calibrating the compass
Applies to vehicles: with digital compass
The compass has to be recalibrated if the dis
play is wrong or inaccurate.
• Hold the@ button down until the letter C
is displayed on the interior rear view m irror .
• Drive in a circle at a speed of about 5 mph
(10 km/h) until a d irection is shown on the
i nterior rear view m irror.
A WARNING
-
The digital compass is to be used as a di-
rectional aid only. Even though you may
want to look at it while you are driving, you
must still pay attent ion to traffic, road and
weather conditions as well as othe r possi
b le ha zards.
Page 63 of 280

Seats and storage
General recommen
dations
Why is your seat adjustment so important?
The safety belts and the airbag system can
only provide maximum protection if the front
seats are correctly adjusted.
There are several different ways you can ad
just the driver's seat and the front passenger's seat so that it conforms to your body size.
It is
especia lly important that the seat be adjusted
properly so that:
- you can easily and quick ly reach all the
switches and controls in the instrument
panel
- your body is properly supported thus reduc
ing physical stress and fatigue
- the safety belts and airbag system can offer
maximum protection ¢
page 122
In the following chapte rs, you will see exactly
how you can best adjust your seats.
There are special regulations and instructions
for installing a child safety seat on the front passenger's seat. Always heed the informa
tion regard ing child safety provided in
¢ page 143, Child Safety .
A WARNING
Incorrect seating position of the driver and
all other passengers can result in serious
personal injury.
- Always keep your feet on the f loor when
the vehicle is in motion -never put your
feet on top of the instrument panel, out of the w indow or on top of the seat cush
ion! This applies espec ially to the passen
gers.
If your seating position is incorrect
you increase the r isk of injury in the case
of sudden braking or an acc ident. If the
airbag infla tes and the seating posi tion
is incorrect this could result in personal
injury or even death.
S eat s an d sto rage 61
-It is important for both the driver and
front passenger to keep a distance of at
least 10 inches (25 cm) between them
selves and the steering wheel and/or in
strument panel.
If you're s itting any
closer than th is, the airbag system can
not protect you prope rly. In addition to
this, the front seats and head restra ints
m ust be adjusted to yo ur body height so
that they can give you maximum protec
tion.
'
- Always try to keep as much distance as
possible between yourself and the steer
ing wheel or instrument pane l.
- Do not adjust the driver's or front pas
senger's seat whi le the vehicle is moving .
Your seat may move unexpected ly, caus
ing sudden loss of veh icle control and
personal injury. If you adjust your seat
while the veh icle is moving, you are out
of posit ion .
Driver's seat
The correct seat position is important for safe
and relaxed driving .
We recommend that you adjust the driver 's
seat in the fo llow ing manner :
.. Adjust the seat in fo re and aft direction so
that you can easily push the peda ls to the
floor wh ile keeping your knees slight ly bent
¢ .& in Why is your seat adjustment so im
portant? on page 61.
.. Adjust the seatback so that when you sit
w ith your back against the seatback, you can
st ill grasp the top of the steering wheel.
.. Adjust t he head restra int so the upper edge
is as even as possible wi th the top of your
head . If that is not poss ible , try to adjust
the head restraint so that it is as close to
this position as possib le
<=:> page 65.
A WARNING
-Never place any objects in the dr iver's foot-
well. An object could get into the pedal
area and interfere with pedal funct ion. In
Page 64 of 280

62 Seats and storage
case of sudden braking or an accident, you
would not be ab le to brake or acce lerate!
Front passenger's seat
Always move the front passenger seat into
the rearmost position.
To avo id contact with the airbag wh ile i t is de
p loying, do not sit a ny closer to the inst ru
ment panel than necessary and always wear
the three-point safety be lt provided adjusted
correctly. We recommend that you adjust the passenger's seat in the following manner:
... Move the front passenger seat into the rear
most position of the fore and aft adjustment
range
¢ .&.. in Why is your seat adjustment
so important? on page
61.
... Bring the backrest up to an (almost) upright
pos it ion .
Do not ride w ith the seat reclined.
... Adjust the head restraint so the upper edge
i s as
even as possible with the top of your
head. If that is not possib le, try to adjust
the head rest raint so that it is as close to
t h is position as possible
¢ page 65.
... Place your feet on the f loor in front of the
passenger's seat.
Adjusting front seats manually
Adjustment controls
Applies to vehicles: with manual seat adjustme nt
Various controls on the manual seats provide
a wide range for individual adjus tments.
==""" -®
Fig . 6 4 Ad just ment contro ls: locat ions on drive r"s seat
CD Moving the seat forward or backward
@ Adjusting the seat height
@ Adjusting the seatback ang le
@ Adjusting head restraint height
Some of the co ntrols are fitted on certain
models on ly or they are optiona l equipment.
Adjusting the manual seats
Applies to vehicles: with manual seat adjust ment
Position, angle and shape of the manual
seats can be adjusted to provide safe and
comfortable seating.
Rea d and heed all WARNINGS ¢.&.. befo re
you adjust yo ur seat .
Moving the front seats forward or
backward
"' Lift the leve r¢ page 62, fig. 64 CD and slide
the seat to the desired position .
... Release the lever and then move the seat
further until you feel and hear it engage .
Ad justing the seat height
... Pull the lever @up and pump it to raise the
seat.
... Push the lever down and pump it to lower
the seat.
Adjusting the seatback angle
... Lean forward to take your weight off the
seatback .
... Tur n the hand wheel@ in the di rection yo u
want the seatback to tilt.
A WARNING
- Never adjust the driver's or front pas
senger's seat whi le the vehicle is moving.
If you do th is while the veh icle is moving,
you will be out of position . Always adjust
the dr iver's or front pass enge r's seat
when the vehi cle is not mov ing.
- Be careful when adj usting the seat
he ight. Check to see that no one is in t he
way, or ser io us inju ry co ul d result!
- To reduce the risk of injury in the case of
sudden b raking o r acciden t, front pas
senge rs mus t never r ide in a mov ing
ve
h icle with the seatback reclined . Sa fety
 1
1 2
2 3
3 4
4 5
5 6
6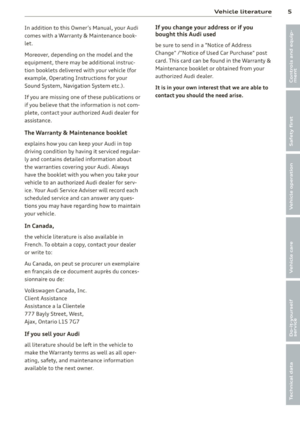 7
7 8
8 9
9 10
10 11
11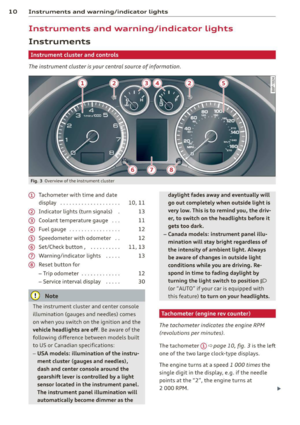 12
12 13
13 14
14 15
15 16
16 17
17 18
18 19
19 20
20 21
21 22
22 23
23 24
24 25
25 26
26 27
27 28
28 29
29 30
30 31
31 32
32 33
33 34
34 35
35 36
36 37
37 38
38 39
39 40
40 41
41 42
42 43
43 44
44 45
45 46
46 47
47 48
48 49
49 50
50 51
51 52
52 53
53 54
54 55
55 56
56 57
57 58
58 59
59 60
60 61
61 62
62 63
63 64
64 65
65 66
66 67
67 68
68 69
69 70
70 71
71 72
72 73
73 74
74 75
75 76
76 77
77 78
78 79
79 80
80 81
81 82
82 83
83 84
84 85
85 86
86 87
87 88
88 89
89 90
90 91
91 92
92 93
93 94
94 95
95 96
96 97
97 98
98 99
99 100
100 101
101 102
102 103
103 104
104 105
105 106
106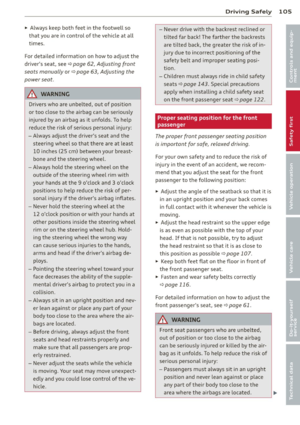 107
107 108
108 109
109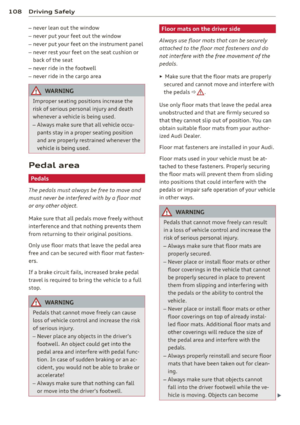 110
110 111
111 112
112 113
113 114
114 115
115 116
116 117
117 118
118 119
119 120
120 121
121 122
122 123
123 124
124 125
125 126
126 127
127 128
128 129
129 130
130 131
131 132
132 133
133 134
134 135
135 136
136 137
137 138
138 139
139 140
140 141
141 142
142 143
143 144
144 145
145 146
146 147
147 148
148 149
149 150
150 151
151 152
152 153
153 154
154 155
155 156
156 157
157 158
158 159
159 160
160 161
161 162
162 163
163 164
164 165
165 166
166 167
167 168
168 169
169 170
170 171
171 172
172 173
173 174
174 175
175 176
176 177
177 178
178 179
179 180
180 181
181 182
182 183
183 184
184 185
185 186
186 187
187 188
188 189
189 190
190 191
191 192
192 193
193 194
194 195
195 196
196 197
197 198
198 199
199 200
200 201
201 202
202 203
203 204
204 205
205 206
206 207
207 208
208 209
209 210
210 211
211 212
212 213
213 214
214 215
215 216
216 217
217 218
218 219
219 220
220 221
221 222
222 223
223 224
224 225
225 226
226 227
227 228
228 229
229 230
230 231
231 232
232 233
233 234
234 235
235 236
236 237
237 238
238 239
239 240
240 241
241 242
242 243
243 244
244 245
245 246
246 247
247 248
248 249
249 250
250 251
251 252
252 253
253 254
254 255
255 256
256 257
257 258
258 259
259 260
260 261
261 262
262 263
263 264
264 265
265 266
266 267
267 268
268 269
269 270
270 271
271 272
272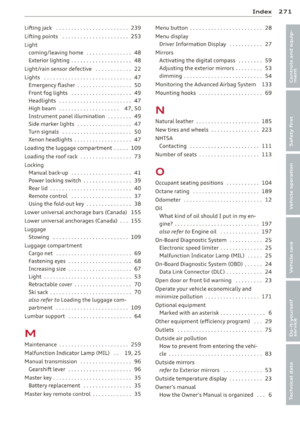 273
273 274
274 275
275 276
276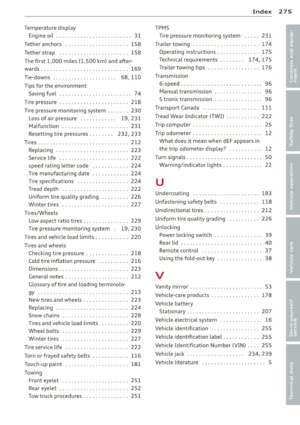 277
277 278
278 279
279