Page 49 of 280

Clear vision Lights
· r/.· Switching the headlights on and off
F ig. 4 3 In str ume nt pa ne l: light switch
F ig. 44 Instrumen t pane l: Light sw itch with dayt ime
running lights (DRL)
The ligh t sw itch must not be ove rtu rn ed past
the s tops in
either d ire ct io n.
Switching on automatic headlight
control*
.,. Turn the light swi tch to AUTO* ¢ fig. 43.
Switching on the side ma rker lights
.,. Turn the light switch to ooo=.
Switching on the headlights and high
beam
.,. Turn the light switch to tD .
.,. Pus h the high beam lever forward towards
the instrument pane l
Q page 50.
Switching off the lights
.,. Turn the light swi tc h to 0 .
The headlig hts on ly wo rk whe n the igni tion is
sw itche d on . W hile s tartin g the e ng ine or
when swit ching
off the ign ition , th e head-
Clear vision 4 7
lig hts w ill go off and only the side ma rke r
li ghts wi ll be on.
Daytime running lights (DRL) (USA
models)
The d aytime r unning lights can be tur ned on
o r
off using t his fu nction . If the function is ac
tive, the dayt ime ru nning lights a re turned on
a utomat ica lly when the ign ition is switched
o n.
T he daytime r unning lights are activate d
only
when the light switc h is at the AUTO* or DRL *
pos ition.
Daytime running lights (Canada models
only)
The daytime r unning lights are activated only
whe n the light switc h ¢ fig. 43 is either at the
0 or the coo: pos ition.
T he daytime r unning lights funct io n can not be
turned
off .
Automatic headlight control*
In the swi tch positi on AUTO the automatic
headlight control
i s tur ned on. The l ow
beams are turne d on au tomatically through a
li ght se nsor as soo n as amb ient brightness
(e .g. when dr iv ing into a t unnel) fa lls below a
val ue p reset at t he factory. Whe n ambient
bri ghtness i ncreases aga in, the low beams are
turned
off aga in a utomat ica lly c:> & .
In the AUTO position the low beams are
switc hed
off automatically when the ignition
is tur ned
off.
Light Sensor Malfunction*
In the event of a light se nsor malfunction, the
drive r is notifie d in the instrument cluste r dis
play:
ral Automatic headlights/automatic wipers
defective
Fo r sa fety reaso ns the low beam s are turned
on perm anen tly wi th the switch in
AUTO* .
However, you can co nti nu e to turn the lights
o n and
off u sing the lig ht switch. Have t he ..,.
Page 50 of 280

48 Clear vis ion
light sensor checked as soon as possible at a
dea lership.
Com ing home /leaving home function *
The function is switched on when the switch is
i n the AU TO* position and the function is
shown as active in the driver info rmation sys
tem .
The
co ming h om e function illuminates the
a rea around the veh icle when the ign it ion is
switched off and the driver 's door is opened.
The length of time the lights remain on can be set in the menu display
( Illumination > Exte
r io r light s> coming hom e).
The leav ing home function illuminates the
area around the vehicle when unlock ing it.
A WARNING
- Never use dayt ime running lights to see
where you are going. They are not bright
enough and w ill not let you see far
enough ahead for safety, especially at
dusk or when it is dark. Always switch on
the low beams at dusk or when it is dark.
- Automatic headlights are only intended
to assist the dr iver . They do not relieve
the driver of his responsibility to check
the headlights and to tu rn them on man
ually according to the current light and
visibili ty cond itions. Fo r example, fog
and rain cannot be detected by the light
sensors . So a lways switch on the head
lights under these weather cond itions
and when driving in the dark
io.
- Crashes can happen when yo u cannot see
the road ahead and when you cannot be seen by other motorists .
- Always turn on the headlights so that
you can see ahead and so tha t others
can see yo ur car from the bac k.
- With the switch in
AUTO front fog lights
ca nnot be t urned on in addition .
- The light sensor fo r headlight contro l is
l ocated in the rear view m irror mount .
Do no t apply any stickers to the w ind- shield in this area to prevent malfunc
tions or fa ilures.
- Some exter io r light ing funct ions can be
adjusted in the driver informat ion sys
tem
~ page 2 7.
- If you remove the ignition from the igni
tion lock while the headlights are still
on, a buzzer will so und as long as the
dr iver's door is open to rem ind you to
turn off the lights.
- Always observe the specif ic loca l regula
tions for your area as to when to use your
lights.
- With automatic headlights, the high
beam funct ion is also available, but wit h
one restrict ion: If you have not switched
the high beams back to low beams dur
ing automatic headlight operation (fo r
example, after d riving through a tunnel) ,
only the low beams come on the nex t
t ime au tomati c headlights are swi tc h ed
on. To use the high beams, you first have
to pull the high beam lever back and
then push the lever fo rward again.
- In cool or damp weather , the inside of
the headlights, turn signals and tail lights can fog over due to the tempera
ture difference between the inside and
outside. They w ill clear shortly after
switching them on. This does not affect
the se rv ice life of the lighting .
- Frequent use of the coming home/leav
ing home function for app roach ing and
depa rting a vehicle parked in the da rk
w ill strain the battery . Thi s ap plies pa r
tic ular ly if only short distances a re d riven
between stops . Occasionally drive longer
dis tances to make sure the battery is re
charged sufficiently.
Page 51 of 280

:l:D Front fog lights
Use the light switch to turn on the front fog
lights.
Fig. 45 Fog light act ivat ion: light sw itc h pos it ion o n ve
h icles WITHO UT sensor light
}D Switching on the front fog lights
.. Do not turn the light switch -"t;.. -<=> fig. 45 to-
ward the fog light symbol
.. Turn the light switch to
coo: or to @:D.
.. Pull the light switch to the first stop (D.
When the front fog lights are on, the sym
bol
:iO next to the light switch will illuminate.
C:t:t Instrument panel illumination
The illumination of the instruments, displays
and the center console can be adjusted .
Fig. 46 In st rum ent pa nel illum inat ion
0
"' d. .. m
You regulate the brightness of the instru
ments with the left thumbwhee l
Co/<=> fig. 46 .
@ Ignition ON, light switch.
With the ignition switched ON, the glow of in
strument needles
can be adjusted to appear
brighter or d immer.
Clear vision 49
:oo: or io Ignition ON, light switch.
With the lights swit ched on, the brightness of
instrument cluste r (i.e. needles, gauges and
displays) and center console illumination can
be adjusted.
(D Note
The instrument cluster and center console
ill umination (gauges and need les) comes
on when you switch on the ignition and the
vehicle headlights are off . Be aware of the
follow ing difference between models built
to US or Canadian specifications:
-USA models: illumination of the instru
ment cluster (gauges and needles),
dash and center console around the
gearshift lever is controlled by a light
sensor located in the instrument panel.
The instrument panel illumination will
automatically become dimmer as the
daylight fades away and eventually will
go out completely when outside light is
very low. This is to remind you, the driv
er, to switch on the headlights before it
gets too dark.
- Canada models: instrument panel illu·
mination will stay bright regardless of
the intensity of ambient light. Always be aware of changes in outside light
conditions while you are driving. Re
spond in time to fading daylight by
turning the light switch to position
gD
(or "AUTO " if your car is equipp ed with
th is feature)
to turn on your headlights.
Page 52 of 280

50 Clear vis ion
Emergency flasher
The emergency flasher makes other motorists
aware that you or your vehicle are in an emer
gency situation .
Fig. 47 Center console: emergency flasher switch
.. Press the switch ~ c:> fig. 47, to switch the
emergency flasher on or off.
When the emergency flasher is on, a ll four
turn signal b link a t the same time. The t urn
signal indicator lights
liliN in the instrument
cluster, as we ll as the light in the emergency
f lasher switch ~ blink likewise .
The emergency f lasher w ill automa tica lly
switch on if you are in an accident where the
ai rbag has deployed.
(D} Tips
You shou ld switch on the emergency flash
er when:
- you are the last vehicle st anding in a tr af
fic jam so that any other veh icles coming
can see you, or when
- you r vehicle has broken down or yo u are
i n an emergency situation, or when
- you r vehicle is being towed by a tow
truck or if yo u are towing a nothe r vehicle
behind you.
¢ Q Turn signals - and ~D high beam
lever
The lever on the left side of the steering col
umn is used to operate the turn signal s and
the high beam as well as the headlight flash
er .
t
'
F ig. 48 Tu rn signal and high beam lever
The turn signal and high beam lever has the
following functions:
¢ Q Turn signals
.. Lift the lever up a ll the way c:> fig. 48 (D , to
use the right turn signals, or push the leve r
down all the way @to use the left turn sig
nals.
Auto -blin k
.. Move the lever (up or down) just to the
point of resistance to use the turn signals
for as long as you need them, for example
when changing lanes.
.. Briefly move the lever up or down just to
the point of resistance and then release it to
flash the turn s ignals
three times in succes
sion .
This featu re allows to ind icate lane
changes clearly and w ith minimum effo rt
when driv ing on highways.
~D High beam
.. Push the lever forward @ to switch on the
h igh beam .
" Pull the lever back towards you to switch off
the high beam.
~D Headlight flasher
" Pull the lever toward the steering wheel@
to use the headlight flasher. ..,_
Page 53 of 280

Notes on these featur es
- The turn signals only work with t he ignition
switched on. The indicator lights
B or IN in
the instrument cluster¢
page 13 also b link.
- After yo u have turned a corner, the turn sig-
nal switches off a utomatica lly.
- The
high beam works only when the head
lights are on. The indicato r light
II in the
instrument cluster illuminates when the
high beams a re on.
- The
headlight flasher wo rks only as long as
you hold the lever -even if there are no
lights switched on. The indicator light
II in
the instrument cluster illuminates when you
use the headlight f lasher.
(D Note
Do not use the high beam or headlight
flasher if you know that these could be
blind ing oncoming traffic.
Interior lights
Interior lights and glove compartment
light
The interior lights include the both reading
lights for the driver and the front passenger.
............. ...... ... ........... ... J :·:::: ::::::::: : :: :::::::::::: . :: : .. :: ::::::::···· .......... ::::::::: :: ::: :! mmr ·::::m :: mu
... mmi ~ mim g gm,
II IIGI II
Fig. 49 Control pa nel above winds hield : interior light
switches
L ight switch¢ fig. 49 has the follow ing func
tions:
Door cont act activation
• Move the sw itch to the center pos it io n. The
forward dome light is turned on/off by the contact switches on any of the doors.
Clear vi sion 51
Forward dome light on
• Move the swit ch to position I. The forwa rd
dome light goes on and stays on regardless
of door position.
Forward dome light off
• Move the swi tch to position 0 . The light will
no t go on regard less of door position .
Glove compartment light
• Open the glove compartment -the light in
the glove compartment automatically illu
m inates as long as the side marker lights or
head lights are on. When you close the glove
compa rtme nt, the light goes off.
Wi th the interio r light sw itch at the door con
tact (center) posit ion, the forward dome light
i ll uminates whenever you u nlock the veh icle
or open a door. The dome ligh t goes out after
approximately 30 seconds after you have
closed the door . Likewise, when you lock your
vehicle or switch on the ignition, the dome
li ght goes out.
If you leave a door open, the dome light w ill
go out after ten minutes to conserve battery
charge.
A d immer automa tica lly contro ls t he b rig ht
ness of the lights when they a re switche d on .
Interior lights and forward reading
lights
App lies to vehicles: wit h lig ht pac kage
The interior lights include the both reading
lights for the driver and the front passenger.
• •
Fi g. 50 Control panel above w inds hield: inter ior ligh t
switc hes
0 0 ....
~ CJ) a,
Page 54 of 280

52 Clear vis ion
Light switch @c:::> page 51, fig . 49 has the fo l
lowing functions:
Door cont act activ ation
.. Move t he sw itch to the center posit ion. The
f orward dome light is turned on/off by the
contact switches on any of the doors.
Forw ard dom e light on
.. Move the sw itch to position I. The forward
dome light goes on and stays on regard less
of door position.
Forw ard dome light off
.. Move th e sw itch to position 0 . The light will
not go on regardless of door position.
~ F o rward re a ding light s
.. Press the left or right switch @ to switch
the left or right forward reading light on or
off.
Glove compartment light
.. Open the glove compartment -the light in
the g love compartment automatically illu
mi nates as long as the side marker lights or
headlights are on. When you close the g love
compartment, the light goes off.
With the interior lig ht switch at the door con
tact (center) position, the forward dome light illum inates whenever you unlock the vehicle
or open a door. The dome light goes out after
approximately 30 seconds after you have
closed the door. L ikewise, when you lock your
vehicle or switch on the ign ition, the dome
l ight goes out.
If you leave a door open, the dome light will
go out after ten minutes to conserve battery
cha rge.
A dimmer automatically controls the bright
ness of the lights when they are sw itched on .
Ambient lighting
Applies to vehicles: with light package
The ambient lighting illuminate important
controls for you .
0 0
Fig . 51 Contro l panel above w inds hield: positio n of
amb ient light bulbs
0 ,..
cL
m a,
When you switc h on the ignition, the lights in
t h e door handles illum inate .
When the side marker lights or headlig hts are
switched on, the center conso le is i lluminated
from the ambient light located above the
windshield .
You cannot manua lly turn off these lights.
Rear reading light
Fig. 52 Rear reading light
Rear reading light
Press the sw itch ~ to turn on and off the
readi ng lig ht.
N
0 ,..
-cL m a,
Page 55 of 280

Luggage compartment light
A dome light in the rear roof liner illuminates
the luggage comportment. An additional
light is provided on the inside of the rear lid.
The light is located on the left side of the
trunk.
With the switch at the center position, the
rear dome light is automatically switched on
as soon as the rear lid is opened. The rear
dome light goes out 30 seconds after the rear
lid is closed .
If the rear lid is left open for more than 10 mi
nutes, both the rear dome light and the light
i n rear lid are switched off to conse rve the
battery charge.
Vision
Sun visors
Applies to vehicles: with lig ht package o r ill umin ated va n
ity m irror
Using the sun visors makes driving safer.
l
-
Fig. 5 3 Sun visor
The s un visors for the dr iver and front passen
ger can be removed from their center mo unt
ings and moved toward the door w indows
(D
~ fig . 53 to protect against side glare .
The vani ty mir ror in the sun viso rs is covered
by a lid. When you s lide the lid @open the
mirror illum ination comes on automat ica lly.
W hen you slide the lid shut or fold the su n vi
sor back up, the illumination also goes out.
There is a folding visor between the visors for
the driver and the passenger which can be
Clear vi sion 5 3
used to cover the space above the rear view
mirror.
Sun blind
Applies to veh icles: w ith sun blinds o n rear side windows
Use the sun shades to cut glare through the
rear passenger windows and the rear window .
.,
F ig. 5 4 Rear side window : sun blind extended
Sun blind, rear side windows door s
.. Pull the shade upward out o f the door sill
and engage in the hooks located at the top
of the door frame
q fig. 54.
Mirrors
Adjusting the exterior mirrors
Fig. 55 Fo rwa rd sect ion of d river's a rm rest: power mir
ror cont rols
Adjusting the outside mirrors
.. Tur n the ad justing knob to q fig. 55 ©
(driver's s ide outside m irror) to ® (fron t
passenger's outside mirror).
.. Press the knob in the appropriate direction
to move the mirror surface so that you have
a good view to the rear.
Heated mirrors*
.. Tur n the rotary k nob to @.
Page 56 of 280

54 Clear vis ion
Depending on outside temperature and vehi
cle speed, the mirror surfaces are heated until
the ignition is switched off -even if the rotary
knob is no longer in position@.
You are well-advised to fold the exterior mir
rors in when maneuvering in tight spaces or
when leaving the car parked close to other ve
hicles.
(D Note
- Cu rved mirror surfaces (convex or spheri
ca l*) increaseyourf ield of view. Remem
ber that vehicles or other objects wi ll ap
pear smaller and farther away than when
seen in a flat mirror. If yo u use this mir
r or to est imate distances of following ve
hicles when changing lanes, you could
estima te incorrect ly and cause an acci
dent.
(D Tips
I f the re should be a malfunction in the
e lec trical system, you can still adjust the
exterior m irrors by pres sing the edge of
the mirror.
Dimming the mirrors
F ig. 56 Automatic dimm ing rearview mirror•
Manual anti-glare adjustment
• Move the small lever (located on the bot
tom edge of the mirror) to the rear.
Automatically dimm ing mirror s*
• To dim the rearview mirror and both exteri
or mirrors, press the® button. The diode
@ turns on. The rearview and exterior m ir
rors dim automatically when light sh ines on them, for
example from headlights on ave
hicle to the rear.
A WARNING
Electro lyte fluid can leak from automatic
dimming mirrors if the glass is broken.
Electro lyte fluid can irr itate skin, eyes and
respiratory system.
- Repeated or prolonged exposure to elec
trolyte can cause irr itation to the respira
tory system, especially among people
with asthma or other resp iratory condi
tions. Get fresh air immediately by leav i n g the vehicle o r, if that is not possib le,
open windows and doors all the way.
- I f electrolyte gets into the eyes, flus h
them thoroughly with large amounts of clean water fo r at least 1 5 minutes;
medical attention is recommended.
- I f electrolyte contac ts skin, fl ush affect
ed area with clean water for at least 15
minutes and the n wash affected area
with soap and water; medical attention
is recommended. Thoroughly wash af
fected clothing and shoes before reuse.
- If swallowed and person is conscious,
rinse mouth with water for at least 15
minutes. Do not induce vomiting unless
instructed to do so by medical professio
nal. Get medical attention immediately.
(D Note
Liqu id electrolyte leaking from broken m ir
r or glass w ill damage any plastic surfaces
i t comes in contact with. Clean up spilled
electrolyte imme diately with clean water
and a sponge.
(D Tips
- Switching off the dimming function of
the ins ide rear view mir ro r also deacti
vates the automatic dimming function of
the exter io r mir ro rs.
- The automatic dimming m irrors do not
dim when the inte rior lighting i s tur ned
on or the reverse ge ar is sele cted. .,.
 1
1 2
2 3
3 4
4 5
5 6
6 7
7 8
8 9
9 10
10 11
11 12
12 13
13 14
14 15
15 16
16 17
17 18
18 19
19 20
20 21
21 22
22 23
23 24
24 25
25 26
26 27
27 28
28 29
29 30
30 31
31 32
32 33
33 34
34 35
35 36
36 37
37 38
38 39
39 40
40 41
41 42
42 43
43 44
44 45
45 46
46 47
47 48
48 49
49 50
50 51
51 52
52 53
53 54
54 55
55 56
56 57
57 58
58 59
59 60
60 61
61 62
62 63
63 64
64 65
65 66
66 67
67 68
68 69
69 70
70 71
71 72
72 73
73 74
74 75
75 76
76 77
77 78
78 79
79 80
80 81
81 82
82 83
83 84
84 85
85 86
86 87
87 88
88 89
89 90
90 91
91 92
92 93
93 94
94 95
95 96
96 97
97 98
98 99
99 100
100 101
101 102
102 103
103 104
104 105
105 106
106 107
107 108
108 109
109 110
110 111
111 112
112 113
113 114
114 115
115 116
116 117
117 118
118 119
119 120
120 121
121 122
122 123
123 124
124 125
125 126
126 127
127 128
128 129
129 130
130 131
131 132
132 133
133 134
134 135
135 136
136 137
137 138
138 139
139 140
140 141
141 142
142 143
143 144
144 145
145 146
146 147
147 148
148 149
149 150
150 151
151 152
152 153
153 154
154 155
155 156
156 157
157 158
158 159
159 160
160 161
161 162
162 163
163 164
164 165
165 166
166 167
167 168
168 169
169 170
170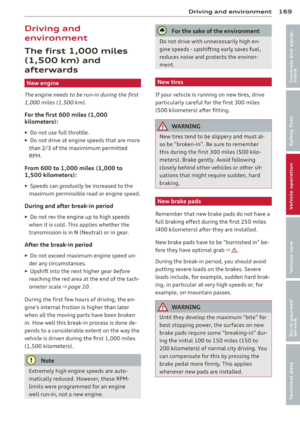 171
171 172
172 173
173 174
174 175
175 176
176 177
177 178
178 179
179 180
180 181
181 182
182 183
183 184
184 185
185 186
186 187
187 188
188 189
189 190
190 191
191 192
192 193
193 194
194 195
195 196
196 197
197 198
198 199
199 200
200 201
201 202
202 203
203 204
204 205
205 206
206 207
207 208
208 209
209 210
210 211
211 212
212 213
213 214
214 215
215 216
216 217
217 218
218 219
219 220
220 221
221 222
222 223
223 224
224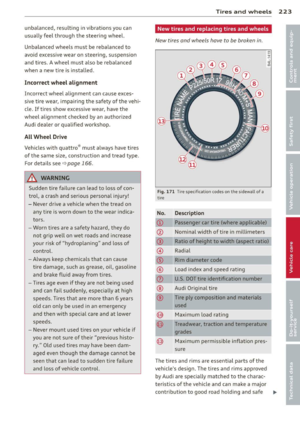 225
225 226
226 227
227 228
228 229
229 230
230 231
231 232
232 233
233 234
234 235
235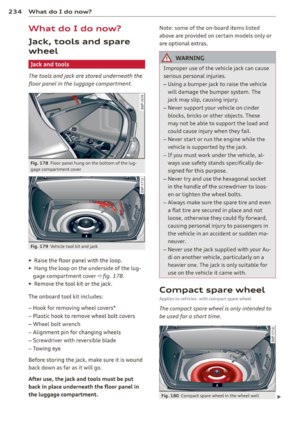 236
236 237
237 238
238 239
239 240
240 241
241 242
242 243
243 244
244 245
245 246
246 247
247 248
248 249
249 250
250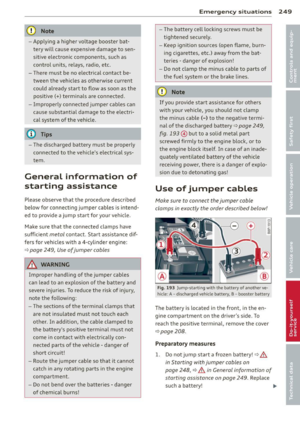 251
251 252
252 253
253 254
254 255
255 256
256 257
257 258
258 259
259 260
260 261
261 262
262 263
263 264
264 265
265 266
266 267
267 268
268 269
269 270
270 271
271 272
272 273
273 274
274 275
275 276
276 277
277 278
278 279
279