Page 9 of 370
7
Quick Reference Guide
Safe Driving (P 21)
Airbags (P 35)
● Your vehicle is fitted with airbags to help protect you and
your passengers during a m oderate-to-severe collision.
Child Safety (P 50)
● All children 12 an d younger should be seated in the rear seat.
● Smaller children should be properly rest rained in a forward-facing child seat.
● Infants must be properly restrai ned in a rear-facing child seat.
Exhaust Gas Hazard (P 64)
● Your vehicle emits dangerous ex haust gases that contain carbon
monoxide. Do not run the engine in confined spaces where carbon
monoxide gas can accumulate.
Before Driving Checklist (P 26)
● Before driving, check that the front seats, head restraints,
steering wheel, and mirrors ha ve been properly adjusted.
Seat Belts (P 27)
● Fasten your seat belt and sit upright well
back in the seat.
● Check that your passengers are wearing
their seat belts correctly.
Fasten your lap belt as
low as possible.
Page 10 of 370

8
Quick Reference Guide
Instrument Panel (P 67)
System Indicators
Malfunction
Indicator Lamp Low Oil Pressure
Indicator
Charging System
IndicatorAnti-lock Brake
System (ABS)
Indicator
Vehicle Stability
Assist (VSA ®)
System Indicator VSA ® OFF Indicator
Low Tire Pressure/
TPMS Indicator Electronically
Controlled Power
Steering System
(ECPS) Indicator
*
Lights Reminders
Lights On Indicator
High Beam Indicator
Fog Light Indicator
Immobilizer System
Indicator
Seat Belt Reminder
Indicator
System Indicators
Cruise Control
Indicator*
System Message
Indicator
Parking Brake and
Brake System
Indicator Supplemental
Restraint System
Indicator
Side Airbag Off
Indicator
Door and Tailgate
Open Indicator
Cruise Main
Indicator
*
TachometerSpeedometer
Fuel Gauge
Security System
Indicator Shift Lever Position Indicator
Low Fuel Indicator
Gauges (P 87)/Multi-Information Display (P 88)/
System Indicators
(P 68)
Turn Signal and
Hazard Warning
Indicators
Temperature Gauge
SH-AWD Indicator
Keyless Access
System Indicator
*
Active Damper
System Indicator*
Blind Spot
Information
Indicator
*
Collision Mitigation
Braking SystemTM
(CMBSTM) Indicator*
Adaptive Cruise
Control (ACC)
Indicator
*
System Indicators
Multi-Information Display
U.S.
Canada Canada
U.S.
Page 11 of 370
9
Quick Reference Guide
Controls (P 101)
Turn Signals (P 131)
LeftRight
Turn Signal Control Lever
Lights (P 131)
Light Control Switches
High Beam
Low
Beam
Flashing
Wipers and Washers (P 134)
Wiper/Washer Control Lever Adjustment Ring: Long Delay
: Short Delay
MIST
OFF
INT : Low speed with intermittent
LO : Low speed wipe
HI : High speed wipe Pull toward
you to spray
washer
fluid.
*
Not available on all models
Page 12 of 370

10
Quick Reference Guide
Steering Wheel (P 140)
● To adjust, push and hold the adjustment
switch to move the steering wheel to the
desired position.
Tailgate (P 114)
● With all the doors unlocked, press the
tailgate release button on the tailgate to
open it.
● Press the power tailgate button on the
instrument panel or the remote
transmitter to open and close the power
tailgate.
Power Door Mirrors (P 142)
● With the ignition switch in ON
w*1, move
the selector switch to L or R.
● Push the appropriate edge of the
adjustment switch to adjust the mirror.
● Place the selector switch in the L or R
position to use the reverse tilt door mirror
feature.
Selector Switch
Adjustment Switch
Power Windows (P 123)
● With the ignition switch in ON
w*1, open
and close the power windows.
● If the power window lock button is in the
OFF position, each passenger’s window
can be opened and closed with its own
switch.
● If the power window lock button is in the
ON position (indicator is on), each
passenger’s window switch is disabled.
*1: Models with the keyless access system
have an ENGINE START/STOP button instead
of an ignition switch.
Power Window Lock Button
Window
Switch Indicator
Page 13 of 370

11
Quick Reference Guide
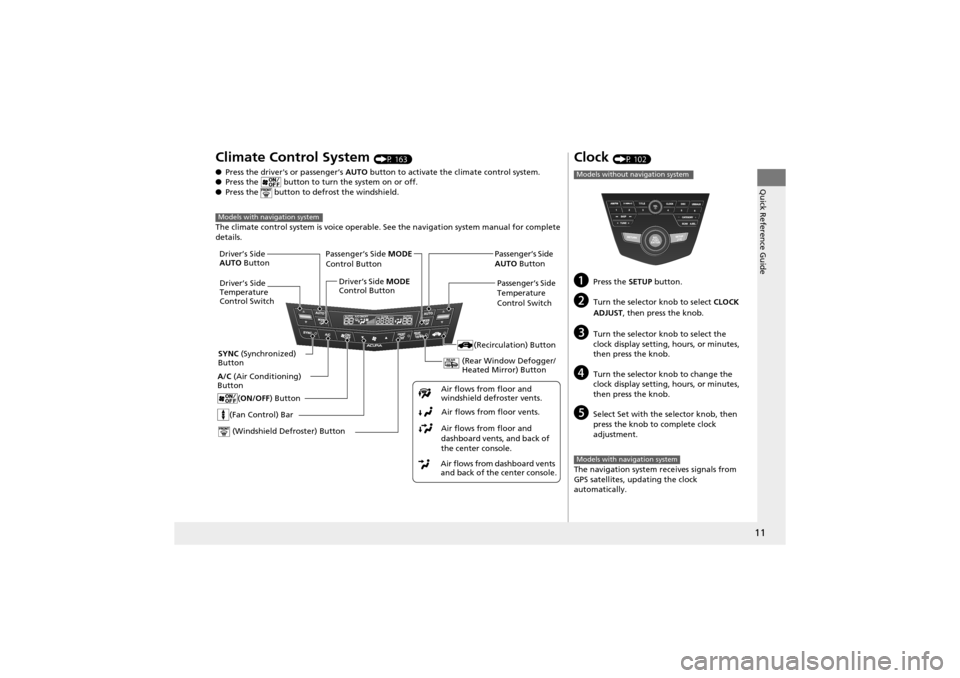
Climate Control System (P 163)
● Press the driver's or passenger’s AUTO button to activate the climate control system.
● Press the button to turn the system on or off.
● Press the button to defrost the windshield.
The climate control syst em is voice operable. See the navi gation system manual for complete
details.
Models with navigation system
(Fan Control) Bar
(Rear Window Defogger/
Heated Mirror) Button
(Windshield Defroster) Button
A/C (Air Conditioning)
Button
Air flows from dashboard vents
and back of the center console.Air flows from floor and
dashboard vents, and back of
the center console.
Air flows from floor vents.
Air flows from floor and
windshield defroster vents.
(ON/OFF
) Button
(Recirculation) Button
Passenger’s Side MODE
Control Button
Passenger’s Side
Temperature
Control Switch
SYNC (Synchronized)
Button Driver’s Side
AUTO
Button
Driver’s Side
Temperature
Control Switch Driver’s Side
MODE
Control Button Passenger’s Side
AUTO
Button
Clock (P 102)
aPress the SETUP button.
bTurn the selector knob to select CLOCK
ADJUST , then press the knob.
cTurn the selector knob to select the
clock display setting, hours, or minutes,
then press the knob.
dTurn the selector kn ob to change the
clock display setting, hours, or minutes,
then press the knob.
eSelect Set with the selector knob, then
press the knob to complete clock
adjustment.
The navigation system re ceives signals from
GPS satellites, updating the clock
automatically.
Models without navigation system
Models with navigation system
Page 14 of 370
12
Quick Reference Guide
Features (P 167)
Audio system (P 168)
For navigation system operation () See Navigation System Manual
Audio Display
SCAN/A.SEL (Auto
Select) Bar
AM/FM
Button
RETURN Button
Selector Knob
TITLE
Button
TUNE Bar VOL
(Volume/
Power) Knob
DISC Button
USB/AUX Button
CD Slot (CD Eject)
Button
Preset Buttons
(1-6)
SETUP Button
SKIP
Bar
CATEGORY Bar
LOAD Button (
XM ®)
Button
● Audio Remote Controls (P 190)
● VOL (Volume) Button
Press / to adjust the volume
up/down.
● MODE Button
Press and release to change the audio
mode: FM1 /FM2 /AM /XM1 /XM2 /CD/ AUX .
● CH (Channel) Button
Radio: Press and release to change the preset station.
Press and hold to select the next or
previous strong station.
CD/USB device: Press and release to skip to the
beginning of the next song or
return to the beginning of the
current song.
Press and hold to change a folder.
VOL Button
MODE Button
CH Button
34
Page 15 of 370

13
Quick Reference Guide
Driving (P 209)
Release ButtonShift Lever
Depress the brake pedal and press the
release button to move out of
P.
Move the shift lever without
pressing the release button.
Press the rele
ase button to
move the shift lever.
Automatic Transmission (P 227)
● Shift to
P and depress the brake pedal when starting the engine.
● Shifting
Park
Turn off or start the engine.
Transmission is locked.
Reverse
Neutral
Transmission is not locked.
Drive
Normal driving. D-paddle shift mode can be used.
S Position
Sequential shift mode can be used. Paddle Shifters
(P 230)
M Indicator
Shift Down
Paddle Shifter
-Shift Up +
Paddle Shifter
●
Paddle shifters allow you to shift gears much like a manual
transmission (1st through 6th). This is useful for engine braking.
● D-paddle shift mode: The transmission will shift back to
automatic mode once the system detects that the vehicle is
cruising.
● Sequential shift mode: Holds the selected gear, and the M
indicator comes on.
Selected Gear Number
Page 16 of 370

14
Quick Reference Guide
VSA® OFF Button (P 244)
● The vehicle stabil ity assist (VSA®) system
helps stabilize the vehicle during
cornering, and helps maintain traction
while accelerating on loose or slippery
road surfaces.
● VSA ® comes on automati cally every time
you start the engine.
● To turn VSA ® on or off, press and hold
the button until you hear a beep.
Cruise Control (P 232)
● Cruise control allows you to maintain a
set speed without keeping your foot on
the accelerator pedal.
● To use cruise control, press the CRUISE
button, then press the DECEL/SET button
once you have received the desired speed
(above 25 mph or 40 km/h).
Tire Pressure Monitoring
System (TPMS)
(P 248)
● TPMS monitors tire pressure.
● TPMS is turned on automatically every
time you start the engine.
Refueling (P 263)
aUnlock the driver’s door.
bPress on the edge of the
fuel fill door to make it
pop up slightly.
cTurn the fuel fill cap
slowly to remove the
cap.
dPlace the cap in the
holder on the fuel fill
door.
eAfter refueling, screw
the cap back on until it
clicks at least once.
Fuel recommendation: Premium unleaded gasoline with a pump octane number
91 or higher required
Fuel tank capacity: 21.00 US gal (79.5 L)