Page 17 of 284
.Familiarisation
15
Tr a n s l u c e n t d igital
instrument panel
Switch panels
If the levels are not correct, top up the levels
which are low.A.With the ignition on, the level of fuelremaining is displayed in the digitalinstrument panel.B.With the ignition on, the oil level indicator should display "OIL OK"for a few seconds. Illumination of the indicator lamp indicates the
status of the corresponding function.A.Deactivation of the ESP/ASR system. With the i
gnition on, the orange and red
warning lamps come on.
With the engine running, these warning lampsshould go off almost immediately, with theexception of warning lamp C
(passenger'sfront airbag activated) which goes off after
approximately one minute.
If warning lamps remain on, refer to the
relevant page.
Warning lamps
Monitoring
222311
6
140
72
133
B. Deactivation of the rear parking sensors.
C.
Central locking.
D.Deactivation of the Stop & Start system.
Page 18 of 284
Familiarisation
16
Passenger's front airbag
Electric child lock
1.
Inser t the key.2.
Select the position:
"OFF"
(deactivation), with "rear facing" child seat",
"ON"
(activation), with front passenger or "forwards facing" child seat.3.
Remove the key keeping the switch in the new position. Illumination of the indicator lamp
A
indicatesthat the electric child lock is on. A
. Front and/or rear seat belts not fastened / unfastened warning lamp.B.
Front left seat belt warning lamp.C.
Front right seat belt warning lamp.D.Rear right seat belt warning lamp.
E.Rear centre seat belt warning lamp.
F. Rear left seat belt warning lamp.
G.Passenger's front airbag deactivated
warning lamp.
H.Passenger's front airbag activated warning lamp.
Seat belts and passenger's
front airba
g
Passenger safety
122
117, 118
112
Page 19 of 284
.Familiarisation
17
Driving safely
This 6 -speed gearbox offers the choice of the comfor t of automated operation or the pleasure
of manual gear changing.
1.Gear lever.2."-"
steering mounted control paddle. 3."+"steering mounted control paddle.
The
gear engaged or the driving mode selected appears in the instrument panel screen. N.Neutral. R. Reverse.1 to 6.
Gears engaged. AUTO.
Automated mode.
)
Select position N
and press the brake pedal firmly while star ting the engine. )
Select automated mode (position A
) or Amanual mode (position M ) by moving thegear lever 1,
or
en
gage reverse by pushing the gear lever 1towards position R . ) Release the parking brake. )
Progressively release the foot brake, then
accelerate away.
6-speed electronic
gearbox system
Display in the instrument panel
Moving off
127
Page 20 of 284

Familiarisation
18
Driving safely
Going into engine STOP mode
- gear lever in position A
or M, when you
release the brake pedal,
- or
gear lever in position N
and brake pedal
released, when you change to position Aor AM,
- or when you engage reverse.
Stop & Start
The "ECO"
warning lamp comes on
in the instrument panel and the engine
automatically goes into standby with the
6-speed electronic gearbox syste
m:
- at speeds below 5 mph (8 km/h), when you
press the brake pedal or when you put thegear lever in position N .
Going into engine START mode
The "ECO"
warning lamp goes off
and the engine restarts automatically
with a 6-speed electronic gearbox
syste
m:
In some circumstances
STOP mode may not
be available; the "ECO"
warning lamp flashesfor a few seconds, then goes off. In some circumstances
STA R T m o d e m ay be
invoked automatically; the "ECO"warning lamp flashes for a few seconds, then goes off.
Deactivation / Reactivation
You can deactivate the system at any time by
pressing the "ECO OFF" button; the warninglamp in the button comes on.
Before refuelling or doing anything under the bonnet, you must switch off
the ignition using the key.
The system is reactivated automatically at every new start using the key.
13
2133
133, 13 4
Page 21 of 284
.Familiarisation
19
Speed limiter "LIMIT"
Display in the instrument panel
1.
Limiter mode Selection / Off. 2.Decreasing the programmed value. 3.Increasing the programmed value. 4.
Speed limiter On / Off. The cruise control or speed limiter mode
appears in the instrument panel when it isselected. 1
.Cruise control mode Selection / Off.2. Programming a speed / Decreasing the
programmed value.3. Programming a speed / Increasing the
programmed value.
4. Cruise control Off / Resume.
Cruise control "CRUISE"
In order to be programmed or activated, the
vehicle speed must be higher than 25 mph(40 km/h), with at least fourth gear engaged on
the manual gearbox. The values must be set with the en
gine running. Cruise control
Speed limite
r
Driving safely
135
137
Page 22 of 284

20
Eco-driving
Optimise the use of your gearbox
With a manual gearbox, move off gently, change up without waiting and drive by changing up quite soon. If your vehicle has the system, the gear efficiency indicator invites you to change up; it is displayed in theinstrument panel, follow its instructions.
With an automatic or electronic gearbox, stay in Drive "D"or Auto "A"
, according to the type of gearbox, without pressing the accelerator pedalheavily or suddenly.
Drive smoothly
Maintain a safe distance between vehicles, use engine braking rather than the brake pedal, and press the accelerator progressively. Thesepractices contribute towards a reduction in fuel consumption and CO2emissions and also helps reduce the background traffic noise.
If your vehicle has cruise control, make use of the system at speedsabove 25 mph (40 km/h) when the traffic is flowing well.
Control the use of your electrical
equipment
Before moving off, if the passenger compar tment is too warm, ventilate it by opening the windows and air vents before using the air conditioning.
Above 30 mph (50 km/h), close the windows and leave the air ventsopen.
Remember to make use of equipment that can help keep the temperature in the passenger compar tment down (sunroof and windowblinds...).
Switch off the air conditioning, unless it has automatic digital regulation,as soon as the desired temperature is attained. Switch off the demisting and defrosting controls, if not automatic. Switch off the heated seat as soon as possible.
Switch off the headlamps and front foglamps when the level of lightdoes not require their use.
Avoid running the engine before moving off, particularly in winter; your vehicle will warm up much faster while driving.
As a passenger, if you avoid connecting your multimedia devices
(film, music, video game...), you will contribute towards limiting theconsumption of electrical energy, and so of fuel.
Disconnect your por table devices before leaving the vehicle.
Eco-driving is a range of everyday practices that allow the motorist to optimise their fuel consumption and CO2emissions.
Page 23 of 284

.
21
Limit the causes of excess consumption
Spread loads throughout the vehicle; place the heaviest items in the bottom of the boot, as close as possible to the rear seats.Limit the loads carried in the vehicle and reduce wind resistance (roof bars, roof rack, bicycle carrier, trailer...). Use a roof box in preference.Remove roof bars and roof racks after use.
At the end of winter, remove snow tyres and refit your summer tyres.
Observe the recommendations on
maintenance
Check the tyre pressures regularly, when cold, referring to the label inthe door aperture, driver's side. Carry out this check in par ticular:
- before a long journey,
- at each change of season,
- after a long period out of use.
Don't forget the spare wheel and the tyres on any trailer or caravan.
Have your vehicle ser viced regularly (engine oil, oil filter, air filter...) andobser ve the schedule of operations recommended by the manufacturer.
When refuelling, do not continue after the 3 rd
cut-off of the nozzle toavoid any overflow.
At the wheel of your new vehicle, it is only after the first 1 800 miles (3 000 kilometres) that you will see the fuel consumption settle down toa consistent average.
Page 24 of 284

Monitoring
22
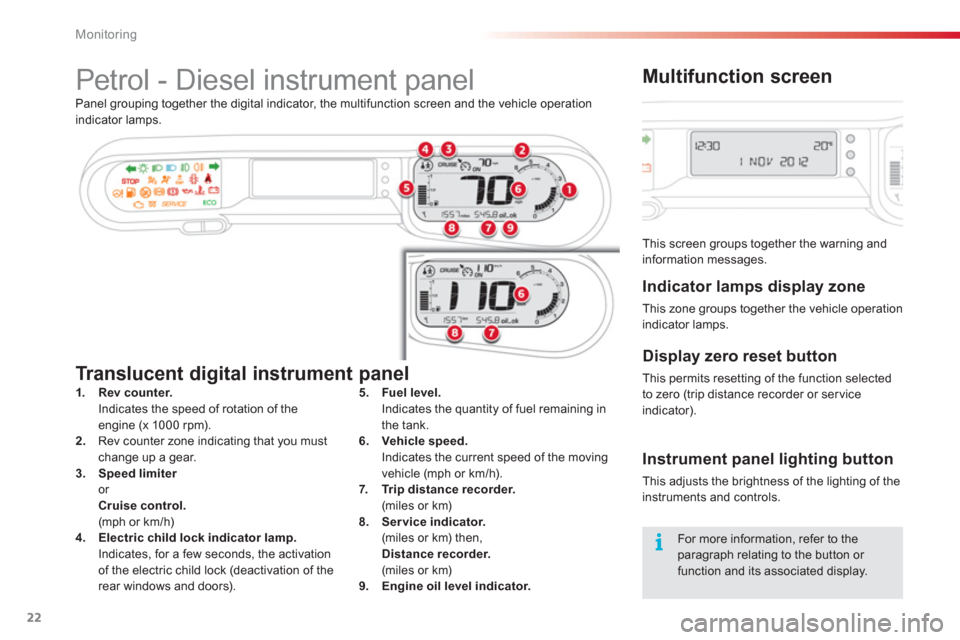
Petrol - Diesel instrument panel
Panel grouping together the digital indicator, the multifunction screen and the vehicle operation
indicator lamps.
1.Rev counter.Indicates the speed of rotation of the
engine (x 1000 rpm). 2. Rev counter zone indicating that you must change up a gear. 3.Speed limiteror
Cruise control.(mph or km/h)
4.Electric child lock indicator lamp.Indicates, for a few seconds, the activation
of the electric child lock (deactivation of the rear windows and doors).
Tr a n s l u c e n t d igital instrument panel
This screen groups together the warning and
information messages.
Multifunction screen
Indicator lamps display zone
This zone groups together the vehicle operation indicator lamps.
Display zero reset button
This permits resetting of the function selected
to zero (trip distance recorder or ser vice
indicator).
Instrument panel lighting button
This adjusts the brightness of the lighting of theinstruments and controls. 5
.Fuel level. Indicates the quantity of fuel remaining in
the tank.
6.Vehicle speed. Indicates the current speed of the moving
vehicle (mph or km/h).
7.Trip distance recorder. (miles or km) 8. Ser vice indicator.
(miles or km) then, Distance recorder. (miles or km) 9.Engine oil level indicator.
For more information, refer to the paragraph relating to the button or function and its associated display.