2011 VOLKSWAGEN TRANSPORTER turn signal bulb
[x] Cancel search: turn signal bulbPage 439 of 486
The actions should only be carried out in the specified order·
311 Turn signal bulb
1. Observe and follow the instructions on the checklist ""page 433.
2. Open the bonnet.&. 350.
3. Remove the seating cap Q).
4. Release the connector@, and pull it off the bulb holder.
5. Turn the bulb holder@ anticlockwise as far as it will go and pull it out to the rear along with the bulb.
6. Push the bulb slightly into the bulb holder, turn it anti-clockwise, and pull it out straight.
7. Replace the defective bulb with a new bulb of the same type (see the last line in the table "Bulbs").
8. Insert the bulb holder into the headlight and turn it clockwise as far as it will go.
9. Fit the sealing cap.
Bulb H21W
m The illustrations show the left-hand LED W headlight from behind. The right-hand LED headlight is a mirror image of the one shown.
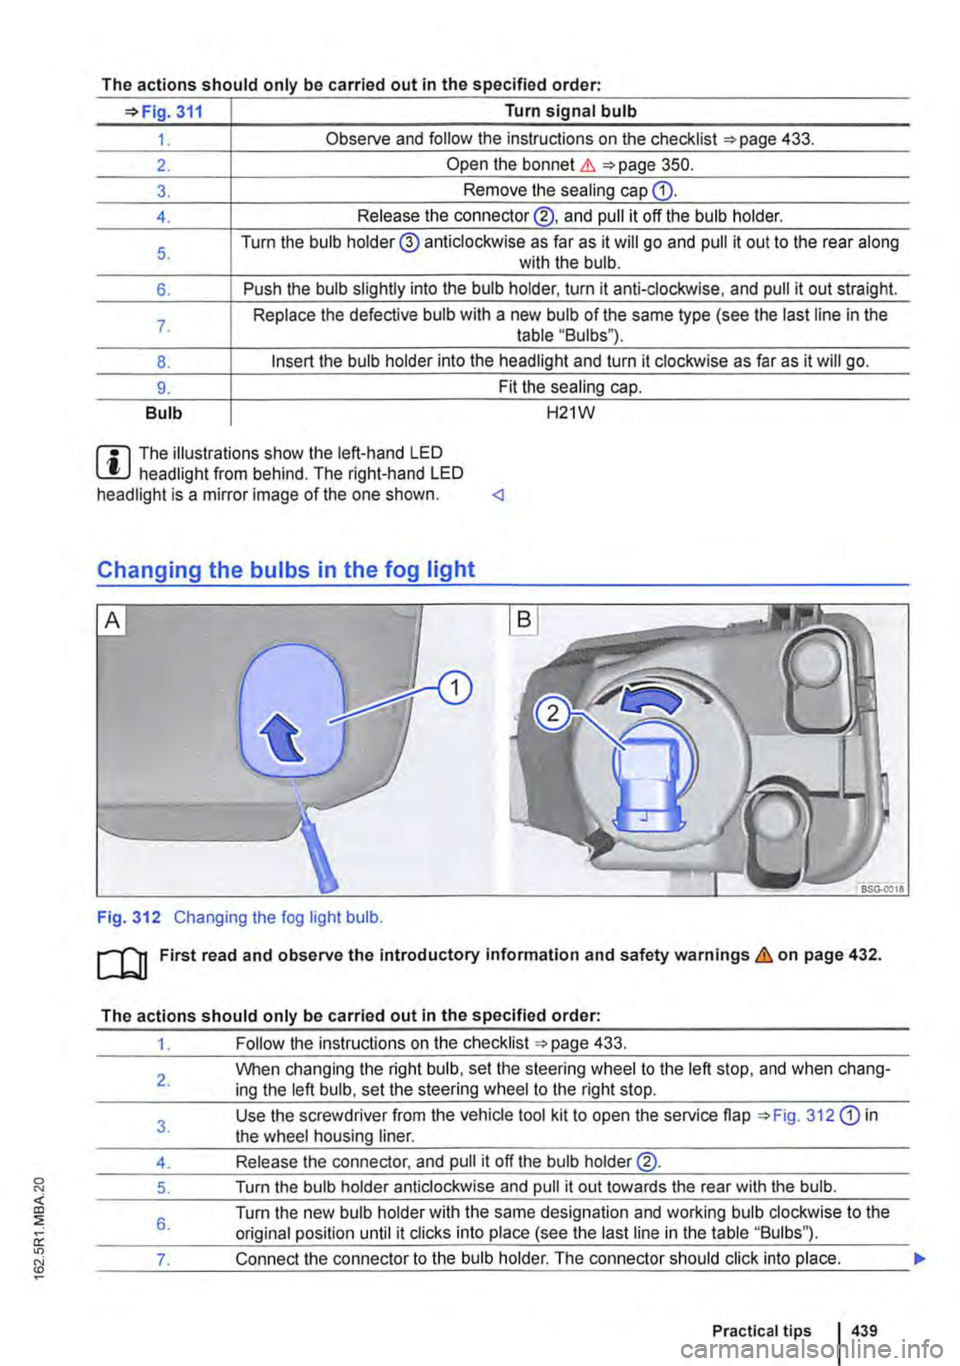
Fig. 312 Changing the fog light bulb.
m First read and observe the introductory information and safety warnings & on page 432.
The actions should only be carried out in the specified order:
1. Follow the instructions on the checklist 433.
2.
3.
4.
5.
6.
When changing the right bulb, set the steering wheel to the left stop, and when chang-ing the left bulb, set the steering wheel to the right stop.
Use the screwdriver from the vehicle tool kit to open the service flap 312 Q) in the wheel housing liner.
Release the connector, and pull it off the bulb holder@.
Turn the bulb holder anticlockwise and pull it out towards the rear with the bulb.
Turn the new bulb holder with the same designation and working bulb clockwise to the original position until it clicks into place (see the last line in the table "Bulbs").
__ ___:7...:.. ___ ..::.sh...:.o:...:u:....ld::.....:.c:...:lic.::.k:....i:....nt.:..:.o-"p-'-la:....c:..:e...:.. ___
Practical tips 439
Page 440 of 486
![VOLKSWAGEN TRANSPORTER 2011 Owners Manual The actions should only be carried out in the specified order:
8. Close the service flap CD in the wheel housing liner.
Bulb H11 <]
Fig. 313 Changing the tail light bulbs.
ro First read and observ VOLKSWAGEN TRANSPORTER 2011 Owners Manual The actions should only be carried out in the specified order:
8. Close the service flap CD in the wheel housing liner.
Bulb H11 <]
Fig. 313 Changing the tail light bulbs.
ro First read and observ](/manual-img/18/55786/w960_55786-439.png)
The actions should only be carried out in the specified order:
8. Close the service flap CD in the wheel housing liner.
Bulb H11 <]
Fig. 313 Changing the tail light bulbs.
ro First read and observe the introductory Information and safety warnings & on page 432.
The actions should only be carried out in the specified order:
Brake light/tail Rear fog light bulb '*Fig. 313 Tail light bulb Turn signal bulb light bulb or reversing light bulb
1. Observe and follow the instructions on the checklist =>page 433.
2. Unscrew the two securing bolts G).
3. Push the tail light cluster towards the outside out of the mounting, release the connec-tor, and pull it off the bulb holder.
4. Unscrew the four securing bolts@, and pull the bulb holder@ out of the tail light cl us-ter.
Push the bulb® Push the bulb 0 Pull the bulb@ Pull the bulb ® slightly into the bulb slightly into the bulb 5. straight out of the straight out of the holder, turn it anti-holder, turn it anti-bulb holder. bulb holder. clockwise, and pull it clockwise, and pull it out straight. out straight.
6. Replace the defective bulb with a new bulb of the same type (see the last line in the table "Bulbs").
7. Insert the bulb holder into the tail light cluster and tighten the bolts.
8. Carefully insert the tail light cluster into the body so that it is flush with the vehicle body-work, and tighten the bolts.
Bulb W5W I W16W I P21/4W I H21Wor P21W <]
440 I If and whon
Page 441 of 486
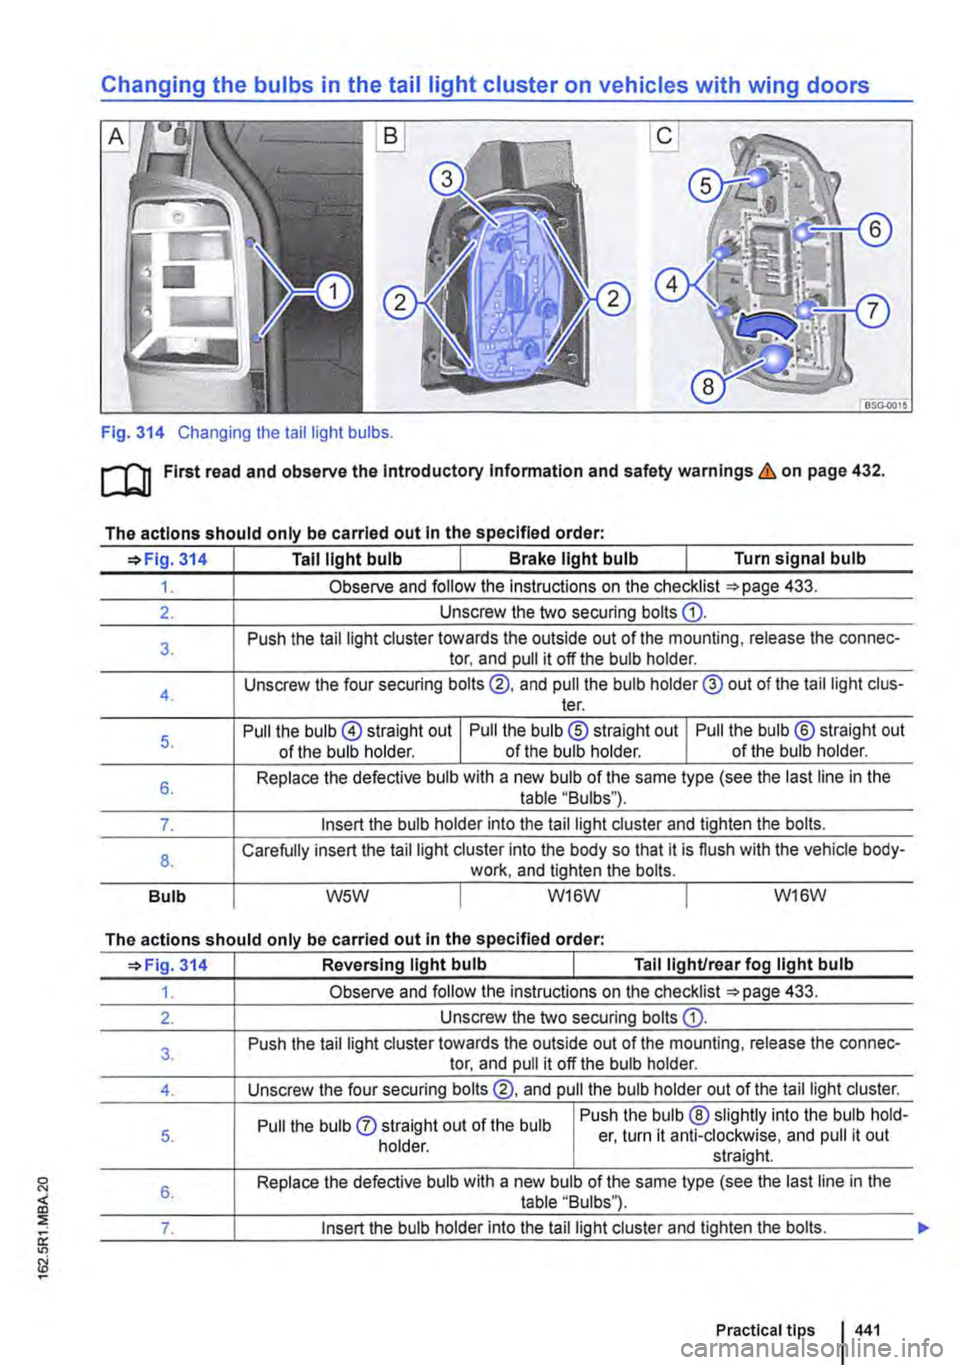
Changing the bulbs in the tail light cluster on vehicles with wing doors
Fig. 314 Changing the tail light bulbs.
ru First read and observe the Introductory Information and safety warnings&, on page 432.
The actions should only be carried out In the specified order:
'*Fig. 314 Tall light bulb 1 Brake light bulb I Turn signal bulb
1. Observe and follow the instructions on the checklist =:-page 433.
2. Unscrew the two securing bolts G).
3. Push the tail light cluster towards the outside out of the mounting, release the connec-tor, and pull it off the bulb holder.
4. Unscrew the four securing bolts®. and pull the bulb holder@ out of the tail light cl us-ter.
5. Pull the bulb @ straight out I Pull the bulb ® straight out I Pull the bulb ® straight out of the bulb holder. of the bulb holder. of the bulb holder.
6. Replace the defective bulb with a new bulb of the same type (see the last line in the table "Bulbs").
7. Insert the bulb holder into the tail light cluster and tighten the bolts.
8. Carefully insert the tail light cluster into the body so that it is flush with the vehicle body-work, and tighten the bolts.
Bulb wsw I W16W I W16W
The actions should only be carried out In the specified order:
'*Fig. 314 Reversing light bulb Tall light/rear fog light bulb
1. Observe and follow the instructions on the checklist =:-page 433.
2. Unscrew the two securing bolts G).
3. Push the tail light cluster towards the outside out of the mounting, release the connec-tor, and pull it off the bulb holder.
4. Unscrew the four securing bolts ®. and pull the bulb holder out of the tail light cluster.
Pull the bulb 0 straight out of the bulb Push the bulb ®slightly into the bulb hold-5. er, turn it anti-clockwise, and pull it out holder. straight.
6. Replace the defective bulb with a new bulb of the same type (see the last line in the table "Bulbs").
7. Insert the bulb holder into the tail light cluster and tighten the bolts.
Practical tips 441
Page 442 of 486
The actions should only be carried out in the specified order:
=>Fig. 314 Reversing light bulb Tail lighUrear fog light bulb
8.
Bulb
Carefully insert the tail light cluster into the body so that it is flush with the vehicle body-work, and tighten the bolts.
P21W P21/4W
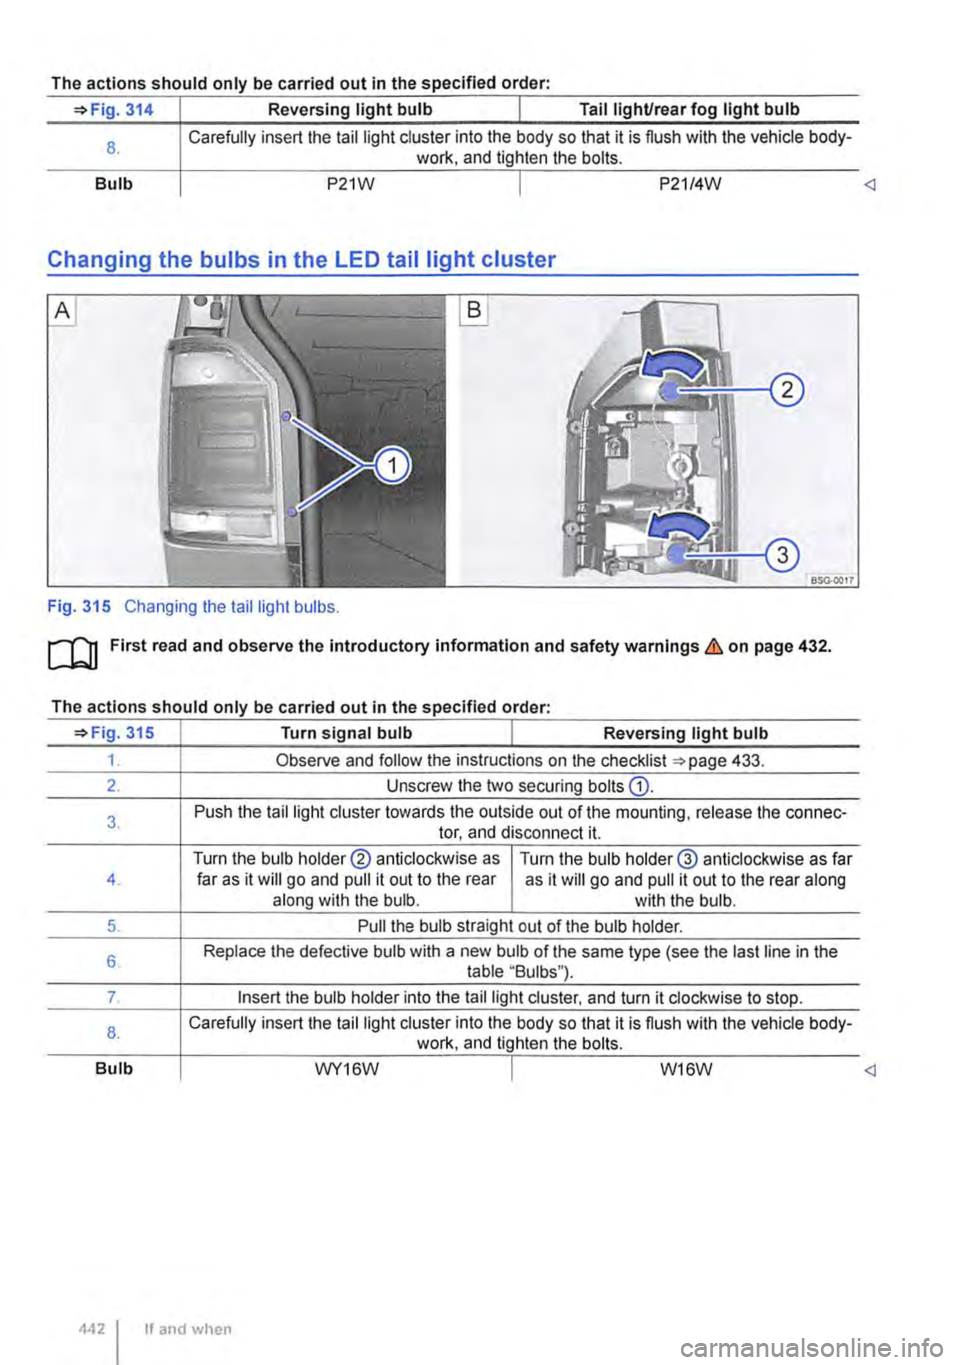
Changing the bulbs in the LED tail light cluster
BSG-0017
Fig. 315 Changing the tail light bulbs.
[Q] First read and observe the introductory information and safety warnings & on page 432.
The actions should only be carried out in the specified order:
=>Fig 315 I Turn signal bulb I Reversing light bulb
1. Observe and follow the instructions on the checklist =>page 433.
2. Unscrew the two securing bolts G).
3. Push the tail light cluster towards the outside out of the mounting, release the connec-tor, and disconnect it.
Turn the bulb holder@ anticlockwise as Tu m the bulb holder@ anticlockwise as far 4. far as it will go and pull it out to the rear as it will go and pull it out to the rear along along with the bulb. with the bulb.
5. Pull the bulb straight out of the bulb holder.
6. Replace the defective bulb with a new bulb of the same type (see the last line in the table "Bulbs").
7. Insert the bulb holder into the tail light cluster, and turn it clockwise to stop.
8. Carefully insert the tail light cluster into the body so that it is flush with the vehicle body-work, and tighten the bolts.
Bulb WY16W I W16W
If and when
Page 443 of 486
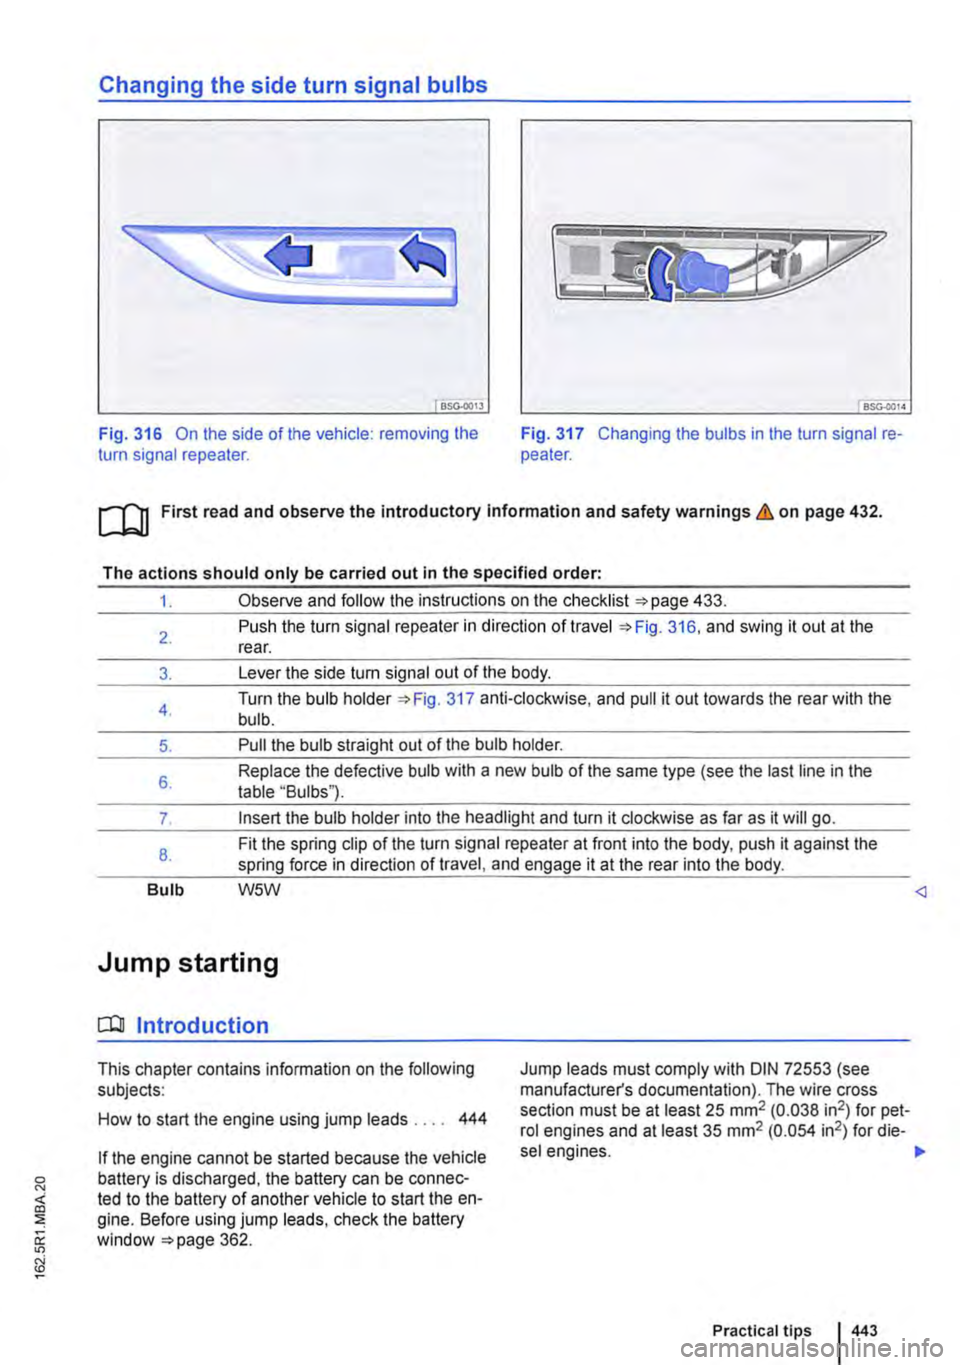
Changing the side turn signal bulbs
BSG-0013
Fig. 316 On the side of the vehicle: removing the turn signal repeater. Fig. 317 Changing the bulbs in the turn signal re-peater.
ro First read and observe the introductory Information and safety warnings & on page 432.
The actions should only be carried out in the specified order:
1. Observe and follow the instructions on the checklist 433.
2.
3.
4.
5.
6.
7.
8.
Bulb
Push the turn signal repeater in direction of travel 316, and swing it out at the rear.
Lever the side turn signal out of the body.
Turn the bulb holder 317 anti-clockwise, and pull it out towards the rear with the bulb.
Pull the bulb straight out of the bulb holder.
Replace the defective bulb with a new bulb of the same type (see the last line in the table "Bulbs").
Insert the bulb holder into the headlight and turn it clockwise as far as it will go.
Fit the spring clip of the turn signal repeater at front into the body, push it against the spring force in direction of travel, and engage it at the rear into the body.
W5W
Jump starting
CQJ Introduction
This chapter contains information on the following subjects:
How to start the engine using jump leads . . . . 444
Jump leads must comply with DIN 72553 (see manufacturer's documentation). The wire cross section must be at least 25 mm2 (0.038 in2) for pet-rol engines and at least 35 mm2 (0.054 in2) for die-
sel engines. ,..
Practical tips 443
Page 468 of 486
ccs ................................ 295
Central control panel, California . . . . . . . . 204 Cleaning the display . . . . . . . . . . . . . . . . . 254 Controls . . . . . . . . . . . . . . . . . . . . . . . . . . 204 Countdown timer . . . . . . . . . . . . . . . . . . . 207 Display . . . . . . . . . . . . . . . . . . . . . . . . . . . 205 Malfunction . . . . . . . . . . . . . . . . . . . • . . . . 206 Menu structure . . . . . . . . . . . . . . . . . . . . . 206 Programming the wake up time . . . • . . . . 207 Warning messages . . . . . . . . . . . . . . . . . 206
Central locking button . . . . . . . . . . . . . . . . . 42
Central locking system . . . . . . . . . . . . . . . . . 39 Anti-theft alarm . . . . . . . . • . . . . . . . . . . • . . 43 Central locking button . . . . . . . . . . . . . • . . 42 Description . . . . . . . . . . . . . . . . . . . . . . . . . 40 Locking from outside . . . . . . . . . . . . . . . . . 40 Locking or unlocking from inside . . . . . . . . 42 SAFELOCK mechanism . . . . . . . . . . . . . . 42 Single door opening . . . . . . . . . . . . . . . . . . 40 Unlocking from outside . . . . . . . . . . . . . . . 40
Central table Base position . . . . . . . . . . . . . . . • . . . . . . 157 Filling . . . . . . . . . . . . . . . . . . . . . . . . . . . . 158 Lowering the table module . . . . . • . . . . . . 157 Moving . . . . . . . . . . . . . . . . . . . . . . . . . . . 157 Moving the table module . . . . . . • . . . . . . 157 Opening the table surfaces . . . . . . . • . . . 157 Raising the table module . . . . . . . . . . . . . 157 Removing . . . . . . . . . . . . . . . . . . . . . . . . . 158
Centre armrest 3-seat bench . . . . . . . . . . . . . . . . . . • . . . . 78
Centre console, comfort version . . . . . . . . . 13
Centre console, standard version . . . . . . . . 12
Changing a wheel . . . . . . . . . . . . . . . . • . . . 420 After changing a wheel . . . . . . . . • . . . . . 425 Changing a wheel . . . . . . . . . . . . . . . . . . 424 Lifting the vehicle . . . . . . . . . . . . . . . . . . . 423 More than one damaged tyre . . . . . . . . . . 420 Preparation . . . . . . . . . . . . . . . . . . . . . . . 420 Wheel bolts . . . . . • . . . . . . . . . . . . . . . . . 421
Changing bulbs . . . . . . . . . . . . . . . . . . . . . . 432 Checklist . . . . . . . . . . . . . . . . . . . . . . . . . 433 Daytime running light in H4 halogen head-lights . . . . . . . . . . . . . . . . . . . . . . . . . . . 435 Daytime running light in H7 halogen head-lights . . . . . . . . . . . . . . . . . . . . . . . . . . . 437 Dipped beam in H4 halogen headlights . . 435 Dipped beam In H7 halogen headlights . . 437 Fog light . . . . . . . . . . . . . . . . . . . . . . . . . . 439 Indicator lamp . . . . . . . . . . . . . . . . . . . . . 433 In front bumper . . . . . . . . . . . . . . . . . . . . . 439 in H4 halogen headlights . . . . . . . . . . • . . 435 in H7 halogen headlights . . . . . . . . . . . . . 437 in the LED headlight . . . . . . . . . . . . . . . . . 438 LED headlights . . . . . . . . . . • . . . . . . . . . . 434 LED tail light cluster . . . . . . • . . . . . . . . . . 442 LED tail lights . . . . . . . . • . . . . . . . . . . . . . 434
468 I Index
Main beam in H4 halogen headlights . . . . 435 Main beam in H7 halogen headlights . . . . 437 Number plate light . . . . . . . . . . . . . . . . . . 434 Preparation . . . . . . . . . . . . . . . . . . . . . . . 433 Side light in H4 halogen headlights . . . . . 435 Side light in H7 halogen headlights . . . . . 437 Side turn signal . . . . . . . . . . . . . . . . . . . . 443 Tail light cluster on vehicles with tailgate . 440 Tail light cluster on vehicles with wing doors . . . . . . . . . . . . . . . . . . . . . . . . . . . 441 Tail lights with LEDs . . . . . . . . . . . . . . . . . 442 Turn signal bulb in the LED headlight . . . 438 Turn signal light in H4 halogen headlights 435 Turn signal light in H7 halogen headlights 437
Changing gear DSG dual clutch gearbox . . . . . . . . . . . . . 264 Gear-change indicator . . . . . . . . . . . . . . . 268 Selecting a gear (dual clutch gearbox) . . 264 Unlocking the selector lever lock manually .4.15 Warning and indicator lamps . . . . . . . . . . 261 With Tiptronic . . . . . . . . . . . . . . . . . . • . . . 266
Changing gears . . . . . . . . . . . . . . . . . . . . . . 260 Manual gearbox . . . . . . . . . . . . . . . . . . . . 263 Selecting a gear (manual gearbox) . . . . . 263
Charger.. . . . . . . . . . . . . . . . . . . . . . . . . . . . 247
Chassis number . . . . . . . . . . . . . . • . . . . . . 451
Checking the oil level . . . . . . . . . . . . . . . . . 356
Checklist Before working in the engine compartment .352 Breakdown set . . . . . . . . . . . . . . . . . . . . . 427 Broken down . . . . . . . . . . . . . . . . • . . . . . 412 Changing bulbs . . . . . . . . . . . . . . . . . . . . 433 Checking the engine oil level . . . . . . . . . . 356 Checks when filling the tank . . . . . . . . . . 343 Driving abroad . . . . . . . . . . . . . . . • . . . . . . 34 Driving safely . . . . . . . . . . . . . . . . . . . 33, 252 Emergency . . . . . . . . . . . . . . . . . . . . . . . . 412 Lifting the vehicle with the jack . . . . . . . . 423 Preparation for a journey . . . . . . . . . . 33, 252 Preparation for changing a wheel . . . . . . 420 Refilling the engine oil . . . . . . . . . . . . . . . 356 Seat belts . . . . . . . . . . . . . . . . . . . . . . . . . . 83 Seat covers . . . . . . . . . . . . . . . . . . . . . . . 389
Checks when filling the tank . . . . . . . . . . . 343
Childproof lock . . . . . . . . . . . . . . . . . . . . . . 255 Sliding doors . . . . . . . . . . . . . . . . . . . . . . . 48 Tailgate . . . . . . . . . . . . . . . . . . . . . . . . . . . . 52 Wing doors . . . . . . . . . . . . . . . . . . . . . . • . . 55
Child seat . . . . . . . . . . . . . . . . . . . . . . . . . . . . 96 Airbag sticker . . . . . . . . . . . . . . . . . • . . . . . 97 Approval categories . . . . . . . . . . . . . . . . . . 99 Integrated child seat . . . . . . . . . . . . . . . . . 102 Securing systems . . . . . . . . . . . . . . . . . . . . 99 Securing with a lockable seat bell . . . . . . 102 Securing with a seat belt . . . . . . . . . . . . . 102 Securing with ISO FIX . . . . . . . . . . . . . . . . 100 Securing with the top tether strap . . . . . . 101
Page 476 of 486
Fitting opaque shades for the windscreen and the rear window . . . . . . . . . . . . . . . 177 Fitting the opaque shades to the side win-dows . . . . . . . . . . . . . . . . . . . . . . . . . . . 178 Opaque shades, Multivan Removing and stowing ........... , . . . 179
Opening Doors . . . . . . . . . . . . . . . . . . . . . • . . . . . . . 45 Electric sliding door . . . . . . . . . . . . . . . . . . 47 Sliding/tilting roof . . . . . . . . . . . . . . . . . . . . 59 Sliding door . . . . . . . . • . . . . . . . . . . . . . . . 46 Sliding windows . . . . . . . . . . . . . . . . . . . . . 58 Tailgate . . . . . . . . . . . . . . . . . . . . . . . . . . . . 50 Vehicle . . . . . . . . . . . . • . . . . . . . . . . . . 40, 42 Windows .......................... 56 Wing doors . . . . . . . . . . . . . . . . . . . . . • . . . 53
Outside temperature display . . . . . . . . . . . . 21 Black ice warning . . . . . . . . . . . . . . . . . . . . 21 Overview Centre console, comfort version . . . . . . . . 13 Centre console, standard version . . . . . . . 12 Driver door . . . . . . . . . . . . . . . . . . . . . . . . . . 9 Driver side . . . . . . . . . . . . . . . . . . . . . . . . . 10 Front passenger side . . . . . . . . . . . .. . • . . 14 Front view . . . . . . . . . . . . . . . . . . . . . . • . . . 6 Headliner .................... , . . • . . 15 Indicator lamps . . . . . . . . . . . . . . . . . . . . . . 16 Instruments . . . . . . . . . . . . . . . . . . . . . . . . 20 Menu structure . . . . . . . . . . . . . . • . . . . . . . 25 Rear view (with tailgate) . . . . . . . . . . . . . . . . 7 Rear view (with wing doors) . . . . . . . • . . . . . 8 Side view ........................... 5 Turn signal and main beam lever . . . . . . . 107 Warning lamps . . . . . . . . . . . . . . . . . • . . . . 16
Overview of indicator lamps . . . . . . . . . . . . 16
Overview of seats . . . . . . . . . . . • . . . . . . . . . 64
Overview of warning lamps ... , . . . . . . . . . 16
p
Pairing Rear-seat telephony... . . . . . . . . . . . . . . 190 Pairing mobile telephone Rear-seat telephony................. 190
Parking . . . . . . . . . . . . . . . . . . . . . . . . . 269, 272 Using the rear view camera system . . . . . 295
Parking aid see ParkPilot . . . . . . . . . . . . . . • . . . . . . . 287
Parking aid (front and rear) . . . . . . . . . . . . 289
Parking aid (only at rear) . . . . . . . . . . . . . . 288
Parking distance warning system see ParkPilot . . . . . . . . . . . . . . . . . . . . . . 287
Parking light..... . . . . . . . . . . • . . . . . . . . . 109
ParkPIIot . . . . . . . . . . . . . . . . . . . . . . . . . . . . 287 Fault . . . . . . . . . . . . . . . . . . . . . . . . . 288. 289 Signal tones and screen display . . . . . . . 290
476 I Index
Using a high-pressure cleaner . . . . . . . . . 382 Wilh trailer . . . . . . . . . . . . . . . . . . . . 288, 290
ParkPilot (front and rear) . . . . . . . . . . . . . . 289
ParkPilot (only at rear) . . . . . . . . . . . . . . . . 288
Pedals . . . . . . . . . . . . . . . . . . . . • . . • . . . 63, 262
Performance figures . . . . . . . . . . . . . . . . . . 450
Petrol . . . . . . . . . . . . . . . . . . • . . . . . . . . . . . 344 Additives . . . . . . . • . . . . . . . . . . . . . . • . . 344 Filling the tank . . . • . . . . . • . . . . . . . . • . . 342 Fuel ..........................•.. 344 Fuel gauge . . . . . . . . . . . . • . . • . . . . . • . . 341 Types . . . . . . . . . . . . . . . . . . . . . . . . . . . . 344
Petrol engines Technical data . . . . • . . . . . . . . . . . . . . . . 453
Plates . . . . . . . . . . . . . . . . . . . . . . . . . . . . . . 405
Plenum chamber . . . . . . . • . . . . . . . . • . . . . 387
Polishing . . . . . . . . . . . . . • . . . . . . . . . . . . . 384
Pollen filter . . . . . . . . . . . . . . . . . . . . . . . . . . 322
Pollution filter . . . . . . . . . . . . • . . • . . . . . . . 322
Pop-up roof Closing electrically . . . . . . . . . . . . . . . . . . 223 Closing manually . . . . . . . . . . . . . . . . . . . 220 Electric pop-up roof, California . . . . . . . . . 221 Interior lights . . . . . . . . . . . . . . . . . . . . . . 210 Manual pop-up roof, California......... 218 Opening electrically . . . . . . . . . . . . . . . . . 222 Opening manually . . . . . . . . . . . . . . . . . . 219 Pop-up roof bed . . . . . . . . . . • . . • . . 219, 222 Safety net..................... 219, 222 Windows in canvas . . . . . . . . . . . . . . . . . 222
Pop-up roof bed . . . . . . . . . . . . . . . . . . 219, 222 Safety net . . . . . . . . . . . . . • . . . . . . . 219, 222
Power closing . . . . . • . . • . . . . . • . . . . . . . . . 50
Power steering . . . . . . . . . . . . . . . . . . . . . . . 281
Preheatlng . . . . . . . . . . . . . . . . . • . . . . . . . . 258
Preparation Before every trip . . . . . . . . . . . . . . . . . . . . . 33 Breakdown set . . . . . . . . . . . . . . . . . . . . . 427 Changing a wheel . . . . . . . . . . . . . • . . . . 420 Changing bulbs . . . . . . . . . . . . . . . • . . . . 433 Checking the coolant level . . . . . . . . . . . . 361 Checking the engine oil level . . . . . . . . . . 356 Refilling coolant . . . . . . . . . . . . . . . . . . . . 361 Refilling engine oil . . . . . . . . . . . . . . . . . . 356 Vehicle battery . . . . . . . . . . . . . . . . . . . . . 364 Working in the engine compartment . . . . 352
Preparing for a journey . . . . . . . . . . . . . . . . . 33 Private mode Rear-seat telephony . . . . . . . . . . . . . . . . . 191
Problem solving...................... 410
Programming the wake up time Central control panel, California . . . . . . . . 207
Protection from the sun . . . . . . . . . . . . . . . . 115
Pull-away assist systems Indicator lamps . . . . . . . . . . . . . . . . . . . . . 282 Warning lamps . . . . . . . . . . . . . . . . . . . . . 282