2011 VOLKSWAGEN TRANSPORTER brake
[x] Cancel search: brakePage 7 of 486

Rear view (vehicles with tailgate)
Fig. 3 Overview of rear with tailgate.
Key to Fig. 3:
CD High-mounted brake light
@ Rear window
-Rear window heating ........................ .
@ Rear wiper .................................. .
@ Tailgate . . . . ............... .
-Number plate lights ......................... .
® Tail light cluster ............................................ .
®
0
®
®
®
Lever for opening the tailgate .................................................... .
Rear ParkPilot sensors ............. .
Towing bracket1> ........................•................•••.••••.•............•
Rear number plate holder
Reversing camera (Rear Assist) ................................•..................
I) On vehicles without towing bracket, there is a fixed towing eye under the rear bumper cover on the right side.
322
116
49
432
106,432
49
287
139
291
Page 8 of 486

Rear view (vehicles with wing doors)
Fig. 4 Overview of rear with wing doors.
Key to Fig. 3:
G) High-level brake lights
® Rear windows
-Rear window heating ......................................................... .
@ Rear wiper ............................•.......................................
@
®
® Q)
®
®
®
®
Door arresters of wing doors .................... .
Tail light cluster ..................... .
Right wing door .....
Rear ParkPilot sensors
Towing bracket1> ..... .
Left wing door ................................ .
Rear number plate holder
Lock and lever for opening the wing doors as well as number plate lighting
11 On vehicles without towing bracket. there is a fixed towing eye under the rear bumper cover on the right side.
Overview of the vehicle
BSG.0074
322
116
52
106,432
52
287
139
52
52
Page 16 of 486

Instrument cluster
Warning and indicator lamps
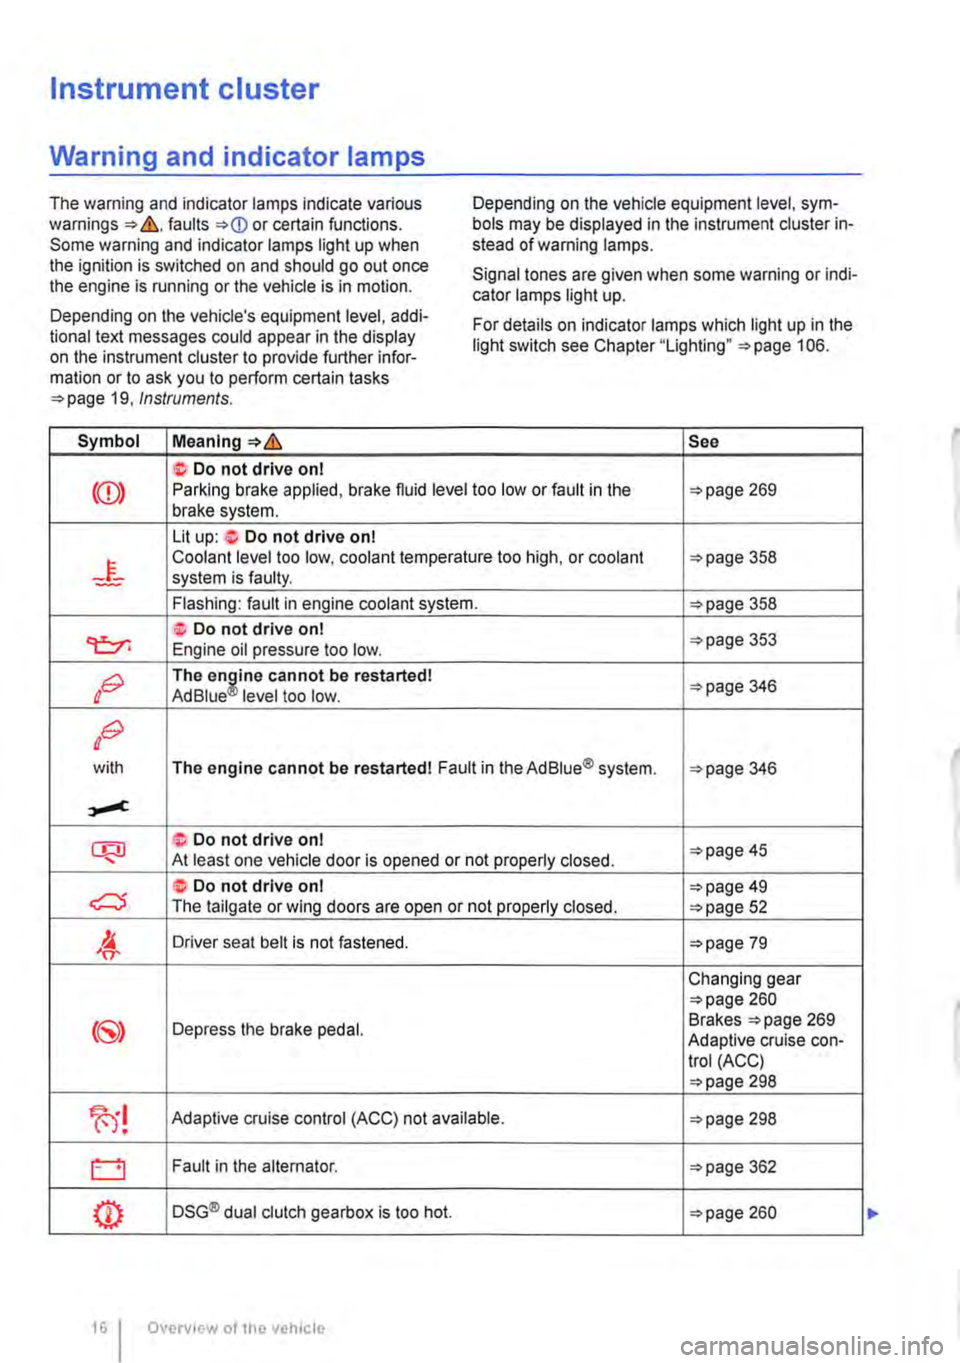
The warning and indicator lamps indicate various warnings ::.&.faults ::.(D or certain functions. Some warning and indicator lamps light up when the ignition is switched on and should go out once the engine is running or the vehicle is in motion.
Depending on the vehicle's equipment level, addi-tional text messages could appear in the display on the instrument cluster to provide further infor-mation or to ask you to perform certain tasks ::.page 19, Instruments.
Symbol Meaning=:>&
Do not drive on I
Depending on the vehicle equipment level, sym-bols may be displayed in the instrument cluster in-stead of warning lamps.
Signal tones are given when some warning or indi-cator lamps light up.
For details on indicator lamps which light up in the light switch see Chapter "Lighting" ::.page 106.
See
Lit up: ·i:-Do not drive ont
-F-Coolant level too low. coolant temperature too high, or coolant ::.page 358 system is faulty.
Flashing: fault in engine coolant system. ::.page 358
Do not drive ont ::.page 353 "t:::r. Engine oil pressure too low.
oG The en£ine cannot be restarted! AdBiue level too low. ::.page 346
oG
with The engine cannot be restarted! Fault in the Ad Blue® system. ::.page 346
CRl ::0 Do not drive on I ::.page 45 .... At least one vehicle door is opened or not properly closed .
c:::5 Do not drive on I ::.page 49 The tailgate or wing doors are open or not properly closed. ::.page 52
!6 'er Driver seat belt is not fastened. ::.page 79
Changing gear ::.page 260
({5)) Depress the brake pedal. Brakes ::.page 269 Adaptive cruise con-trol (ACC) ::.page 298
Adaptive cruise control (ACC) not available. ::.page 298
0 Fault in the alternator. ::.page 362
m DSG® dual clutch gearbox is too hot. ::.page 260
Overv1cw of the vehicle
Page 17 of 486

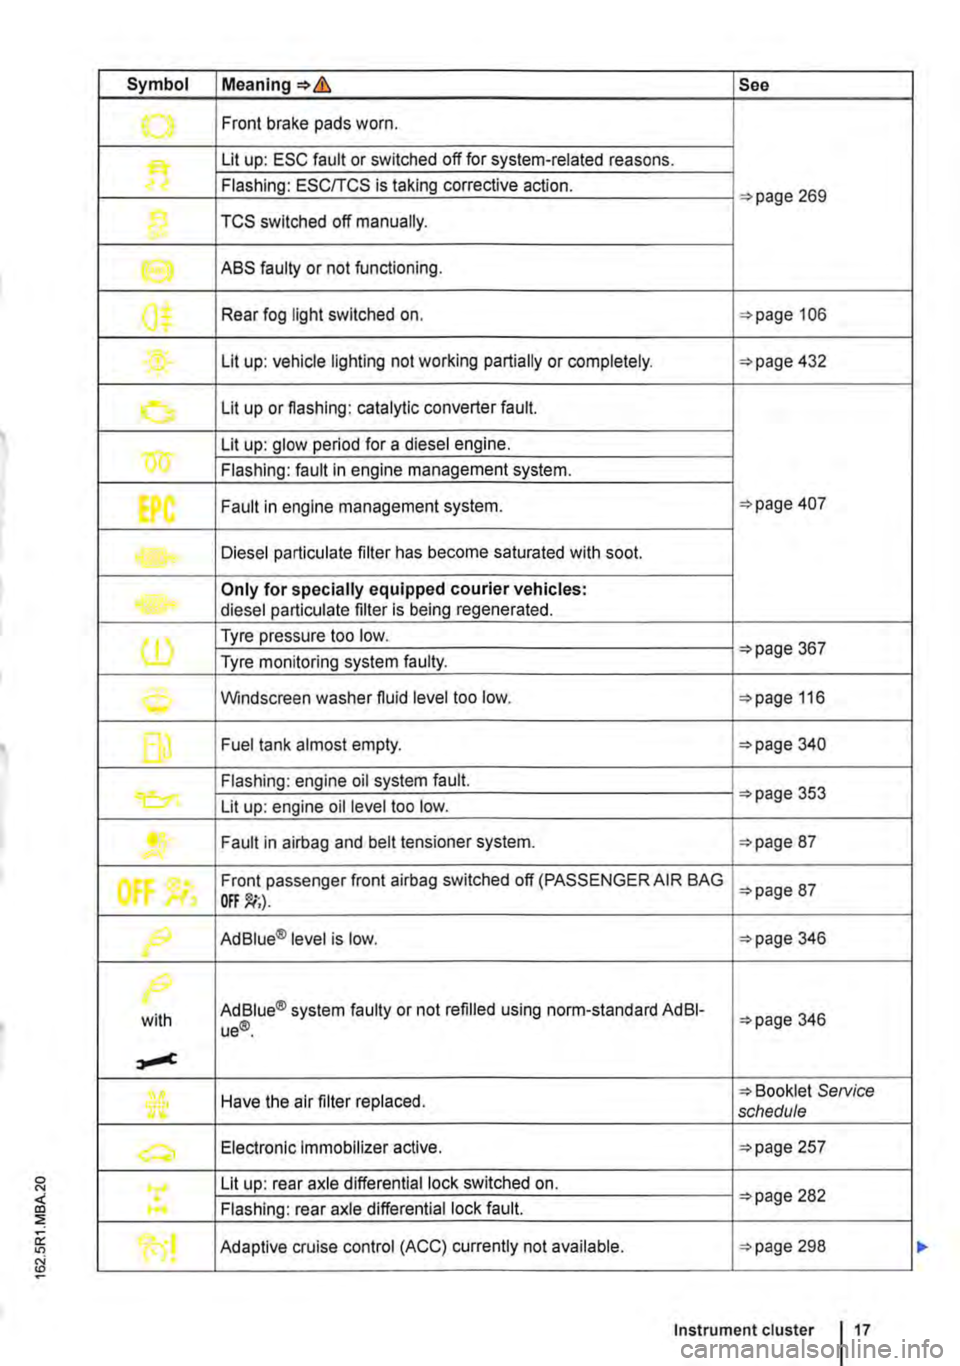
Symbol Meaning=>& See
.......,. Front brake pads worn .
Lit up: ESC fault or switched off for system-related reasons.
Flashing: ESC/TCS is taking corrective action. =>page 269
1} TCS switched off manually.
e ABS faulty or not functioning.
0$ Rear fog light switched on. =>page 106
Lit up: vehicle lighting not working partially or completely. =>page 432
0 Lit up or flashing: catalytic converter fault.
w Lit up: glow period for a diesel engine.
Flashing: fault in engine management system.
EPC Fault in engine management system. =>page 407
Diesel particulate filter has become saturated with soot.
Only for specially equipped courier vehicles: diesel particulate filter is being regenerated.
(1) Tyre pressure too low. =>page 367 Tyre monitoring system faulty.
0 Windscreen washer fluid level too low. =>page 116
f] Fuel tank almost empty. =>page 340
Flashing: engine oil system fault.
Lit up: engine oil level too low. =>page 353
....... Fault in airbag and belt tensioner system. =>page 87
tf'
Front passenger front airbag switched off (PASSENGER AIR BAG =>page 87
f9 Ad Blue® level is low. =>page 346
/>.
with Ad Blue® system faulty or not refilled using norm-standard AdBI-ue®. =>page 346
Have the air filter replaced. => Booklet SeNice schedule
a, Electronic Immobilizer active. =>page 257
Lit up: rear axle differential lock switched on. =>page 282 .... Flashing: rear axle differential lock fault.
Adaptive cruise control (ACC) currently not available. =>page 298
Instrument cluster 17
Page 18 of 486

Symbol Meaning=>& See
Lane change assist system currently not available. =>page 312 .
The fog light is switched on. =>page 106
.......,,...., Turn signal, left or right. =>page 106 r., Hazard warning lights switched on. =>page 411
Trailer turn signals in operation. =>page 139
Lit up: depress the brake pedal. Changing gear
CS» =>page 260 Flashing: the lock button in the selector lever is not engaged. Braking, stopping and parking =>page 269
The cruise control system (CCS) is controlling the speed. =>page 295
(") Adaptive cruise control (ACC) active. No vehicle has been detec-ted ahead. =>page 298
th. Lit up: Hill Descent Assist switched on. =>page 285 Flashing: the lock button in the selector lever is not engaged.
Main beam is switched on or the headlight flasher is being opera!-=>page 106 ed.
When displayed in white: Adaptive cruise control (ACC) active.
B'
Vehicle detected ahead.
When displayed in grey: Adaptive cruise control (ACC) not active. =>page 298
System switched on, does not regulate.
Main beam assist (Light Assist) is activated. =>page 110
Lit up: service interval display. =>page 22
,....c. Flashes alternately with selector lever display, e.g. 0: fault in dual clutch gearbox (DSG®. =>page 260
(A) The starUstop system is available, automatic engine stop is active.
The starUstop system is not available. =>page 282
(J9 OR: the starUstop system has switched off the engine automatical-ly.
*
Black ice warning. The outside temperature is below =>page 19 +4·c (+39.F).
® A mobile telephone is connected via Bluetooth to the factory-fitted => Booklet Radio, pro-provision for mobile telephone. vision for mobile tele-
Mobile telephone battery charge level. Only for factory-fitted provi-phone, infotainment system, navigation sion for mobile telephone. system
A WARNING A WARNING (Continued)
Failure to observe illuminated warning lamps and text messages can lead to your vehicle breaking down in traffic, and can cause acci-dent and serious injury.
• Never ignore any illuminated warning lamps or text messages.
Overv1ew of the vehicle
• Stop the vehicle as soon as possible and when safe to do so.
• Stop the vehicle at a safe distance away from moving traffic and ensure that no part of the exhaust system can come Into contact with any inflammable material underneath the vehicle, e.g. dry grass or fuel. ll>
Page 35 of 486

Driving through water on roads
r"f"'n First read and observe the introductory l-J,::.U information and safety warnings & on page 33.
Please follow these rules to help prevent damage to your vehicle when driving through water, for ex-ample if the road is flooded:
• Check the depth of the water before driving through it. The water level must be no higher than the lower edge of the vehicle body
• Do not drive faster than walking speed.
• Never stop the vehicle, reverse or switch off the engine while in water.
• Oncoming vehicles will create waves that could increase the water level for your vehicle to such an extent that it is not safe to drive through the water.
• Always switch off the start/stop system manual-ly when driving through water.
A wARNING
After driving through water, mud, slush etc., the brakes may react slowly and the braking distance will be increased as the brake discs and pads will be wet, or possibly iced up in winter.
• You can "dry and de-ice" the brakes by performing careful braking manoeuvres. Make sure that you do not endanger any oth-er road users or violate any legal regulations when doing so.
• Avoid abrupt and sudden braking ma-noeuvres directly after driving through water.
CD
• If you drive through water, parts of the vehi-cle, such as the engine, drive train, running gear and vehicle electrics, could sustain severe damage.
• Never drive through salt water as salt can cause corrosion. Rinse all components that have been exposed to salt water immediately with fresh water. <1
Before setting off 35
Page 46 of 486

Sliding doors
o:D Introduction
This chapter contains information on the following subjects:
Opening and closing a sliding door manually . 46 Opening and closing the sliding door electrically . . . . . . . . . . . . . . . . . . . . . . . . . . . 4 7 Roll-back function on the electric sliding doors . . . . . . . . . . . . . . . . . . . . . . . . . . . . . . . . . . 48 Child proof lock in the sliding door . . . . . . . . . 48
Additional information and warnings:
• Exterior views 5
• Vehicle key set 36
• Central locking system 39
• Manual opening and dosing 413
A WARNING
If the sliding door is not properly closed it could open suddenly while the vehicle is in motion. This could lead to severe injuries.
• Stop as soon as possible and close the sliding door.
A WARNING (Continued)
• Make sure that the sliding door Is properly closed and that the lock has engaged. The closed sliding door must be flush with the surrounding body panels.
• Sliding doors should only be opened or closed when you are sure that nobody Is in their operating area.
A WARNING
If the sliding door is not opened properly it could close suddenly. This could lead to se-vere injuries.
• Always open the sliding doors fully.
A WARNING
Opening sliding doors while the vehicle is In motion is dangerous. The sliding door could be automatically pushed open or closed when the vehicle accelerates and brakes. Risk of severe injury.
• Never open sliding doors while the vehicle is in motion.
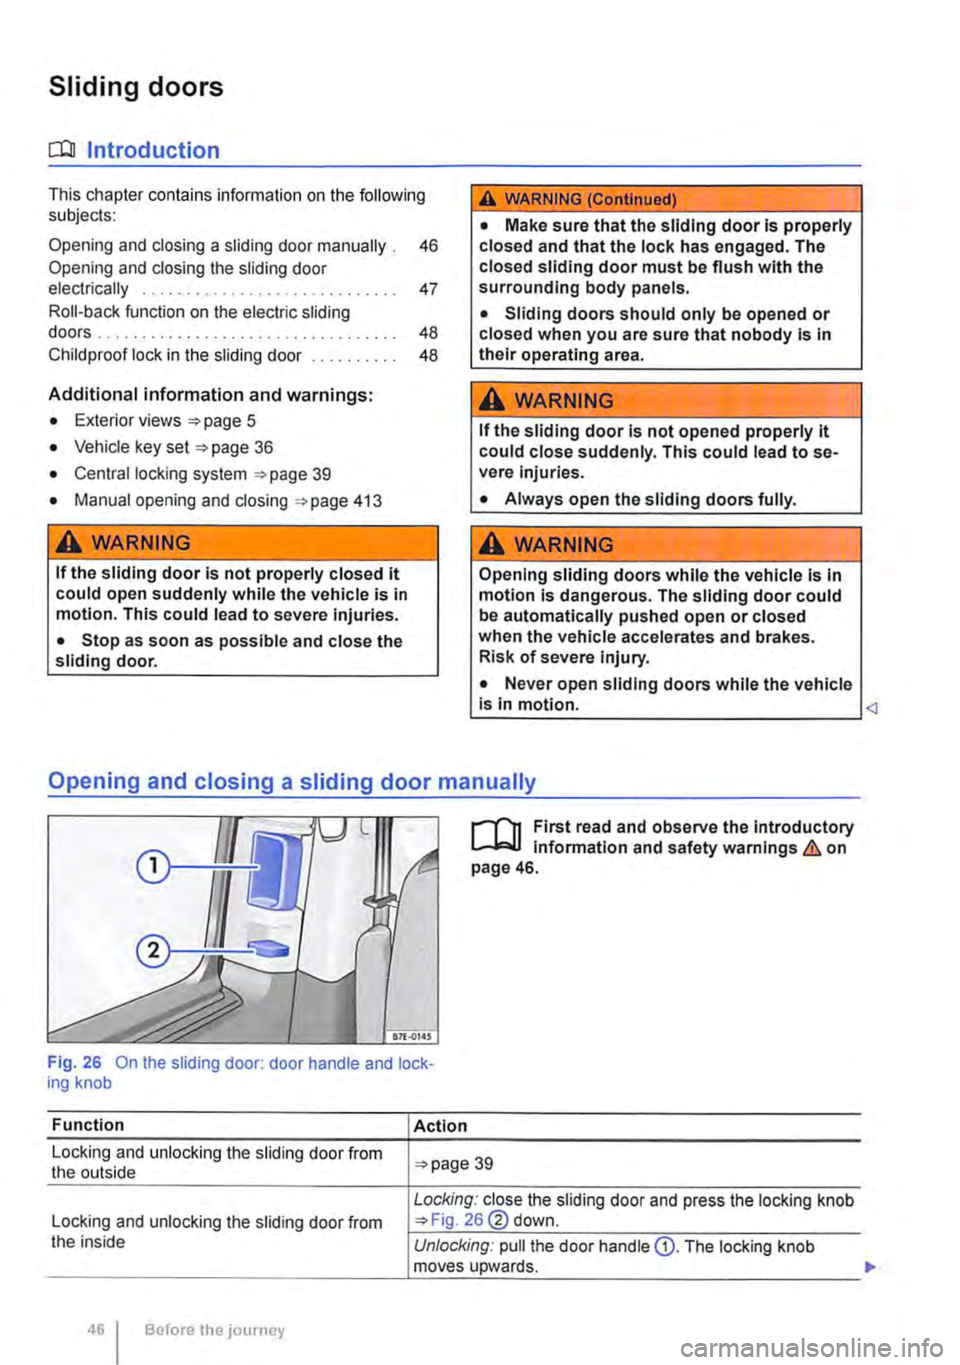
l'"'""("n First read and observe the Introductory L-J,...U Information and safety warnings & on page 46.
Fig. 26 On the sliding door: door handle and lock-ing knob
Function
Locking and unlocking the sliding door from the outside
Locking and unlocking the sliding door from the inside
Before the journey
Action
39
Locking: close the sliding door and press the locking knob 26@ down.
Unlocking: pull the door handle Q). The locking knob moves upwards. .,.
Page 70 of 486

• The seat cushion is damp or wet.
• The interior or exterior temperature is above 2s•c (7rF).
Function
Switching on
Adjusting the heating output
Switching off
Action 49
Press the 0 or (9 button. The seat heating is switched on at the highest setting. All indicator lamps light up.
Press the 0 or (9 button repeat-edly until the required heat level is set.
Press the button 0 or (9 until the indicator lamps in the button go out 49.
A WARNING
Anyone experiencing reduced sensitivity to pain or temperature due to medication, para-lysis or chronic illness (e.g. diabetes) could sustain burns on the back, buttocks and legs when using the seat heating. These burns may take a long time to heal or may never heal fully. Please consult a doctor to deter-mine your own level of health.
Memory seats
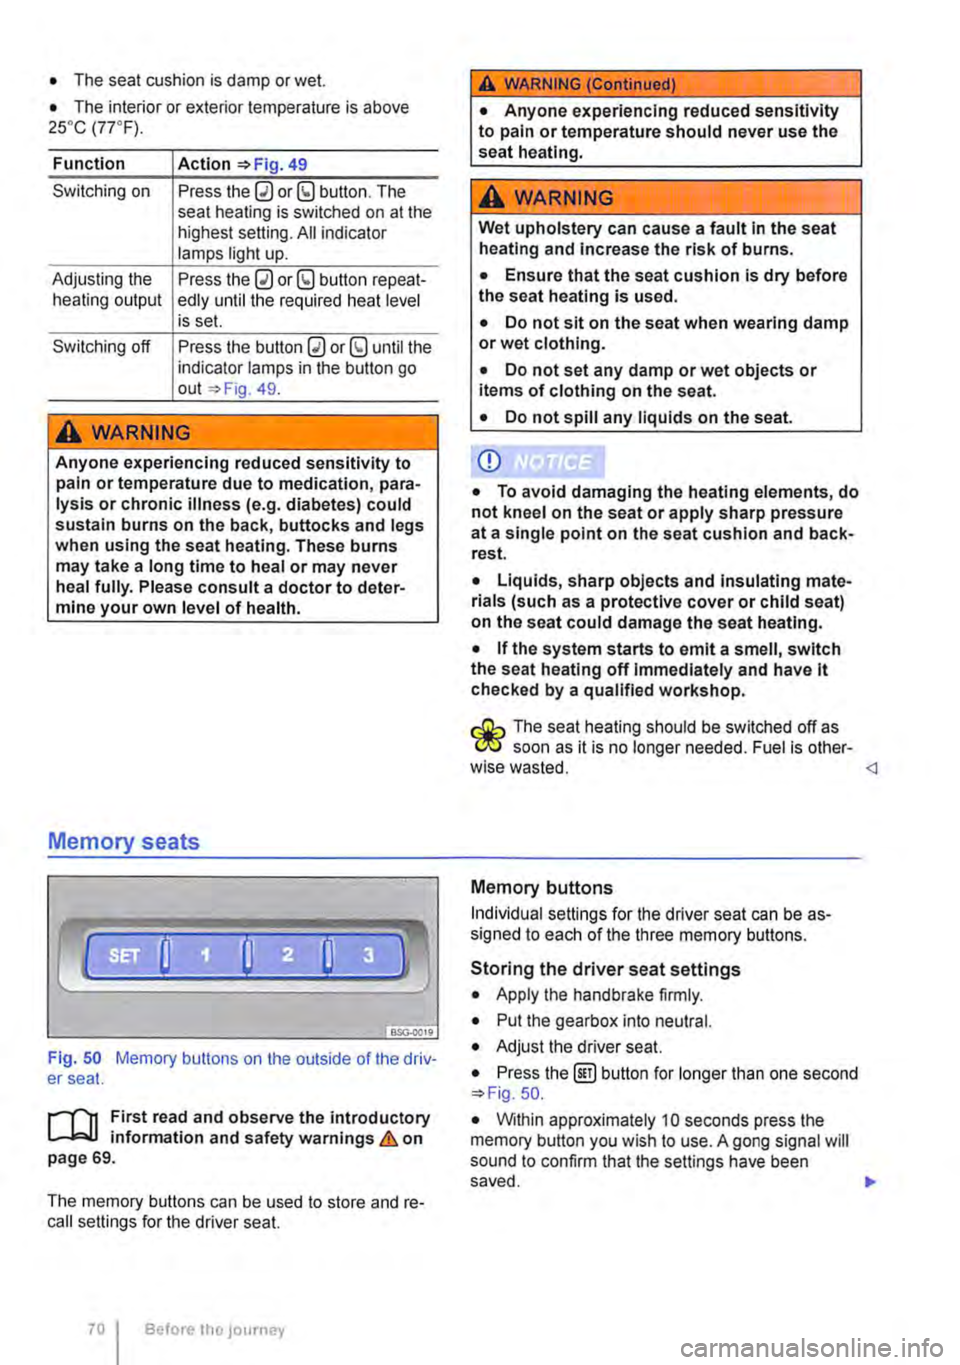
Fig. 50 Memory buttons on the outside of the driv-er seat.
r"''l1 First read and observe the introductory L-JcJ.I information and safety warnings & on page 69.
The memory buttons can be used to store and re-call settings for the driver seat.
Before the JOurney
A WARNING (Continued)
• Anyone experiencing reduced sensitivity to pain or temperature should never use the seat heating.
A wARNING
Wet upholstery can cause a fault In the seat heating and Increase the risk of burns.
• Ensure that the seat cushion is dry before the seat heating is used.
• Do not sit on the seat when wearing damp or wet clothing.
• Do not set any damp or wet objects or items of clothing on the seat.
• Do not spill any liquids on the seat.
Q)
• To avoid damaging the heating elements, do not kneel on the seat or apply sharp pressure at a single point on the seat cushion and back-rest.
• Liquids, sharp objects and Insulating mate-rials (such as a protective cover or child seat) on the seat could damage the seat heating.
• If the system starts to emit a smell, switch the seat heating off Immediately and have lt checked by a qualified workshop.
r:O:-, The seat heating should be switched off as C!JtJ soon as it is no longer needed. Fuel is other-wise wasted.
Individual settings for the driver seat can be as-signed to each of the three memory buttons.
Storing the driver seat settings
• Apply the handbrake firmly.
• Put the gearbox into neutral.
• Adjust the driver seat.
• Press the @] button for longer than one second 50.
• Within approximately 10 seconds press the memory button you wish to use. A gong signal will sound to confirm that the settings have been saved. .,..