2011 TOYOTA VERSO S ECU
[x] Cancel search: ECUPage 77 of 664

77
1
1-4. Theft deterrent system
For safety and security
*: If equipped
■Setting
Turn the power switch to OFF, have
all the passengers exit the vehicle
and ensure that all the doors are
closed.
Using the entry function:
Touch the sensor area on the front
outside door handle twice within 5
seconds.
Using the wireless remote control:
Press twice within 5 sec-
onds.
■Canceling
Using the entry function:
Hold the front outside door handle.
Using the wireless remote control:
Press .
Double locking system*
Unauthorized access to the
vehicle is prevented by dis-
abling the door unlocking
function from both the interior
and exterior of the vehicle.
Vehicles employing this sys-
tem have labels on the front
side windows.
Setting/canceling the double
locking system
WARNING
■Double locking system precau- tion
Never activate the double locking sys-
tem when there are people in the vehicle because all the doors cannot be opened from inside the vehicle.
Page 79 of 664

79
1
1-4. Theft deterrent system
For safety and security
●The doors are unlocked using the
mechanical key.
●A person inside the vehicle opens a
door or hood, or unlocks the vehicle using an inside lock button.
●The 12-volt battery is recharged or replaced when the vehicle is locked. ( P.606)
■Alarm-operated door lock
In the following cases, depending on the
situation, the door may automatically lock to prevent improper entry into the vehicle:
●When a person remaining in the vehi-cle unlocks the door and the alarm is
activated.
●While the alarm is activated, a person
remaining in the vehicle unlocks the door.
●When recharging or replacing the 12-volt battery.
■Customization (if equipped)
The alarm can be set to deactivate when the mechanical key is used to unlock.(Customizable features: P.630)
■The intrusion sensor and tilt
sensor detection
The intrusion sensor detects
intruders or movement in the
vehicle.
The tilt sensor detects changes
in vehicle inclination, such as
when the vehicle is towed away.
This system is designed to deter
and prevent vehicle theft but does
not guarantee absolute security
against all intrusions.
■Setting the intrusion sensor
and tilt sensor
The intrusion sensor and tilt sensor
will be set automatically when the
alarm is set. ( P.78)
■Canceling the intrusion sensor
and tilt sensor
If you are leaving pets or other
moving things inside the vehicle,
make sure to disable the intrusion
sensor and tilt sensor before setting
NOTICE
■To ensure the system operates correctly
Do not modify or remove the system.
If modified or removed, the proper operation of the system cannot be guaranteed.
Intrusion sensor and tilt
sensor
Page 81 of 664

81
1
1-4. Theft deterrent system
For safety and security
●Ice or snow is removed from the vehi-
cle, causing the vehicle to receive repeated impacts or vibrations.
●The vehicle is inside an automatic or high-pressure car wash.
●The vehicle experiences impacts, such as hail, lightning strikes, and other kinds of repeated impacts or
vibrations.
■Tilt sensor detection consider- ations
The sensor may trigger the alarm in the
following situations:
●The vehicle is transported by a ferry,
trailer, train, etc.
●The vehicle is parked in a parking
garage.
●The vehicle is inside a car wash that
moves the vehicle.
●Any of the tires loses air pressure.
●The vehicle is jacked up.
●An earthquake occurs or the road caves in.
NOTICE
■To ensure the intrusion sensor functions correctly
●To ensure that the sensors operate properly, do not touch or cover them.
●Do not spray air fresheners or other products directly into the sensor
holes.
●Installing accessories other than
genuine Toyota parts or leaving objects between the driver’s seat and front passenger’s seat may
reduce the detection performance.
●The intrusion sensor may be can-
celed when the electronic key is near the vehicle.
Page 108 of 664
1082-2. Charging
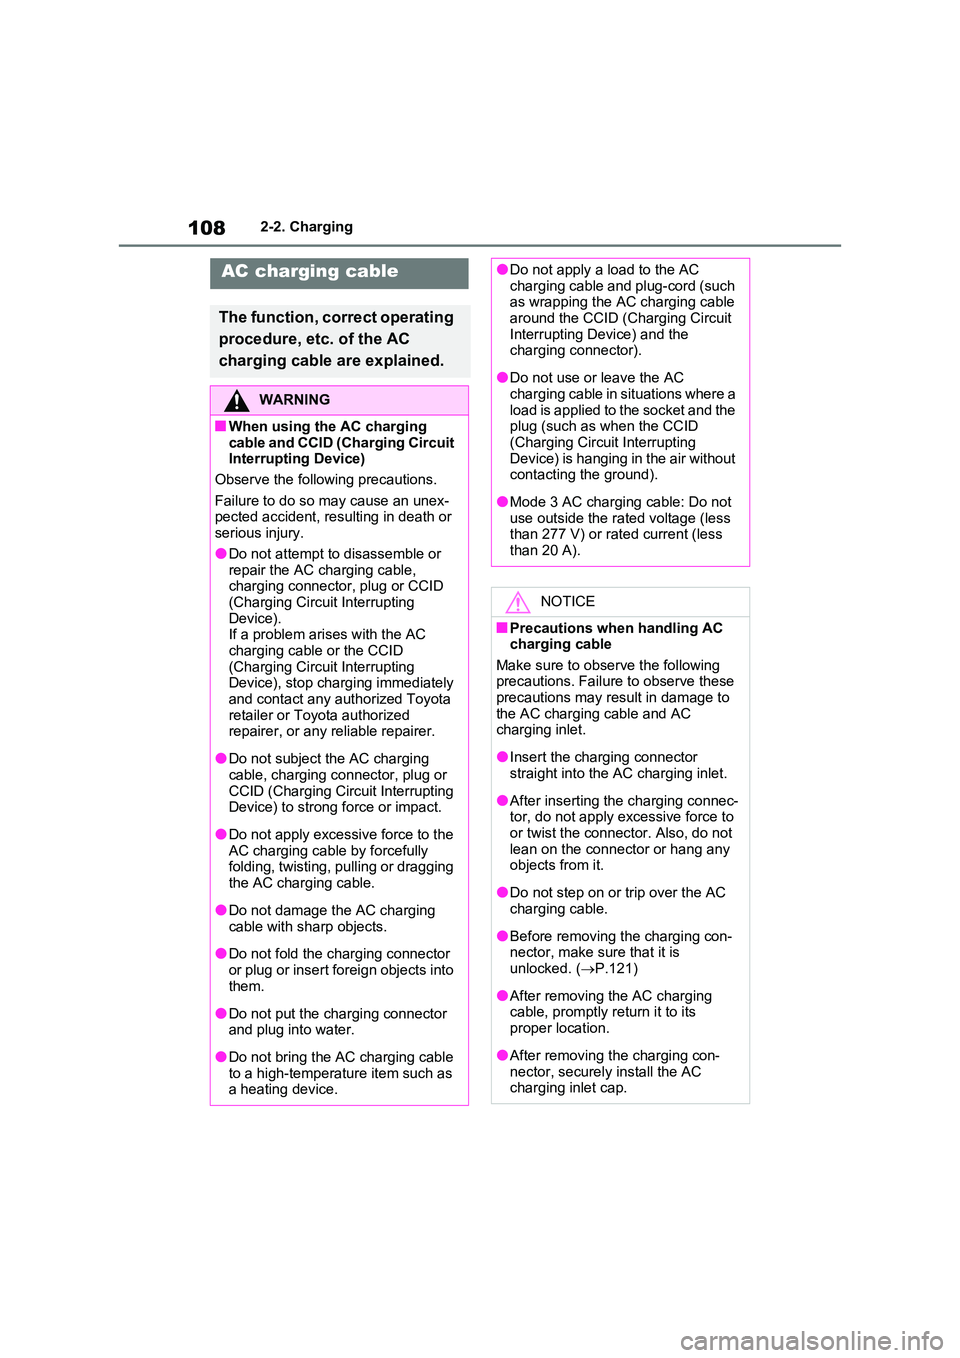
AC charging cable
The function, correct operating
procedure, etc. of the AC
charging cable are explained.
WARNING
■When using the AC charging
cable and CCID (Charging Circuit Interrupting Device)
Observe the following precautions.
Failure to do so may cause an unex- pected accident, resulting in death or serious injury.
●Do not attempt to disassemble or repair the AC charging cable, charging connector, plug or CCID
(Charging Circuit Interrupting Device).If a problem arises with the AC
charging cable or the CCID (Charging Circuit Interrupting Device), stop charging immediately
and contact any authorized Toyota retailer or Toyota authorized repairer, or any reliable repairer.
●Do not subject the AC charging cable, charging connector, plug or
CCID (Charging Circuit Interrupting Device) to strong force or impact.
●Do not apply excessive force to the AC charging cable by forcefully folding, twisting, pulling or dragging
the AC charging cable.
●Do not damage the AC charging
cable with sharp objects.
●Do not fold the charging connector
or plug or insert foreign objects into them.
●Do not put the charging connector and plug into water.
●Do not bring the AC charging cable to a high-temperature item such as a heating device.
●Do not apply a load to the AC charging cable and plug-cord (such as wrapping the AC charging cable
around the CCID (Charging Circuit Interrupting Device) and the charging connector).
●Do not use or leave the AC charging cable in situations where a
load is applied to the socket and the plug (such as when the CCID (Charging Circuit Interrupting
Device) is hanging in the air without contacting the ground).
●Mode 3 AC charging cable: Do not use outside the rated voltage (less than 277 V) or rated current (less
than 20 A).
NOTICE
■Precautions when handling AC charging cable
Make sure to observe the following precautions. Failure to observe these precautions may result in damage to
the AC charging cable and AC charging inlet.
●Insert the charging connector straight into the AC charging inlet.
●After inserting the charging connec-tor, do not apply excessive force to or twist the connector. Also, do not
lean on the connector or hang any objects from it.
●Do not step on or trip over the AC charging cable.
●Before removing the charging con-nector, make sure that it is unlocked. ( P.121)
●After removing the AC charging cable, promptly return it to its
proper location.
●After removing the charging con-
nector, securely install the AC charging inlet cap.
Page 114 of 664
1142-2. Charging
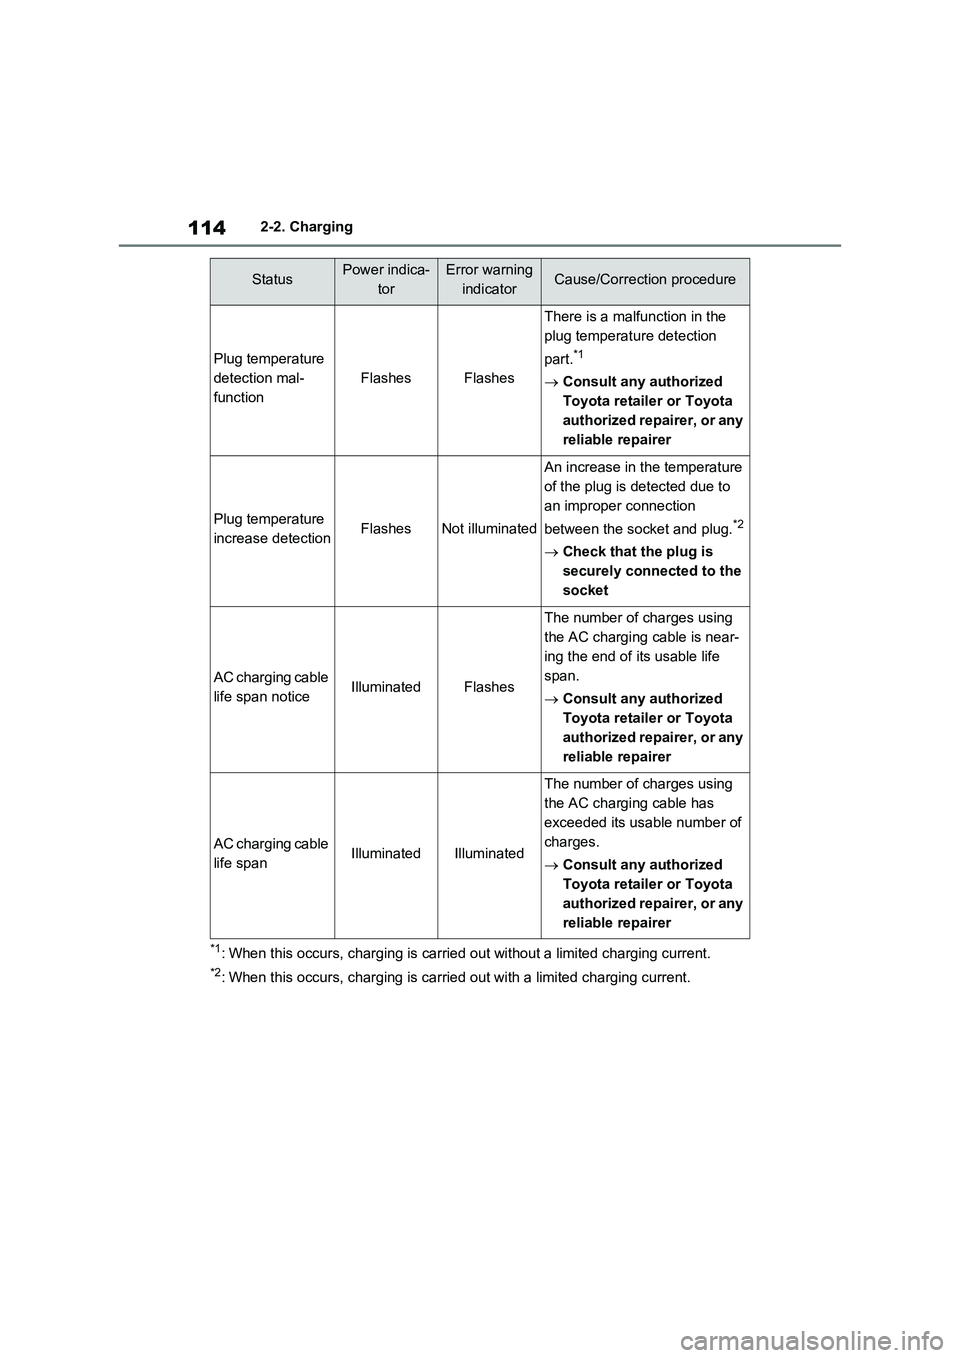
*1: When this occurs, charging is carried out without a limited charging current.
*2: When this occurs, charging is carried out with a limited charging current.
Plug temperature
detection mal-
function
FlashesFlashes
There is a malfunction in the
plug temperature detection
part.
*1
Consult any authorized
Toyota retailer or Toyota
authorized repairer, or any
reliable repairer
Plug temperature
increase detectionFlashesNot illuminated
An increase in the temperature
of the plug is detected due to
an improper connection
between the socket and plug.
*2
Check that the plug is
securely connected to the
socket
AC charging cable
life span noticeIlluminatedFlashes
The number of charges using
the AC charging cable is near-
ing the end of its usable life
span.
Consult any authorized
Toyota retailer or Toyota
authorized repairer, or any
reliable repairer
AC charging cable
life spanIlluminatedIlluminated
The number of charges using
the AC charging cable has
exceeded its usable number of
charges.
Consult any authorized
Toyota retailer or Toyota
authorized repairer, or any
reliable repairer
StatusPower indica-
torError warning
indicatorCause/Correction procedure
Page 116 of 664
1162-2. Charging
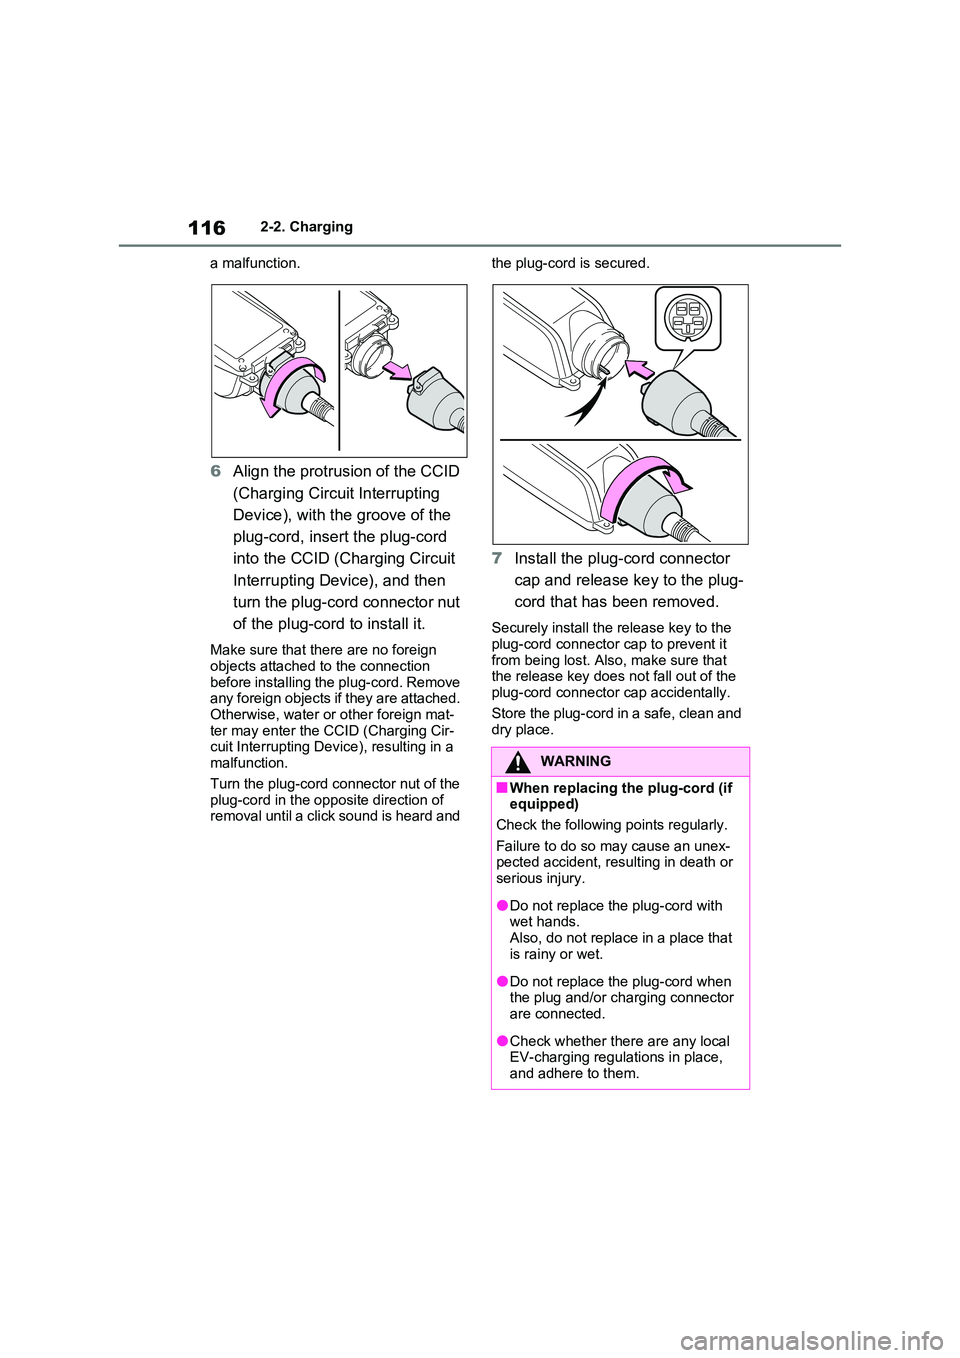
a malfunction.
6 Align the protrusion of the CCID
(Charging Circuit Interrupting
Device), with the groove of the
plug-cord, insert the plug-cord
into the CCID (Charging Circuit
Interrupting Device), and then
turn the plug-cord connector nut
of the plug-cord to install it.
Make sure that there are no foreign objects attached to the connection
before installing the plug-cord. Remove any foreign objects if they are attached. Otherwise, water or other foreign mat-
ter may enter the CCID (Charging Cir- cuit Interrupting Device), resulting in a malfunction.
Turn the plug-cord connector nut of the plug-cord in the opposite direction of removal until a click sound is heard and
the plug-cord is secured.
7 Install the plug-cord connector
cap and release key to the plug-
cord that has been removed.
Securely install the release key to the
plug-cord connector cap to prevent it from being lost. Also, make sure that the release key does not fall out of the
plug-cord connector cap accidentally.
Store the plug-cord in a safe, clean and dry place.
WARNING
■When replacing the plug-cord (if equipped)
Check the following points regularly.
Failure to do so may cause an unex- pected accident, resulting in death or serious injury.
●Do not replace the plug-cord with wet hands.
Also, do not replace in a place that is rainy or wet.
●Do not replace the plug-cord when the plug and/or charging connector are connected.
●Check whether there are any local EV-charging regulations in place,
and adhere to them.
Page 117 of 664
117
2
2-2. Charging
Plug-in hybrid system
For safety, inspect the AC charging
cable on a routine basis.
WARNING
●Do not leave the CCID (Charging Circuit Interrupting Device) with the
plug-cord removed.
●Make sure that there are no foreign
objects attached to the connection when installing the plug-cord to the CCID (Charging Circuit Interrupting
Device).
●When replacing the plug-cord,
firmly turn the nut of the plug-cord until a click sound can be heard.
●Do not replace the plug cord in Nor-way.
NOTICE
■Precautions for the plug-cord (if
equipped)
Do not use the plug-cord for any use other than charging this vehicle.
Doing so may cause the plug-cord to be damaged.
Inspecting and maintaining
the AC charging cable
WARNING
■Routine inspection
Check the following points regularly.
Failure to do so may cause an unex- pected accident, resulting in death or
serious injury.
●The AC charging cable, plug, charging connector, CCID
(Charging Circuit Interrupting Device) etc. have not been dam-
aged.
●The socket has not been damaged.
●The plug can be securely inserted into the socket.
●The plug does not get extremely hot during use.
●The tip of the plug has not been deformed.
●The plug is not dirtied by dust etc.
Remove the plug from the socket
before inspecting it. If any abnormali-
ties are found in the AC charging
cable as a result of the inspection,
immediately stop use and consult any
authorized Toyota retailer or Toyota
authorized repairer, or any reliable
repairer.
■Maintaining the AC charging cable
When the AC charging cable is dirty,
first remove the dirt with a hard, wringed cloth, and then wipe the cable with a dry cloth.
However, never wash it with water. If the AC charging cable is washed with water, fire or electric shock may occur
during charging, possibly resulting in death or serious injury.
■When not using the AC charging cable for a long time
Remove the plug from the socket.
Dust could accumulate on the plug or in the socket, possibly causing over-heating which could lead to a fire.
Also, keep the cable in a place free from moisture.
Page 121 of 664
121
2 2-2. Charging
Plug-in hybrid system
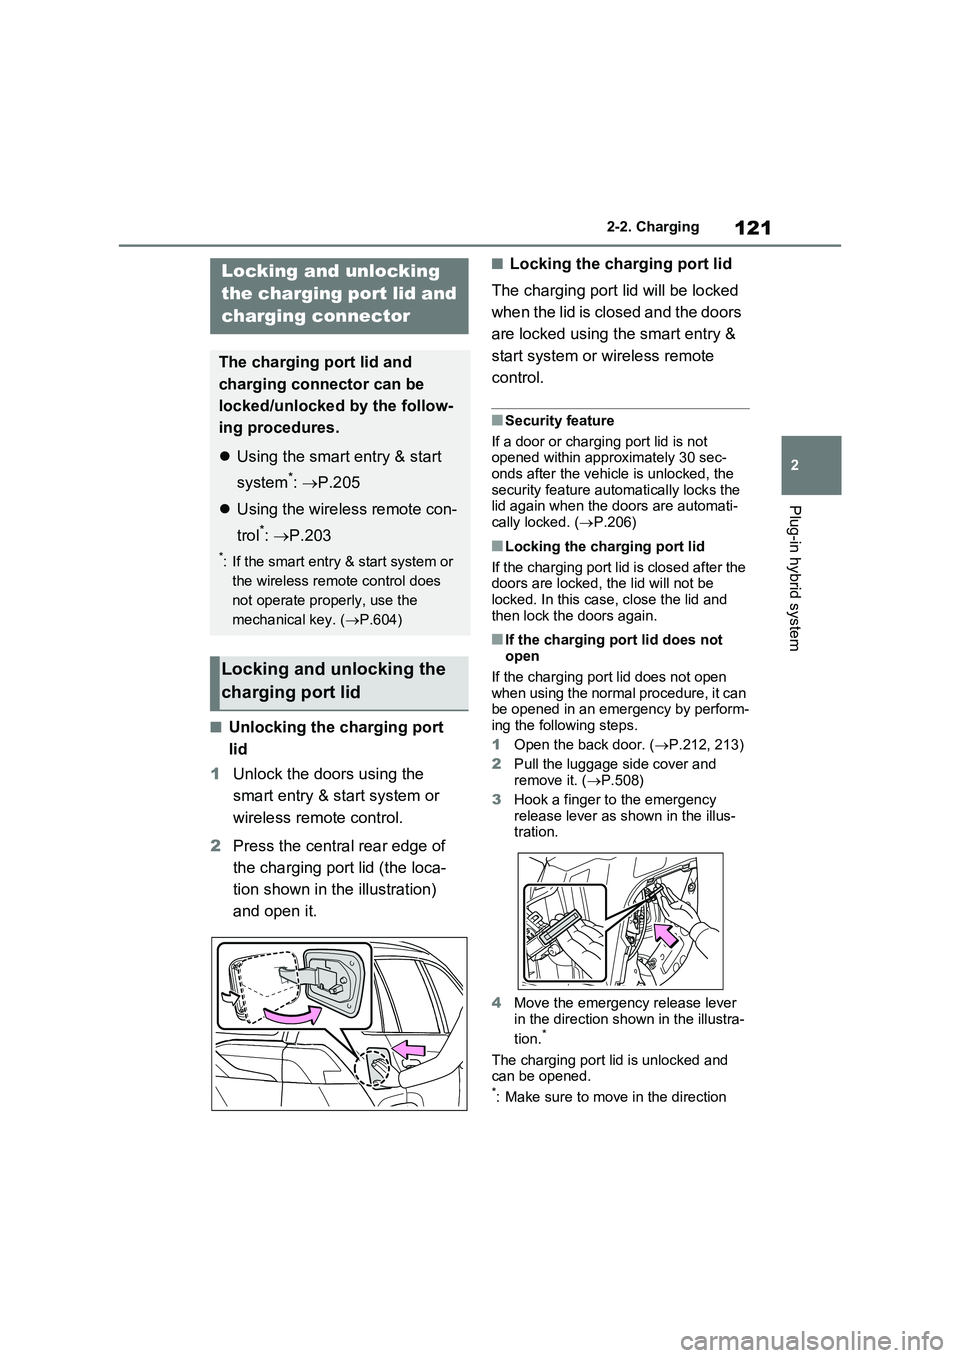
■Unlocking the charging port
lid
1Unlock the doors using the
smart entry & start system or
wireless remote control.
2Press the central rear edge of
the charging port lid (the loca-
tion shown in the illustration)
and open it.
■Locking the charging port lid
The charging port lid will be locked
when the lid is closed and the doors
are locked using the smart entry &
start system or wireless remote
control.
■Security feature
If a door or charging port lid is not
opened within approximately 30 sec-
onds after the vehicle is unlocked, the
security feature automatically locks the
lid again when the doors are automati-
cally locked. (P.206)
■Locking the charging port lid
If the charging port lid is closed after the
doors are locked, the lid will not be
locked. In this case, close the lid and
then lock the doors again.
■If the charging port lid does not
open
If the charging port lid does not open
when using the normal procedure, it can
be opened in an emergency by perform-
ing the following steps.
1Open the back door. (P.212, 213)
2Pull the luggage side cover and
remove it. (P.508)
3Hook a finger to the emergency
release lever as shown in the illus-
tration.
4Move the emergency release lever
in the direction shown in the illustra-
tion.
*
The charging port lid is unlocked and
can be opened.
*: Make sure to move in the direction
Locking and unlocking
the charging port lid and
charging connector
The charging port lid and
charging connector can be
locked/unlocked by the follow-
ing procedures.
Using the smart entry & start
system
*: P.205
Using the wireless remote con-
trol
*: P.203
*: If the smart entry & start system or
the wireless remote control does
not operate properly, use the
mechanical key. (P.604)
Locking and unlocking the
charging port lid