Page 57 of 252

Automatic wipe/wash for windscreen
–
Pull the lever towards the steering wheel into sprung position 5 , the wash
system sprays immediately, the windscreen wiper starts wiping a little later.
The wash system and the windscreen wiper operate simultaneously at a
speed of more than 120 km/h.
– Release the lever. The windscreen wash system stops and the wiper contin-
ues for another 3 - 4 wiper strokes (depending on the period of spraying of the
windscreen). At a speed of more than 2 km/h, the wiper wipes once again 5
seconds after the last wiper stroke in order to wipe the last drops from the
windscreen. This function can be activated/deactivated by a specialist garage.
Rain sensor
– Move the lever into position 1 .
– You can set the sensitivity of the sensor individually with switch A .
Wiping the rear window pane
– Push the lever away from the steering wheel into position 6 - the windshield
wiper will operate every 6 seconds.
Automatic wipe/wash for the rear window pane
– Press the lever from the steering wheel forward into the sprung position 7 ,
the wash system sprays immediately, the windscreen wiper starts wiping a lit-
tle later. As long as you hold the lever in this position, the wiper operates as
well as the wash system.
– Letting go of the lever will cause the windscreen wash system to stop and the
wiper to continue for another 2 - 3 wiper strokes (depending on the period of
spraying of the windscreen). The lever will stay in position after releasing it
6 .
Switching windscreen wipers off
– Move the lever back into its home position 0 .
After the windscreen wiper switches off each time or the ignition switches off for
the third time, the position of the windscreen wiper changes, this counteracts an
early fatigue of the wiper rubbers. After starting the vehicle, the front window
wipers automatically move into the lower rest position. The windscreen wipers and the wash system only operate if the ignition is switch-
ed on and the bonnet is closed 1)
.
The rear window wiper operates only if the boot lid is closed.
If the intermittent wipe is switched on, the intervals are also controlled depending
on speed.
The rain sensor automatically regulates the break between the individual wiper
strokes depending on the intensity of the rain.
The rear window will be wiped again if the front window wipers are on when re-
verse gear is selected.
Top up with wash liquid ⇒ page 199
.
Winter position
If the windscreen wipers are in rest position, they cannot be folded out from the
windscreen. For this reason we recommend adjusting the windscreen wipers in
winter so that they can be folded out from the windscreen easily. You can set this
rest position yourself as follows:
● Switch on the windscreen wipers.
● Switch off the ignition. The windscreen wipers remain in the position in which
they were when switching off the ignition.
You can also use the service position ⇒
page 57 as a winter position. WARNING
● Properly maintained windscreen wiper blades are essential for clear visibil-
ity and safe driving ⇒
page 57.
● Do not use the windscreen washer system at low temperatures, without
heating the windscreen beforehand. Otherwise the window cleaner could
freeze on the windscreen and restrict the view to the front.
● The rain sensor only operates as a support. The driver is not released from
the responsibility to set the function of the windscreen wipers manually de-
pending on the visibility conditions. £1)
On vehicles which do not have a contact switch for the bonnet, the windshield wiper and wash sys-
tem operates also when the bonnet is opened. 55
Lights and Visibility Using the system Safety Driving Tips General Maintenance Breakdown assistance Technical data
Page 58 of 252

CAUTION
● In cold temperatures and in winter, check before the trip or before switching
on the ignition that the wiper blades are not frozen. Switching on windscreen
wipers when the blades are frozen to the windscreen may result in damage both
to the blades and the motor of the windscreen wipers!
● If you switch off the ignition while the windscreen wipers are on, the wipers
will sweep in the same mode the next time the ignition is switched on. At low
temperatures, the wipers may freeze to the window between switching off the ig-
nition and the next time you switch the ignition on again.
● Carefully detach frozen wiper blades from the front or rear window.
● Remove snow and ice from the window wipers before driving. Note
● If the slower 2 ⇒ fig. 37 or the faster
3 wiper setting is switched on and the
vehicle speed decreases to below 4 km/h, the lower wiper step is switched on au-
tomatically. At a speed increase of more than 8 km/h the previous wiper setting is
established again.
● If there is an obstacle on the windscreen, the wiper will try to push away the
obstacle. If the obstacle continues to block the wiper, the wiper stops automati-
cally after 5 attempts to eliminate the obstacle, in order to avoid a damage to the
wiper. Remove the obstacle and and switch on the wiper again.
● The windscreen washer nozzles for the windscreen are heated when the en-
gine is running and the outside temperature is less than +10 °C.
● The content of the windscreen wiper reservoir is 3 litres. On vehicles which are
equipped with a headlight cleaning system, the content of the reservoir is 5.5
li-
tres. On vehicles fitted with auxiliary heating, the content of the windscreen wiper
reservoir is 4.5 litres.
Automatic rear window wiper If the windshield wiper is in position
2 or
3 , the rear view window is wiped ev-
ery 30 seconds if the vehicle's speed exceeds 5
km/h.
When the rain sensor is active (the lever is in the position 1 ) the function is only
active if the front window wipers continue to operate (no break between each
wiping process). Activation/deactivation
The function of the automatic rear window wiper is activated/deactivated in the
information display in the menu:
■ Settings
■ Lights & Vision
■Rear wiper Note
The function of the automatic rear window wiper is only valid for vehicles which
are equipped with the information display. The function is activated in the factory.
Alternative park position of the rear window wiper Each time after switching off the engine for the second time, the wiper blade of
the rear window wiper is tilted. Thus, the life of the wiper blade is prolonged.
Activation/deactivation
– Switch on the ignition.
– Push the operating level into the position 6
⇒ fig. 37 five times in succession
within 5 seconds.
– Switch off the ignition. After switching on the ignition again, the alternative
park position of the rear window wiper is activated/deactivated.
Headlight cleaning system The headlights are being cleaned after the windscreen has been sprayed for the
first time and fifth time, the low beam or main beam are switched on and the
windscreen wiper lever was held in the position 5
⇒ fig. 37 for about 1 second.
The headlight washer nozzles are moved forward out of the bumper by the water
pressure for cleaning the headlights.
You should remove stubborn dirt (such as insect residues) from the headlight len-
ses at regular intervals, for example when refuelling. Please refer to the following
guidelines ⇒
page 183, The headlight lenses.
You should remove any snow from the fixtures of the washer nozzles and clear ice
in winter with a de-icing spray in order to ensure proper operation of the cleaning
system. £56
Lights and Visibility
Page 59 of 252

CAUTION
Never remove the nozzles from the headlamp cleaning system by hand - risk of
damage!
Replacing wiper blades for the windscreen wipers Fig. 38 Wiper blade for the windscreen
wiper
One cannot fold out the wiper arms in the rest position from the windscreen. Be-
fore replacing the wiper arms you must put them into the service position.
Service position for changing wiper blades
– Close the bonnet.
– Switch the ignition on and then again off.
– Then press the windscreen wiper lever in the position 4
⇒ fig. 37 within
10 seconds – the wiper arms move into the service position.
Removing the wiper blade
– Fold windscreen wiper arm away from the windscreen.
– Press the locking button 1
⇒ fig. 38 , in order to unlock the wiper blade and
pull off in the direction of the arrow 2 .
Attaching the wiper blade
– Push the wiper blade until it locks up to the stop.
– Check whether the wiper blade is correctly attached.
– Fold the windscreen wiper arm back onto the windscreen. The wiper arms move back into the rest position - after switching on the ignition
and after changing the position of the window wiper lever or when driving at a
speed greater than 6°km/h.
Windscreen wiper blades in proper condition are essential to obtain good visibility.
Wiper blades should not be allowed to become dirtied by dust, insect remains and
preserving wax.
Juddering or smearing of the wiper blades could then be due to wax residues left
on the windscreen by vehicle washing in automatic vehicle wash systems. It is
therefore important to degrease the lips of the winscreen wiper blades after ev-
ery pass through an automatic vehicle wash system . WARNING
● If the windscreen wipers are handled carelessly, there is a risk of damage
to the windscreen.
● You should clean the wiper blades regularly with a windscreen cleaner in
order to avoid any smears. Clean a wiper blade with a sponge or cloth if it is
very dirty, for example from insect residues.
● Replace the windscreen wiper blades once or twice a year for safety rea-
sons. These can be bought from an authorised ŠKODA Service Partner.
Replacing the wiper blade on the rear window wiper Fig. 39 Wiper blade for the rear window
Removing the wiper blade
– Fold windscreen wiper arm out from the windscreen and position the wiper
blade at right angles to the wiper arm ⇒
fig. 39.
– Hold the window wiper arm at the top end with one hand. £ 57
Lights and Visibility Using the system Safety Driving Tips General Maintenance Breakdown assistance Technical data
Page 60 of 252

–
With the other hand unlock the locking button 1 and remove the wiper blade
in the direction of arrow 2 .
Attaching the wiper blade
– Push the wiper blade until it locks up to the stop.
– Check whether the wiper blade is correctly attached.
– Fold the windscreen wiper arm back onto the windscreen.
The same remarks apply here as for ⇒ page 57.
Rear-view mirror Manual dimming interior rear-view mirror Basic setting
–
Pull the lever on the bottom edge of the mirror forward.
Dimming mirror
– Pull the lever on the bottom edge of the mirror back.
Automatic dimming interior mirror Fig. 40 Automatic dimming interior mir-
ror
Switching on the automatic dimming
– Press the button B
⇒ fig. 40 , the warning light A lights up.
Switching off the automatic dimming
– Press again the button B - the warning light goes out
A .If the automatic dimming is switched on, the mirror dims
automatically depending
on the light striking the mirror from the rear. The mirror has no lever on the bot-
tom edge of the mirror. After the reverse gear is engaged, the mirror always
moves back into the normal position.
Do not attach external navigation devices on the windshield or in the vicinity of
the automatic dimming interior mirror ⇒
.
WARNING
The display lighting of the external navigation device may cause malfunction
of the automatic dimming interior mirror – risk of accident. Note
● Automatic mirror dimming operates only properly if the light striking the rear
of the interior rear-view mirror is not affected by other objects.
● Do not affix any stickers in front of the light sensor, so that you do not impair
the automatic dimming function or put it out of operation.
● If you switch off the automatic dimming interior rear-view mirror, also the ex-
terior mirror dimming is switched off.
Exterior mirror You can adjust the exterior mirrors electrically.
Fig. 41 Inner part of door: Rotary knob
Adjust the rear mirror before commencing to drive so that there is a clear view to
the rear.
Heating of the external mirror
– Turn the rotary knob to position
⇒
fig. 41. £58
Lights and Visibility
Page 61 of 252

The exterior mirror heater only operates when the engine is running and up to an
outside temperature of +20 °C.
Adjusting left and right exterior mirrors simultaneously
– Turn the rotary knob to position . The movement of the mirror surface is iden-
tical to the movement of the rotary knob.
The adjustment of both mirrors simultaneously or each individual mirror is possi-
ble in the Information display ⇒
table on page 20 in the menu point Mirror adjust.
(Mirror adjust.).
Adjusting the right-hand exterior mirror
– Turn the rotary knob to position . The movement of the mirror surface is iden-
tical to the movement of the rotary knob.
Switching off operating control
– Turn the rotary knob to position .
Folding in both exterior mirrors
– Turn the rotary knob to position .
Fold in the exterior mirrors using the remote control key
– If all the windows are closed, press the unlock button 3 on the radio remote
control ⇒ fig. 17 for approx. 2 seconds.
Tilting surface of front passenger exterior mirror
On vehicles fitted with a memory for the driver seat, the surface of the mirror tilts
down slightly when the rear gear is engaged and the rotary knob is in the posi-
tion ⇒ fig. 41 . This provides an aid in seeing the kerb of the pavement when park-
ing the car.
The mirror returns into its initial position, after the rotary knob is moved out of the
position and put into another position or if the speed is more than 15 km/h.
Memory for exterior mirrors
On vehicles fitted with a memory for the driver seat, the relevant setting of the
exterior mirror is also stored automatically when the seat position is stored
⇒ page 63. WARNING
● Convex (curved outward) or a spherical exterior mirrors increase the vision
field. They do, however, make objects appear smaller in the mirror. These mir-
rors are only of limited use, therefore, for estimating distances to the follow-
ing vehicles.
● Use whenever possible the interior rear mirror, for estimating the distan-
ces to the following vehicles. Note
● If the exterior mirrors are folded in using the remote control of the vehicle key,
these are folded back into the driving position after opening the door or switching
on the ignition.
● If the exterior mirrors are folded in using the rotary knob ⇒
fig. 41, they can on-
ly be folded back into the driving position using the rotary knob.
● If the exterior mirrors were folded in using the remote control of the vehicle
key and if the rotary knob was in the fold-in position before switching on the igni-
tion, the mirrors remain in the fold-in position the next time the ignition is switch-
ed on. Folding back into the driving position is performed by actuating the rotary
knob in a different position from the fold-in position.
● Do not touch the surfaces of the exterior mirrors if the exterior mirror heater is
switched on.
● You can set the exterior mirrors by hand, if the power setting function fails at
any time, by pressing on the edge of the mirror surface.
● Contact your specialist garage if a fault exists with the power setting of the
exterior mirrors.
Automatic dimming exterior mirror on the driver's side The exterior mirror on the driver's side is dimmed together with the interior mirror.
If the automatic dimming is switched on, the mirror dims automatically depending
on the light striking the mirror from the rear.
When the interior lights are switched on or the reverse gear is engaged, the mirror
always moves back into the basic position (not dimmed). £ 59
Lights and Visibility Using the system Safety Driving Tips General Maintenance Breakdown assistance Technical data
Page 62 of 252
Note
● Automatic mirror dimming operates only properly if the light striking the rear
of the interior rear-view mirror is not affected by other objects.
● Do not affix any stickers in front of the light sensor, so that you do not impair
the automatic dimming function or put it out of operation.
● If you switch off the automatic dimming interior rear-view mirror, also the ex-
terior mirror dimming is switched off. 60
Lights and Visibility
Page 63 of 252

Seats and Stowage
Front seats
Basic information The front seats have a wide range of different settings and can thus be matched
to the physical characteristics of the driver and front passenger. Correct adjust-
ment of the seats is particularly important for:
● safely and quickly reaching the controls;
● a relaxed, fatigue-free body position;
● achieving the maximum protection offered by the seat belts and the airbag
system. WARNING
● Never transport more occupants than the maximum seating in the vehicle.
● Each occupant must correctly fasten the seat belt belonging to the seat.
Children must be fastened ⇒
page 146, Transporting children safely with a
suitable restraint system.
● The front seats and the head restraints must always be adjusted to match
the body size of the seat occupant as well as the seat belts must always be
correctly fastened in order to provide an optimal protection for you and your
occupants.
● Always keep your feet in the footwell when the car is being driven - never
place your feet on the instrument panel, out of the window or on the surfaces
of the seats. This is particularly important for the front seat passenger. You
will be exposed to increased risk of injury if it becomes necessary to apply the
brake or in the event of an accident. If an airbag is deployed, you may suffer
fatal injuries when adopting an incorrect seated position!
● It is important for the driver and front passenger to maintain a distance of
at least 25 cm from the steering wheel or dash panel. Not maintaining this
minimum distance will mean that the airbag system will not be able to proper-
ly protect you - hazard! The front seats and the head restraints must always
also be correctly adjusted to match the body size of the occupant. WARNING (Continued)
● Ensure that there are no objects in the footwell as any objects may get be-
hind the pedals during a driving or braking manoeuvre. You would then no
longer be able to operate the clutch, to brake or accelerate.
● Do not transport any objects on the front passenger seat except objects
(e.g. child safety seat) provided for this purpose - risk of accident!
Adjusting the front seats Fig. 42 Controls at seat
Adjusting a seat in a forward/back direction
– Pull the lever 1
⇒
fig. 42 up and push the seat into the desired position.
– Release the lever 1 and push the seat further until the lock is heard to en-
gage.
Adjusting height of seat
– Lift the seat if required by pulling or pumping lever 2 upwards.
– Lower the seat if required by pushing or pumping lever 2 downwards.
Adjust the angle of the seat backrest
– Relieve any pressure on the seat backrest (do not lean on it) and turn the
handwheel 3 to adjust the angle of the backrest.
Adjusting lumbar support
– Turn the lever 4 until you have set the most comfortable curvature of the
seat upholstery in the area of your spine. £ 61
Seats and Stowage Using the system Safety Driving Tips General Maintenance Breakdown assistance Technical data
Page 64 of 252

The driver's seat should be adjusted in such a way that the pedals can be fully
pressed to the floor with slightly bent legs.
The seat backrest on the driver's seat should be adjusted in such a way that the
upper point of the steering wheel can be easily reached with slightly bent arms.
WARNING
● Only adjust the driver seat when the vehicle is stationary - risk of injury!
● Take care when adjusting the seat! Adjusting the seat without care can
lead to bruises or injuries.
● The seat backrests must not be angled too far back when driving other-
wise this will affect proper operation of the seat belts and of the airbag sys-
tem - risk of injury!
Folding seat backrest of the front passenger seat Fig. 43 Folding seat backrest of the
front passenger seat
If required, you can fold the seat backrest of the front passenger seat forward into
a horizontal position.
Folding the seat backrest forwards
– Pull the lever in the direction of arrow ⇒ fig. 43 and fold the seat backrest for-
ward until the until the lock is heard to engage.
Put the seat backrest into the original position
– Pull the lever in the direction of arrow and pull the seat backrest forward up
until the until the lock is heard to engage. WARNING
● If you want to carry objects on the folded seat backrest, you will need to
disable the front passenger airbag ⇒
page 145, Switch for the front passenger
front airbag.
● Adjust the seat backrest only when the car is stationary.
● When moving the seat backrest, keep limbs away from between the seat
cushion and seat backrest - risk of injury!
● When moving the seat backrest always make sure the seat backrest has
been properly secured - check that it is by pulling on the seat backrest.
● If the front passenger seat backrest is folded, passengers may only be con-
veyed on the outer seat behind the driver.
● Never carry goods on the folded seat backrest which:
– impair driver visibility,
– make it impossible for the driver to control the vehicle, e.g. if they are
placed under the pedals, or could protrude into the driver's zone,
– could lead to injury to passengers due to a change of direction or brak-
ing manouvre when accelerating sharply.
Folding table on the seat backrest of the front seats Fig. 44 Folding table on the seat back-
rest of the front seats
– Fold the table into the horizontal position by pulling in the direction of arrow
⇒ fig. 44 .
– Pushing against the direction of the arrow folds the table back into the verti-
cal position. £62
Seats and Stowage
 1
1 2
2 3
3 4
4 5
5 6
6 7
7 8
8 9
9 10
10 11
11 12
12 13
13 14
14 15
15 16
16 17
17 18
18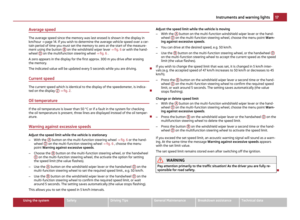 19
19 20
20 21
21 22
22 23
23 24
24 25
25 26
26 27
27 28
28 29
29 30
30 31
31 32
32 33
33 34
34 35
35 36
36 37
37 38
38 39
39 40
40 41
41 42
42 43
43 44
44 45
45 46
46 47
47 48
48 49
49 50
50 51
51 52
52 53
53 54
54 55
55 56
56 57
57 58
58 59
59 60
60 61
61 62
62 63
63 64
64 65
65 66
66 67
67 68
68 69
69 70
70 71
71 72
72 73
73 74
74 75
75 76
76 77
77 78
78 79
79 80
80 81
81 82
82 83
83 84
84 85
85 86
86 87
87 88
88 89
89 90
90 91
91 92
92 93
93 94
94 95
95 96
96 97
97 98
98 99
99 100
100 101
101 102
102 103
103 104
104 105
105 106
106 107
107 108
108 109
109 110
110 111
111 112
112 113
113 114
114 115
115 116
116 117
117 118
118 119
119 120
120 121
121 122
122 123
123 124
124 125
125 126
126 127
127 128
128 129
129 130
130 131
131 132
132 133
133 134
134 135
135 136
136 137
137 138
138 139
139 140
140 141
141 142
142 143
143 144
144 145
145 146
146 147
147 148
148 149
149 150
150 151
151 152
152 153
153 154
154 155
155 156
156 157
157 158
158 159
159 160
160 161
161 162
162 163
163 164
164 165
165 166
166 167
167 168
168 169
169 170
170 171
171 172
172 173
173 174
174 175
175 176
176 177
177 178
178 179
179 180
180 181
181 182
182 183
183 184
184 185
185 186
186 187
187 188
188 189
189 190
190 191
191 192
192 193
193 194
194 195
195 196
196 197
197 198
198 199
199 200
200 201
201 202
202 203
203 204
204 205
205 206
206 207
207 208
208 209
209 210
210 211
211 212
212 213
213 214
214 215
215 216
216 217
217 218
218 219
219 220
220 221
221 222
222 223
223 224
224 225
225 226
226 227
227 228
228 229
229 230
230 231
231 232
232 233
233 234
234 235
235 236
236 237
237 238
238 239
239 240
240 241
241 242
242 243
243 244
244 245
245 246
246 247
247 248
248 249
249 250
250 251
251