2011 SKODA OCTAVIA TOUR lights
[x] Cancel search: lightsPage 43 of 183
Lights and Visibility
42
Switch for hazard warning lights
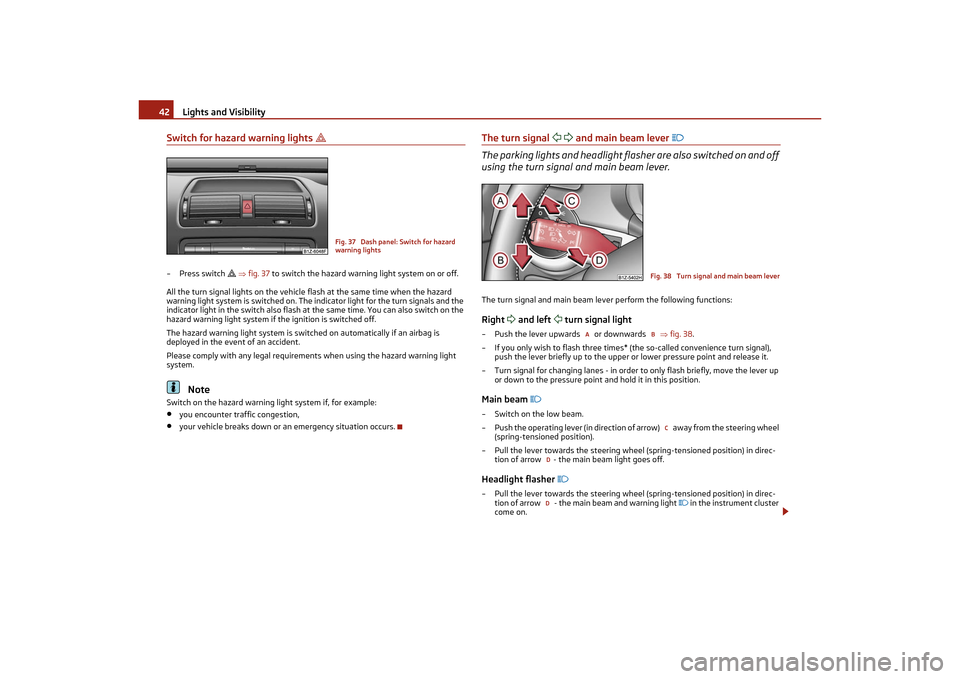
– Press switch
fig. 37 to switch the hazard warning light system on or off.
All the turn signal lights on the vehicle flash at the same time when the hazard
warning light system is switched on. The indicator light for the turn signals and the
indicator light in the switch also flash at the same time. You can also switch on the
hazard warning light system if the ignition is switched off.
The hazard warning light system is switched on automatically if an airbag is
deployed in the event of an accident.
Please comply with any legal requirements when using the hazard warning light
system.
Note
Switch on the hazard warning light system if, for example:•
you encounter traffic congestion,
•
your vehicle breaks down or an emergency situation occurs.
The turn signal
and main beam lever
The parking lights and headlight flas her are also switched on and off
using the turn signal and main beam lever.The turn signal and main beam le ver perform the following functions:Right
and left
turn signal light
– Push the lever upwards or downwards fig. 38 .
– If you only wish to flash three times* (the so-called convenience turn signal), push the lever briefly up to the upper or lower pressure point and release it.
– Turn signal for changing lanes - in order to only flash briefly, move the lever up or down to the pressure point and hold it in this position.Main beam
– Switch on the low beam.
– Push the operating lever (in direction of arrow) away from the steering wheel
(spring-tensioned position).
– Pull the lever towards the steering wheel (spring-tensioned position) in direc- tion of arrow - the main beam light goes off.Headlight flasher
– Pull the lever towards the steering wheel (spring-tensioned position) in direc-tion of arrow - the main beam and warning light
in the instrument cluster
come on.
Fig. 37 Dash panel: Switch for hazard
warning lights
Fig. 38 Turn signal and main beam lever
A
B
C
DD
s2lk.2.book Page 42 Monday, April 18, 2011 7:41 AM
Page 44 of 183

Lights and Visibility43
Using the system
Safety
Driving Tips
General Maintenance
Breakdown assistance
Technical Data
Parking light
– Switch off the ignition.
– Push the lever up or down - the right-hand or left-hand parking light is switched
on.
Information concerning the function of the lights.•
The turn signal system only operates when the ig nition is switched on. The
corresponding indicator light
or in the instrument cluster also flashes.
•
The turn signal is automatically cancelled after negotiating a curve.
•
The indicator light flashes at twice its normal rate if a bulb of the turn signal light
fails.
•
The side light and rear light on the appropriate side of the vehicle are switched
on when the parking light is selected. The parking light only operates if the ignition
is switched off.Caution
Use main beam or the headlight flasher only if this does not risk dazzling other road
users.
Note
•
If you have switched on the right or left turn signal light and you switch off the
ignition, the parking light is not automatically switched on.
•
Use only in accordance with the legal requirements the described lighting and
signal systems.
Interior lightingLighting of the interior of the vehicle - Version 1Switching on the interior lighting– Press the switch in the direction of the edge of the light, the symbol
fig. 39 appears.
Switching off the interior lighting– Press the switch into the middle position O .Operation of the lamp using the door switch– Press the switch in the direction of the centre of the light, the symbol
appears.
Reading lights– The reading lights are switched on or off with the switch .
If the lights are controlled via the door switch (switch in position
), the lighting
is switched on when:
•
Unlocking the vehicle
•
Opening doors
•
Withdrawing the ignition key.
If the lights are controlled via the door switch (switch in position
), the lighting
is switched off when:
•
the vehicle is locked,
Fig. 39 Interior lighting with reading
lights
AAA
B
AA
s2lk.2.book Page 43 Monday, April 18, 2011 7:41 AM
Page 45 of 183
Lights and Visibility
44
•
the ignition is switched on.
•
auto switch-off - about 30 seconds after all the doors have been closed.
If the doors remain open, the switch in position
, the interior lighting switches
off automatically after around 10 minutes to stop the battery from running down.
Note
We recommend having these bulbs replaced by a specialist garage.Vehicle interior lighting version 2Switching on the interior lighting– Turn the switch to position
fig. 40 .
Switching off the interior lighting– Turn the switch to position O.Operation of the lamp using the door switch– Turn the switch to position
.
The same principles apply for interior lighting version 2 as for page 43, “Lighting
of the interior of the vehicle - Version 1”.
Luggage compartment lightThe lighting comes on automatically when the boot lid is opened. If the lid remains
open for more than about 10 minutes, th e luggage compartment lighting switches
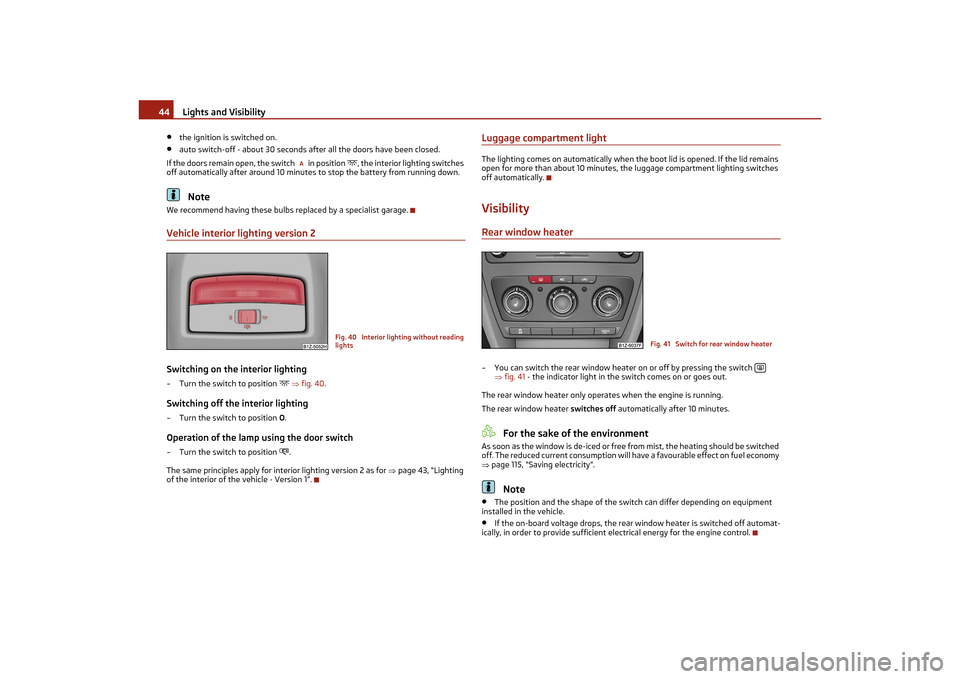
off automatically.VisibilityRear window heater– You can switch the rear window heater on or off by pressing the switch
fig. 41 - the indicator light in the switch comes on or goes out.
The rear window heater only operates when the engine is running.
The rear window heater switches off automatically after 10 minutes.
For the sake of the environment
As soon as the window is de-iced or free from mist, the heating should be switched
off. The reduced current consumption will ha ve a favourable effect on fuel economy
page 115, “Saving electricity”.
Note
•
The position and the shape of the switch can differ depending on equipment
installed in the vehicle.
•
If the on-board voltage drop s, the rear window heater is switched off automat-
ically, in order to provide sufficient electrical energy for the engine control.
A
Fig. 40 Interior lighting without reading
lights
Fig. 41 Switch for rear window heater
s2lk.2.book Page 44 Monday, April 18, 2011 7:41 AM
Page 46 of 183

Lights and Visibility45
Using the system
Safety
Driving Tips
General Maintenance
Breakdown assistance
Technical Data
Sun visorsYou can pull the sun visor for the driver or front passenger out of the fixture and
swivel it toward the door in the direction of the arrow fig. 42 .
A vanity mirror*, which is provided with a cover, is located in the front passenger
side sun visor. Push the cover in direction of arrow .
WARNING
The sun visors must not be swivelled to the side windows into the deployment
area of the head airbags if any objects, su ch as ball-point pens etc. are attached
to them. This might result in injuries to the occupants if the head airbag is
deployed.
Windshield wiper and wash systemWindshield wiper
You can operate the windscreen wipers and automatic wipe/wash
using the windscreen wiper lever.The windscreen wiper lever fig. 43 has the following positions:Finger-operated wiping– If you wish to wipe the windscreen only briefly , push the lever into the sprung
position . If you hold the lever in the lower position for more than 1 second,
the wiper wipes faster.Intermittent wiping– Position the lever up into position .
– Set with the switch the desired brea k between the individual wiper strokesSlow wipe– Position the lever up into position .Fast wipe– Position the lever up into position .
Fig. 42 Sun visor: swivelling out
1
2
Fig. 43 Windscreen wiper lever
4
1
A
23
s2lk.2.book Page 45 Monday, April 18, 2011 7:41 AM
Page 47 of 183

Lights and Visibility
46
Automatic wipe/wash for windscreen
– Pull the lever towards the steering wheel into sprung position , the wash system sprays immediately, the windscreen wiper starts wiping a little later. The
wash system and the windscreen wiper operate simultaneously at a speed of
more than 120 km/h.
– Release the lever. The windscreen wash system stops and the wiper continues for another 3 - 4 wiper strokes (depending on the period of spraying of the wind-
screen). At a speed of more than 2 km/h, the wiper wipes once again* 5 seconds
after the last wiper stroke in order to wipe the last drops from the windscreen.
This function can be activated/de activated by a specialist garage.Wiping the rear window pane*– Push the lever away from the steering wheel into position - the widescreen
wiper will operate every 6 seconds.Automatic wipe/wash for the rear window pane*– Press the lever from the steering wheel forward into the sprung position , the
wash system sprays immediately, the windscreen wiper starts wiping a little
later. As long as you hold the lever in this position, the wiper operates as well as
the wash system.
– Letting go of the lever will cause the windscreen wash system to stop and the wiper to continue for another 2 - 3 wiper strokes (depending on the period of
spraying of the windscreen). The lever will stay in position after releasing it .Switching windscreen wipers off– Move the lever back into its home position .
After the windscreen wiper switches off each time or the ignition switches off for
the third time, the position of the windscreen wiper changes, this counteracts an
early fatigue of the wiper rubbers.
The windscreen wipers and the wash system only operate if the ignition is switched
on and the bonnet is closed
4).
If the intermittent wipe is switched on, the intervals are also controlled depending
on speed.
The rear window will be wiped again if the front window wipers are on when
reverse gear is selected. The windscreen washer nozzles are heated* when the ignition is switched on.
Top up with wash liquid
page 140.
Winter position
If the windscreen wipers are in rest position, they cannot be folded out from the
windscreen. For this reason we recommend adjusting the windscreen wipers in
winter so that they can be folded out from the windscreen easily. You can set this
rest position as follows:
•
Switch on the windscreen wipers.
•
Switch off the ignition. The windscreen wipers remain in the position in which
they were when switching off the ignition.
You can also use the service position page 47 as a winter position.
WARNING
•
Properly maintained windscreen wiper bl ades are essential for clear visibility
and safe driving page 47.
•
Do not use the windscreen washer system at low temperatures, without
heating the windscreen beforehand. Ot herwise the window cleaner could
freeze on the windscreen and restrict the view to the front.
•
The rain sensor only operates as a supp ort. The driver is not released from
the responsibility to set the function of the windscreen wipers manually
depending on the visibility conditions.Caution
In frosty weather, please first of all check whether the windscreen wiper blades are
not frozen to the windscreen before switching them on. Switching on windscreen
wipers when the blades are frozen to the windscreen may result in damage both to
the blades and the motor of the windscreen wipers!
Note
•
If the slower or the faster wiper setting is switched on page 45, fig. 43
and the vehicle speed decreases to below 4 km/h, the lower wiper step is switched
on automatically. At a speed increase of more than 8 km/h the previous wiper
setting is established again.
•
If there is an obstacle on the windscreen, the wiper will try to push away the
obstacle. If the obstacle continues to bloc k the wiper, the wiper stops after 5 cycles,
in order to avoid a damage to the wiper. Remove the obstacle and switch on the
wiper again.
4)On vehicles which do not have a contact switch for the bonnet, the windshield wiper and wash
system operates also when the bonnet is opened.
5
6
7
6
0
2
3
s2lk.2.book Page 46 Monday, April 18, 2011 7:41 AM
Page 48 of 183

Lights and Visibility47
Using the system
Safety
Driving Tips
General Maintenance
Breakdown assistance
Technical Data
Replacing wiper blades for the windscreen wipersOne cannot fold out the wiper arms in the rest position from the windscreen. Before
replacing the wiper arms you must put them into the service position.Service position for changing wiper blades– Close the bonnet.
– Switch the ignition on and then again off.
– Then press the windscreen wiper lever in the position page 45, fig. 43
within 20 seconds - the wiper arms move into the service position.Taking off the wiper blade– Fold windscreen wiper arm out from th e windscreen and position the wiper
blade at right angles to the wiper arm .
– Take off the wiper blade in direction of arrow fig. 44 .Attaching a wiper blade– Push the new wiper blade over the wiper arm and turn the wiper blade into the
vertical position.
– Check whether the wiper blade is correctly attached.
– Fold the windscreen wiper arms onto the window and switch on the ignition. By
pressing the window wiper lever into the sprung position fig. 44 or when
driving at a speed greater than 4 km/h, the windscreen wiper arms move back
into the rest position. Wiper blades in proper condition are essential to obtain good visibility. Wiper blades
should not be allowed to become dirtied by dust, insect remains and preserving
wax.
Juddering or smearing of the wiper blades could then be due to wax residues left on
the windscreen by vehicle washing in automatic vehicle wash systems. It is there-
fore important to degrease
the lips of the wiper blades after every pass through an
automatic vehicle wash system .
WARNING
•
The ignition must not be switched on if the front windscreen wiper arms are
folded out. The wiper blades would move back into their rest position and while
doing so damage the paintwork of the bonnet.
•
If the windscreen wipers are handled care lessly, there is a risk of damage to
the windscreen.
•
You should clean the wiper blades regu larly with a windscreen cleaner in
order to avoid any smears. Clean a wiper blad e with a sponge or cloth if it is very
dirty, for example from insect residues.
•
Replace the wiper blades once or twice a year for safety reasons. These can
be bought from an authorised Škoda Service Partner.
Replacing the wiper blade on the rear window wiperTaking off the wiper blade – Fold windscreen wiper arm out from the windscreen and position the wiper
blade at right angles to the wiper arm fig. 45 .
– Hold the window wiper arm at the top end with one hand.
Fig. 44 Wiper blade for the windscreen
wiper
4
4
Fig. 45 Wiper blade for rear window
s2lk.2.book Page 47 Monday, April 18, 2011 7:41 AM
Page 49 of 183

Lights and Visibility
48
– With the other hand unlock the locking button in the direction of arrow and
remove the wiper blade.Attaching a wiper blade– Position the wiper blade onto the wiper arm and lock the locking button .
– Check whether the wiper blade is correctly attached.
The same remarks apply here as for page 47, “Replacing wiper blades for the
windscreen wipers”.Rear-view mirrorManual dimming interior rear-view mirrorBasic setting– Pull the lever on the bottom edge of the mirror forward.Dimming mirror– Pull the lever on the bottom edge of the mirror back.Exterior mirror
You can adjust the exterior mirrors electrically*.The exterior mirror heater only operates when the engine is running and up to an
outside temperature of +20 °C.
Heating of the external mirror – Turn the rotary knob to position
fig. 46 .
Adjusting left and right exterior mirrors simultaneously– Turn the rotary knob to position
. The movement of the mi rror surface is iden-
tical to the movement of the rotary knob.
Adjusting the right-hand exterior mirror– Turn the rotary knob to position
. The movement of the mirror surface is iden-
tical to the movement of the rotary knob.
Switching off operating control– Turn the rotary knob to position
.
WARNING
•
Convex (curved outward) or spherical (differently curved) exterior mirrors
increase the vision field. They do, howe ver, make objects appear smaller in the
mirror. These mirrors are only of limited use, therefore, for estimating distances
to the following vehicles.
•
Use whenever possible the interior rear mirror, for estimating the distances
to the following vehicles.Note
•
Do not touch the surfaces of the exterior mirrors if the exterior mirror heater is
switched on.
•
You can set the exterior mirrors by hand, if the power setting function fails at
any time by pressing on the edge of the mirror surface.
•
Contact your specialist garage if a faul t exists with the power setting of the
exterior mirrors.
A
A
Fig. 46 Inner part of door: Rotary knob
s2lk.2.book Page 48 Monday, April 18, 2011 7:41 AM
Page 53 of 183
Seats and Stowage
52
•
Pay attention that the seat backrests are correctly interlocked. It is only then
that the three-point seat belt for the midd le seat can reliably fulfil its function.
•
Before folding the seat backrest back into the secure position, place the rear
lateral seat belt behind the edge of the side trim panel. Take suitable measures
to prevent that the seat belt is jammed between the seat backrest and the side
trim panel and is thus damaged.
Removing the seat cushionYou can enlarge the luggage compartment on vehicles with divided rear seats* by
removing the rear seat.Removing– Fold the seat cushion forwards completely.
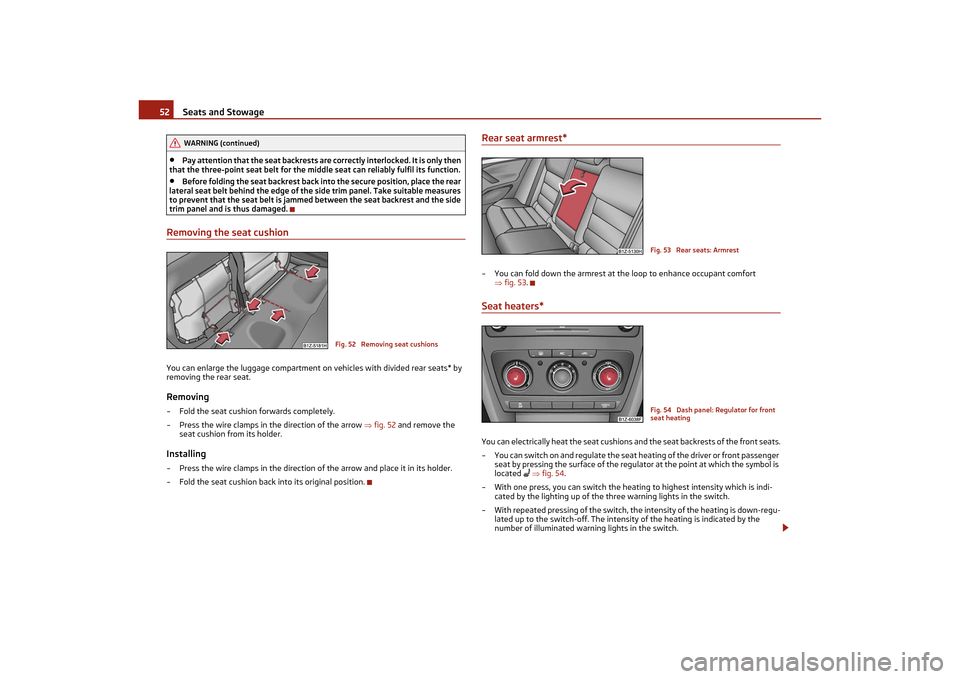
– Press the wire clamps in the direction of the arrow fig. 52 and remove the
seat cushion from its holder.Installing– Press the wire clamps in the direction of the arrow and place it in its holder.
– Fold the seat cushion back into its original position.
Rear seat armrest*– You can fold down the armrest at th e loop to enhance occupant comfort
fig. 53 .Seat heaters*You can electrically heat the seat cushions and the seat backrests of the front seats.
– You can switch on and regulate the seat heating of the driver or front passenger seat by pressing the surface of the regulator at the point at which the symbol is
located
fig. 54 .
– With one press, you can switch the heating to highest intensity which is indi- cated by the lighting up of the three warning lights in the switch.
– With repeated pressing of the switch, th e intensity of the heating is down-regu-
lated up to the switch-off. The intensit y of the heating is indicated by the
number of illuminated warning lights in the switch.
WARNING (continued)
Fig. 52 Removing seat cushions
Fig. 53 Rear seats: ArmrestFig. 54 Dash panel: Regulator for front
seat heating
s2lk.2.book Page 52 Monday, April 18, 2011 7:41 AM