2011 Peugeot 3008 Hybrid 4 warning
[x] Cancel search: warningPage 65 of 280

63
Access to the retractable screen
This screen is opened and stored auto-
matically.
However, you can also open it, store it
and adjust it using the various manual
controls:
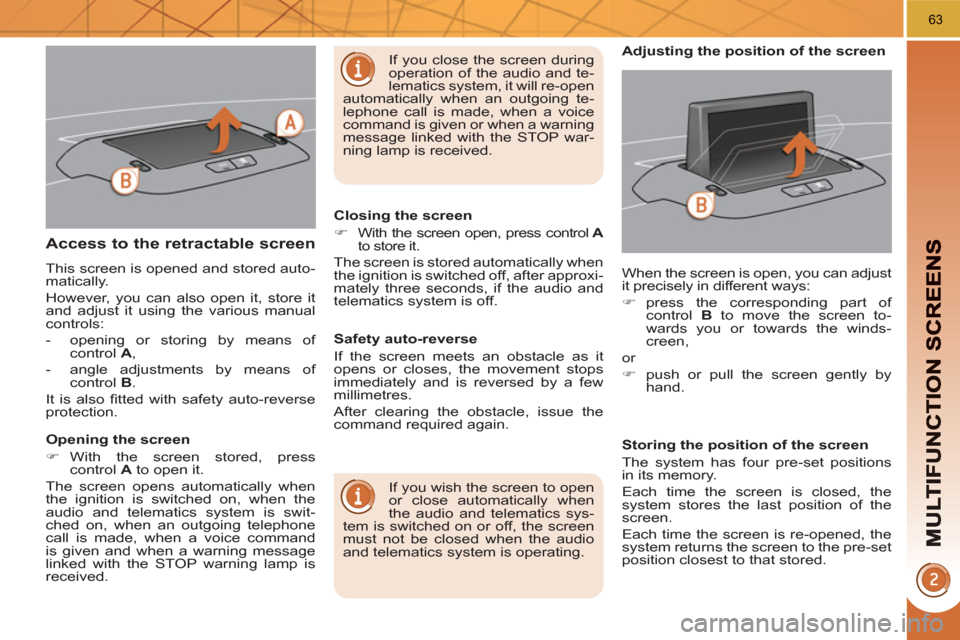
- opening or storing by means of
control A
,
- angle adjustments by means of
control B
.
It is also fi tted with safety auto-reverse
protection.
Opening the screen
�)
With the screen stored, press
control A
to open it.
The screen opens automatically when
the ignition is switched on, when the
audio and telematics system is swit-
ched on, when an outgoing telephone
call is made, when a voice command
is given and when a warning message
linked with the STOP warning lamp is
received.
Closing the screen
�)
With the screen open, press control A
to store it.
The screen is stored automatically when
the ignition is switched off, after approxi-
mately three seconds, if the audio and
telematics system is off.
If you wish the screen to open
or close automatically when
the audio and telematics sys-
tem is switched on or off, the screen
must not be closed when the audio
and telematics system is operating. When the screen is open, you can adjust
it precisely in different ways:
�)
press the corresponding part of
control B
to move the screen to-
wards you or towards the winds-
creen,
or
�)
push or pull the screen gently by
hand.
Adjusting the position of the screen
Safety auto-reverse
If the screen meets an obstacle as it
opens or closes, the movement stops
immediately and is reversed by a few
millimetres.
After clearing the obstacle, issue the
command required again.
Storing the position of the screen
The system has four pre-set positions
in its memory.
Each time the screen is closed, the
system stores the last position of the
screen.
Each time the screen is re-opened, the
system returns the screen to the pre-set
position closest to that stored.
If you close the screen during
operation of the audio and te-
lematics system, it will re-open
automatically when an outgoing te-
lephone call is made, when a voice
command is given or when a warning
message linked with the STOP war-
ning lamp is received.
Page 85 of 280

83
A heavy object (key fob...), at-
tached to the key and weigh-
ing down on its shaft in the
ignition switch, could cause a
malfunction.
Electronic engine immobiliser
The key contains an electronic chip
which has a special code. When the
ignition is switched on, this code must
be recognised in order for starting to be
possible.
This electronic engine immobiliser locks
the engine management system a few
minutes after the ignition is switched off
and prevents starting of the engine by
anyone who does not have the key.
Anti-theft protection
In the event of a fault, you are
informed by illumination of this
warning lamp, an audible signal
and a message in the screen.
In this case, your vehicle does not start;
contact a PEUGEOT dealer as soon as
possible.
For more information, refer to the
"Practical information - Energy
economy mode" section.
Energy economy mode
After switching off the engine (posi-
tion 1-Stop
), you can still use functions
such as the audio and telematics sys-
tem, wipers, dipped beam headlamps,
courtesy lamps, etc. for a maximum
combined period of thirty minutes.
Page 86 of 280

84
Remote control problem
Following disconnection of the vehicle
battery, replacement of the remote con-
trol battery or in the event of a remote
control malfunction, you can no longer
unlock, lock or locate your vehicle.
�)
First of all, use the key in the lock to
unlock or lock your vehicle.
�)
Then, reinitialise the remote control.
If the problem persists, contact a
PEUGEOT dealer as soon as possible.
Changing the battery
Battery ref.: CR1620/3 volts.
Reinitialisation
�)
Switch off the ignition.
�)
Turn the key to position 2 (Ignition
on)
.
�)
Press the closed padlock immedi-
ately for a few seconds.
�)
Switch off the ignition and remove
the key from the ignition switch.
The remote control is fully operational
again. If the battery is fl at, you are in-
formed by illumination of this
warning lamp, an audible signal
and a message in the multifunc-
tion screen.
�)
Unclip the casing using a coin at the
notch.
�)
Slide the fl at battery out of its location.
�)
Slide the new battery into its loca-
tion observing the original direction.
�)
Clip the casing.
�)
Reinitialise the remote control.
Page 92 of 280

90
DOORS
�)
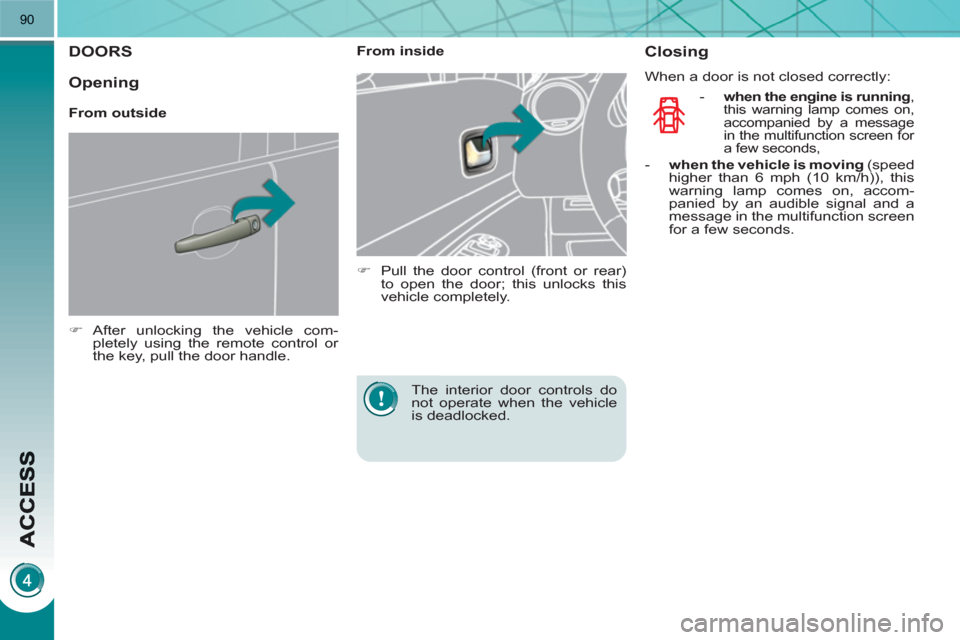
After unlocking the vehicle com-
pletely using the remote control or
the key, pull the door handle.
From inside
�)
Pull the door control (front or rear)
to open the door; this unlocks this
vehicle completely.
The interior door controls do
not operate when the vehicle
is deadlocked.
Closing
When a door is not closed correctly:
-
when the engine is running
,
this warning lamp comes on,
accompanied by a message
in the multifunction screen for
a few seconds,
- when the vehicle is moving
(speed
higher than 6 mph (10 km/h)), this
warning lamp comes on, accom-
panied by an audible signal and a
message in the multifunction screen
for a few seconds.
Opening
From outside
Page 96 of 280

94
The key cannot be removed
from the lock until the cap is
put back on the tank.
Opening the cap may trigger an in-
rush of air. This vacuum, which is
completely normal, is caused by the
sealing of the fuel system.
FUEL TANK
Capacity of the tank: approximately
56.5 litres.
To fi ll the tank safely:
When refuelling is complete:
�)
put the cap back in place,
�)
turn the key to the right, then remove
it from the cap,
�)
close the fi ller fl ap.
�)
remove the cap and secure it on the
hook, located on the inside of the
fl ap,
�)
fi ll the tank, but do not continue
after the 3rd cut-off of the nozzle
;
this could cause malfunctions.
Low fuel level
Operatin
g fault
A malfunction of the fuel gauge is indi-
cated by the return to zero of the fuel
gauge needle.
Have it checked by a PEUGEOT dealer.
Refuelling
A label affi xed to the inside of the fi ller
fl ap reminds you of the type of fuel to be
used according to your engine.
More than 5 litres of fuel must be add-
ed in order to be registered by the fuel
gauge. When the low fuel level is
reached, this warning lamp
comes on in the instrument
panel, accompanied by an
audible signal and a message
in the multifunction screen. When the
lamp fi rst comes on, there is approxi-
mately
6 litres
of fuel remaining.
Until suffi cient fuel has been added, this
warning lamp appears every time the
ignition is switched on, accompanied by
an audible signal and a message. When
driving, this audible signal and message
are repeated with increasing frequency,
as the fuel level drops towards "0"
.
You must refuel to avoid run-
ning out of fuel.
If you run out of fuel (Diesel),
refer also to the "Checks"
section.
�)
the engine must
be turned off
at the ignition
switch
(the Ready
lamp must be off) to avoid an auto-
matic restart of the engine while re-
fuelling,
�)
open the fuel fi ller fl ap,
�)
insert the key in the cap, then turn it
to the left,
Page 99 of 280

97
Model with rear foglamp only
rear foglamp
This operates with the dipped beam
headlamps and main beam headlamps.
�)
To switch on the foglamp, turn the
ring C
forwards.
�)
To switch off the foglamp, turn the
ring C
rearwards.
When the lighting is switched on auto-
matically (with AUTO model), the dipped
headlamps and sidelamps remain on
until the rear foglamp is switched off.
In good or rainy weather, by
both day and night, the front
foglamps and the rear foglamp
are prohibited. In these situations,
the power of their beams may dazzle
other drivers.
Do not forget to switch off the front
foglamps and the rear foglamp when
they are no longer necessary.
Model with front and rear foglamps front and rear foglamps
The rear foglamp operates with the
dipped beam and main beam head-
lamps.
The front foglamps also operate with
the sidelamps.
�)
To switch on the rear foglamp, turn
the ring C
forwards.
�)
To switch on the front foglamps, turn
the ring C
forwards again.
�)
To switch off the rear foglamp, turn
the ring C
rearwards.
�)
To switch off the front foglamps, turn
the ring C
rearwards again.
C.
Fog lamps selection ring.
Lighting on audible warning
When the ignition is switched off, all of
the lamps switch off automatically, unless
guide-me-home lighting is activated.
If the lighting is switched on manually
after switching off the ignition, there
is an audible signal when a front door
is opened to warn the driver that they
have forgotten to switch off the vehicle's
lighting, with the ignition off.
When the lighting is switched off auto-
matically (with AUTO model) or when
the dipped headlamps are switched off
manually, the foglamps and the side-
lamps will remain on.
In some weather conditions
(e.g. low temperature or hu-
midity), the presence of mist-
ing on the internal surface of the glass
of the headlamps and rear lamps is
normal; it disappears after the lamps
have been on for a few minutes.
When the lighting is switched on auto-
matically (with AUTO model), the dipped
headlamps and sidelamps remain on
until the rear foglamp is switched off.
Page 101 of 280

99
In fog or snow, the sunshine
sensor may detect suffi cient
light. Therefore, the lighting
will not come on automatically.
Do not cover the sunshine sensor,
coupled with the rain sensor and lo-
cated in the centre of the windscreen
behind the rear view mirror; the as-
sociated functions would no longer
be controlled.
Associated with the automatic
"Guide-me-home" lighting
Association with the automatic lighting
provides the "guide-me-home" lighting
with the following additional options:
- selection of the lighting duration of
15, 30 or 60 seconds in the vehicle
parameters on the multifunction
screen confi guration menu,
-
automatic activation of "guide-me-home"
lighting when automatic lighting is in
operation.
Automatic illumination of headlamps
The sidelamps and dipped beam head-
lamps are switched on automatically,
without any action on the part of the
driver, when a low level of external light
is detected or in certain cases of activa-
tion of the windscreen wipers.
As soon as the brightness returns to a
suffi cient level or after the windscreen
wipers are switched off, the lamps are
switched off automatically.
Activation
�)
Turn the ring to the "AUTO"
position.
The automatic illumination of head-
lamps is accompanied by a mes-
sage on the multifunction screen.
Deactivation
�)
Turn the ring to another position.
Deactivation is accompanied by
a message on the multifunction
screen.
Operating fault
In the event of a malfunction of
the sunshine sensor, the light-
ing comes on, this warning
lamp is displayed on the instru-
ment panel and/or a message appears
on the multifunction screen, accompa-
nied by an audible signal.
Consult a PEUGEOT dealer.
MANUAL ADJUSTMENT OF
HALOGEN HEADLAMPS
The initial setting is position "0"
.
To avoid causing a nuisance to other
road users, the height of the halogen
headlamps should be adjusted accord-
ing to the load in the vehicle.
0.
1 or 2 people in the front seats.
-.
3 people.
1.
5 people.
-.
Intermediate setting.
2.
5 people + maximum authorised
load.
-.
Intermediate setting.
3.
Driver + maximum authorised load.
Page 103 of 280

101
Windscreen and headlamp
wash
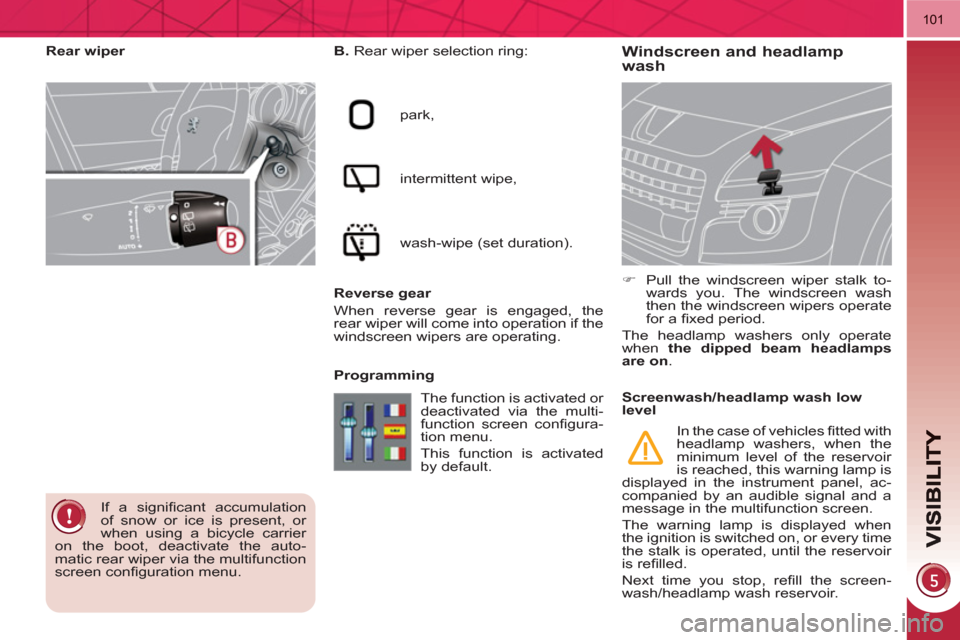
B.
Rear wiper selection ring:
park,
intermittent wipe,
wash-wipe (set duration).
Reverse gear
When reverse gear is engaged, the
rear wiper will come into operation if the
windscreen wipers are operating.
Programming
�)
Pull the windscreen wiper stalk to-
wards you. The windscreen wash
then the windscreen wipers operate
for a fi xed period.
The headlamp washers only operate
when the dipped beam headlamps
are on
.
Rear wiper
If a signifi cant accumulation
of snow or ice is present, or
when using a bicycle carrier
on the boot, deactivate the auto-
matic rear wiper via the multifunction
screen confi guration menu. The function is activated or
deactivated via the multi-
function screen confi gura-
tion menu.
This function is activated
by default.
Screenwash/headlamp wash low
level
In the case of vehicles fi tted with
headlamp washers, when the
minimum level of the reservoir
is reached, this warning lamp is
displayed in the instrument panel, ac-
companied by an audible signal and a
message in the multifunction screen.
The warning lamp is displayed when
the ignition is switched on, or every time
the stalk is operated, until the reservoir
is refi lled.
Next time you stop, refi ll the screen-
wash/headlamp wash reservoir.