2011 Peugeot 3008 Hybrid 4 warning
[x] Cancel search: warningPage 153 of 280
151
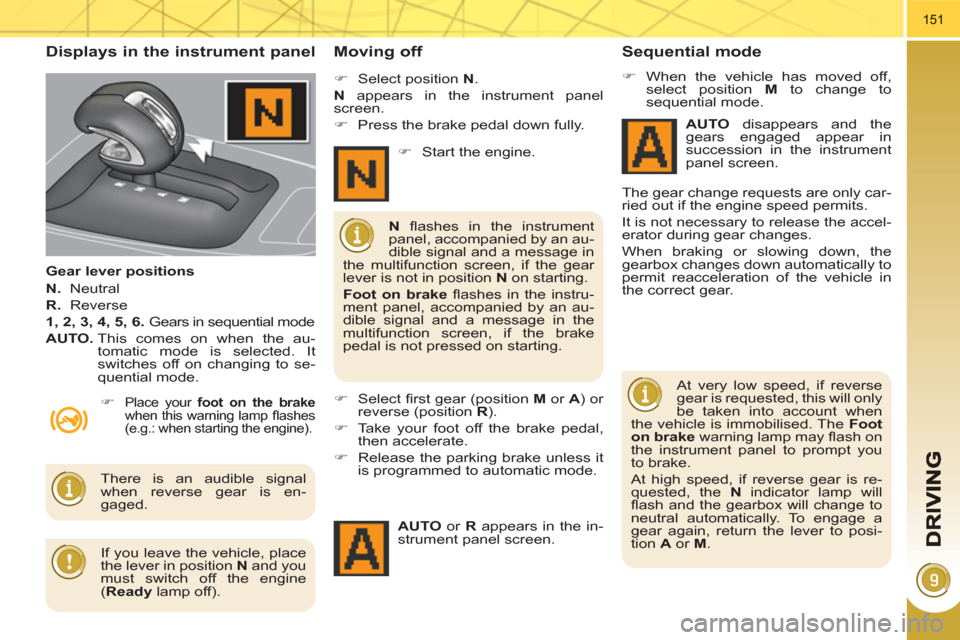
Displays in the instrument panel
Gear lever positions
N.
Neutral
R.
Reverse
1, 2, 3, 4, 5, 6.
Gears in sequential mode
AUTO.
This comes on when the au-
tomatic mode is selected. It
switches off on changing to se-
quential mode.
Moving off
�)
Place your foot on the brake
when this warning lamp fl ashes
(e.g.: when starting the engine).
�)
Select position N
.
N
appears in the instrument panel
screen.
�)
Press the brake pedal down fully.
�)
Select fi rst gear (position M
or A
) or
reverse (position R
).
�)
Take your foot off the brake pedal,
then accelerate.
�)
Release the parking brake unless it
is programmed to automatic mode.
AUTO
or R
appears in the in-
strument panel screen.
N
fl ashes in the instrument
panel, accompanied by an au-
dible signal and a message in
the multifunction screen, if the gear
lever is not in position N
on starting.
Foot on brake
fl ashes in the instru-
ment panel, accompanied by an au-
dible signal and a message in the
multifunction screen, if the brake
pedal is not pressed on starting.
There is an audible signal
when reverse gear is en-
gaged.
�)
Start the engine.
Sequential mode
�)
When the vehicle has moved off,
select position M
to change to
sequential mode.
AUTO
disappears and the
gears engaged appear in
succession in the instrument
panel screen.
The gear change requests are only car-
ried out if the engine speed permits.
It is not necessary to release the accel-
erator during gear changes.
When braking or slowing down, the
gearbox changes down automatically to
permit reacceleration of the vehicle in
the correct gear.
At very low speed, if reverse
gear is requested, this will only
be taken into account when
the vehicle is immobilised. The Foot
on brake
warning lamp may fl ash on
the instrument panel to prompt you
to brake.
At high speed, if reverse gear is re-
quested, the N
indicator lamp will
fl ash and the gearbox will change to
neutral automatically. To engage a
gear again, return the lever to posi-
tion A
or M
.
If you leave the vehicle, place
the lever in position N
and you
must switch off the engine
( Ready
lamp off).
Page 157 of 280
155
In addition to the rear parking sensors,
the front parking sensors are triggered
when an obstacle is detected in front
and the speed of the vehicle is still be-
low 6 mph (10 km/h).
The sound emitted by the speaker (front
or rear) indicates whether the obstacle
is in front or behind.
The front parking sensors are inter-
rupted if the vehicle stops for more than
three seconds in forward gear, if no
further obstacles are detected or when
the speed of the vehicle exceeds 6 mph
(10 km/h).
Front parking sensors
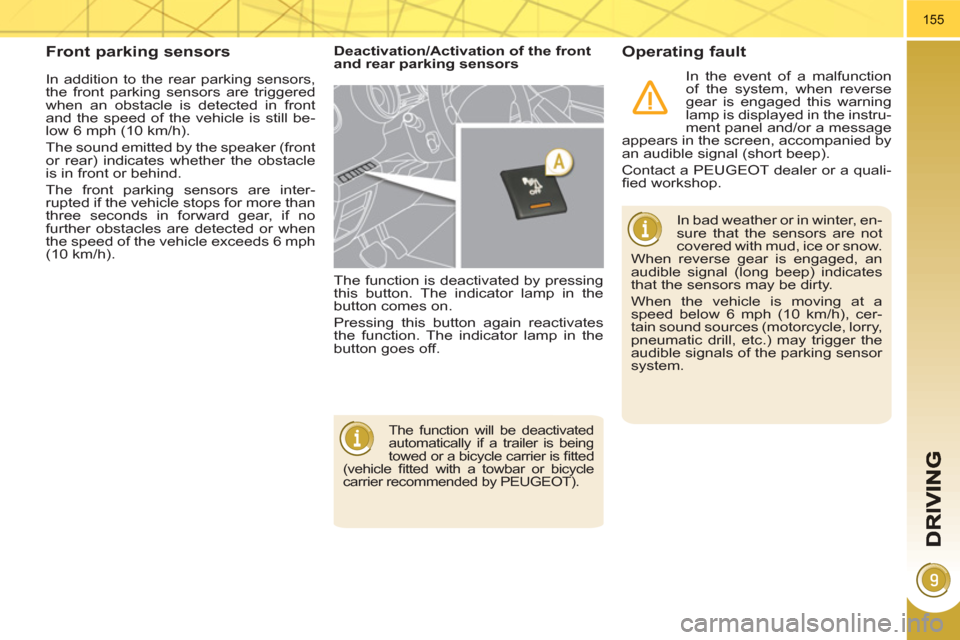
Deactivation/Activation of the front
and rear parking sensors
The function is deactivated by pressing
this button. The indicator lamp in the
button comes on.
Pressing this button again reactivates
the function. The indicator lamp in the
button goes off.
Operating fault
The function will be deactivated
automatically if a trailer is being
towed or a bicycle carrier is fi tted
(vehicle fi tted with a towbar or bicycle
carrier recommended by PEUGEOT).
In bad weather or in winter, en-
sure that the sensors are not
covered with mud, ice or snow.
When reverse gear is engaged, an
audible signal (long beep) indicates
that the sensors may be dirty.
When the vehicle is moving at a
speed below 6 mph (10 km/h), cer-
tain sound sources (motorcycle, lorry,
pneumatic drill, etc.) may trigger the
audible signals of the parking sensor
system.
In the event of a malfunction
of the system, when reverse
gear is engaged this warning
lamp is displayed in the instru-
ment panel and/or a message
appears in the screen, accompanied by
an audible signal (short beep).
Contact a PEUGEOT dealer or a quali-
fi ed workshop.
Page 163 of 280
CHECKS
161
Avoid prolonged contact of
used oil or fl uids with the skin.
Most of these fl uids are
harmful to health or indeed
very corrosive.
Do not discard used oil or
fl uids into sewers or onto the
ground.
Take used oil to a PEUGEOT dealer
(France) or an authorised waste dis-
posal site.
Diesel additive level (Diesel
engine with particle emission
filter)
A low additive level is indicated by illumi-
nation of the service warning lamp, ac-
companied by an audible warning and a
message in the multifunction screen.
Used products
CHECKS
12 V battery
The battery does not require
any maintenance.
However, check that the ter-
minals are clean and correctly
tightened, particularly in sum-
mer and winter.
When carrying out work on the battery,
refer to the "Practical information" sec-
tion for details of the precautions to be
taken before disconnecting the battery
and following its reconnection.
Air filter
Refer to the Warranty and
Maintenance Record for de-
tails of the replacement inter-
vals for these components.
Depending on the environment (e.g. dusty atmosphere) and the use of
the vehicle (e.g. city driving), replace
them twice as often if necessary
(refer to the "Engines" paragraph).
Oil filter
Replace the oil fi lter each time
the engine oil is changed.
Refer to the Warranty and
Maintenance Record for de-
tails of the replacement inter-
val for this component.
Topping up
This additive must be topped up by a
PEUGEOT dealer or a qualifi ed work-
shop without delay.
Unless otherwise indicated, check
these components in accordance with
the Warranty and Maintenance Record.
Otherwise, have them checked by a
PEUGEOT dealer.
Before doing anything under
the bonnet, switch off the igni-
tion ( Ready
lamp off) to avoid
any risk of injury resulting from auto-
matic operation of the motor.
Page 172 of 280
PRACTICAL INFORMATION
170
Parking the vehicle
Immobilise the vehicle where
it does not block traffi c: the
ground must be level, stable and
non-slippery ground.
Apply the parking brake unless it
has been programmed to automatic
mode, switch off the ignition and put
the gear lever in the A
, M
or R
posi-
tion to lock the wheels.
Check that the braking warning lamp
and the P
warning lamp on the park-
ing brake control come on.
If necessary, place a chock under the
wheel diagonally opposite the wheel
to be changed.
The occupants must get out of the ve-
hicle and wait where they are safe.
Never go underneath a vehicle raised
using a jack; use an axle stand.
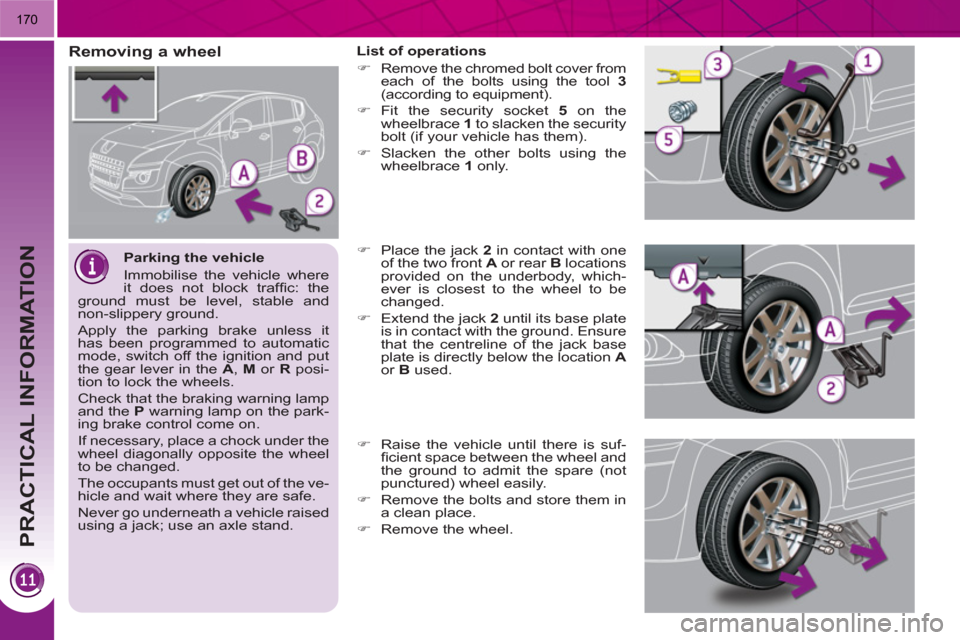
Removing a wheel
List of operations
�)
Remove the chromed bolt cover from
each of the bolts using the tool 3
(according to equipment).
�)
Fit the security socket 5
on the
wheelbrace 1
to slacken the security
bolt (if your vehicle has them).
�)
Slacken the other bolts using the
wheelbrace 1
only.
�)
Place the jack 2
in contact with one
of the two front A
or rear B
locations
provided on the underbody, which-
ever is closest to the wheel to be
changed.
�)
Extend the jack 2
until its base plate
is in contact with the ground. Ensure
that the centreline of the jack base
plate is directly below the location A
or B
used.
�)
Raise the vehicle until there is suf-
fi cient space between the wheel and
the ground to admit the spare (not
punctured) wheel easily.
�)
Remove the bolts and store them in
a clean place.
�)
Remove the wheel.
Page 181 of 280
PRACTICAL INFORMATION
179
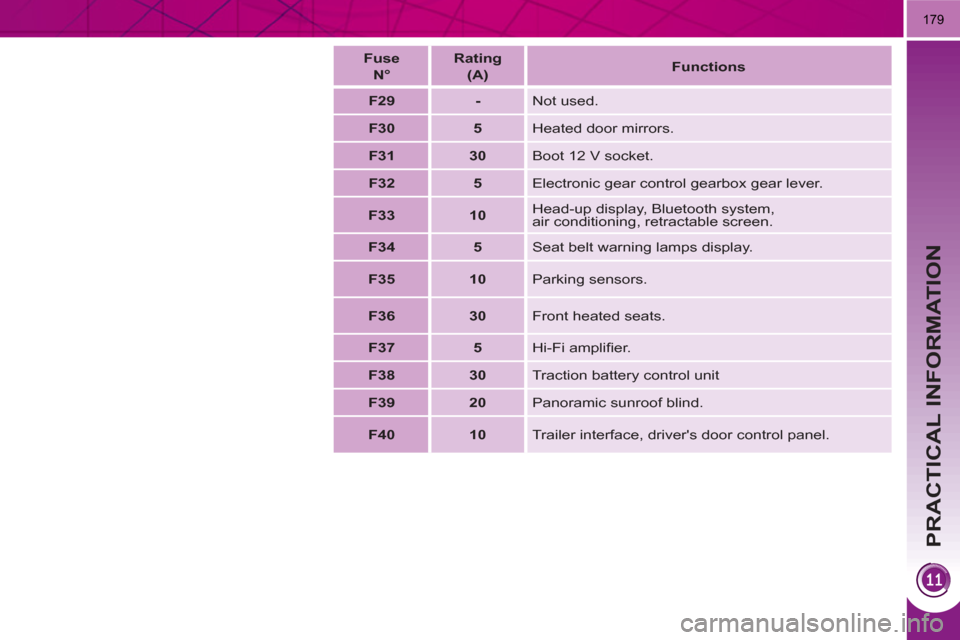
Fuse
N°
Rating
(A)
Functions
F29
-
Not used.
F30
5
Heated door mirrors.
F31
30
Boot 12 V socket.
F32
5
Electronic gear control gearbox gear lever.
F33
10
Head-up display, Bluetooth system,
air conditioning, retractable screen.
F34
5
Seat belt warning lamps display.
F35
10
Parking sensors.
F36
30
Front heated seats.
F37
5
Hi-Fi amplifi er.
F38
30
Traction battery control unit
F39
20
Panoramic sunroof blind.
F40
10
Trailer interface, driver's door control panel.
Page 190 of 280
PRACTICAL INFORMATION
188
RECOVERING THE VEHICLE ONA FLAT-BED
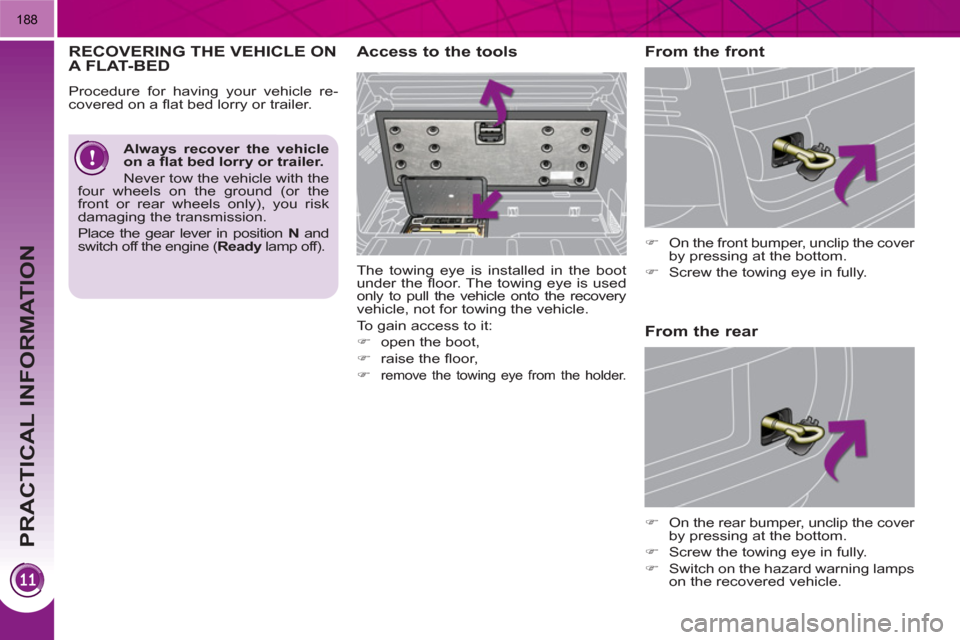
Access to the tools
From the front
�)
On the front bumper, unclip the cover
by pressing at the bottom.
�)
Screw the towing eye in fully.
�)
On the rear bumper, unclip the cover
by pressing at the bottom.
�)
Screw the towing eye in fully.
�)
Switch on the hazard warning lamps
on the recovered vehicle.
From the rear
The towing eye is installed in the boot
under the fl oor. The towing eye is used
only to pull the vehicle onto the recovery
vehicle, not for towing the vehicle.
To gain access to it:
�)
open the boot,
�)
raise the fl oor,
�)
remove the towing eye from the holder.
Always recover the vehicle
on a fl at bed lorry or trailer.
Never tow the vehicle with the
four wheels on the ground (or the
front or rear wheels only), you risk
damaging the transmission.
Place the gear lever in position N
and
switch off the engine ( Ready
lamp off).
Procedure for having your vehicle re-
covered on a fl at bed lorry or trailer.
Page 191 of 280
PRACTICAL INFORMATION
189
TOWING A TRAILER, ...
Towbar suitable for the attachment of a
trailer or caravan with additional lighting
and signalling.
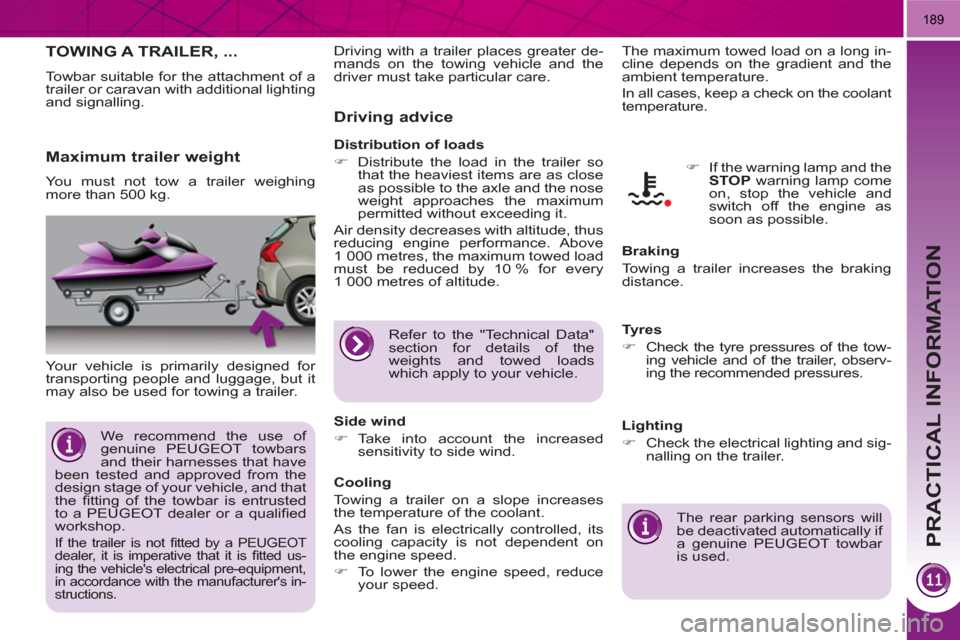
Your vehicle is primarily designed for
transporting people and luggage, but it
may also be used for towing a trailer.
Driving advice
The maximum towed load on a long in-
cline depends on the gradient and the
ambient temperature.
In all cases, keep a check on the coolant
temperature.
Cooling
Towing a trailer on a slope increases
the temperature of the coolant.
As the fan is electrically controlled, its
cooling capacity is not dependent on
the engine speed.
�)
To lower the engine speed, reduce
your speed.
Side wind
�)
Take into account the increased
sensitivity to side wind.
Tyres
�)
Check the tyre pressures of the tow-
ing vehicle and of the trailer, observ-
ing the recommended pressures.
Braking
Towing a trailer increases the braking
distance.
The rear parking sensors will
be deactivated automatically if
a genuine PEUGEOT towbar
is used.
�)
If the warning lamp and the
STOP
warning lamp come
on, stop the vehicle and
switch off the engine as
soon as possible.
Maximum trailer weight
You must not tow a trailer weighing
more than 500 kg.
Distribution of loads
�)
Distribute the load in the trailer so
that the heaviest items are as close
as possible to the axle and the nose
weight approaches the maximum
permitted without exceeding it.
Air density decreases with altitude, thus
reducing engine performance. Above
1 000 metres, the maximum towed load
must be reduced by 10 % for every
1 000 metres of altitude. Driving with a trailer places greater de-
mands on the towing vehicle and the
driver must take particular care.
We recommend the use of
genuine PEUGEOT towbars
and their harnesses that have
been tested and approved from the
design stage of your vehicle, and that
the fi tting of the towbar is entrusted
to a PEUGEOT dealer or a qualifi ed
workshop.
If the trailer is not fi tted by a PEUGEOT
dealer, it is imperative that it is fi tted us-
ing the vehicle's electrical pre-equipment,
in accordance with the manufacturer's in-
structions.
Lighting
�)
Check the electrical lighting and sig-
nalling on the trailer.
Refer to the "Technical Data"
section for details of the
weights and towed loads
which apply to your vehicle.
Page 193 of 280
PRACTICAL INFORMATION
191
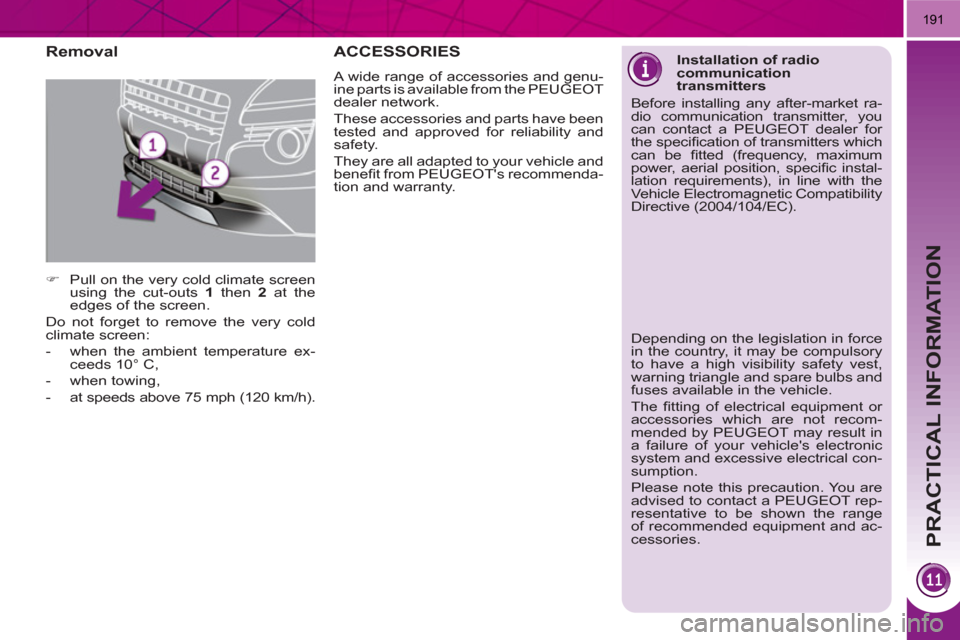
Removal
�)
Pull on the very cold climate screen
using the cut-outs 1
then 2
at the
edges of the screen.
Do not forget to remove the very cold
climate screen:
- when the ambient temperature ex-
ceeds 10° C,
- when towing,
- at speeds above 75 mph (120 km/h).
ACCESSORIES
A wide range of accessories and genu-
ine parts is available from the PEUGEOT
dealer network.
These accessories and parts have been
tested and approved for reliability and
safety.
They are all adapted to your vehicle and
benefi t from PEUGEOT's recommenda-
tion and warranty.
Installation of radio
communication
transmitters
Before installing any after-market ra-
dio communication transmitter, you
can contact a PEUGEOT dealer for
the specifi cation of transmitters which
can be fi tted (frequency, maximum
power, aerial position, specifi c instal-
lation requirements), in line with the
Vehicle Electromagnetic Compatibility
Directive (2004/104/EC).
Depending on the legislation in force
in the country, it may be compulsory
to have a high visibility safety vest,
warning triangle and spare bulbs and
fuses available in the vehicle.
The fi tting of electrical equipment or
accessories which are not recom-
mended by PEUGEOT may result in
a failure of your vehicle's electronic
system and excessive electrical con-
sumption.
Please note this precaution. You are
advised to contact a PEUGEOT rep-
resentative to be shown the range
of recommended equipment and ac-
cessories.