2011 NISSAN LATIO turn signal
[x] Cancel search: turn signalPage 3541 of 3787
RF-18
< FUNCTION DIAGNOSIS >
TROUBLE DIAGNOSIS
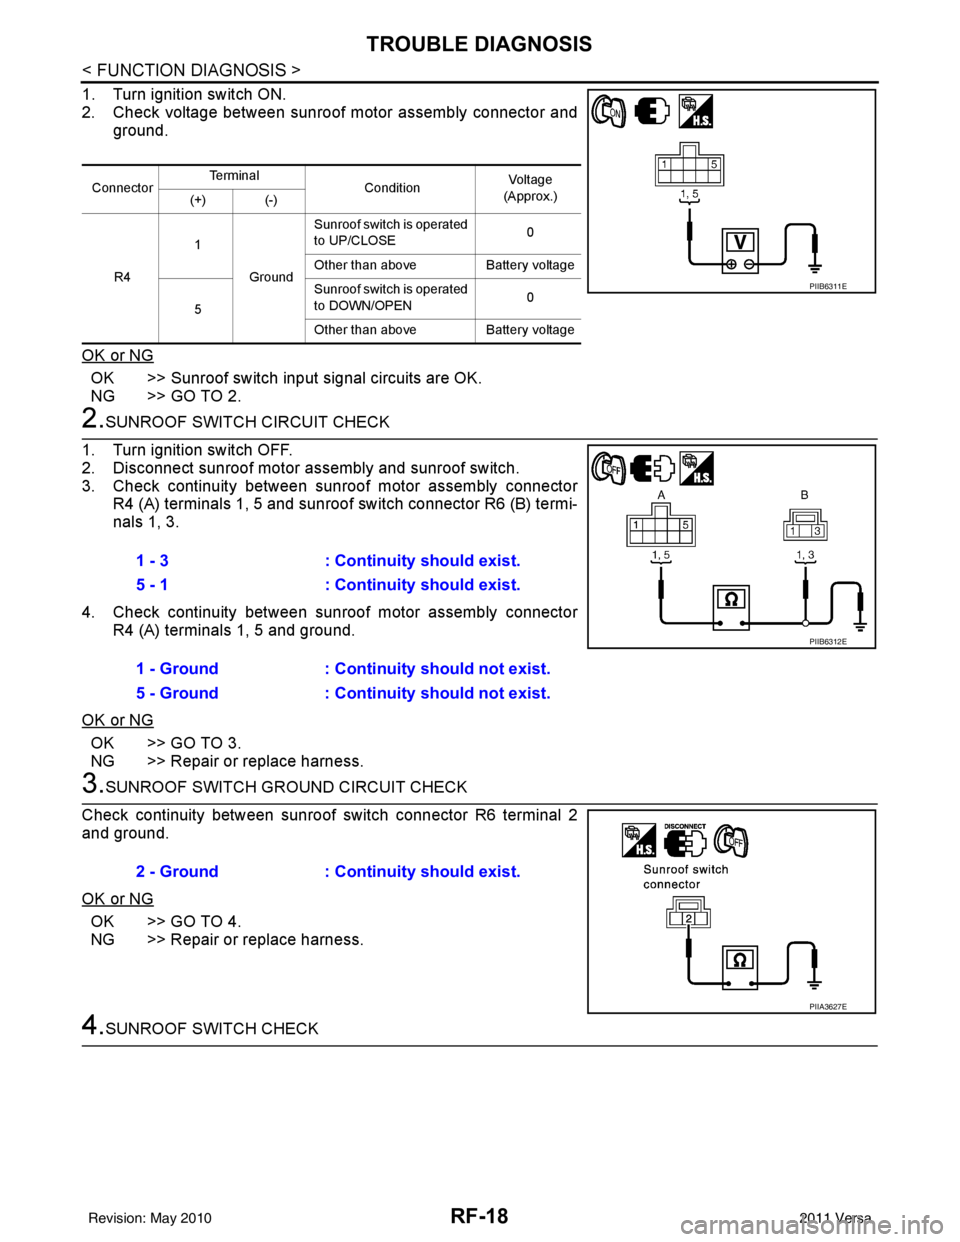
1. Turn ignition switch ON.
2. Check voltage between sunroof motor assembly connector andground.
OK or NG
OK >> Sunroof switch input signal circuits are OK.
NG >> GO TO 2.
2.SUNROOF SWITCH CIRCUIT CHECK
1. Turn ignition switch OFF.
2. Disconnect sunroof motor assembly and sunroof switch.
3. Check continuity between sunroof motor assembly connector R4 (A) terminals 1, 5 and sunroof switch connector R6 (B) termi-
nals 1, 3.
4. Check continuity between sunroof motor assembly connector R4 (A) terminals 1, 5 and ground.
OK or NG
OK >> GO TO 3.
NG >> Repair or replace harness.
3.SUNROOF SWITCH GROUND CIRCUIT CHECK
Check continuity between sunroof switch connector R6 terminal 2
and ground.
OK or NG
OK >> GO TO 4.
NG >> Repair or replace harness.
4.SUNROOF SWITCH CHECK
Connector Te r m i n a l
ConditionVol tag e
(Approx.)
(+) (-)
R4 1
Ground Sunroof switch is operated
to UP/CLOSE
0
Other than above Battery voltage
5 Sunroof switch is operated
to DOWN/OPEN
0
Other than above Battery voltage
PIIB6311E
1 - 3: Continuity should exist.
5 - 1 : Continuity should exist.
1 - Ground : Continuity should not exist.
5 - Ground : Continuity should not exist.
PIIB6312E
2 - Ground: Continuity should exist.
PIIA3627E
Revision: May 2010 2011 Versa
Page 3542 of 3787
TROUBLE DIAGNOSISRF-19
< FUNCTION DIAGNOSIS >
C
DE
F
G H
J
K L
M A
B
RF
N
O P
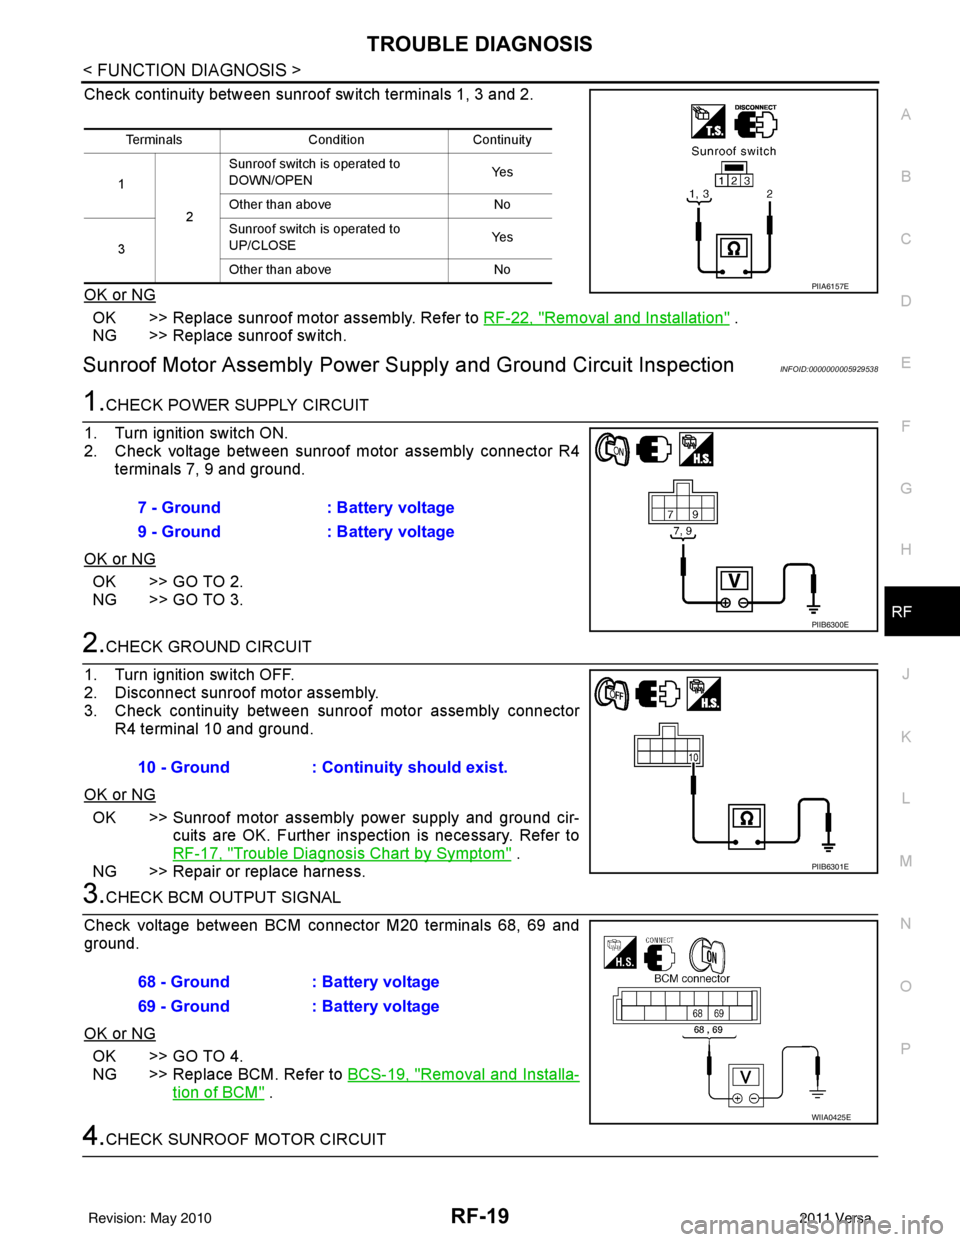
Check continuity between sunroof switch terminals 1, 3 and 2.
OK or NG
OK >> Replace sunroof motor assembly. Refer to RF-22, "Removal and Installation" .
NG >> Replace sunroof switch.
Sunroof Motor Assembly Power Supply and Ground Circuit InspectionINFOID:0000000005929538
1.CHECK POWER SUPPLY CIRCUIT
1. Turn ignition switch ON.
2. Check voltage between sunroof motor assembly connector R4 terminals 7, 9 and ground.
OK or NG
OK >> GO TO 2.
NG >> GO TO 3.
2.CHECK GROUND CIRCUIT
1. Turn ignition switch OFF.
2. Disconnect sunroof motor assembly.
3. Check continuity between sunroof motor assembly connector R4 terminal 10 and ground.
OK or NG
OK >> Sunroof motor assembly power supply and ground cir- cuits are OK. Further inspection is necessary. Refer to
RF-17, "
Trouble Diagnosis Chart by Symptom" .
NG >> Repair or replace harness.
3.CHECK BCM OUTPUT SIGNAL
Check voltage between BCM connector M20 terminals 68, 69 and
ground.
OK or NG
OK >> GO TO 4.
NG >> Replace BCM. Refer to BCS-19, "
Removal and Installa-
tion of BCM" .
4.CHECK SUNROOF MOTOR CIRCUIT
Terminals ConditionContinuity
1 2Sunroof switch is operated to
DOWN/OPEN
Ye s
Other than above No
3 Sunroof switch is operated to
UP/CLOSE
Ye s
Other than above No
PIIA6157E
7 - Ground: Battery voltage
9 - Ground : Battery voltage
PIIB6300E
10 - Ground: Continuity should exist.
PIIB6301E
68 - Ground : Battery voltage
69 - Ground : Battery voltage
WIIA0425E
Revision: May 2010 2011 Versa
Page 3543 of 3787
RF-20
< FUNCTION DIAGNOSIS >
TROUBLE DIAGNOSIS
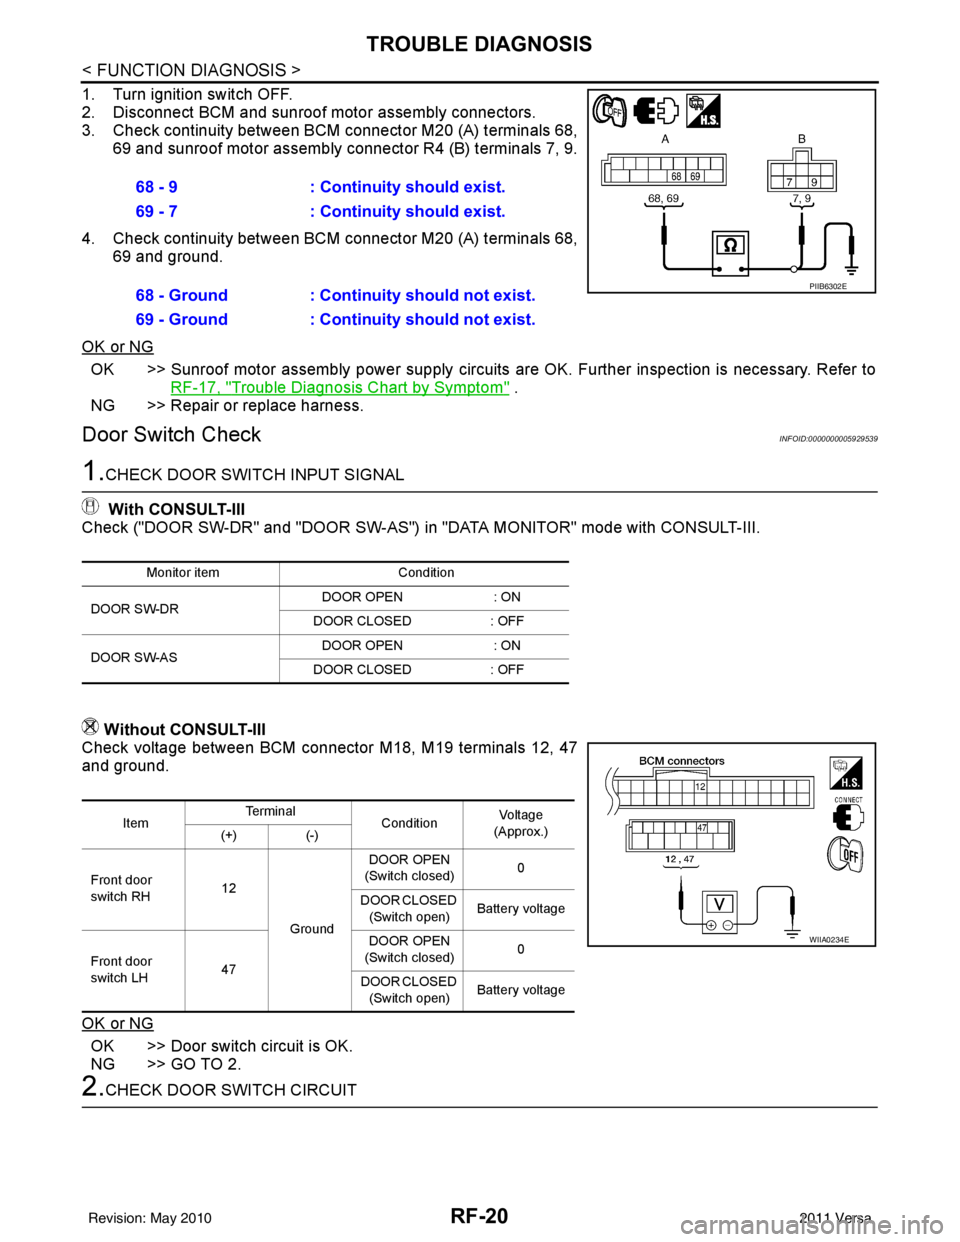
1. Turn ignition switch OFF.
2. Disconnect BCM and sunroof motor assembly connectors.
3. Check continuity between BCM connector M20 (A) terminals 68,
69 and sunroof motor assembly connector R4 (B) terminals 7, 9.
4. Check continuity between BCM connector M20 (A) terminals 68,
69 and ground.
OK or NG
OK >> Sunroof motor assembly power supply circuits are OK. Further inspection is necessary. Refer to
RF-17, "
Trouble Diagnosis Chart by Symptom" .
NG >> Repair or replace harness.
Door Switch CheckINFOID:0000000005929539
1.CHECK DOOR SWITCH INPUT SIGNAL
With CONSULT-III
Check ("DOOR SW-DR" and "DOOR SW-AS") in "DATA MONITOR" mode with CONSULT-III.
Without CONSULT-III
Check voltage between BCM connector M18, M19 terminals 12, 47
and ground.
OK or NG
OK >> Door switch circuit is OK.
NG >> GO TO 2.
2.CHECK DOOR SWITCH CIRCUIT 68 - 9
: Continuity should exist.
69 - 7 : Continuity should exist.
68 - Ground : Continuity should not exist.
69 - Ground : Continuity should not exist.
PIIB6302E
Monitor item Condition
DOOR SW-DR DOOR OPEN
: ON
DOOR CLOSED : OFF
DOOR SW-AS DOOR OPEN
: ON
DOOR CLOSED : OFF
ItemTe r m i n a l
ConditionVo l ta g e
(Approx.)
(+) (-)
Front door
switch RH 12
Ground DOOR OPEN
(Switch closed) 0
DOOR CLOSED (Switch open) Battery voltage
Front door
switch LH 47 DOOR OPEN
(Switch closed) 0
DOOR CLOSED (Switch open) Battery voltage
WIIA0234E
Revision: May 2010
2011 Versa
Page 3544 of 3787
TROUBLE DIAGNOSISRF-21
< FUNCTION DIAGNOSIS >
C
DE
F
G H
J
K L
M A
B
RF
N
O P
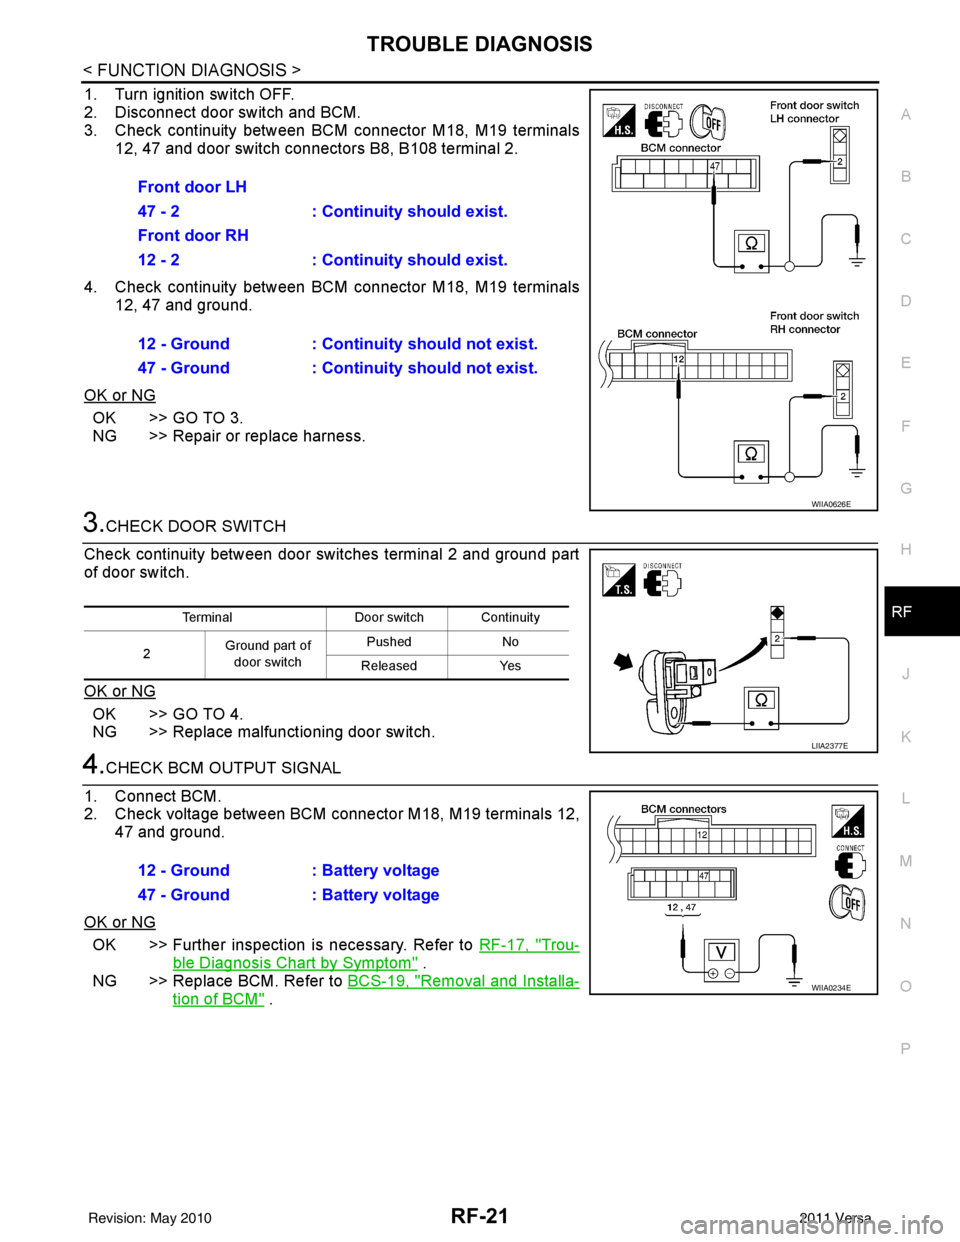
1. Turn ignition switch OFF.
2. Disconnect door switch and BCM.
3. Check continuity between BCM connector M18, M19 terminals 12, 47 and door switch connectors B8, B108 terminal 2.
4. Check continuity between BCM connector M18, M19 terminals 12, 47 and ground.
OK or NG
OK >> GO TO 3.
NG >> Repair or replace harness.
3.CHECK DOOR SWITCH
Check continuity between door switches terminal 2 and ground part
of door switch.
OK or NG
OK >> GO TO 4.
NG >> Replace malfunctioning door switch.
4.CHECK BCM OUTPUT SIGNAL
1. Connect BCM.
2. Check voltage between BCM connector M18, M19 terminals 12, 47 and ground.
OK or NG
OK >> Further inspection is necessary. Refer to RF-17, "Trou-
ble Diagnosis Chart by Symptom" .
NG >> Replace BCM. Refer to BCS-19, "
Removal and Installa-
tion of BCM" .
Front door LH
47 - 2 : Continuity should exist.
Front door RH
12 - 2 : Continuity should exist.
12 - Ground : Continuity should not exist.
47 - Ground : Continuity should not exist.
WIIA0626E
Terminal
Door switch Continuity
2 Ground part of
door switch Pushed
No
Released Yes
LIIA2377E
12 - Ground : Battery voltage
47 - Ground : Battery voltage
WIIA0234E
Revision: May 2010 2011 Versa
Page 3652 of 3787

SRS-18
< SYMPTOM DIAGNOSIS >
TROUBLE DIAGNOSIS
HOW TO CHANGE BETWEEN SELF-DIAGNOSIS MODE AND USER MODE WITH CONSULT-III
From User Mode to Diagnosis Mode
After selecting “AIR BAG” on the “SELECT SYSTEM” screen, User mode automatically changes to Diagnosis
mode.
From Diagnosis Mode to User Mode
To return to User mode from Diagnosis mode, touch “BACK” key of CONSULT-III until “SELECT SYSTEM”
appears, Diagnosis mode automatically changes to User mode.
HOW TO ERASE SELF-DIAGNOSIS RESULTS
NOTE:
If the memory in “SELF-DIAG [PAST]” is not erased, User mode will continue to show the system mal-
function by the operation of th e warning lamp even if the malfun ction is repaired completely.
• “SELF-DIAG [CURRENT]” A current self-diagnosis result is displayed on the CO NSULT-III screen in real time. After the malfunction is
repaired completely, no malfunction is detected on “SELF-DIAG [CURRENT]”.
• “SELF-DIAG [PAST]” Return to the “SELF-DIAG [CURRENT]” CONSULT-III screen by touching “BACK” key of CONSULT-III and
select “SELF-DIAG [CURRENT]” in SELECT DIAG MODE. Touch “ERASE” in “SELF-DIAG [CURRENT]”
mode.
• “TROUBLE DIAG RECORD”
The memory of “TROUBLE DI AG RECORD” cannot be erased.
Self-Diagnosis Function (Without CONSULT-III)INFOID:0000000006211121
The reading of these results is accomplished using one of two modes — “User mode” and “Diagnosis mode”.
HOW TO CHANGE BETWEEN USER MODE AND SELF-DIAGNOSIS MODE WITHOUT CONSULT-
AIR BAG diagnostic mode Description
SELF-DIAG [CURRENT] A current Self-diagnosis result is displayed on the CO
NSULT-III screen in real time. This refers to a mal-
functioning part requiring replacement.
SELF-DIAG [PAST] Diagnosis results previously stored in the memory are displayed on the CONSULT-III screen. The
stored results will remain until the memory is erased.
TROUBLE DIAG RECORD With TROUBLE DIAG RECORD, diagnosis results previously erased by a reset operation can be dis-
played on the CONSULT-III screen.
ECU DISCRIMINATED NO. Air bag diagnosis sensor unit ECU discriminated number (identification number) is displayed. Air bag
diagnosis sensor unit has individual ECU discriminated number (identification number) based on model
and equipment.
PASSENGER AIR BAG The STATUS (readiness) of the front passenger air bag module is displayed. The STATUS displayed
(ON/OFF) depends on the signals supplied to the occupant classification system control module and
air bag diagnosis sensor unit. Refer to
SRS-6, "
Occupant Classification System (OCS)" for more in-
formation.
Revision: May 2010 2011 Versa
Page 3671 of 3787
SPIRAL CABLESRS-37
< ON-VEHICLE REPAIR >
C
DE
F
G
I
J
K L
M A
B
SRS
N
O P
SPIRAL CABLE
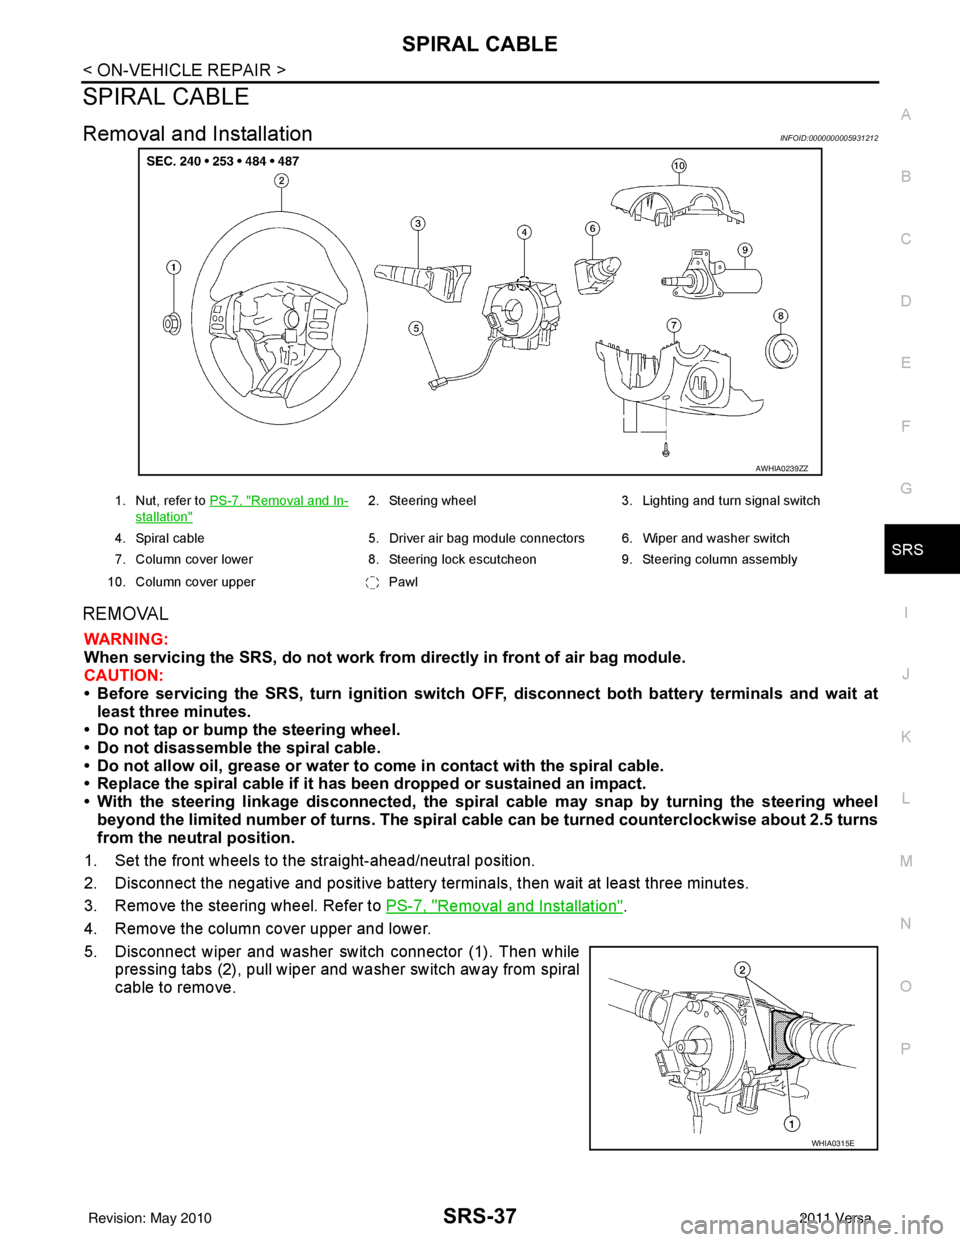
Removal and InstallationINFOID:0000000005931212
REMOVAL
WARNING:
When servicing the SRS, do not work from directly in front of air bag module.
CAUTION:
• Before servicing the SRS, turn ignition switch OFF, disconnect both battery terminals and wait at
least three minutes.
• Do not tap or bump the steering wheel.
• Do not disassemble the spiral cable.
• Do not allow oil, grease or water to co me in contact with the spiral cable.
• Replace the spiral cable if it has b een dropped or sustained an impact.
• With the steering linkage disconn ected, the spiral cable may snap by turning the steering wheel
beyond the limited number of turns. The spiral cable can be turned counterclockwise about 2.5 turns
from the neutral position.
1. Set the front wheels to the straight-ahead/neutral position.
2. Disconnect the negative and positive battery term inals, then wait at least three minutes.
3. Remove the steering wheel. Refer to PS-7, "
Removal and Installation".
4. Remove the column cover upper and lower.
5. Disconnect wiper and washer switch connector (1). Then while pressing tabs (2), pull wiper and washer switch away from spiral
cable to remove.
AWHIA0239ZZ
1. Nut, refer to PS-7, "Removal and In-
stallation"
2. Steering wheel 3. Lighting and turn signal switch
4. Spiral cable 5. Driver air bag module connectors 6. Wiper and washer switch
7. Column cover lower 8. Steering lock escutcheon 9. Steering column assembly
10. Column cover upper Pawl
WHIA0315E
Revision: May 2010 2011 Versa
Page 3672 of 3787
SRS-38
< ON-VEHICLE REPAIR >
SPIRAL CABLE
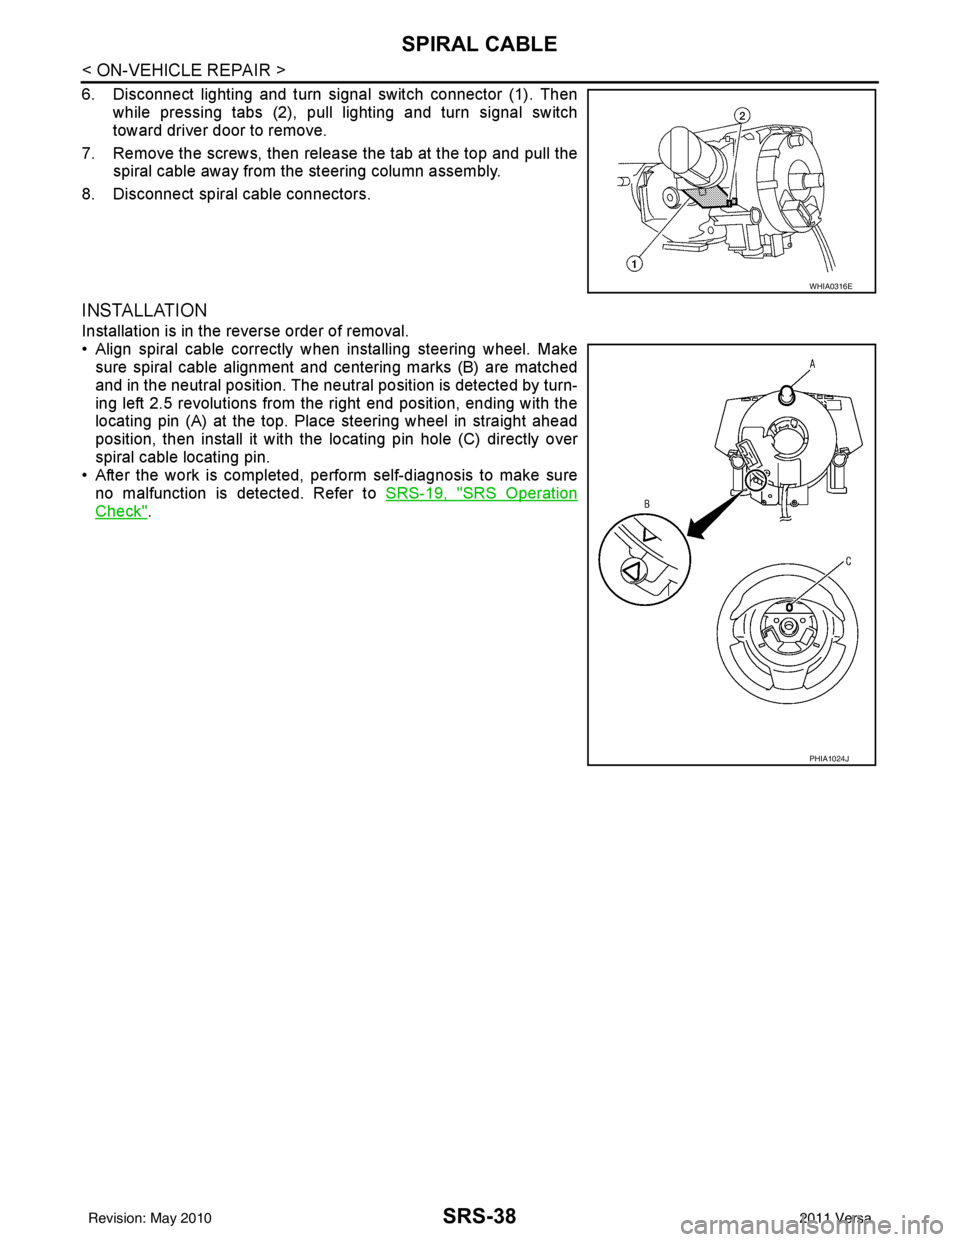
6. Disconnect lighting and turn signal switch connector (1). Thenwhile pressing tabs (2), pull lighting and turn signal switch
toward driver door to remove.
7. Remove the screws, then release the tab at the top and pull the spiral cable away from the steering column assembly.
8. Disconnect spiral cable connectors.
INSTALLATION
Installation is in the reverse order of removal.
• Align spiral cable correctly when installing steering wheel. Make sure spiral cable alignment and centering marks (B) are matched
and in the neutral position. The neutra l position is detected by turn-
ing left 2.5 revolutions from the right end position, ending with the
locating pin (A) at the top. Place steering wheel in straight ahead
position, then install it with the locating pin hole (C) directly over
spiral cable locating pin.
• After the work is completed, perform self-diagnosis to make sure
no malfunction is detected. Refer to SRS-19, "
SRS Operation
Check".
WHIA0316E
PHIA1024J
Revision: May 2010 2011 Versa
Page 3688 of 3787

STC-1
STEERING
C
DE
F
H I
J
K L
M
SECTION STC
A
B
STC
N
O P
CONTENTS
STEERING CONTROL SYSTEM
EPS
BASIC INSPECTION ....... .............................
3
DIAGNOSIS AND REPAIR WORKFLOW ..... .....3
Work Flow ........................................................... ......3
SYSTEM DESCRIPTION ..............................5
EPS SYSTEM ... .............................................. .....5
System Diagram .................................................. ......5
System Description ...................................................5
Component Parts Location ........................................6
Component Description .............................................6
DIAGNOSIS SYSTEM (EPS CONTROL UNIT)
.....
8
CONSULT-III Function ........................................ ......8
DTC/CIRCUIT DIAGNOSIS ..........................9
C1601 BATTERY POWER SUPPLY ..................9
Description .......................................................... ......9
DTC Logic .................................................................9
Diagnosis Procedure .................................................9
C1604 TORQUE SENSOR .................................11
Description ..............................................................11
DTC Logic ...............................................................11
Diagnosis Procedure ...............................................11
C1606 EPS MOTOR ...........................................13
Description .......................................................... ....13
DTC Logic ...............................................................13
Diagnosis Procedure ...............................................13
Component Inspection ............................................13
C1607, C1608 EPS CONTROL UNIT ................15
Description .......................................................... ....15
DTC Logic ...............................................................15
Diagnosis Procedure ...............................................15
C1609 VEHICLE SPEED SIGNAL .....................16
Description ........................................................... ....16
DTC Logic ................................................................16
Diagnosis Procedure ...............................................16
C1610 ENGINE STATUS SIGNAL ...................17
Description ...............................................................17
DTC Logic ................................................................17
Diagnosis Procedure ...............................................17
U1000 CAN COMM CIRCUIT ...........................18
Description ...............................................................18
DTC Logic ................................................................18
Diagnosis Procedure ...............................................18
EPS WARNING LAMP ......................................19
Description ...............................................................19
Component Function Check ....................................19
Diagnosis Procedure ...............................................19
ECU DIAGNOSIS INFORMATION ..............20
EPS CONTROL UNIT .......................................20
Reference Value .................................................. ....20
Wiring Diagram - ELECTRONICALLY CON-
TROLLED POWER STEERING SYSTEM - ............
22
Fail-Safe .............................................................. ....23
DTC Inspection Priority Chart ..................................24
DTC Index ...............................................................24
SYMPTOM DIAGNOSIS ..............................25
EPS WARNING LAMP DOES NOT TURN ON ...25
Description ........................................................... ....25
Diagnosis Procedure ...............................................25
EPS WARNING LAMP DOES NOT TURN
OFF ....................................................................
26
Description ...............................................................26
Diagnosis Procedure ...............................................26
STEERING WHEEL TURNING FORCE IS
HEAVY OR LIGHT ............................................
27
Revision: May 2010 2011 Versa