2011 NISSAN LATIO turn signal
[x] Cancel search: turn signalPage 3719 of 3787

WT-1
SUSPENSION
C
DF
G H
I
J
K L
M
SECTION WT
A
B
WT
N
O PCONTENTS
ROAD WHEELS & TIRES
SERVICE INFORMATION .. ..........................2
PRECAUTIONS .............................................. .....2
Precaution for Supplemental Restraint System
(SRS) "AIR BAG" and "SEAT BELT PRE-TEN-
SIONER" ............................................................. ......
2
Precaution Necessary for Steering Wheel Rota-
tion After Battery Disconnect ............................... ......
2
PREPARATION ...................................................4
Special Service Tool ........................................... ......4
Commercial Service Tool ..........................................4
NOISE, VIBRATION AND HARSHNESS
(NVH) TROUBLESHOOTING .............................
5
NVH Troubleshooting Chart ................................ ......5
ROAD WHEEL ....................................................6
Inspection ............................................................ ......6
ROAD WHEEL TIRE ASSEMBLY ......................7
Adjustment .......................................................... ......7
TIRE PRESSURE MONITORING SYSTEM ........9
System Component ............................................. ......9
System Description ...................................................9
CAN COMMUNICATION ....................................11
System Description ............................................. ....11
TROUBLE DIAGNOSES ....................................12
Wiring Diagram- T/WARN - .....................................12
Terminal and Reference Value for BCM .................12
ID Registration Procedure .......................................13
Transmitter Wake Up Operation .............................14
CONSULT-III Function (BCM) .................................14
How to Perform Trouble Diagnosis for Quick and
Accurate Repair ................................................... ....
15
Preliminary Check ...................................................16
Self-Diagnosis (With CONSULT-III) ........................16
Self-Diagnosis (Without CONSULT-III) ...................17
TROUBLE DIAGNOSIS FOR SELF-DIAG-
NOSTIC ITEMS .................................................
20
Data from Transmitter Not Being Received .............20
Transmitter Malfunction ...........................................20
Transmitter Pressure Malfunction ............................21
Vehicle Speed Signal .......................................... ....21
Vehicle Ignition Signal .............................................22
TROUBLE DIAGNOSIS FOR SYMPTOMS ......23
Low Tire Pressure Warning Lamp Does Not Come
On When Ignition Switch Is Turned On ...................
23
Low Tire Pressure Warning Lamp Stays On When
Ignition Switch Is Turned On ............................... ....
23
Low Tire Pressure Warning Lamp Flashes When
Ignition Switch Is Turned On ...................................
24
Hazard Warning Lamps Flash When Ignition
Switch Is Turned On ................................................
25
ID Registration Cannot Be Completed ....................25
REMOVAL AND INSTALLATION .....................26
Transmitter (Pressure Sens or) ................................26
SERVICE DATA AND SPECIFICATIONS
(SDS) .................................................................
28
Road Wheel ......................................................... ....28
Tire ..........................................................................28
Revision: May 2010 2011 Versa
Page 3732 of 3787
WT-14
< SERVICE INFORMATION >
TROUBLE DIAGNOSES
6. Inflate all tires to proper pressure. Refer to WT-28, "Tire" .
Transmitter Wake Up OperationINFOID:0000000005931106
NOTE:
This procedure must be done after replacement of a low tire pressure warning transmitter or BCM.
New replacement transmitters are provided "asleep" and must first be "woken up" using Transmitter
Activation Tool J-45295 before ID registration can be performed.
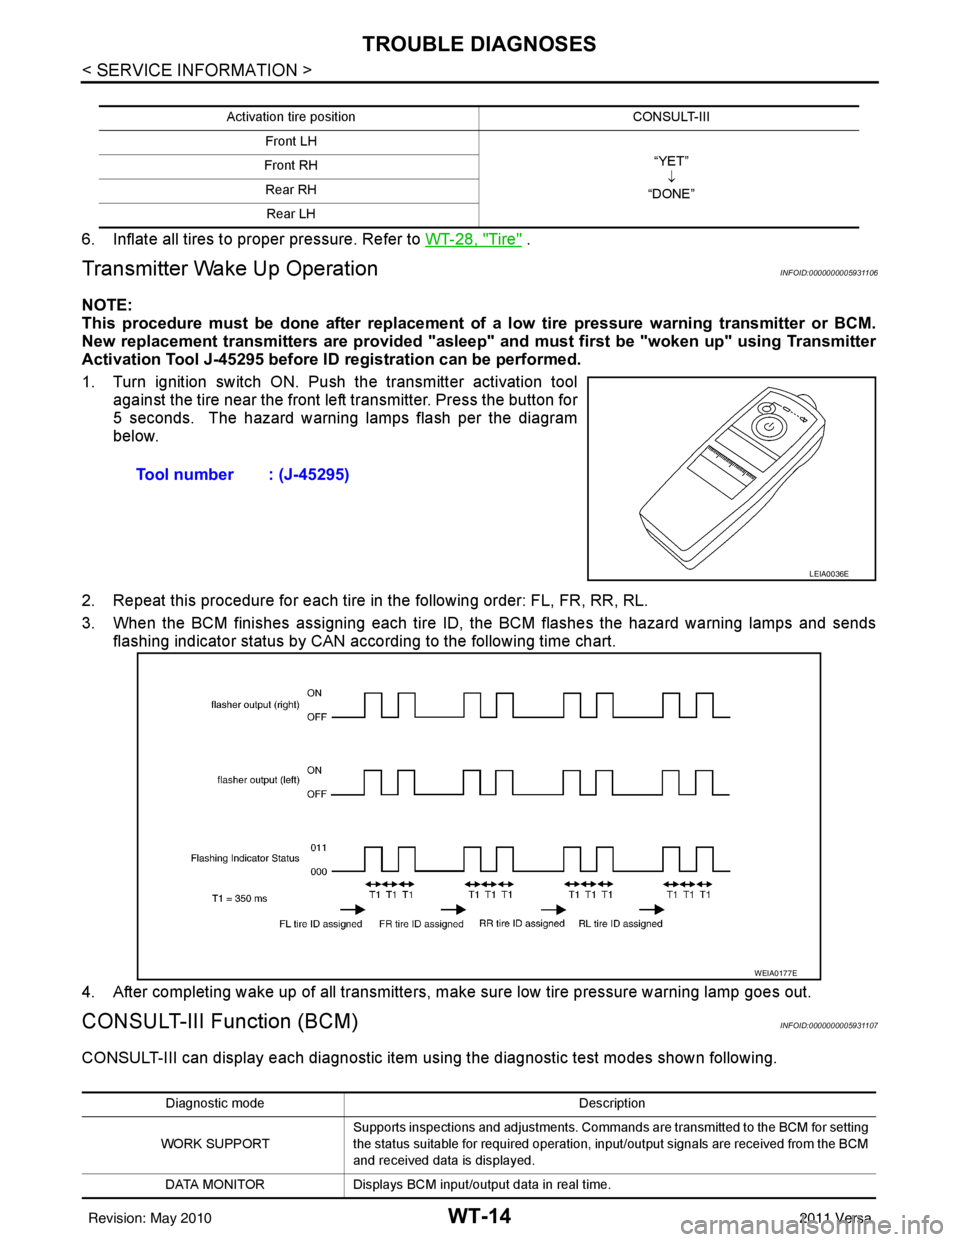
1. Turn ignition switch ON. Push the transmitter activation tool against the tire near the front left transmitter. Press the button for
5 seconds. The hazard warning lamps flash per the diagram
below.
2. Repeat this procedure for each tire in the following order: FL, FR, RR, RL.
3. When the BCM finishes assigning each tire ID, the BCM flashes the hazard warning lamps and sends flashing indicator status by CAN according to the following time chart.
4. After completing wake up of all transmitters, make sure low tire pressure warning lamp goes out.
CONSULT-III Function (BCM)INFOID:0000000005931107
CONSULT-III can display each diagnostic item us ing the diagnostic test modes shown following.
Activation tire position CONSULT-III
Front LH “YET”↓
“DONE”
Front RH
Rear RHRear LH
Tool number : (J-45295)
LEIA0036E
WEIA0177E
Diagnostic mode Description
WORK SUPPORT Supports inspections and adjustments. Commands are transmitted to the BCM for setting
the status suitable for required operation, input/output signals are received from the BCM
and received data is displayed.
DATA MONITOR Displays BCM input/output data in real time.
Revision: May 2010 2011 Versa
Page 3734 of 3787
WT-16
< SERVICE INFORMATION >
TROUBLE DIAGNOSES
Preliminary Check
INFOID:0000000005931109
BASIC INSPECTION
1.CHECK ALL TIRE PRESSURES
Check all tire pressures. Refer to WT-28, "
Tire" .
OK or NG
OK >> GO TO 2.
NG >> Adjust tire pressure to specified value.
2.CHECK LOW TIRE PRESSURE WARNING LAMP ACTIVATION
Check low tire pressure warning lamp activation.
Does warning lamp activate for 1 second when ignition switch is turned ON?
YES >> GO TO 3.
NO >> GO TO WT-23, "
Low Tire Pressure Warning Lamp Does Not Come On When Ignition Switch Is
Turned On" .
3.CHECK BCM CONNECTOR
1. Disconnect BCM harness connector.
2. Check terminals for damage or loose connection.
3. Reconnect harness connector.
OK or NG
OK >> GO TO 4.
NG >> Repair or replace damaged parts.
4.CHECK TRANSMITTER ACTIVATION TOOL
Check transmitter activation tool battery.
OK or NG
OK >> Carry out self-diagnosis.
NG >> Replace battery in transmitter activation tool.
Self-Diagnosis (With CONSULT-III)INFOID:0000000005931110
DESCRIPTION
During driving, the tire pressure monitoring system receives the signal trans mitted from the transmitter
installed in each wheel, and turns on the low tire pressure warning lamp when the tire pressure becomes low.
The control unit (BCM) for this system has pressure judgement and self-diagnosis functions.
FUNCTION
When the tire pressure monitoring system detects low inflation pressure or an internal malfunction, the low tire
pressure warning lamp in the combination meter comes on. The malfunction location is indicated by the low
tire pressure warning lamp flashing and the buzzer sounding.
CONSULT-III Application to Tire Pressure Monitoring System
× : Applicable
– : Not applicable ITEM
SELF-DIAGNOSTIC RESULTS DATA MONITOR
Front - Left transmitter ××
Front - Right transmitter ××
Rear - Left transmitter ××
Rear - Right transmitter ××
Warning lamp —×
Vehicle speed ××
Buzzer (in combination meter) —×
CAN Communication ××
Revision: May 2010 2011 Versa
Page 3736 of 3787
WT-18
< SERVICE INFORMATION >
TROUBLE DIAGNOSES
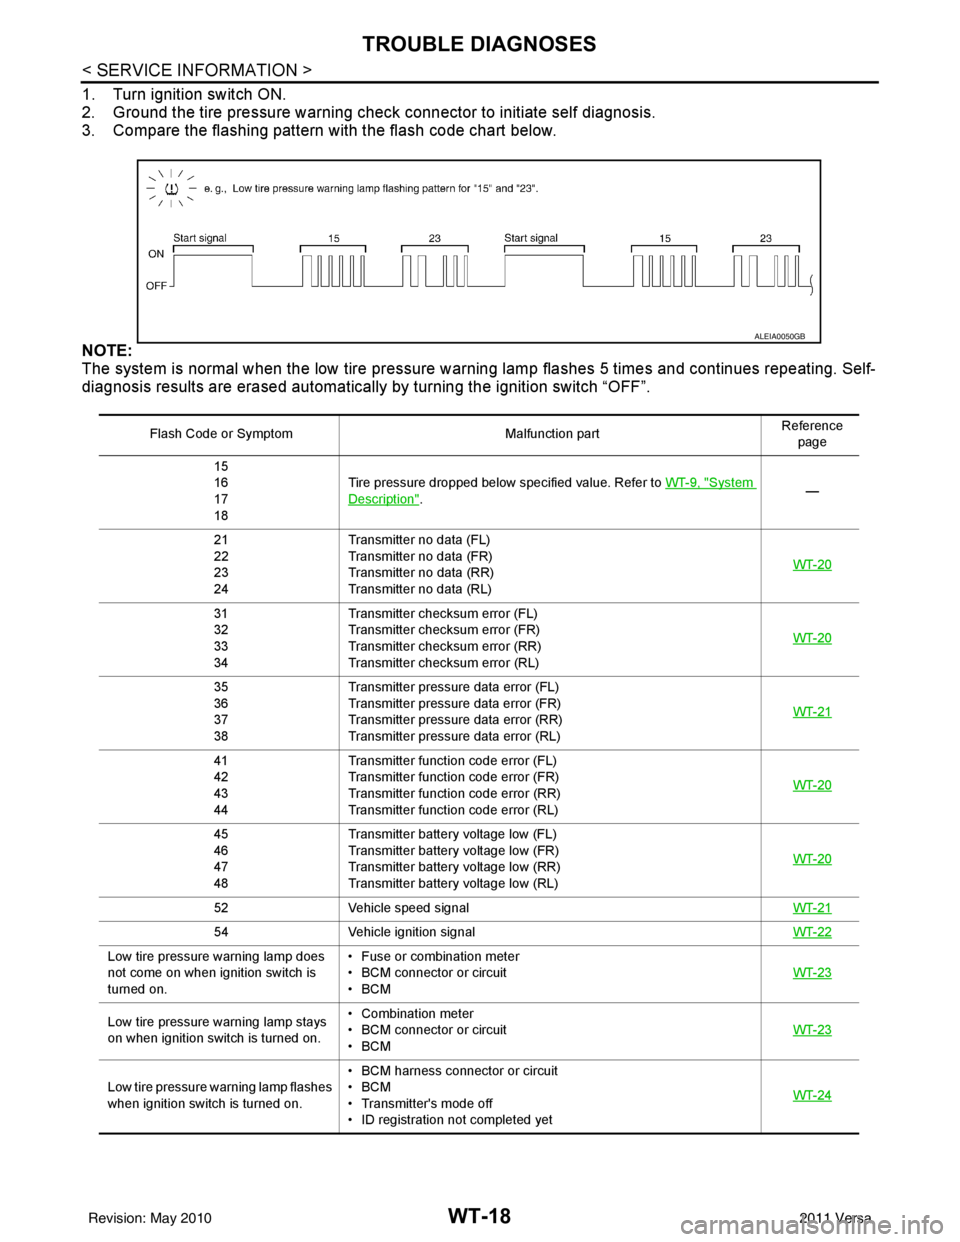
1. Turn ignition switch ON.
2. Ground the tire pressure warning check connector to initiate self diagnosis.
3. Compare the flashing pattern with the flash code chart below.
NOTE:
The system is normal when the low tire pressure warning lamp flashes 5 times and continues repeating. Self-
diagnosis results are erased automatically by turning the ignition switch “OFF”.
Flash Code or Symptom Malfunction partReference
page
15
16
17
18 Tire pressure dropped below specified value. Refer to
WT-9, "
System
Description". —
21
22
23
24 Transmitter no data (FL)
Transmitter no data (FR)
Transmitter no data (RR)
Transmitter no data (RL)
WT-20
31
32
33
34Transmitter chec
ksum error (FL)
Transmitter chec ksum error (FR)
Transmitter chec ksum error (RR)
Transmitter chec ksum error (RL) WT-20
35
36
37
38Transmitter pressure
data error (FL)
Transmitter pressure data error (FR)
Transmitter pressure data error (RR)
Transmitter pressure data error (RL) WT-21
41
42
43
44Transmitter function
code error (FL)
Transmitter function code error (FR)
Transmitter function code error (RR)
Transmitter function code error (RL) WT-20
45
46
47
48Transmitter battery voltage low (FL)
Transmitter battery voltage low (FR)
Transmitter battery voltage low (RR)
Transmitter battery voltage low (RL)
WT-20
52
Vehicle speed signal WT-21
54Vehicle ignition signal WT-22
Low tire pressure warning lamp does
not come on when ignition switch is
turned on.• Fuse or combination meter
• BCM connector or circuit
•BCM
WT-23
Low tire pressure
warning lamp stays
on when ignition switch is turned on. • Combination meter
• BCM connector or circuit
•BCM
WT-23
Low tire pressure wa
rning lamp flashes
when ignition switch is turned on. • BCM harness connector or circuit
•BCM
• Transmitter's mode off
• ID registration not completed yet
WT-24
ALEIA0050GB
Revision: May 2010
2011 Versa
Page 3751 of 3787
FRONT WIPER AND WASHER SYSTEMWW-5
< SERVICE INFORMATION >
C
DE
F
G H
I
J
L
M A
B
WW
N
O P
FRONT WIPER AND WASHER SYSTEM
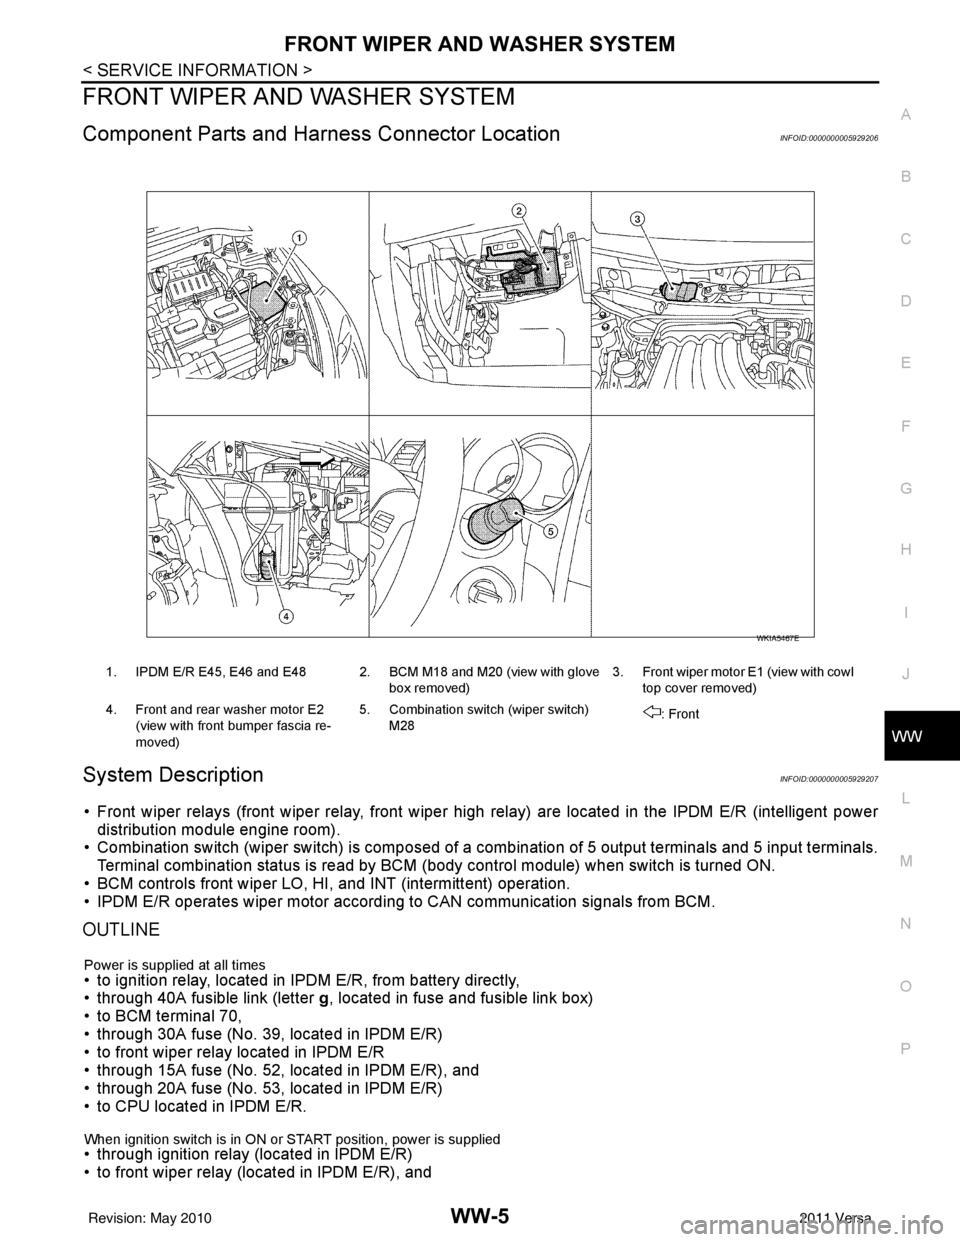
Component Parts and Har ness Connector LocationINFOID:0000000005929206
System DescriptionINFOID:0000000005929207
• Front wiper relays (front wiper relay, front wiper high relay) are located in the IPDM E/R (intelligent power
distribution module engine room).
• Combination switch (wiper switch) is composed of a combination of 5 output terminals and 5 input terminals.
Terminal combination status is read by BCM (body control module) when switch is turned ON.
• BCM controls front wiper LO, HI, and INT (intermittent) operation.
• IPDM E/R operates wiper motor accordi ng to CAN communication signals from BCM.
OUTLINE
Power is supplied at all times• to ignition relay, located in IPDM E/R, from battery directly,
• through 40A fusible link (letter g, located in fuse and fusible link box)
• to BCM terminal 70,
• through 30A fuse (No. 39, located in IPDM E/R)
• to front wiper relay located in IPDM E/R
• through 15A fuse (No. 52, located in IPDM E/R), and
• through 20A fuse (No. 53, located in IPDM E/R)
• to CPU located in IPDM E/R.
When ignition switch is in ON or START position, power is supplied • through ignition relay (located in IPDM E/R)
• to front wiper relay (located in IPDM E/R), and
1. IPDM E/R E45, E46 and E48 2. BCM M18 and M20 (view with glove
box removed)3. Front wiper motor E1
(view with cowl
top cover removed)
4. Front and rear washer motor E2 (view with front bumper fascia re-
moved) 5. Combination switch (wiper switch)
M28 : Front
WKIA5467E
Revision: May 2010
2011 Versa
Page 3752 of 3787

WW-6
< SERVICE INFORMATION >
FRONT WIPER AND WASHER SYSTEM
• to front wiper high relay (located in IPDM E/R), and
• to CPU (located in IPDM E/R),
• through 10A fuse [No. 6, located in fuse block (J/B)]
• to BCM terminal 38,
• through 15A fuse [No. 4, located in fuse block (J/B)]
• to combination switch (wiper switch) terminal 14.
Ground is supplied
• to IPDM E/R terminals 39 and 59, and
• to front wiper motor terminal 2
• through grounds E15 and E24
• to BCM terminal 67, and
• to combination switch (wiper switch) terminal 12
• through grounds M57 and M61.
LOW SPEED WIPER OPERATION
When the front combination switch (wiper switch) is in LO position, the BCM detects the low speed wiper ON
signal by means of the BCM combination switch (wiper switch) reading function.
The BCM sends a front wiper request signal (LO) through the CAN communication line
• from BCM terminals 39 and 40
• to IPDM E/R terminals 40 and 41.
When the IPDM E/R receives front wiper request signal (LO) , it turns ON front wiper relay, located in IPDM E/
R, power is supplied
• through IPDM E/R terminal 33 and front wiper high relay and front wiper relay
• to front wiper motor terminal 3.
Ground is supplied
• to front wiper motor terminal 2
• through grounds E15 and E24.
With power and ground is supplied, front wiper motor operates at low speed.
HIGH SPEED WIPER OPERATION
When the front combination switch (wiper switch) is in HI position, the BCM detects a high speed wiper ON
signal by means of the BCM combination switch (wiper switch) reading function.
The BCM sends a front wiper request signal (HI) through the CAN communication line
• from BCM terminals 39 and 40
• to IPDM E/R terminals 40 and 41.
When the IPDM E/R receives front wiper request signal (HI), it turns ON front wiper relay and front wiper high
relay, located in IPDM E/R, power is supplied
• through IPDM E/R terminal 32
• to front wiper motor terminal 5.
Ground is supplied
• to front wiper motor terminal 2
• through grounds E15 and E24.
With power and ground is supplied, front wiper motor operates at high speed.
INTERMITTENT OPERATION
Wiper intermittent operation delay interval is determined from the intermittent wiper dial position inputs. During
each intermittent operation delay interval, the BCM s ends a front wiper request signal to the IPDM E/R to
operate the wipers.
When the ignition switch is in the ON or START positi on, and the front combination switch (wiper switch) is
turned to the intermittent position, the BCM detects a fr ont wiper (intermittent) ON signal by means of the BCM
combination switch (wiper switch) reading function.
BCM then sends front wiper (intermittent) request signal through the CAN communication lines
• from BCM terminals 39 and 40
• to IPDM E/R terminals 40 and 41.
When BCM determines that combination switch (wiper swit ch) status is front wiper intermittent ON, it performs
the following operations.
• BCM detects ON/OFF status of intermittent wiper dial position
• BCM calculates operation interval from wiper dial position.
• BCM sends a front wiper request signal (INT) to IPDM E/R at calculated operation interval.
When IPDM E/R receives the front wiper request signal (INT), it supplies ground to energize the front wiper
relay. It then sends auto-stop signal to the BCM and conducts intermittent front wiper motor operation.
Revision: May 2010 2011 Versa
Page 3753 of 3787

FRONT WIPER AND WASHER SYSTEMWW-7
< SERVICE INFORMATION >
C
DE
F
G H
I
J
L
M A
B
WW
N
O P
AUTO STOP OPERATION
With combination switch (wiper switch) turned OFF, wi per motor will continue to operate until wiper arms reach
windshield base.
When the wiper arms are not located at base of windshield with combination switch (wiper switch) OFF,
ground is supplied
• from IPDM E/R terminal 33
• to front wiper motor terminal 3, in order to continue wiper motor operation at low speed.
When the wiper arms reach base of windshield, front wiper motor terminals 4 and 2 are connected, and
ground is supplied
• to IPDM E/R terminal 38
• through front wiper motor terminals 4 and 2, and
• through grounds E15 and E24.
Then the IPDM E/R sends auto stop operation signal to BCM with CAN communication line.
When the BCM receives auto-stop operation signal, BCM sends wiper stop signal to IPDM E/R with CAN com-
munication line.
IPDM E/R stops wiper motor. Wiper motor wi ll then stop wiper arms at the STOP position.
WASHER OPERATION
When the combination switch (wiper switch) is in front wiper washer position, BCM detect front wiper washer
signal by BCM combination switch (wiper switch) reading function. Refer to BCS-4, "
System Description" .
Combination switch (wiper switch) power is supplied
• through combination switch (wiper switch) terminal 14
• to washer motor terminal 1.
Ground is supplied
• to front washer motor terminal 2
• through combination switch (wiper switch) terminal 11, and
• through combination switch (wiper switch) terminal 12
• through grounds M57 and M61.
With ground supplied, front washer motor is operated.
When the BCM detects that front washer motor has operated for 0.4 seconds or longer, BCM operates front
wiper motor for low speed.
When the BCM detects washer switch is OFF, low speed operation cycles approximately 2 times and stops.
MIST OPERATION
When the combination switch (wiper switch) is turned to the mist position, wiper low speed operation cycles
once and then stops.
For additional information about wiper operation under th is condition, refer to "LOW SPEED WIPER OPERA-
TION" .
If switch is held in mist posit ion, low speed operation continues.
FAIL-SAFE FUNCTION
If an abnormality occurs in CAN communications, IPDM E/ R holds the condition just before fail-safe status is
initiated until ignition switch is turned OFF. (If wipers we re operating in LO just before the initiation of fail-safe
status, they continue to operate in LO until ignition switch is turned OFF.)
COMBINATION SWITCH (WIPER SWITCH) READING FUNCTION
Refer to BCS-4, "System Description" .
CAN Communication System DescriptionINFOID:0000000005929208
Refer to LAN-7, "System Description".
Revision: May 2010 2011 Versa
Page 3762 of 3787
WW-16
< SERVICE INFORMATION >
FRONT WIPER AND WASHER SYSTEM
3. Start auto active test. Refer to PG-20, "Auto Active Test" .
4. Check voltage between IPDM E/R connector and ground while front wiper (HI, LO) is operating.
OK or NG
OK >> Replace front wiper motor. Refer to WW-22, "Removal and Installation of Front Wiper Drive
Assembly" .
NG >> Replace IPDM E/R. Refer to PG-28, "
Removal and Installation of IPDM E/R" .
Front Wiper Does Not Return to Stop Positi on (After Front Wiper Operates for 10 Sec-
onds, They Stop for 20 Second s, and After Repeating the Operation Five Times, They
Become Inoperative)
INFOID:0000000005929218
CAUTION:
• When auto-stop signal has not varied for 10 seconds or longer while IPDM E/R is operating front wip-
ers, IPDM E/R considers that front wipers are locked, and stops wiper output. That causes this symp-
tom.
• This status can be checked by “DATA MONITOR” of “IPDM E/R” on which “WIPER PROT” item
shows “BLOCK”.
1.CHECK FRONT WIPER STOP SIGNAL
With CONSULT-lIl
Select “IPDM E/R” on CONSULT-III. With “DATA MONITOR”, make sure that “WIP AUTO STOP” turns “ACT
P” - “STOP P” linked with wiper operation.
Without CONSULT-llI
GO TO 2.
OK or NG
OK >> Replace IPDM E/R. Refer to PG-28, "Removal and Installation of IPDM E/R" .
NG >> GO TO 2.
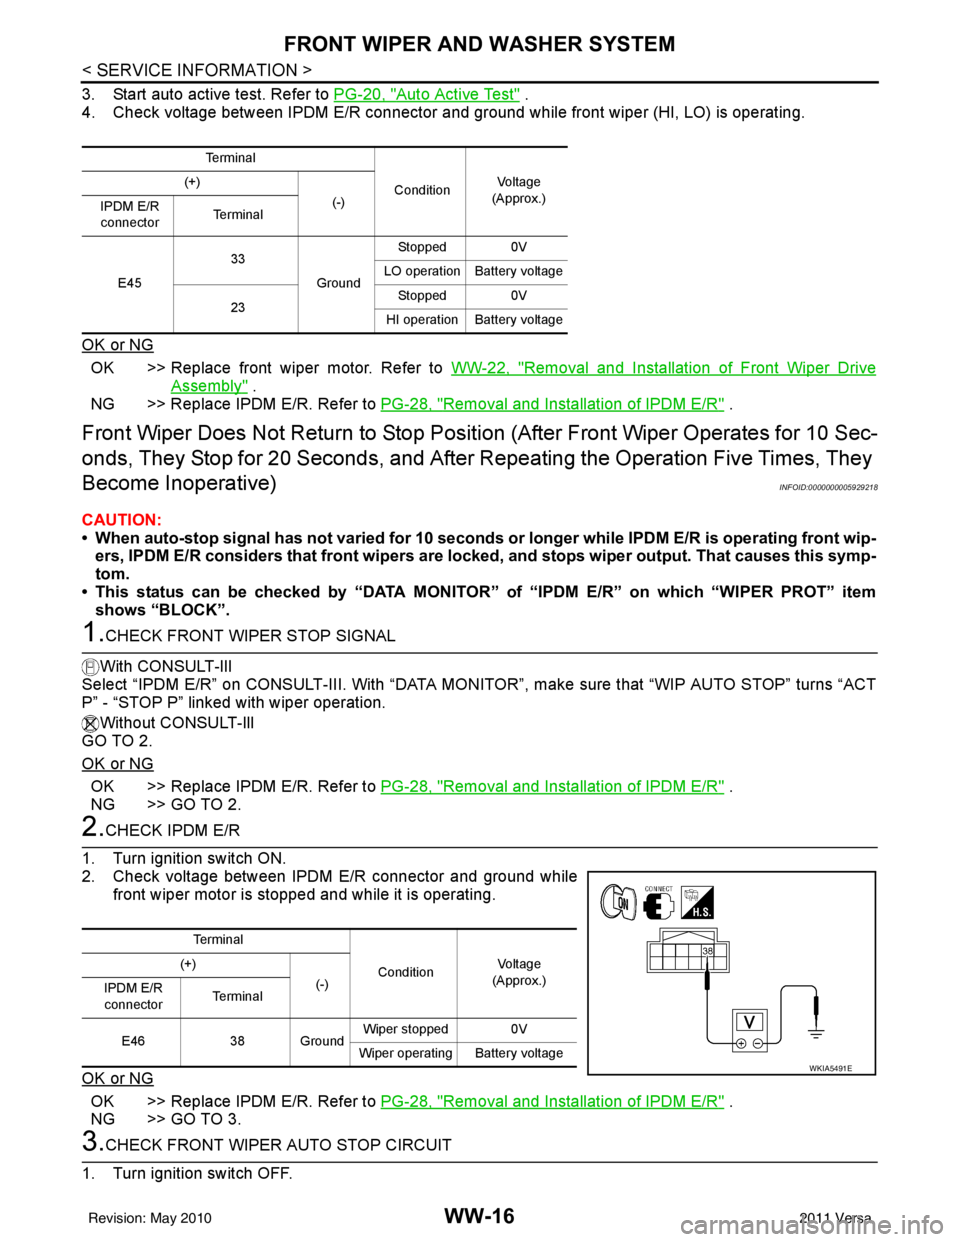
2.CHECK IPDM E/R
1. Turn ignition switch ON.
2. Check voltage between IPDM E/R connector and ground while front wiper motor is stopped and while it is operating.
OK or NG
OK >> Replace IPDM E/R. Refer to PG-28, "Removal and Installation of IPDM E/R" .
NG >> GO TO 3.
3.CHECK FRONT WIPER AUTO STOP CIRCUIT
1. Turn ignition switch OFF.
Te r m i n a l
ConditionVo l ta g e
(Approx.)
(+)
(-)
IPDM E/R
connector Te r m i n a l
E45 33
GroundStopped 0V
LO operation Battery voltage
23 Stopped 0V
HI operation Battery voltage
Te r m i n a l
ConditionVo l ta g e
(Approx.)
(+)
(-)
IPDM E/R
connector Te r m i n a l
E46 38 Ground Wiper stopped 0V
Wiper operating Battery voltage
WKIA5491E
Revision: May 2010 2011 Versa