Page 660 of 3787

BL-150
< SERVICE INFORMATION >
INTELLIGENT KEY SYSTEM
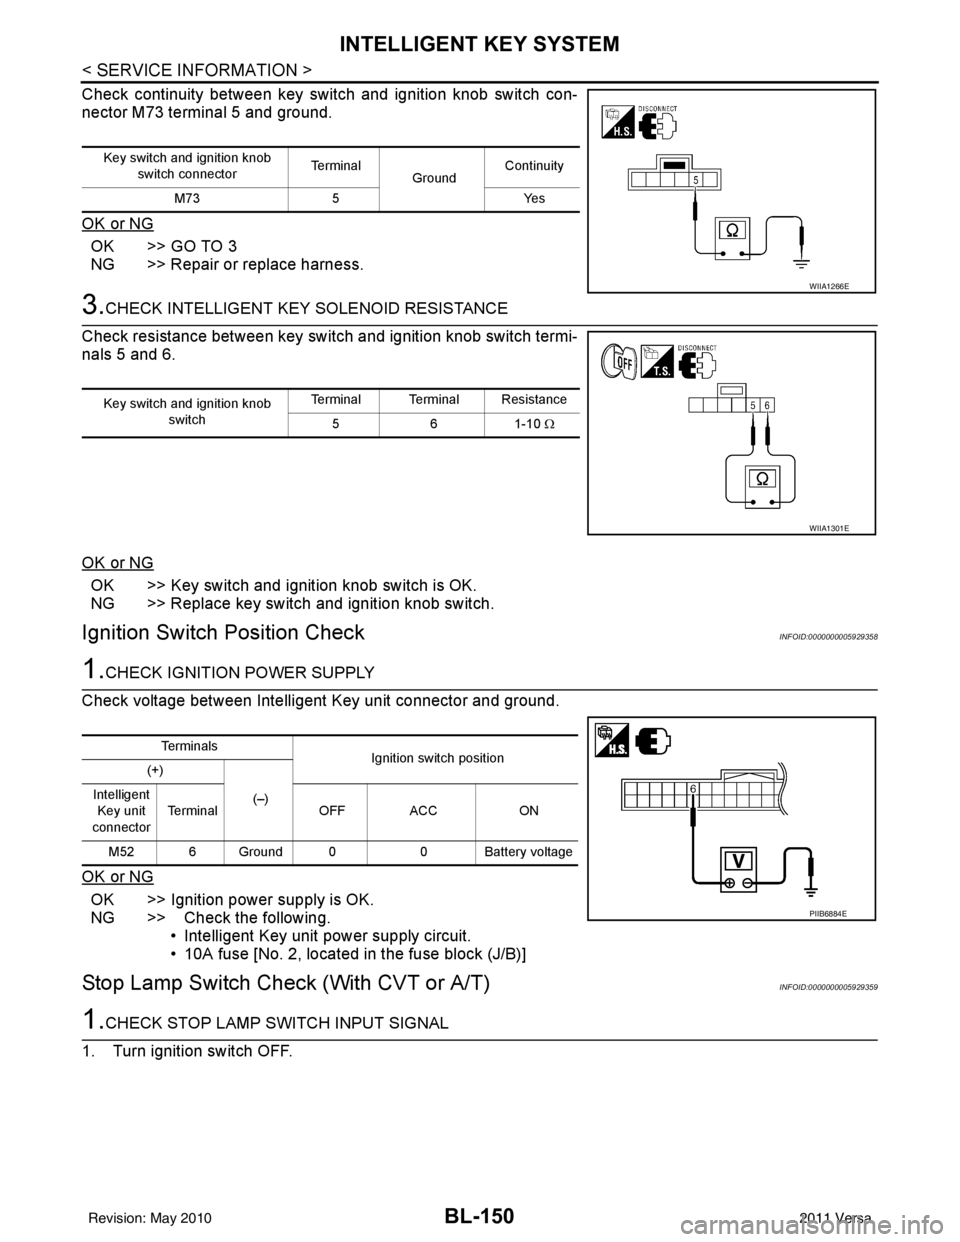
Check continuity between key switch and ignition knob switch con-
nector M73 terminal 5 and ground.
OK or NG
OK >> GO TO 3
NG >> Repair or replace harness.
3.CHECK INTELLIGENT KEY SOLENOID RESISTANCE
Check resistance between key switch and ignition knob switch termi-
nals 5 and 6.
OK or NG
OK >> Key switch and ignition knob switch is OK.
NG >> Replace key switch and ignition knob switch.
Ignition Switch Position CheckINFOID:0000000005929358
1.CHECK IGNITION POWER SUPPLY
Check voltage between Intelligent Key unit connector and ground.
OK or NG
OK >> Ignition power supply is OK.
NG >> Check the following. • Intelligent Key unit power supply circuit.
• 10A fuse [No. 2, located in the fuse block (J/B)]
Stop Lamp Switch Check (With CVT or A/T)INFOID:0000000005929359
1.CHECK STOP LAMP SWITCH INPUT SIGNAL
1. Turn ignition switch OFF.
Key switch and ignition knob switch connector Te r m i n a l
GroundContinuity
M73 5 Yes
WIIA1266E
Key switch and ignition knob
switch Terminal Terminal Resistance
561-10 Ω
WIIA1301E
Te r m i n a l s
Ignition switch position
(+)
(–)
Intelligent
Key unit
connector Terminal
OFF ACC ON
M52 6 Ground 0 0 Battery voltage
PIIB6884E
Revision: May 2010 2011 Versa
Page 665 of 3787

INTELLIGENT KEY SYSTEMBL-155
< SERVICE INFORMATION >
C
DE
F
G H
J
K L
M A
B
BL
N
O P
"LOCK" Warning Lamp (With M/T) CheckINFOID:0000000005929363
1.CHECK WARNING LAMP OPERATION
With CONSULT-III
• Check “INDICATOR” in “ACTIVE TEST” mode with CONSULT-III.
• Select “KNOB ON”.
“LOCK” warning lamp should illuminate.
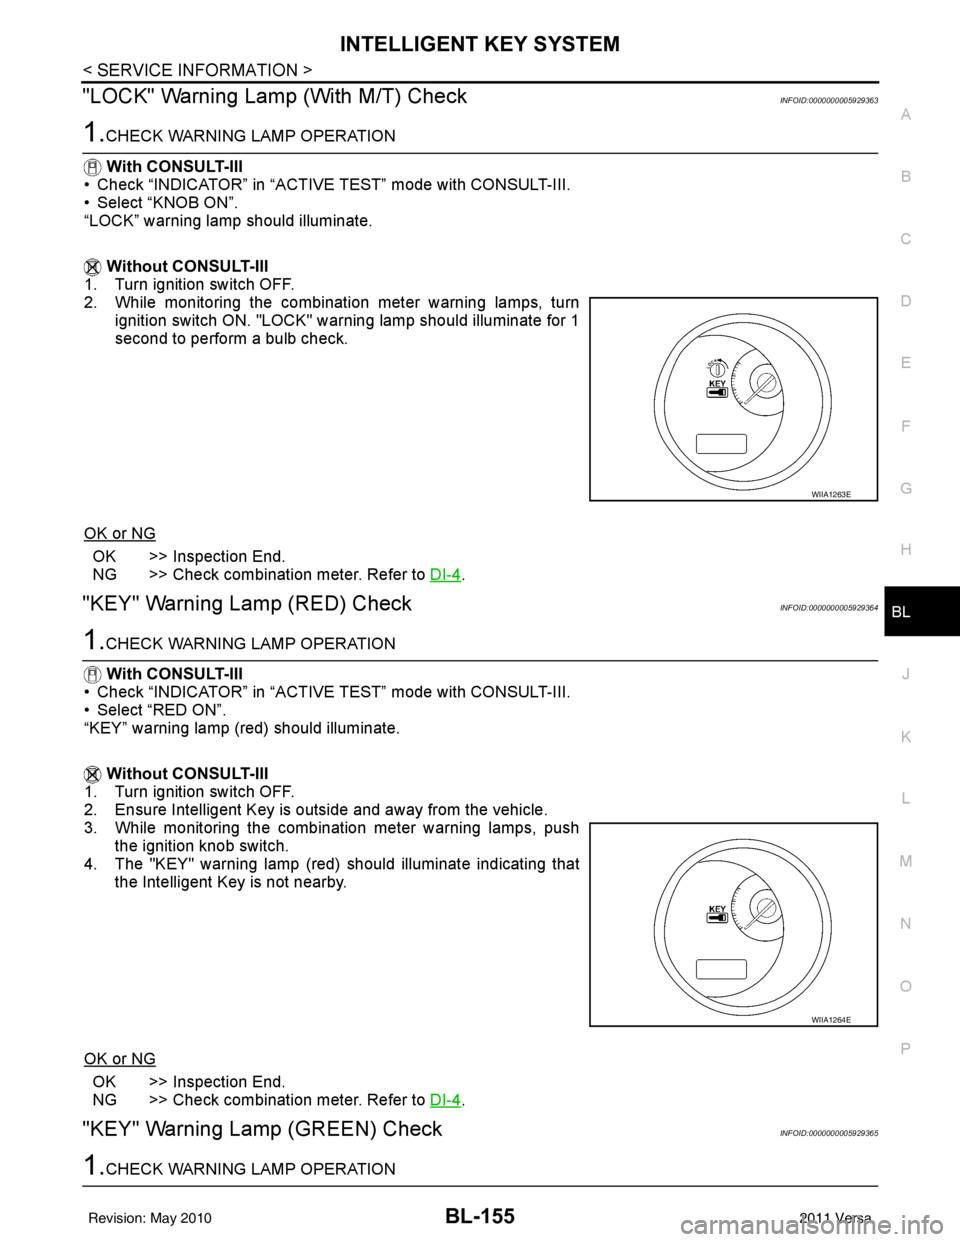
Without CONSULT-III
1. Turn ignition switch OFF.
2. While monitoring the combination meter warning lamps, turn
ignition switch ON. "LOCK" warning lamp should illuminate for 1
second to perform a bulb check.
OK or NG
OK >> Inspection End.
NG >> Check combination meter. Refer to DI-4
.
"KEY" Warning Lamp (RED) CheckINFOID:0000000005929364
1.CHECK WARNING LAMP OPERATION
With CONSULT-III
• Check “INDICATOR” in “ACTIVE TEST” mode with CONSULT-III.
• Select “RED ON”.
“KEY” warning lamp (red) should illuminate.
Without CONSULT-III
1. Turn ignition switch OFF.
2. Ensure Intelligent Key is outside and away from the vehicle.
3. While monitoring the combination meter warning lamps, push the ignition knob switch.
4. The "KEY" warning lamp (red) should illuminate indicating that the Intelligent Key is not nearby.
OK or NG
OK >> Inspection End.
NG >> Check combination meter. Refer to DI-4
.
"KEY" Warning Lamp (GREEN) CheckINFOID:0000000005929365
1.CHECK WARNING LAMP OPERATION
WIIA1263E
WIIA1264E
Revision: May 2010 2011 Versa
Page 675 of 3787
DOOR
BL-165
< SERVICE INFORMATION >
C
D E
F
G H
J
K L
M A
B
BL
N
O P
3. Remove the check link bolt.
4. Remove the hinge nuts and the door assembly.
Installation
Installation is in the reverse order of removal.
BACK DOOR
Removal
1. Remove the back door glass. Refer to GW-16.
2. Remove the back door lock assembly. Refer to BL-173
.
3. Remove the back door wire harness.
4. Remove the rear washer nozzle and hose from the back door. Refer to WW-34, "
Removal and Installa-
tion".
5. Support the back door. CAUTION:
Two technicians should be used to avoid damaging the back door during removal.
6. Remove the back door stays.
7. Remove the door side nuts and the back door assembly.
Installation
Installation is in the reverse order of removal.
• Align the back door. Refer to BL-160, "
Fitting Adjustment".
14.7 N·m (1.5 kg-m, 11 ft-lb)
PIIB6543E
24.5 N·m (2.5 kg-m, 18 ft-lb)
PIIB6522E
LIIA2639E
Revision: May 2010
2011 Versa
Page 677 of 3787

FRONT DOOR LOCKBL-167
< SERVICE INFORMATION >
C
DE
F
G H
J
K L
M A
B
BL
N
O P
FRONT DOOR LOCK
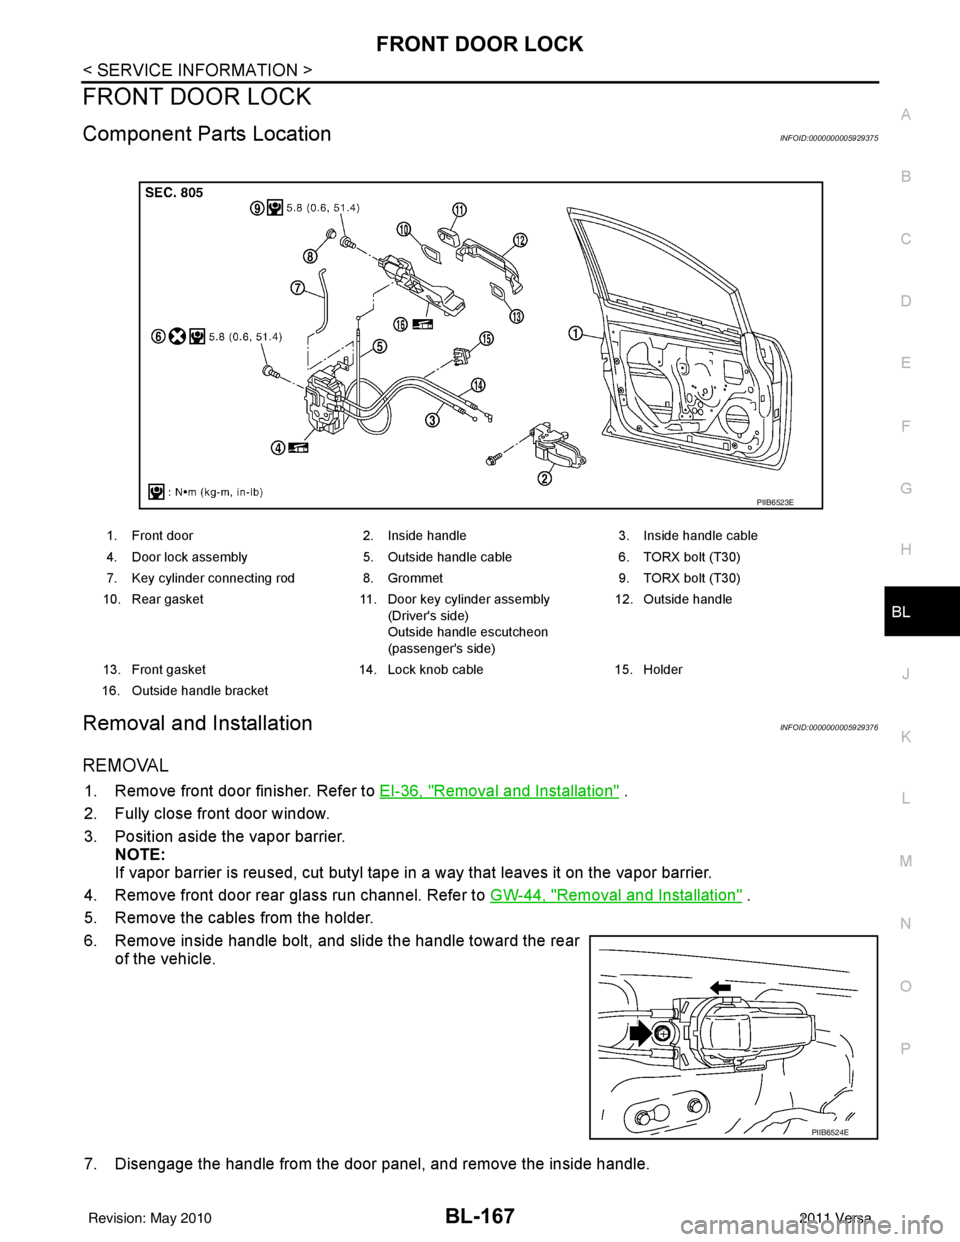
Component Parts LocationINFOID:0000000005929375
Removal and InstallationINFOID:0000000005929376
REMOVAL
1. Remove front door finisher. Refer to EI-36, "Removal and Installation" .
2. Fully close front door window.
3. Position aside the vapor barrier. NOTE:
If vapor barrier is reused, cut butyl tape in a way that leaves it on the vapor barrier.
4. Remove front door rear glass run channel. Refer to GW-44, "
Removal and Installation" .
5. Remove the cables from the holder.
6. Remove inside handle bolt, and slide the handle toward the rear of the vehicle.
7. Disengage the handle from the door panel, and remove the inside handle.
1. Front door 2. Inside handle3. Inside handle cable
4. Door lock assembly 5. Outside handle cable6. TORX bolt (T30)
7. Key cylinder connecting rod 8. Grommet9. TORX bolt (T30)
10. Rear gasket 11. Door key cylinder assembly
(Driver's side)
Outside handle escutcheon
(passenger's side) 12. Outside handle
13. Front gasket 14. Lock knob cable15. Holder
16. Outside handle bracket
PIIB6523E
PIIB6524E
Revision: May 2010 2011 Versa
Page 678 of 3787
BL-168
< SERVICE INFORMATION >
FRONT DOOR LOCK
8. Disconnect the inside handle cable and lock knob cable from theinside handle.
CAUTION:
During removal and installation , work so as not to bend the
ends of the lock knob cable and inside handle cable.
9. Remove the door side grommet, and the door key cylinder assembly (escutcheon) bolt.
10. Remove the key cylinder connecting rod (key cylinder side).
11. If equipped, disconnect the door antenna, the door request switch connector and remove the harness clamp. (Vehicle with
intelligent key systems only).
12. Remove the door cylinder assembly while pulling the outside handle forward.
13. Pull the outside door handle forward and then slide it toward the rear of the vehicle to remove.
14. Remove the front and rear gaskets.
PIIB6525E
PIIB5808E
PIIB5809E
PIIB5810E
PIIB6526E
Revision: May 2010 2011 Versa
Page 679 of 3787
FRONT DOOR LOCKBL-169
< SERVICE INFORMATION >
C
DE
F
G H
J
K L
M A
B
BL
N
O P
15. Remove the door lock assembly bolts.
16. Slide the outside handle bracket toward the rear of the vehicle, and remove the assembly.
17. If equipped, disconnect the door lock assembly electrical connector.
18. Separate the outside handle cable from the outside handle bracket.
INSTALLATION
Installation is in the reverse order of removal.
CAUTION:
• To install each rod, be sure to rotate the rod holder until a click is felt.
• When installing door lock assembly, be careful when rotating the outside handle cable as shown in
the figure.
- Place the outside handle bracket cable on the inside of door
lock assembly before installing. 5.8 N·m (0.6 kg-m, 51.4 in-lb)
PIIB6527E
PIIB6528E
PIIB5815E
PIIB6529E
Revision: May 2010
2011 Versa
Page 680 of 3787
BL-170
< SERVICE INFORMATION >
REAR DOOR LOCK
REAR DOOR LOCK
Component Parts LocationINFOID:0000000005929377
Removal and InstallationINFOID:0000000005929378
REMOVAL
1. Remove the partition glass. Refer to GW-48 .
2. Support door glass while lifting it up to the door window completely closed position.
3. Remove inside handle bolt, slide handle toward rear of vehicle, disconnect it from the door panel, and remove the inside handle.
4. Disconnect the inside handle and lock knob cables from the inside handle.
CAUTION:
During removal and installation , do not to bend the ends of
the lock knob cable and inside handle cable.
1. Rear door 2. Inside handle 3. Inside handle cable
4. Door lock assembly 5. TORX bolt (T30) 6. Outside handle cable
7. Grommet 8. TORX bolt (T30) 9. Rear gasket
10. Outside handle escutcheon 11. Outside handle12. Front gasket
13. Lock knob cable 14. Outside handle bracket
PIIB6530E
PIIB6524E
PIIB6525E
Revision: May 2010 2011 Versa
Page 681 of 3787
REAR DOOR LOCKBL-171
< SERVICE INFORMATION >
C
DE
F
G H
J
K L
M A
B
BL
N
O P
5. Remove the door side grommet, and the outside handle escutcheon screw.
6. Pull the outside handle forward (1), while removing outside han- dle escutcheon (2).
7. Pull outside door handle forward (1), and slide it toward the rear of the vehicle to remove (2).
8. Remove the front and rear gaskets.
9. Remove the door lock assembly screws.
PIIB5808E
PIIB5809E
PIIB5810E
PIIB6526E
: 5.8 N·m (0.6 kg-m, 51.4 in-lb)
PIIB6527E
Revision: May 2010 2011 Versa