Page 540 of 714
Comfort controls
5-113
5
To play USB memory device tracks via voice
operation (vehicles with Bluetooth
® 2.0 interface)
N00765200028
Desired tracks can be selected and played from your USB
memory device by “Artist”, “Album”, “Playlist” and “Genre”
using voice commands.
For information concerning the voice recognition function or
speaker registration function, refer to “Bluetooth
® 2.0 inter-
face” on page 3-234.
The playback sequence of tracks is the same as when an iPod is
connected. Refer to the “To play iPod tracks via voice opera-
tion” on page 5-102.
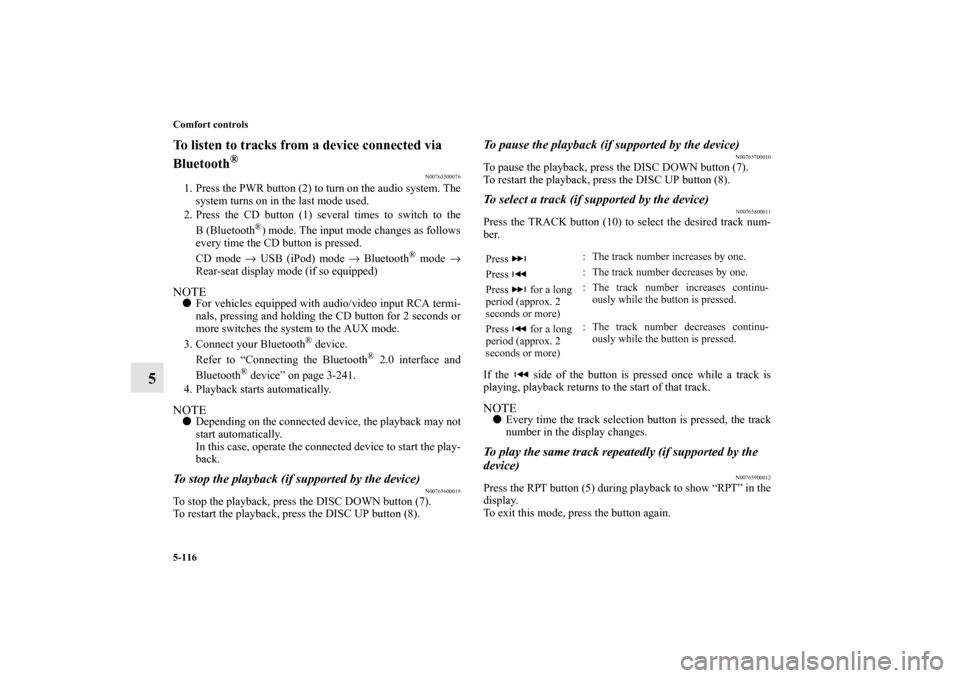
Preparation for voice operationTo use the voice operation, press the SPEECH button (1) first.
BK0122500US.book 113 ページ 2010年5月12日 水曜日 午前11時11分
Page 541 of 714
5-114 Comfort controls
5To play tracks from a Bluetooth
® device
(vehicles with Bluetooth
® 2.0 interface)
N00765300074
You can wirelessly connect a digital audio player or cellular
phone supporting Bluetooth
® to listen to the tracks on the con-
nected device.
Refer to “Bluetooth
® 2.0 interface” for the connecting method,
etc. on page 3-234.
The following explains the basic playback method.
NOTE�This function may not be available depending on the con-
nected device.
�The voice operation is not available to access music files
on the connected Bluetooth
® device.
BK0122500US.book 114 ページ 2010年5月12日 水曜日 午前11時11分
Page 542 of 714
Comfort controls
5-115
5
Bluetooth
® device control panel and display
N00765400017
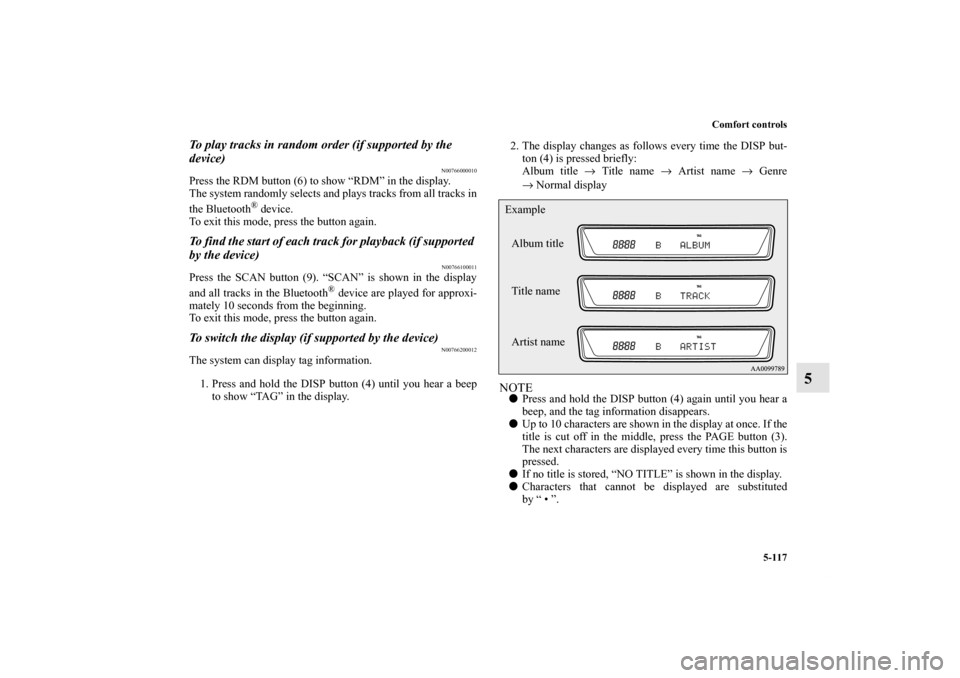
1- CD (Mode change) button
2- PWR (On-Off) button
3- PAGE (Title scroll) button
4- DISP (Title display) button
5- RPT (Repeat) button
6- RDM (Random) button
7- DISC DOWN (Pause/Stop) button
8- DISC UP (Play) button
9- SCAN button
10- TRACK (Track up/down) button
11 - B (Blu etoo th
®) indicator
12- TRACK indicator
13- RPT/RDM/SCAN indicator
BK0122500US.book 115 ページ 2010年5月12日 水曜日 午前11時11分
Page 543 of 714

5-116 Comfort controls
5
To listen to tracks from a device connected via
Bluetooth
®
N00765500076
1. Press the PWR button (2) to turn on the audio system. The
system turns on in the last mode used.
2. Press the CD button (1) several times to switch to the
B(Bluetooth
®) mode. The input mode changes as follows
every time the CD button is pressed.
CD mode → USB (iPod) mode → Bluetooth
® mode →
Rear-seat display mode (if so equipped)
NOTE�For vehicles equipped with audio/video input RCA termi-
nals, pressing and holding the CD button for 2 seconds or
more switches the system to the AUX mode.
3. Connect your Bluetooth
® device.
Refer to “Connecting the Bluetooth
® 2.0 interface and
Bluetooth
® device” on page 3-241.
4. Playback starts automatically.
NOTE�Depending on the connected device, the playback may not
start automatically.
In this case, operate the connected device to start the play-
back.To stop the playback (if supported by the device)
N00765600019
To stop the playback, press the DISC DOWN button (7).
To restart the playback, press the DISC UP button (8).
To pause the playback (if supported by the device)
N00765700010
To pause the playback, press the DISC DOWN button (7).
To restart the playback, press the DISC UP button (8).To select a track (if supported by the device)
N00765800011
Press the TRACK button (10) to select the desired track num-
ber.
If the side of the button is pressed once while a track is
playing, playback returns to the start of that track.NOTE�Every time the track selection button is pressed, the track
number in the display changes.To play the same track repeatedly (if supported by the
device)
N00765900012
Press the RPT button (5) during playback to show “RPT” in the
display.
To exit this mode, press the button again.Press : The track number increases by one.
Press : The track number decreases by one.
Press for a long
period (approx. 2
seconds or more): The track number increases continu-
ously while the button is pressed.
Press for a long
period (approx. 2
seconds or more): The track number decreases continu-
ously while the button is pressed.
BK0122500US.book 116 ページ 2010年5月12日 水曜日 午前11時11分
Page 544 of 714

Comfort controls
5-117
5
To play tracks in random order (if supported by the
device)
N00766000010
Press the RDM button (6) to show “RDM” in the display.
The system randomly selects and plays tracks from all tracks in
the Bluetooth
® device.
To exit this mode, press the button again.
To find the start of each track for playback (if supported
by the device)
N00766100011
Press the SCAN button (9). “SCAN” is shown in the display
and all tracks in the Bluetooth
® device are played for approxi-
mately 10 seconds from the beginning.
To exit this mode, press the button again.
To switch the display (if supported by the device)
N00766200012
The system can display tag information.
1. Press and hold the DISP button (4) until you hear a beep
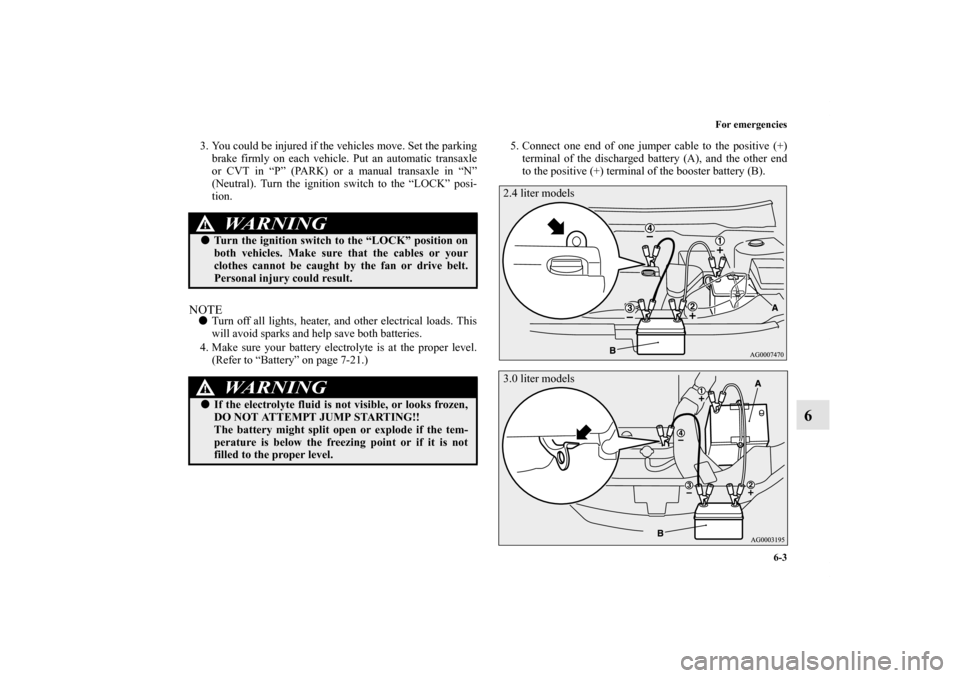
to show “TAG” in the display.2. The display changes as follows every time the DISP but-
ton (4) is pressed briefly:
Album title → Title name → Artist name → Genre
→Normal display
NOTE�Press and hold the DISP button (4) again until you hear a
beep, and the tag information disappears.
�Up to 10 characters are shown in the display at once. If the
title is cut off in the middle, press the PAGE button (3).
The next characters are displayed every time this button is
pressed.
�If no title is stored, “NO TITLE” is shown in the display.
�Characters that cannot be displayed are substituted
by “ • ”.Album title
Title name Example
Artist name
BK0122500US.book 117 ページ 2010年5月12日 水曜日 午前11時11分
Page 572 of 714

For emergencies
6-3
6
3. You could be injured if the vehicles move. Set the parking
brake firmly on each vehicle. Put an automatic transaxle
or CVT in “P” (PARK) or a manual transaxle in “N”
(Neutral). Turn the ignition switch to the “LOCK” posi-
tion.NOTE�Turn off all lights, heater, and other electrical loads. This
will avoid sparks and help save both batteries.
4. Make sure your battery electrolyte is at the proper level.
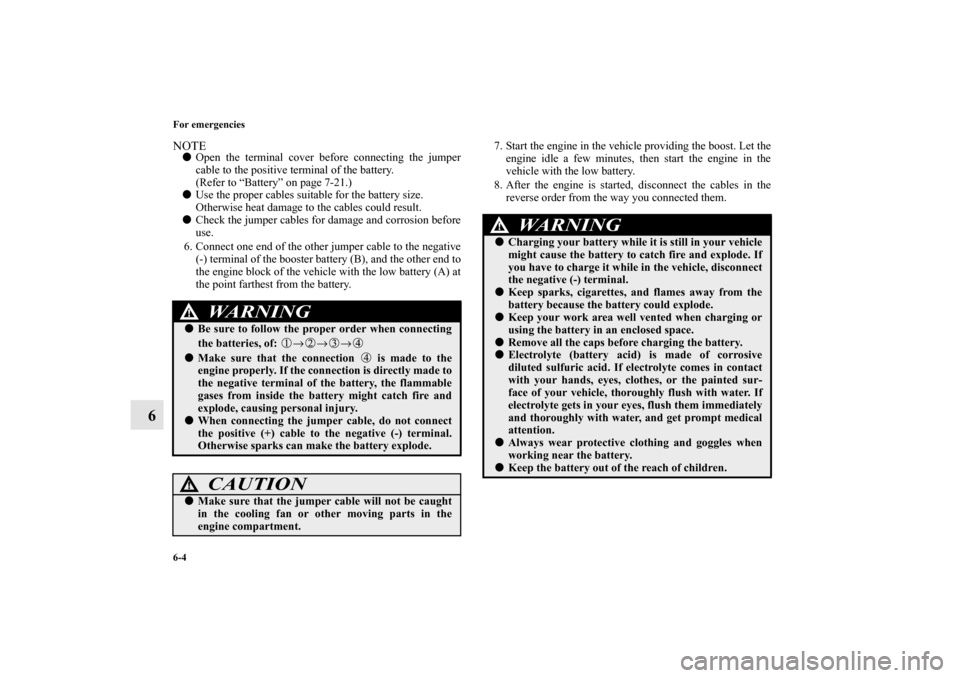
(Refer to “Battery” on page 7-21.)5. Connect one end of one jumper cable to the positive (+)
terminal of the discharged battery (A), and the other end
to the positive (+) terminal of the booster battery (B).
WA R N I N G
!�Turn the ignition switch to the “LOCK” position on
both vehicles. Make sure that the cables or your
clothes cannot be caught by the fan or drive belt.
Personal injury could result.
WA R N I N G
!�If the electrolyte fluid is not visible, or looks frozen,
DO NOT ATTEMPT JUMP STARTING!!
The battery might split open or explode if the tem-
perature is below the freezing point or if it is not
filled to the proper level.
2.4 liter models3.0 liter models
BK0122500US.book 3 ページ 2010年5月12日 水曜日 午前11時11分
Page 573 of 714

6-4 For emergencies
6
NOTE�Open the terminal cover before connecting the jumper
cable to the positive terminal of the battery.
(Refer to “Battery” on page 7-21.)
�Use the proper cables suitable for the battery size.
Otherwise heat damage to the cables could result.
�Check the jumper cables for damage and corrosion before
use.
6. Connect one end of the other jumper cable to the negative
(-) terminal of the booster battery (B), and the other end to
the engine block of the vehicle with the low battery (A) at
the point farthest from the battery.7. Start the engine in the vehicle providing the boost. Let the
engine idle a few minutes, then start the engine in the
vehicle with the low battery.
8. After the engine is started, disconnect the cables in the
reverse order from the way you connected them.
WA R N I N G
!�Be sure to follow the proper order when connecting
the batteries, of: →→→�Make sure that the connection is made to the
engine properly. If the connection is directly made to
the negative terminal of the battery, the flammable
gases from inside the battery might catch fire and
explode, causing personal injury.�When connecting the jumper cable, do not connect
the positive (+) cable to the negative (-) terminal.
Otherwise sparks can make the battery explode.
CAUTION
!�Make sure that the jumper cable will not be caught
in the cooling fan or other moving parts in the
engine compartment.
WA R N I N G
!�Charging your battery while it is still in your vehicle
might cause the battery to catch fire and explode. If
you have to charge it while in the vehicle, disconnect
the negative (-) terminal.�Keep sparks, cigarettes, and flames away from the
battery because the battery could explode.�Keep your work area well vented when charging or
using the battery in an enclosed space.�Remove all the caps before charging the battery.�Electrolyte (battery acid) is made of corrosive
diluted sulfuric acid. If electrolyte comes in contact
with your hands, eyes, clothes, or the painted sur-
face of your vehicle, thoroughly flush with water. If
electrolyte gets in your eyes, flush them immediately
and thoroughly with water, and get prompt medical
attention.�Always wear protective clothing and goggles when
working near the battery.�Keep the battery out of the reach of children.
BK0122500US.book 4 ページ 2010年5月12日 水曜日 午前11時11分
Page 580 of 714

For emergencies
6-11
6
NOTE�The chocks shown in the illustration do not come with
your vehicle. It is recommended that you purchase chocks
or blocks and keep them in the vehicle for use if needed.
�If chocks or blocks are not available, use stones or any
other objects that are large enough to hold the wheel in
position.
6. Get the jack, bar and wheel nut wrench ready.
(Refer to “Jack and tools” on page 6-7.)
Spare tire information
N00849600315
Compact spare tireThe compact spare tire is stowed below the luggage compart-
ment floor. It is designed to save space in the luggage compart-
ment. Its lighter weight makes it easier to use if a flat tire
occurs.
WA R N I N G
!�Be sure to apply chocks or blocks to the correct tire
when jacking up the vehicle. If the vehicle moves
while jacked up, the jack could slip out of position,
leading to an accident.
WA R N I N G
!�Tires, including spare tire, degrade over time with
age even when they are not being used. It is recom-
mended that tires over 6 years generally be replaced
even if damage is not obvious.
CAUTION
!�While the compact spare tire is stowed, the inflation
pressure should be checked at least once a month to
assure that it remains at the recommended inflation
pressure. See the tire and loading information plac-
ard attached to the driver’s door sill. Refer to “Tire
and loading information placard” on page 9-4.�Driving with an improperly inflated tire can cause
an accident. If you have no choice but to drive with
an under-inflated tire, keep your speed down and
avoid sudden steering or braking, if possible. Inflate
the tire to the correct pressure as soon as possible.
Refer to “Tire inflation pressures” on page 7-28.
BK0122500US.book 11 ページ 2010年5月12日 水曜日 午前11時11分