2011 MITSUBISHI L200 fuel consumption
[x] Cancel search: fuel consumptionPage 99 of 330
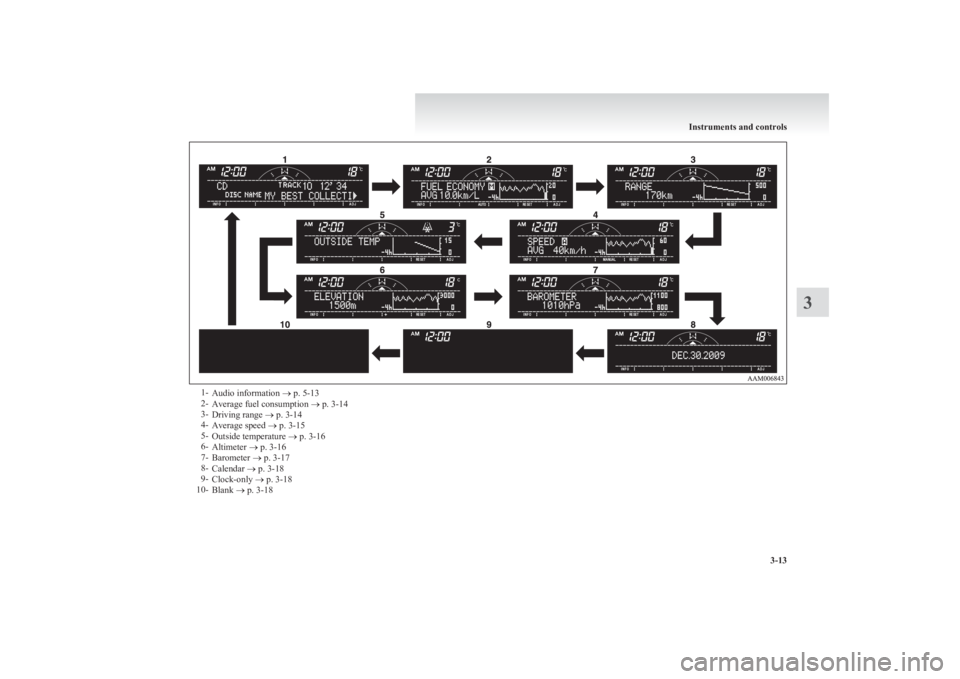
1-Audio information ® p. 5-13
2- Average fuel consumption ® p. 3-14
3- Driving range ® p. 3-14
4- Average speed ® p. 3-15
5- Outside temperature ® p. 3-16
6- Altimeter ® p. 3-16
7- Barometer ® p. 3-17
8- Calendar ® p. 3-18
9- Clock-only ® p. 3-18
10- Blank ® p. 3-18
Instruments and controls
3-13
3
Page 100 of 330
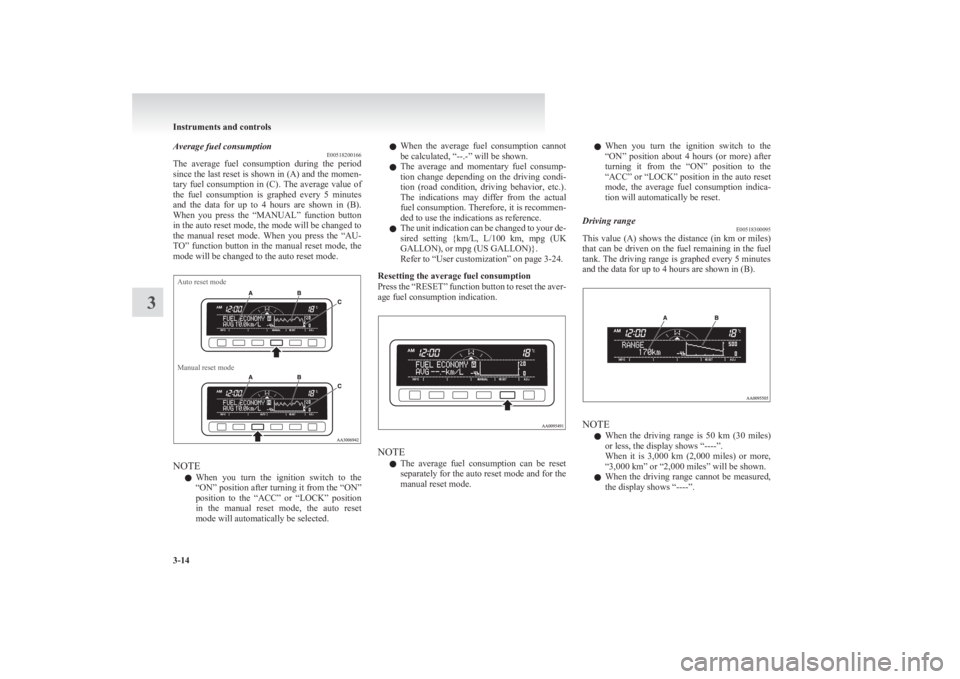
Average fuel consumptionE00518200166
The average fuel consumption during the period
since the last reset is shown in (A) and the momen-
tary fuel consumption in (C). The average value of
the fuel consumption is graphed every 5 minutes
and the data for up to 4 hours are shown in (B).
When you press the “MANUAL” function button
in the auto reset mode, the mode will be changed to
the manual reset mode. When you press the “AU-
TO” function button in the manual reset mode, the
mode will be changed to the auto reset mode.Auto reset modeManual reset mode
NOTE
l When you turn the ignition switch to the
“ON” position after turning it from the “ON”
position to the “ACC” or “LOCK” position
in the manual reset mode, the auto reset
mode will automatically be selected.
l When the average fuel consumption cannot
be calculated, “--.-” will be shown.
l The average and momentary fuel consump-
tion change depending on the driving condi-
tion (road condition, driving behavior, etc.).
The indications may differ from the actual
fuel consumption. Therefore, it is recommen-
ded to use the indications as reference.
l The unit indication can be changed to your de-
sired setting {km/L, L/100 km, mpg (UK
GALLON), or mpg (US GALLON)}.
Refer to “User customization” on page 3-24.
Resetting the average fuel consumption
Press the “RESET” function button to reset the aver-
age fuel consumption indication.
NOTE
l The average fuel consumption can be reset
separately for the auto reset mode and for the
manual reset mode.
l When you turn the ignition switch to the
“ON” position about 4 hours (or more) after
turning it from the “ON” position to the
“ACC” or “LOCK” position in the auto reset
mode, the average fuel consumption indica-
tion will automatically be reset.Driving range E00518300095
This value (A) shows the distance (in km or miles)
that can be driven on the fuel remaining in the fuel
tank. The driving range is graphed every 5 minutes
and the data for up to 4 hours are shown in (B).
NOTE
l When the driving range is 50 km
(30 miles)
or less, the display shows “----”.
When it is 3,000 km (2,000 miles) or more,
“3,000 km” or “2,000 miles” will be shown.
l When the driving range cannot be measured,
the display shows “----”.
Instruments and controls
3-14
3
Page 101 of 330
lThe driving range is shown based on the ac-
cumulated fuel consumption data, however,
may be changed depending on the driving con-
dition (road condition, driving behavior,
etc.). If the battery terminals are disconnec-
ted, the accumulated fuel consumption data
will be erased. It is recommended to use the
indication as reference.
l When the vehicle is fueled, the driving range
will be updated. However, if the amount of
fueling is small, the indication may not be cor-
rect. Therefore, fill up the tank as much as
possible in case of fueling.
l When the vehicle is stopped on a steep slope,
the value of the driving range may increase.
This is caused by the fuel movement inside
the tank on the slope and is not deemed as a
failure.
Resetting the driving range
Press the “RESET” function button to reset the driv-
ing range plotted in graph.NOTE
l Pressing the “RESET” function button will
not reset the indication (C).
l It is possible to set the display unit to km or
miles.
Refer to “User customization” on page 3-24.Average speed E00518400126
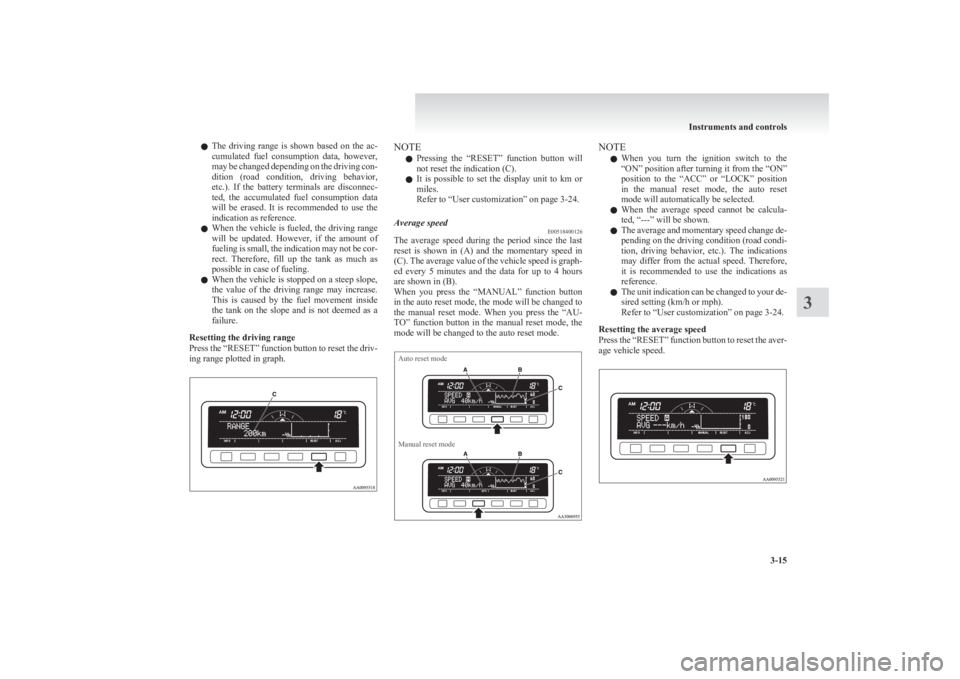
The average speed during the period since the last
reset is shown in (A) and the momentary speed in
(C). The average value of the vehicle speed is graph-
ed every 5 minutes and the data for up to 4 hours
are shown in (B).
When you press the “MANUAL” function button
in the auto reset mode, the mode will be changed to
the manual reset mode. When you press the “AU-
TO” function button in the manual reset mode, the
mode will be changed to the auto reset mode.
Auto reset modeManual reset modeNOTE
l When you turn the ignition switch to the
“ON” position after turning it from the “ON”
position to the “ACC” or “LOCK” position
in the manual reset mode, the auto reset
mode will automatically be selected.
l When the average speed cannot be calcula-
ted, “---” will be shown.
l The average and momentary speed change de-
pending on the driving condition (road condi-
tion, driving behavior, etc.). The indications
may differ from the actual speed. Therefore,
it is recommended to use the indications as
reference.
l The unit indication can be changed to your de-
sired setting (km/h or mph).
Refer to “User customization” on page 3-24.
Resetting the average speed
Press the “RESET” function button to reset the aver-
age vehicle speed.
Instruments and controls
3-15
3
Page 111 of 330
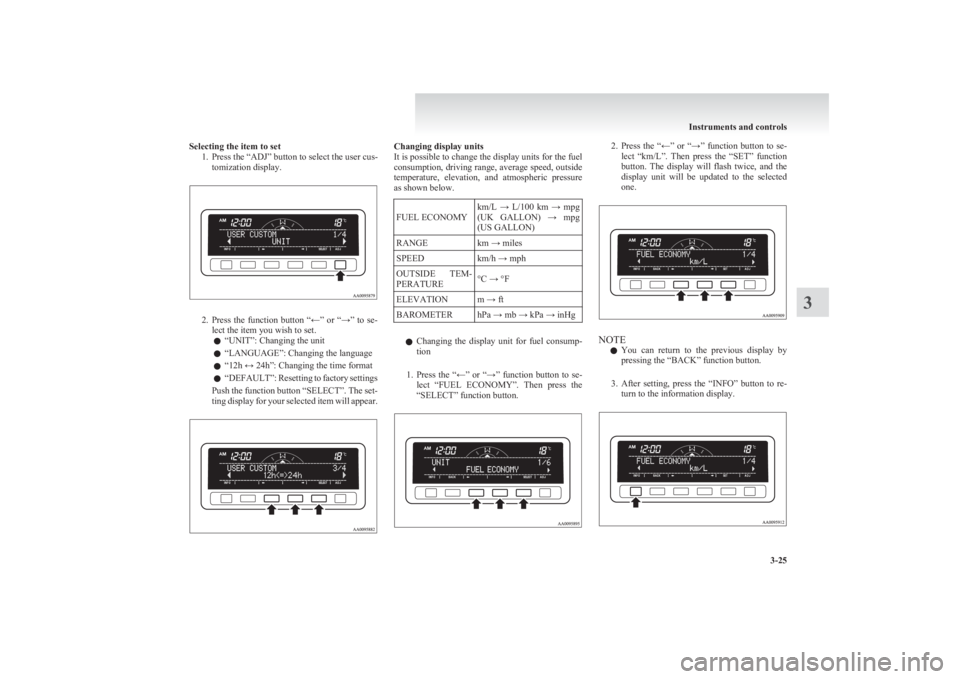
Selecting the item to set1. Press the “ADJ” button to select the user cus-tomization display.
2.Press the function button “←” or “→” to se-
lect the item you wish to set.
l “UNIT”: Changing the unit
l “LANGUAGE”: Changing the language
l “12h ↔ 24h”: Changing the time format
l “
DEFAULT”: Resetting to factory settings
Push the function button “SELECT”. The set-
ting display for your selected item will appear.
Changing display units
It is possible to change the display units for the fuel
consumption, driving range, average speed, outside
temperature, elevation, and atmospheric pressure
as shown below.FUEL ECONOMYkm/L → L/100 km → mpg
(UK GALLON) → mpg
(US GALLON)RANGEkm → milesSPEEDkm/h → mphOUTSIDE TEM-
PERATURE°C → °FELEVATIONm → ftBAROMETERhPa → mb → kPa → inHg
l Changing the display unit for fuel consump-
tion
1. Press the “←” or “→” function button to se-
lect “FUEL ECONOMY”. Then press the
“SELECT” function button.
2. Press the “←” or “→” function button to se-
lect “km/L”. Then press the “SET” function
button. The display will flash twice, and the
display unit will be updated to the selected
one.
NOTE
l You can return to the previous display by
pressing the “BACK” function button.
3. After setting, press the “INFO” button to re-
turn to the information display.
Instruments and controls
3-25
3
Page 113 of 330
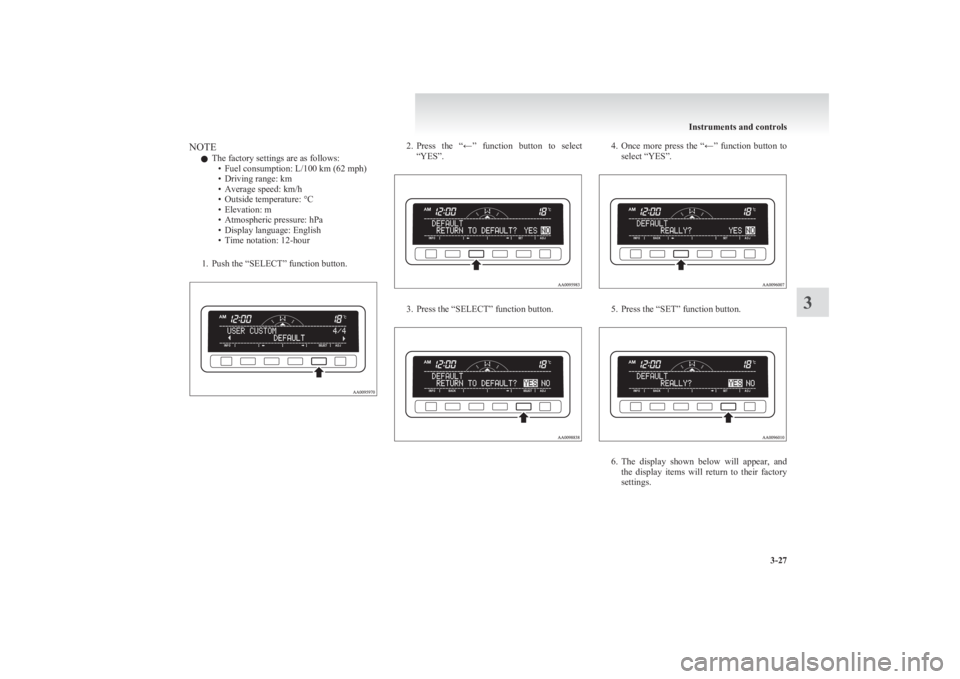
NOTEl The factory settings are as follows:
• Fuel consumption: L/100 km (62 mph)
• Driving range: km
• Average speed: km/h
• Outside temperature: °C
• Elevation: m
• Atmospheric pressure: hPa
• Display language: English
• Time notation: 12-hour
1. Push the “SELECT” function button.2. Press the “←” function button to select
“YES”.
3. Press the “SELECT” function button.
4. Once more press the “←” function button to
select “YES”.
5. Press the “SET” function button.
6. The display shown below will appear, and
the display items will return to their factory
settings.
Instruments and controls
3-27
3
Page 128 of 330

Economical drivingE00600100620
For economical driving, there are some technical re-
quirements that have to be met. The prerequisite
for low fuel consumption is a properly adjusted en-
gine. In order to achieve longer life of the vehicle
and the most economical operation, we recommend
you to have the vehicle checked at regular intervals
in accordance with the service standards.
Fuel economy and generation of exhaust gas and
noise are highly influenced by personal driving hab-
its as well as the particular operating conditions.
The following points should be observed in order
to minimize wear of brakes, tyres and engine as
well as to reduce environmental pollution.
Starting
Avoid rapid acceleration and sudden starts; such op-
eration will result in higher fuel consumption.
Shifting
Shift only at an appropriate speed and engine
speed. Always use the highest gear possible.
The transfer shift lever should be set to “2H” when
driving 4WD vehicles on normal roads and express
ways to obtain best possible fuel economy.
City traffic
Frequent starting and stopping increases the aver-
age fuel consumption. Use roads with smooth traf-
fic flow whenever possible. When driving on con-
gested roads, avoid use of a low gear at high en-
gine speeds.
Idling
The vehicle consumes fuel even during idling.
Avoid extended idling whenever possible.Speed
The higher the vehicle speed, the more fuel con-
sumed. Avoid driving at full speed. Even a slight re-
lease of the accelerator pedal will save a significant
amount of fuel.
Tyre inflation pressure
Check the tyre inflation pressures at regular inter-
vals. Low tyre inflation pressure increases road re-
sistance and fuel consumption. In addition, low
tyre pressures adversely affect tyre wear and driv-
ing stability.
Load
Do not drive with unnecessary articles in the cargo
area. Especially during city driving where frequent
starting and stopping is necessary, the increased
weight of the vehicle will greatly affect fuel con-
sumption.
Cold engine starting
Starting of a cold engine consumes more fuel.
Unnecessary fuel consumption is also caused by
keeping a hot engine running. After the engine is
started, commence driving as soon as possible.
Air conditioning*
The use of the air conditioning will increase the
fuel consumption.Driving, alcohol and drugs E00600200012
Driving after drinking alcohol is one of the most fre-
quent causes of accidents.
Your driving ability can be seriously impaired even
with blood alcohol levels far below the legal mini-
mum. If you have been drinking, don’t drive. Ride
with a designated non-drinking driver, call a cab or
a friend, or use public transportation.
Drinking coffee or taking a cold shower will not
make you sober.
Similarly, prescription and nonprescription drugs af-
fect your alertness, perception and reaction time.
Consult with your doctor or pharmacist before driv-
ing while under the influence of any of these medi-
cations.WARNINGl NEVER DRINK AND DRIVE.
Your perceptions are less accurate, your
reflexes are slower and your judgment is
impaired.
Starting and driving
4-02
4
Page 151 of 330
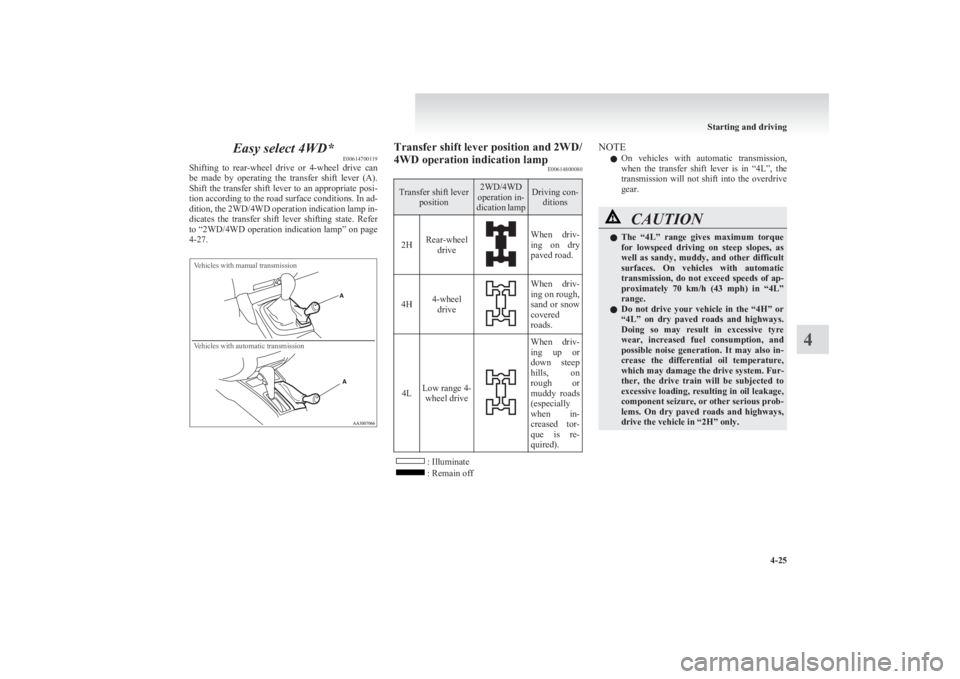
Easy select 4WD*E00614700119
Shifting to rear-wheel drive or 4-wheel drive can
be made by operating the transfer shift lever (A).
Shift the transfer shift lever to an appropriate posi-
tion according to the road surface conditions. In ad-
dition, the 2WD/4WD operation indication lamp in-
dicates the transfer shift lever shifting state. Refer
to “2WD/4WD operation indication lamp” on page
4-27.
Vehicles with manual transmissionVehicles with automatic transmissionTransfer shift lever position and 2WD/
4WD operation indication lamp E00614800080Transfer shift lever
position2WD/4WD
operation in-
dication lampDriving con- ditions
2HRear-wheel driveWhen driv-
ing on dry
paved road.4H4-wheel drive
When driv-
ing on rough,
sand or snow
covered
roads.
4LLow range 4- wheel drive
When driv-
ing up or
down steep
hills, on
rough or
muddy roads
(especially
when in-
creased tor-
que is re-
quired).
: Illuminate: Remain off
NOTE
l On vehicles with automatic transmission,
when the transfer shift lever is in “4L”, the
transmission will not shift into the overdrive
gear.CAUTIONl The “4L” range gives maximum torque
for lowspeed driving on steep slopes, as
well as sandy, muddy, and other difficult
surfaces. On vehicles with automatic
transmission, do not exceed speeds of ap-
proximately 70 km/h (43 mph) in “4L”
range.
l Do not drive your vehicle in the “4H” or
“4L” on dry paved roads and highways.
Doing so may result in excessive tyre
wear, increased fuel consumption, and
possible noise generation. It may also in-
crease the differential oil temperature,
which may damage the drive system. Fur-
ther, the drive train will be subjected to
excessive loading, resulting in oil leakage,
component seizure, or other serious prob-
lems. On dry paved roads and highways,
drive the vehicle in “2H” only.
Starting and driving
4-25
4
Page 156 of 330
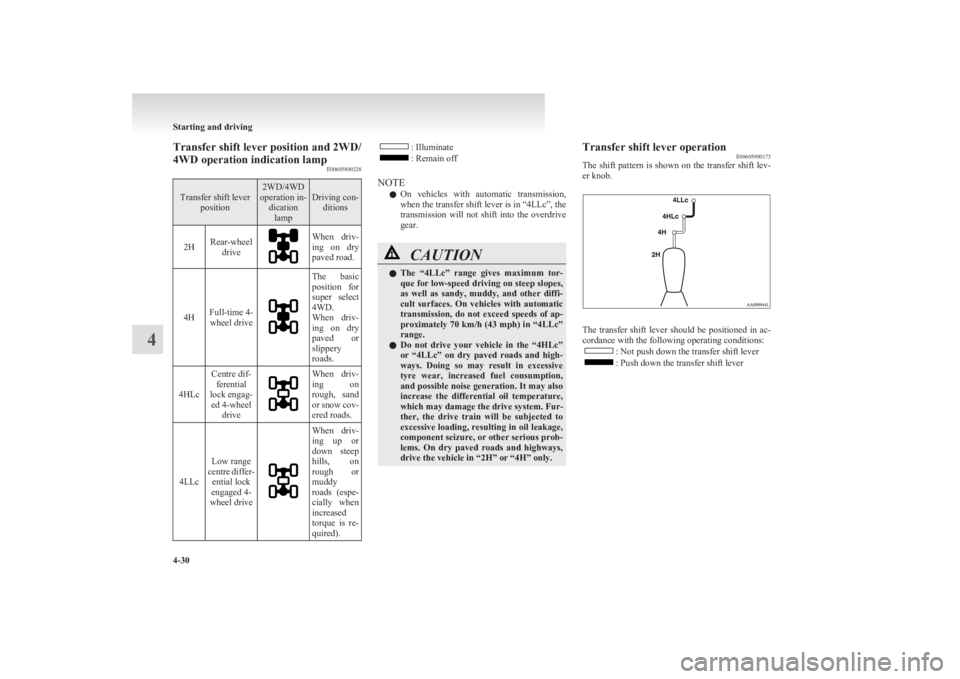
Transfer shift lever position and 2WD/
4WD operation indication lamp E00605800228Transfer shift lever
position2WD/4WD
operation in- dicationlampDriving con- ditions2HRear-wheel driveWhen driv-
ing on dry
paved road.
4HFull-time 4- wheel drive
The basic
position for
super select
4WD.
When driv-
ing on dry
paved or
slippery
roads.
4HLc
Centre dif- ferential
lock engag- ed 4-wheel driveWhen driv-
ing on
rough, sand
or snow cov-
ered roads.
4LLc
Low range
centre differ- ential lock
engaged 4-
wheel drive
When driv-
ing up or
down steep
hills, on
rough or
muddy
roads (espe-
cially when
increased
torque is re-
quired).: Illuminate: Remain off
NOTE l On vehicles with automatic transmission,
when the transfer shift lever is in “4LLc”, the
transmission will not shift into the overdrive
gear.CAUTIONl The “4LLc” range gives maximum tor-
que for low-speed driving on steep slopes,
as well as sandy, muddy, and other diffi-
cult surfaces. On vehicles with automatic
transmission, do not exceed speeds of ap-
proximately 70 km/h (43 mph) in “4LLc”
range.
l Do not drive your vehicle in the “4HLc”
or “4LLc” on dry paved roads and high-
ways. Doing so may result in excessive
tyre wear, increased fuel consumption,
and possible noise generation. It may also
increase the differential oil temperature,
which may damage the drive system. Fur-
ther, the drive train will be subjected to
excessive loading, resulting in oil leakage,
component seizure, or other serious prob-
lems. On dry paved roads and highways,
drive the vehicle in “2H” or “4H” only.Transfer shift lever operation E00605900173
The shift pattern is shown on the transfer shift lev-
er knob.
The transfer shift lever should be positioned in ac-
cordance with the following operating conditions:
: Not push down the transfer shift lever: Push down the transfer shift lever
Starting and driving
4-30
4