2011 MITSUBISHI L200 brake fluid
[x] Cancel search: brake fluidPage 92 of 330

Indication and warning lampsE00501502002
Type 1Type 21.CRUISE indication lamp* ® p. 4-49
2. Turn-signal indication lamps/Hazard warning indication lamps ® p. 3-07
3. High-beam indication lamp ® p. 3-07
4. Front fog lamp indication lamp* ® p. 3-07
5. Rear fog lamp indication lamp ® p. 3-07
6. Seat belt reminder/warning lamp ® p. 2-10
7. Low fuel warning lamp ® p. 3-04
8. 2WD/4WD operation indication lamp* ® p. 4-27, 4-32
9. Rear differential lock indication lamp* ® p. 4-34
10. Check engine warning lamp ® p. 3-08
11. Diesel preheat indication lamp ® p. 3-07
12. Oil pressure warning lamp ® p. 3-0913.
Fuel filter indication lamp ® p. 3-07
14. Charge warning lamp ® p. 3-09
15. A/T (automatic transmission) fluid temperature warning lamp (vehicles
with A/T) ® p. 4-18
16. Overdrive off indication lamp (vehicles with 4A/T) ® p. 4-18
17. Selector lever position indicator (vehicles with A/T) ® p. 4-16, 4-23
18. Brake warning lamp ® p. 3-08
19. Active Stability & Traction Control (ASTC) OFF indication
lamp* ® p. 4-47
20. Anti-lock brake system (ABS) warning lamp* ® p. 4-44
21. Active Stability & Traction Control (ASTC) indication lamp* ® p. 4-47
22. Door ajar warning lamp ® p. 3-09
23. Supplement Restraint System (SRS) warning lamp ® p. 2-38
Instruments and controls
3-06
3
Page 94 of 330

Warning lampsE00502400017Brake warning lamp E00502501637
This lamp illuminates when the ignition
switch is turned to the “ON” position,
and goes off after a few seconds.
Always make sure that the lamp goes off
before driving.
With the ignition switch in the “ON” po-
sition, the brake warning lamp illumi-
nates under the following conditions:
l When the parking brake lever has
been engaged.
l When the brake fluid level in the
reservoir falls to a low level.
l When the brake force distribution
function is not operating correctly.
(vehicles with anti-lock brake sys-
tem)CAUTIONl In the situations listed below,
brake performance may be com-
promised or the vehicle may be-
come unstable if brakes are ap-
plied suddenly; consequently,
avoid driving at high speeds or
applying the brakes suddenly.
Furthermore, immediately the
vehicle should be brought to a
stop in a safe location and to
have it checked.CAUTION• The brake warning lamp
does not illuminate when
the parking brake is applied
or does not turn off when
the parking brake is re-
leased.
• The ABS warning lamp and
brake warning lamp illumi-
nate at the same time.
For details, refer to “ABS
warning lamp” on page
4-44. (vehicles with anti-lock
brake system)
• The brake warning lamp re-
mains illuminated during
driving.
l The vehicle should be brought
to a halt in the following man-
ner when brake performance
has deteriorated. •Depress the brake pedal
harder than usual.
Even if the brake pedal
moves down to the very end
of its possible stroke, keep it
pressed down hard.
• Should the brakes fail, use
engine braking to reduce
your speed and carefully
pull the parking brake lever
to park your vehicle.
Depress the brake pedal to
operate the stop lamp to
alert the vehicles behind you.Check engine warning lamp E00502600657
This lamp is a part of an onboard diag-
nostic system which monitors the emis-
sions, engine and automatic transmission
control systems.
If a problem is detected in one of these
systems, this lamp illuminates.
Although your vehicle will usually be
drivable and not need towing, we recom-
mend you to have the system checked as
soon as possible.
This lamp will also illuminate for a few
seconds when the ignition switch is
turned to the “ON” position. If it does
not go off after a few seconds, we recom-
mend you to have the vehicle checked.CAUTIONl Prolonged driving with this
lamp on may cause further dam-
age to the emission control sys-
tem. It could also affect fuel
economy and drivability.
l If the lamp does not illuminate
when the ignition switch is
turned to the “ON” position,
we recommend you to have the
system checked.
Instruments and controls
3-08
3
Page 149 of 330

When a malfunction occurs in the au-
tomatic transmission E00615100152When the selector lever position indicator blinksE00615200179
When the selector lever position indicator blinks
while you are driving, there could be a malfunction
in the automatic transmission system.
throughor
CAUTIONl If the selector lever position indicator
blinks while you are driving, it is likely
that a safety device is operating because
of a malfunction in the automatic trans-
mission. We recommend you to have
your vehicle inspected as soon as possible.CAUTIONl The selector lever position indicator warn-
ing function does not operate with the se-
lector lever in the “P” (PARK), “R” (RE-
VERSE) or “N” (NEUTRAL) position.When the A/T (automatic transmission) fluid tem-
perature warning lamp comes on E00615300141
The automatic transmission fluid temperature warn-
ing lamp comes on when the automatic transmis-
sion fluid temperature becomes abnormally high.
Normally the warning lamp comes on when the ig-
nition switch is turned to the “ON” position, and
then will go out after a few seconds.
CAUTIONl If the lamp comes on, reduce the engine
speed and stop the vehicle in a safe area.
Then set the selector lever to the “P”
(PARK) position and idle the engine until
the warning lamp goes off. When the warn-
ing lamp goes off, resume normal driving.
If the warning lamp does not go off, we
recommend you to have your vehicle in-
spected.Operation of the automatic transmis-
sion E00604200528CAUTIONlBefore selecting a gear with the engine
running and the vehicle stationary, fully
depress the brake pedal to prevent the ve-
hicle from creeping.
The vehicle will begin to move as soon as
the gear is engaged, especially when the
engine speed is high, at fast idle or with
the air conditioning operating, the brakes
should only be released when you are
ready to drive away.
l Depress the brake pedal with the right
foot at all times.
Using the left foot could cause driver move-
ment delay in case of an emergency.
l To prevent sudden acceleration, never
race the engine when shifting from the
“P” (PARK) or “N” (NEUTRAL) position.
Starting and driving
4-23
4
Page 171 of 330

NOTEl Immediately after the vehicle starts moving
after engine start up, a whining sound of a mo-
tor will be heard from the engine compart-
ment. If the brake pedal is depressed at that
moment, you can feel the brake pedal pulsat-
ing.
This pulsation is due to the self-diagnosis op-
eration of the ABS and does not indicate a
malfunction.
l After driving on snowy roads, remove any
snow and ice which may have become ad-
hered to the wheel areas.
When doing this, be careful not to damage
the wheel speed sensors (A) and cables loca-
ted at each wheel on vehicles equipped with
an ABS.FrontRear
l The ABS becomes operative after the vehicle
has accelerated to a speed in excess of approx-
imately 10 km/h (6 mph). It stops operating
when the vehicle decelerates to a speed be-
low approximately 7 km/h (4 mph).
Power steering system E00607400071
When the engine is stopped, the power steering sys-
tem will not function and it will require greater man-
ual effort to operate the steering wheel. Keep this
in mind in particular when towing the vehicle. Nev-
er turn off the engine while driving.
Periodically check the power steering fluid level.CAUTIONl Do not hold the steering wheel in the fully
turned position (either left or right), for
longer than 10 seconds.
This can cause damage to the power steer-
ing system.
Starting and driving
4-45
4
Page 232 of 330

If the vehicle breaks downE00800101166
If the vehicle breaks down on the road, move it to
the shoulder and use the hazard warning flashers and/
or the warning triangle etc.
Refer to “Hazard warning flasher switch” on page
3-34.
If the engine stops/fails
Vehicle operation and control are affected if the en-
gine stops.
Before moving the vehicle to a safe area, be aware
of the following:
l The brake booster becomes inoperative and
the pedal effort will increase. Press down the
brake pedal harder than usual.
l Since the power steering pump is no longer
operative, the steering wheel feels heavy
when turning it.Emergency starting E00800502112
If the engine cannot be started because the battery
is weak or dead, the battery from another vehicle
can be used with jumper cables to start the engine.WARNINGl To start the engine using jumper cables
connected from another vehicle, perform
the correct procedures according to the in-
struction manual. Incorrect procedures
could result in a fire or explosion or dam-
age to the vehicles.
1. Get the vehicles close enough so the jumper
cables can reach, but be sure the vehicles
aren’t touching each other.
If they are, it could cause a ground connec-
tion you don’t want. The vehicle will not
start, and the bad grounding could damage
the electrical systems.
CAUTIONl Check the other vehicle. It must have a 12-
volt battery.
If the other system isn’t 12-volt, shorting
can damage both vehicles.
2. You could be injured if the vehicles move.
Set the parking brake firmly on each vehicle.
Put an automatic transmission in “P”
(PARK) or a manual transmission in “N”
(Neutral). Turn off the ignition switch.
WARNINGl Turn off the ignition on both vehicles be-
forehand.
Make sure that the cables or your clothes
cannot be caught by the fan or drive belt.
Personal injury could result.
NOTE
l Turn off all lamps, heater and other electrical
loads. This will avoid sparks and help save
both batteries.
3. Make sure battery electrolyte is at the proper
level.
Refer to “Battery” on page 8-09.
WARNINGl If electrolyte fluid is not visible, or ap-
pears to be frozen, Do Not Attempt Jump
Starting!
A battery might rupture or explode if the
temperature is below the freezing point
or if it is not filled to the proper level.
4. Connect one end of one jumper cable to the
positive (+) terminal of the discharged bat-
tery (A), and the other end to the positive (+)
terminal of the booster battery (B).
For emergencies
6-02
6
Page 251 of 330

The regulations concerning towing may differ from
country to country. It is recommended that you
obey the regulations of the area where you are driv-
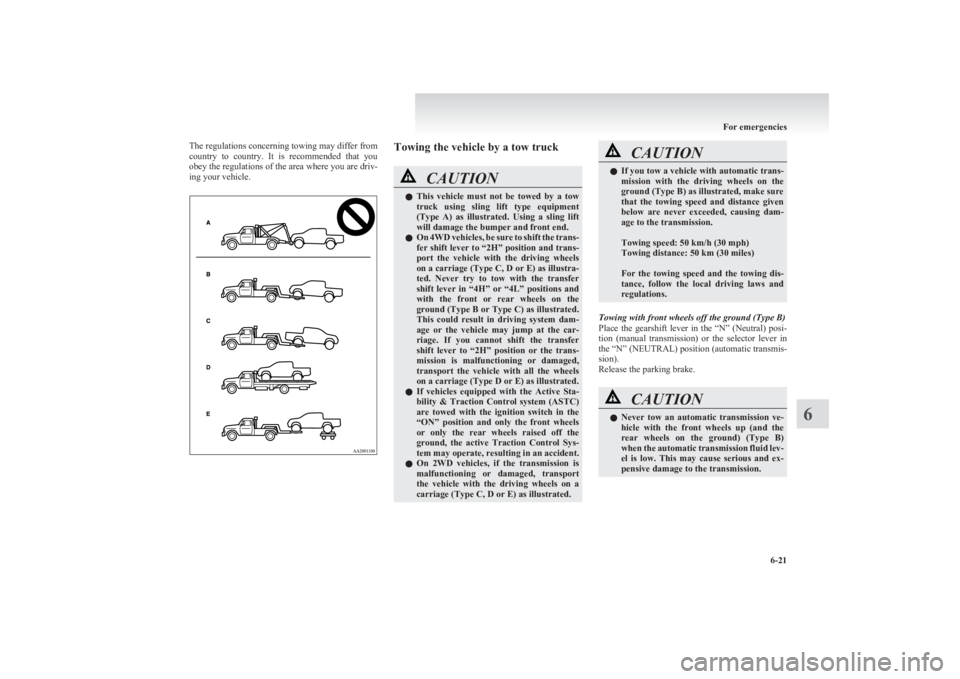
ing your vehicle.Towing the vehicle by a tow truckCAUTIONl This vehicle must not be towed by a tow
truck using sling lift type equipment
(Type A) as illustrated. Using a sling lift
will damage the bumper and front end.
l On 4WD vehicles, be sure to shift the trans-
fer shift lever to “2H” position and trans-
port the vehicle with the driving wheels
on a carriage (Type C, D or E) as illustra-
ted. Never try to tow with the transfer
shift lever in “4H” or “4L” positions and
with the front or rear wheels on the
ground (Type B or Type C) as illustrated.
This could result in driving system dam-
age or the vehicle may jump at the car-
riage. If you cannot shift the transfer
shift lever to “2H” position or the trans-
mission is malfunctioning or damaged,
transport the vehicle with all the wheels
on a carriage (Type D or E) as illustrated.
l If vehicles equipped with the Active Sta-
bility & Traction Control system (ASTC)
are towed with the ignition switch in the
“ON” position and only the front wheels
or only the rear wheels raised off the
ground, the active Traction Control Sys-
tem may operate, resulting in an accident.
l On 2WD vehicles, if the transmission is
malfunctioning or damaged, transport
the vehicle with the driving wheels on a
carriage (Type C, D or E) as illustrated.CAUTIONl If you tow a vehicle with automatic trans-
mission with the driving wheels on the
ground (Type B) as illustrated, make sure
that the towing speed and distance given
below are never exceeded, causing dam-
age to the transmission.
Towing speed: 50 km/h (30 mph)
Towing distance: 50 km (30 miles)
For the towing speed and the towing dis-
tance, follow the local driving laws and
regulations.
Towing with front wheels off the ground (Type B)
Place the gearshift lever in the “N” (Neutral) posi-
tion (manual transmission) or the selector lever in
the “N” (NEUTRAL) position (automatic transmis-
sion).
Release the parking brake.
CAUTIONl Never tow an automatic transmission ve-
hicle with the front wheels up (and the
rear wheels on the ground) (Type B)
when the automatic transmission fluid lev-
el is low. This may cause serious and ex-
pensive damage to the transmission.
For emergencies
6-21
6
Page 261 of 330

CAUTIONlDo not use a scrubbing brush or other
hard tools as they may damage the plastic
part surface.
l Do not use wax containing compound (pol-
ishing powder) which may damage the
plastic part surface.
l Do not bring the plastic parts into contact
with petrol, light oil, brake fluids, engine
oils, greases, paint thinners, and sulphu-
ric acid (battery electrolyte) which may
crack, stain or discolour the plastic parts.
If they touch the plastic parts, wipe them
off with soft cloth, chamois or the like
and an aqueous solution of neutral deter-
gent then immediately rinse the affected
parts with water.Chrome parts E00901400014
In order to prevent spots and corrosion of chrome
parts, wash with water, dry thoroughly, and apply a
special protective coating. This should be done
more frequently in winter.
Aluminium wheels* E00901500116
1.Remove dirt using a sponge while sprinkling
water on the vehicle.
2. Use neutral detergent on any dirt that cannot
be removed easily with water.
Rinse off the neutral detergent after washing
the vehicle.
3. Dry the vehicle thoroughly using a chamois
leather or a soft cloth.
CAUTIONl Do not use a brush or other hard imple-
ment on the wheels.
Doing so could scratch the wheels.
l Do not use any cleaner that contains an
abrasive substance or is acidic or alka-
line. Doing so could cause the coating on
the wheels to peel or become discoloured
or stained.
l Do not directly apply hot water using a
steam cleaner or by any other means.
l Contact with seawater and road deicer
can cause corrosion. Rinse off such sub-
stances as soon as possible.Window glass E00901600058
The window glass can normally be cleaned using
only a sponge and water.
Glass cleaner can be used to remove oil, grease,
dead insects, etc. After washing the glass, wipe dry
with a clean, dry, soft cloth. Never use the same
cloth to wipe the window glass as would be used to
wipe the paintwork; wax from the painted surfaces
could adhere to the glass and reduce its transparen-
cy and visibility.
NOTE l To clean the inside of the rear window, al-
ways use a soft cloth and wipe the window
glass along the demister heater element so as
not to cause damage.
Wiper blades E00901700017
Use a soft cloth and glass cleaner to remove grease,
dead insects, etc., from the wiper blades. Replace
the wiper blades when they no longer wipe proper-
ly. (Refer to page “Wiper blades” on page 8-17.)Cleaning the sunroof* E00901800180
Clean the inside of the sunroof with a soft cloth.
Hard deposits should be wiped away with a cloth
dipped in warm, neutral detergent solution. Wipe
away the solution with a sponge dipped in fresh wa-
ter.
NOTE l The surface treatment on the inside of the
glass may be removed if hard cloth or organ-
ic solvent (benzine, kerosene, thinner, etc.) is
used.
Engine compartment E00902100265
Clean the engine compartment at the beginning and
end of winter. Pay particular attention to flanges,
crevices and peripheral parts where dust containing
road chemicals and other corrosive materials might
collect.
If salt and other chemicals are used on the roads in
your area, clean the engine compartment at least ev-
ery three months.
Never spray or splash water on the electrical com-
ponents in the engine compartment, as this may
cause damage.
Do not bring the nearby parts, the plastic parts and
so on into contact with sulphuric acid (battery elec-
trolyte) which may crack, stain or discolour them.
Vehicle care
7-05
7
Page 263 of 330

Service precautions....................................................................... 8-02
Catalytic converter ........................................................................ 8-02
Bonnet ........................................................................................... 8-03
Engine oil ...................................................................................... 8-04
Engine coolant .............................................................................. 8-05
Automatic transmission fluid*......................................................8-06
Washer fluid ................................................................................. 8-07
Brake fluid .................................................................................... 8-07
Clutch fluid* ................................................................................. 8-08
Power steering fluid ...................................................................... 8-09
Battery .......................................................................................... 8-09
Tyres ............................................................................................. 8-11
Clutch pedal free play* ................................................................. 8-15
Brake pedal free play .................................................................... 8-16
Parking brake lever stroke ............................................................ 8-16
Wiper blades ................................................................................. 8-17
General maintenance .................................................................... 8-18
For cold and snowy weather ......................................................... 8-19
Fusible links .................................................................................. 8-19
Fuses ............................................................................................. 8-20
Replacement of lamp bulbs .......................................................... 8-23Maintenance8