Page 379 of 424

7-44 Vehicle care and maintenance
7
6. Insert a new fuse of the same capacity securely into the
appropriate slot.
Replacement of light bulbs
N00942900293
Before replacing a bulb, be sure the light is off. Do not touch
the glass part of the new bulb with your bare fingers; the oil
from your skin will stay on the glass and dim or destroy the
bulb when it gets hot.NOTE�If you are unsure of how to perform the work as required,
it is recommended that these procedures be performed by
an authorized Mitsubishi Motors dealer or a repair facility
of your choice.
�Be careful not to scratch the vehicle body when removing
a light and lens.
�When it rains, or when the vehicle has been washed, the
inside of the lens sometimes becomes temporarily foggy.
This is the same phenomenon as when window glass mists
up on a humid day, and does not indicate a functional
problem.
When the light is switched on, the heat will remove the
fog. However, if water gathers inside the light, please
have it checked by an authorized Mitsubishi Motors
dealer or a repair facility of your choice.
CAUTION
!�Never use a fuse with a capacity greater than the one
listed or any substitute, such as wire, foil etc. This
would cause the circuit wiring to heat up and could
cause a fire. �If the replacement fuse blows again after a short
time, have the electrical system checked by an
authorized Mitsubishi Motors dealer or a repair
facility of your choice to find and correct the cause.
CAUTION
!�Bulbs are extremely hot immediately after being
turned off.
When replacing a bulb, wait for it to cool sufficiently
before touching it. You could otherwise be burned.
BK0121200US.book 44 ページ 2010年4月14日 水曜日 午前11時24分
Page 380 of 424
Vehicle care and maintenance
7-45
7
Bulb capacity
N00943000044
The bulb should only be replaced with a new bulb with the
same rating and type. The type and rating are listed on the base
of the bulb.
Outside
N00950300746
Description
Wattage or
Candle power
ANSI Trade No.
or Bulb type
1 - Headlight —9007
HB5
2 - Front side-marker light 5 W WY5W
3 - Front fog light
(if so equipped)45 W H10
4 - Front turn-signal and
parking light32/3 cp 1157NA Front
BK0121200US.book 45 ページ 2010年4月14日 水曜日 午前11時24分
Page 381 of 424
7-46 Vehicle care and maintenance
7
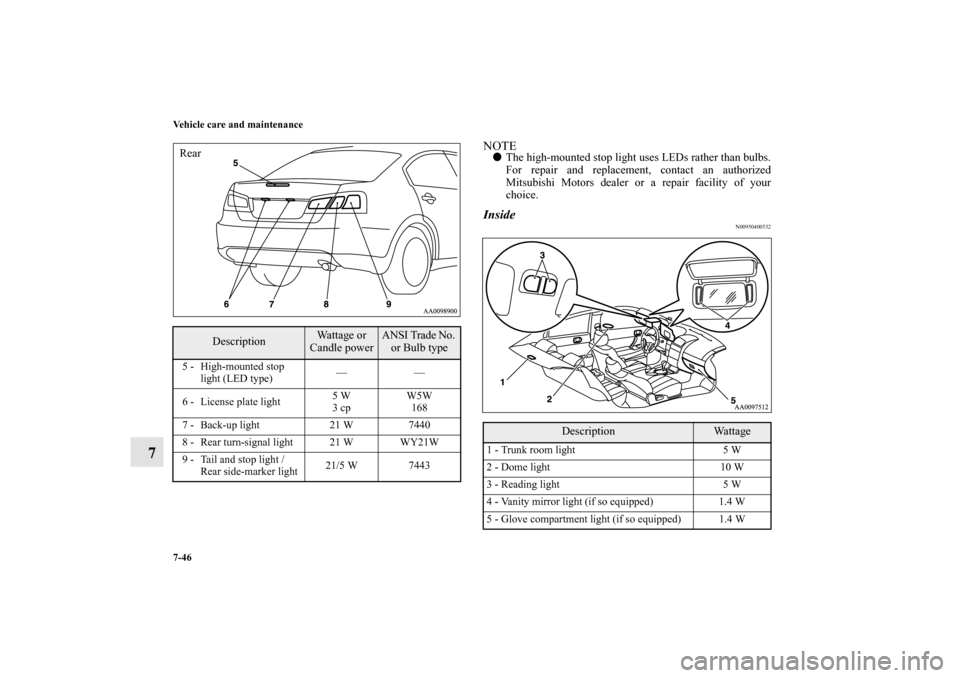
NOTE�The high-mounted stop light uses LEDs rather than bulbs.
For repair and replacement, contact an authorized
Mitsubishi Motors dealer or a repair facility of your
choice.Inside
N00950400532
Description
Wattage or
Candle power
ANSI Trade No.
or Bulb type
5 - High-mounted stop
light (LED type)——
6 - License plate light5 W
3 cpW5W
168
7 - Back-up light 21 W 7440
8 - Rear turn-signal light 21 W WY21W
9 - Tail and stop light /
Rear side-marker light21/5 W 7443Rear
Description
Wa t t a g e
1 - Trunk room light 5 W
2 - Dome light 10 W
3 - Reading light 5 W
4 - Vanity mirror light (if so equipped) 1.4 W
5 - Glove compartment light (if so equipped) 1.4 W
BK0121200US.book 46 ページ 2010年4月14日 水曜日 午前11時24分
Page 382 of 424
Vehicle care and maintenance
7-47
7
Headlights
N00943100856
1. When replacing the headlight bulb on the left side,
remove the relay box. Pull the relay box (B) upward while
pressing the tab (A).2. Depress the tab (C) on the harness connector and pull the
harness connector toward you to remove it.
BK0121200US.book 47 ページ 2010年4月14日 水曜日 午前11時24分
Page 383 of 424
7-48 Vehicle care and maintenance
7
3. Remove the locking cap (D) by turning it counterclock-
wise.4. Remove the headlight bulb (E) with holder.
5. To install the bulb, perform the removal steps in reverse.
BK0121200US.book 48 ページ 2010年4月14日 水曜日 午前11時24分
Page 384 of 424
Vehicle care and maintenance
7-49
7
Adjustment of headlight aim
N00943200121
The alignment of the headlights should be checked by an
authorized Mitsubishi Motors dealer or a repair facility of your
choice.
CAUTION
!�Handle halogen light bulb with care. The gas inside
a halogen light bulb is highly pressurized, so drop-
ping, knocking, or scratching a halogen light bulb
can cause it to shatter.�Never hold the halogen light bulb with a bare hand,
dirty glove, etc. The oil from your hand could cause
the bulb to break the next time the headlights are
used.
If the glass surface is dirty, clean it with alcohol and
let it dry completely before installing the bulb.
BK0121200US.book 49 ページ 2010年4月14日 水曜日 午前11時24分
Page 385 of 424
7-50 Vehicle care and maintenance
7
Front turn-signal and parking lights
N00917300424
1. Turn the bulb socket counterclockwise to remove it. And
remove the bulb from the socket by turning it counter-
clockwise while pressing in.
2. To install the bulb, perform the removal steps in reverse.
Front side-marker lights
N00943400282
1. Turn the bulb socket counterclockwise to remove it. And
remove the bulb from the socket by pulling out.
2. To install the bulb, perform the removal steps in reverse.
BK0121200US.book 50 ページ 2010年4月14日 水曜日 午前11時24分
Page 386 of 424
Vehicle care and maintenance
7-51
7
Front fog lights
(if so equipped)
N00943600691
1. Remove the clips (A) and screws (B), then remove the
cover (C).2. Remove the socket and bulb assembly (D) by turning it
counterclockwise.
BK0121200US.book 51 ページ 2010年4月14日 水曜日 午前11時24分

 upward while
pressing the tab (A).2. Dep")
 by turning it counterclock-
wise.4. Remove the headlight bulb (E) with holder.
5. To install the bulb, perform the removal steps in re")


N00943600691
1. Remove the clips (A) and screws (B), then remove the
cover (C).2. Remove the socket and bulb assembly (D) by turn")