Page 317 of 514
 or more be equipped with its own electric
or surge-type brakes.
If you choose ele")
4-18 Driving safety
4
Trailer brakesMitsubishi recommends that any trailer having a total weight
of 1,500 lbs (680 kg) or more be equipped with its own electric
or surge-type brakes.
If you choose electric brakes, be sure they are electrically actu-
ated. Do not attempt to tap into your vehicle’s hydraulic sys-
tem. No matter how successful it may seem, any attempt to
attach trailer brakes to your vehicle’s hydraulic system will
lower braking effectiveness and create a potential hazard.Trailer lightsTrailer lights and equipment must comply with federal, state,
and local regulations. Check with your local recreational vehi-
cle dealer for the requirements in your area, and use only
equipment designed for your vehicle.
Since lighting and wiring vary by trailer type and brand, you
should have a qualified technician install a suitable connector
between the vehicle and the trailer. Improper equipment or
installation can cause damage to your vehicle’s electrical sys-
tem and affect your vehicle warranty.Additional trailer equipmentMany states and Canadian provinces require special outside
mirrors when towing a trailer. Even if they do not, you should
install special mirrors if you cannot clearly see behind you, or
if the trailer creates a blind spot.
Ask your trailer sales or rental agency if any other items are
recommended or required for your towing situation.
Operating hints
Driver preparationTowing a trailer requires a certain amount of experience.
Before setting out for the open road, you’ll want to get to know
your trailer. Acquaint yourself with the feel of handling and
braking with the added weight of the trailer. And always keep
in mind that the vehicle you are driving is now a good deal
longer and not nearly as responsive as your vehicle is without a
trailer.
WA R N I N G
!�If you have a rear window open and you tow a
trailer with your vehicle, carbon monoxide gas
which you cannot see or smell could come into your
vehicle. It can cause unconsciousness or death. Refer
to “Exhaust system” on page 7-34.
To maximize your safety when towing a trailer:
• Have your exhaust system inspected for leaks, and
make necessary repairs before starting on your
trip.
• Keep the rear windows closed.
• If exhaust does come into your vehicle through a
window or another opening, drive with your front,
main heating or cooling system on and with the
blower on any speed. This will bring fresh, outside
air into your vehicle. Do not use recirculation
because it only recirculates the air inside your
vehicle. Refer to “Air selection switch” on page 5-
8, 5-19.
BK0121600US.book 18 ページ 2010年4月12日 月曜日 午前10時39分
Page 365 of 514
To select the desired equalizer type.SOUND PRESETS (sound setting storage)6 different sound settings can be stored into memory in the
“SOUND PR")
5-46 Comfort controls
5
EQ TYPE (Equalizer type select)To select the desired equalizer type.SOUND PRESETS (sound setting storage)6 different sound settings can be stored into memory in the
“SOUND PRESET” mode. For example:To store your current sound settings into memory, follow these
steps:
1. Go to the “SOUND PRESET” setting (preset button lights
will be flashing).
2. Push one of the memory select buttons (3) for more than 2
seconds.
To recall the sound settings that are stored in memory, follow
these steps:
1. Go to the “SOUND PRESET” setting (preset button lights
will be flashing).
2. Push your desired memory select button (3) for less than 2
seconds.
NOTE�The sound customization adjust mode will automatically
shut off when either the radio or CD is selected, or if no
adjustment is made within 7 seconds.
�If the AUDIO switch (4) is pushed and held for more than
2 seconds during the audio adjust mode, it will change to
“Hold” mode. The selected audio mode will be held until
the AUDIO switch (4) is pushed for more than 2 seconds
again.
EQ type
Description
NONE Sounds good for all types of music.
POP Tight bass and high frequency sound
ROCKTuned for hard rock and heavy metal with
powerful drums, guitars, and vocals.
R+B/R&B Deep bass punch and well-defined vocals
COUNTRY Enhanced main vocals
Settings
Preset 1
Preset 2
Preset 3
SUB GAIN -9 dB -3 dB +3 dB
BASS +1 0 0
MID 0 0 0
TRE +2 +1 0
FADE 0 0 0
BAL 0 0 0
FIELD CLUB NORMAL STUDIO
TYPE POP COUNTRY ROCK
BK0121600US.book 46 ページ 2010年4月12日 月曜日 午前10時39分
Page 401 of 514

6-2 For emergencies
6If the vehicle breaks down
N00836300174
If your vehicle breaks down on the road, move to the shoulder
and turn on the hazard warning flashers. If there is no shoulder,
or the shoulder is not safe, drive in the right lane slowly, with
the hazard lights flashing, until you come to a safe stopping
place. Keep the flashers flashing. If the engine stops/fails If the engine stops, there will be no power assist to the steering
and brakes, making these difficult to use.
�The brake booster will not work, so the brakes will not
grip well. The brake pedal will be harder to press than
usual.
�Since there is no power steering assist, the steering wheel
will be hard to turn.When the engine fails at the intersection Get help from your passengers, bystanders, etc. to push the
vehicle and move it to a safe zone.
Jump-starting the engine
N00836400667
If the engine cannot be started because the battery is weak or
dead, you can start it with the battery from another vehicle
using jumper cables.
1. Take off any metal jewelry such as watch bands or brace-
lets that might make an accidental electrical contact.
2. Position the vehicles close enough together so that the
jumper cables can reach, but be sure the vehicles aren’t
touching each other.
WA R N I N G
!�When using jumper cables to start a vehicle, follow
the procedures and be very cautious.
CAUTION
!�Do not try to start your vehicle by pushing or tow-
ing. Vehicles with automatic transaxles cannot be
started this way. Pushing or towing a vehicle that
has a manual transaxle may overheat and damage
the catalytic converter. Also, there is more risk of an
accident when a vehicle is being pushed or towed.
CAUTION
!�Check the other vehicle. It must have a 12-volt bat-
tery. If the other system isn’t 12-volt, both systems
can be damaged.
BK0121600US.book 2 ページ 2010年4月12日 月曜日 午前10時39分
Page 402 of 514
 or a manual transaxle in “N” (Neutral")
For emergencies
6-3
6
3. You could be injured if the vehicles move. Set the parking
brake firmly on each vehicle. Put an automatic transaxle
in “P” (PARK) or a manual transaxle in “N” (Neutral).
Turn the ignition key to the “LOCK” position. NOTE�Turn off all lights, heater, and other electrical loads. This
will avoid sparks and help save both batteries.
4. Make sure your battery electrolyte is at the proper level.
(Refer to “Battery” on page 7-16.)5. Connect one end of one jumper cable to the positive (+)
terminal of the discharged battery (A), and the other end
to the positive (+) terminal of the booster battery (B).
NOTE�Open the terminal cover before connecting the jumper
cable to the positive terminal of the battery.
(Refer to “Battery” on page 7-16.)
�Use the proper cables suitable for the battery size.
Otherwise heat damage to the cables could result.
�Check the jumper cables for damage and corrosion before
use.
WA R N I N G
!�Turn the ignition key to the “LOCK” position on
both vehicles. Make sure that the cables or your
clothes cannot be caught by the fan or drive belt.
Personal injury could result.
WA R N I N G
!�If the electrolyte fluid is not visible, or looks frozen,
DO NOT ATTEMPT JUMP STARTING!!
The battery might split open or explode if the tem-
perature is below the freezing point or if it is not
filled to the proper level.
BK0121600US.book 3 ページ 2010年4月12日 月曜日 午前10時39分
Page 467 of 514
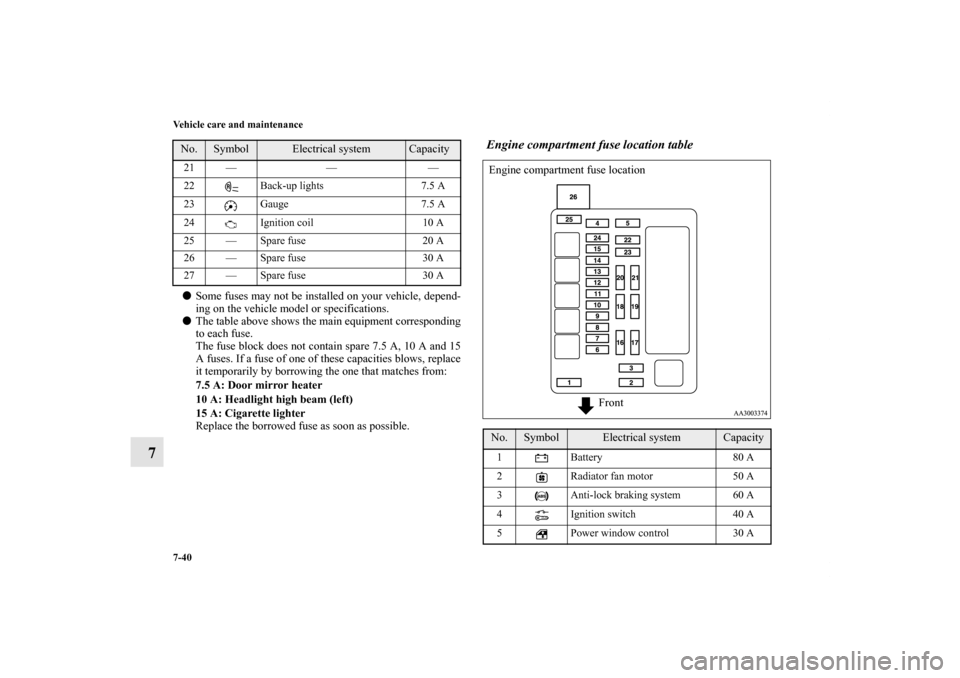
7-40 Vehicle care and maintenance
7
�Some fuses may not be installed on your vehicle, depend-
ing on the vehicle model or specifications.
�The table above shows the main equipment corresponding
to each fuse.
The fuse block does not contain spare 7.5 A, 10 A and 15
A fuses. If a fuse of one of these capacities blows, replace
it temporarily by borrowing the one that matches from:
7.5 A: Door mirror heater
10 A: Headlight high beam (left)
15 A: Cigarette lighter
Replace the borrowed fuse as soon as possible.
Engine compartment fuse location table
21 — — —
22 Back-up lights 7.5 A
23 Gauge 7.5 A
24 Ignition coil 10 A
25 — Spare fuse 20 A
26 — Spare fuse 30 A
27 — Spare fuse 30 A No.
Symbol
Electrical system
Capacity
No.
Symbol
Electrical system
Capacity
1 Battery 80 A
2 Radiator fan motor 50 A
3 Anti-lock braking system 60 A
4 Ignition switch 40 A
5 Power window control 30 A Engine compartment fuse location
Front
BK0121600US.book 40 ページ 2010年4月12日 月曜日 午前10時39分
Page 468 of 514

Vehicle care and maintenance
7-41
7
�Some fuses may not be installed on your vehicle, depend-
ing on the vehicle model or specifications.
�The table above shows the main equipment corresponding
to each fuse.Identification of fuse
6Front fog lights/
Daytime running lights15 A
7 Heated seat 20 A
8 Horn 15 A
9 Engine control 20 A
10 Air conditioning 10 A
11 Stop lights 15 A
12 Trailer 20 A
13 Alternator 7.5 A
14 Hazard warning flasher 10 A
15 Automatic transaxle 20 A
16 Headlight high beam (right) 10 A
17 Headlight high beam (left) 10 A
18 Headlight low beam (right) 10 A
19 Headlight low beam (left) 10 A
20 Tail light (right) 7.5 A
21 Tail light (left) 7.5 A
22 Dome light 15 A
23 Radio 15 A
24
Fuel pump 15 A No.
Symbol
Electrical system
Capacity
25 Front wiper 30 A
26 Radio 40 A Capacity
Color
5 A Yellowish brown
7.5 A Brown
10 A Red
15 A Blue
20 A Yellow
30 A Green (fuse type) / Pink (fusible link type)
40 A Green
50 A Red
60 A Yellow
80 A White
No.
Symbol
Electrical system
Capacity
BK0121600US.book 41 ページ 2010年4月12日 月曜日 午前10時39分
Page 472 of 514
Vehicle care and maintenance
7-45
7
Outside
N00950300788
NOTE�The high-mounted stop light uses LEDs rather than bulbs.
For repair and replacement, contact an authorized Mitsub-
ishi Motors dealer or a repair facility of your choice.
Description
Wattage or
Candle power
ANSI Trade No.
or Bulb type
1 - Headlight —9007
HB5
2 -Parking and front side-
marker and front turn
signal light24/2.2 cp 1157NA
3 -Front fog light
(if so equipped)55 W H11Front
Description
Wattage or
Candle power
ANSI Trade No.
or Bulb type
4 -Tail and stop and rear
side-marker light32/3 cp 1157
5 - Back-up light 21 cp 921
6 - Rear turn signal light 32 cp 1156NA
7 - License plate lights 5 W W5W
8 -High-mounted stop
lamp——Rear
BK0121600US.book 45 ページ 2010年4月12日 月曜日 午前10時39分
Page 473 of 514
7-46 Vehicle care and maintenance
7
Inside
N00950400486
Headlights
N00943100801
1. Depress the tab (A) on the harness connector and pull the
harness connector toward you to remove it.
Description
Wattage
1 - Luggage room light 8 W
2 - Door light 5 W
3 - Dome light (front) 5 W
4 - Rear personal lights 8 WBK0121600US.book 46 ページ 2010年4月12日 月曜日 午前10時39分

 on the harness connector and pull the
harness connector toward you to remove it.
Description
Wat")