Page 475 of 514

7-48 Vehicle care and maintenance
7
Adjustment of headlight aim
N00943200121
The alignment of the headlights should be checked by an
authorized Mitsubishi Motors dealer or a repair facility of your
choice.Parking and front side-marker and front turn
signal lights
N00917300349
1. Turn the bulb socket counterclockwise to remove it. And
remove the bulb from the socket by turning it counter-
clockwise while pressing in.
2. To install the bulb, perform the removal steps in reverse.
CAUTION
!�Handle halogen light bulb with care. The gas inside
a halogen light bulb is highly pressurized, so drop-
ping, knocking, or scratching a halogen light bulb
can cause it to shatter.�Never hold the halogen light bulb with a bare hand,
dirty glove, etc. The oil from your hand could cause
the bulb to break the next time the headlights are
used.
If the glass surface is dirty, clean it with alcohol and
let it dry completely before installing the bulb.
BK0121600US.book 48 ページ 2010年4月12日 月曜日 午前10時39分
Page 476 of 514
Vehicle care and maintenance
7-49
7
Front fog lights
(if so equipped)
N00943600398
To r e m o v e1. Remove the six clips (A) by turning them counterclock-
wise or prying them, and remove the screw (B) by turning
it counterclockwise, then remove the cover (C).2. Depress the tab (D) on the harness connector and pull the
harness connector to downward to remove it.
BK0121600US.book 49 ページ 2010年4月12日 月曜日 午前10時39分
Page 477 of 514
7-50 Vehicle care and maintenance
7
3. Remove the bulb (E) by turning it counterclockwise.
CAUTION
!�Handle halogen light bulb with care. The gas inside
a halogen light bulb is highly pressurized, so drop-
ping, knocking, or scratching a halogen light bulb
can cause it to shatter.�Never hold the halogen light bulb with a bare hand,
dirty glove, etc. The oil from your hand could cause
the bulb to break the next time the fog lights are
used.
If the glass surface is dirty, clean it with alcohol and
let it dry completely before installing the bulb.
BK0121600US.book 50 ページ 2010年4月12日 月曜日 午前10時39分
Page 478 of 514
Vehicle care and maintenance
7-51
7
To reinstall1. Reverse the above removal procedure.
2. When installing the cover, start by fitting the two clips
closest to the outside of the vehicle (the clips numbered 1
and 2 in the illustration) in the order of the numbers.
When fitting the clips, grasp the bottom edge of the cover
and pull it toward the rear of the vehicle to align the clip
holes in the cover with those in the body.
When reinstalling the clips of the cover, push the pin (F).
3. Fit the remaining four clips and the one screw.
Rear combination lights
N00943700373
1. Remove the screws (A) that hold the light unit.
BK0121600US.book 51 ページ 2010年4月12日 月曜日 午前10時39分
Page 480 of 514
Vehicle care and maintenance
7-53
7
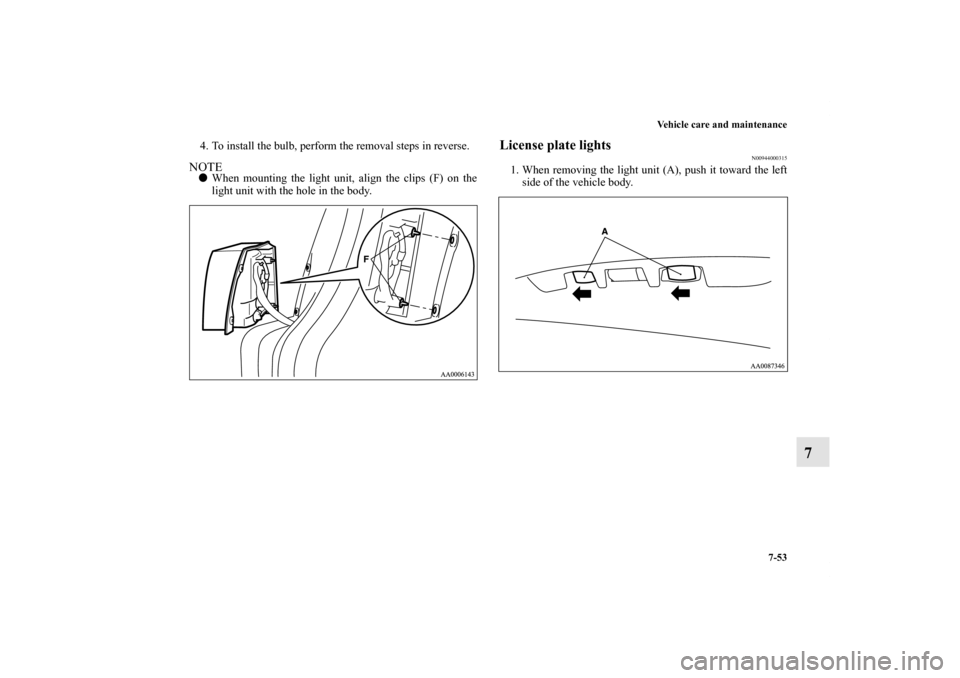
4. To install the bulb, perform the removal steps in reverse.NOTE�When mounting the light unit, align the clips (F) on the
light unit with the hole in the body.
License plate lights
N00944000315
1. When removing the light unit (A), push it toward the left
side of the vehicle body.
BK0121600US.book 53 ページ 2010年4月12日 月曜日 午前10時39分
Page 482 of 514
Vehicle care and maintenance
7-55
7
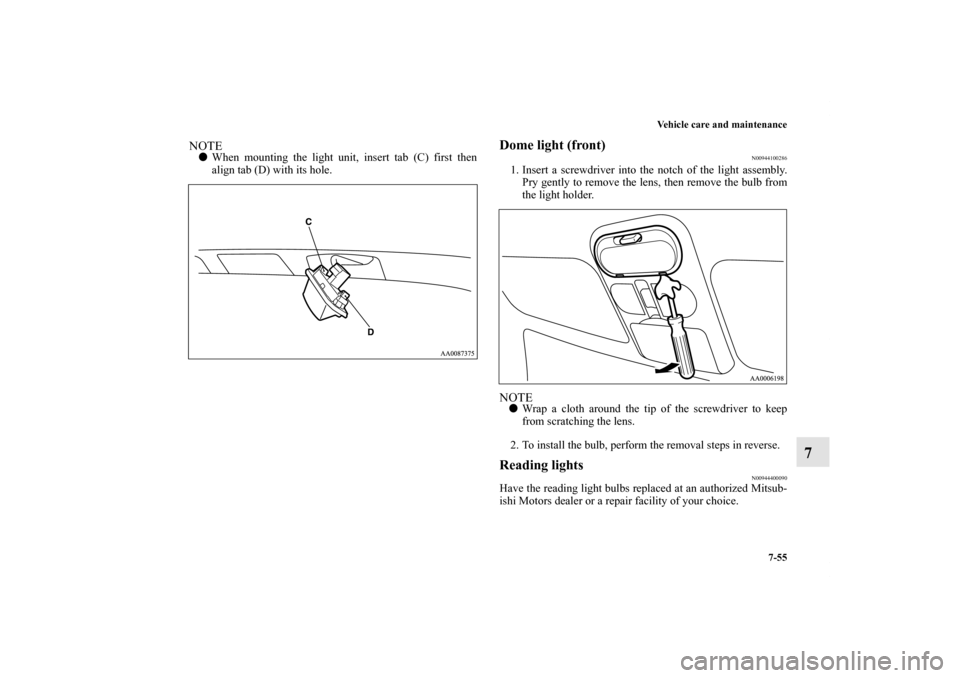
NOTE�When mounting the light unit, insert tab (C) first then
align tab (D) with its hole.
Dome light (front)
N00944100286
1. Insert a screwdriver into the notch of the light assembly.
Pry gently to remove the lens, then remove the bulb from
the light holder. NOTE�Wrap a cloth around the tip of the screwdriver to keep
from scratching the lens.
2. To install the bulb, perform the removal steps in reverse.Reading lights
N00944400090
Have the reading light bulbs replaced at an authorized Mitsub-
ishi Motors dealer or a repair facility of your choice.
BK0121600US.book 55 ページ 2010年4月12日 月曜日 午前10時39分
Page 483 of 514
7-56 Vehicle care and maintenance
7
Rear personal lights
N00944700080
1. Insert the tip of a screwdriver at the edge of the lens, pry
gently to remove the lens, and then remove the bulb from
the light holder.NOTE�Wrap a cloth around the tip of the screwdriver to keep
from scratching the lens.
2. To install the bulb, perform the removal steps in reverse.
Luggage room light
N00944900079
1. Insert a screwdriver into the notch of the light assembly
and pry gently to remove the lens. Pull the light bulb out
from the light holder.NOTE�Wrap a cloth around the tip of the screwdriver to keep
from scratching the lens.
2. To install the bulb, perform the removal steps in reverse.
BK0121600US.book 56 ページ 2010年4月12日 月曜日 午前10時39分
Page 484 of 514

Vehicle care and maintenance
7-57
7
Door lights
N00945000077
1. Insert the tip of a screwdriver at the edge of the lens, pry
gently to remove the lens. Pull the bulb from the light
holder.NOTE�Wrap a cloth around the tip of the screwdriver to keep
from scratching the lens.
2. To install the bulb, perform the removal steps in reverse.
Vehicle care precautions
N00945100153
In order to maintain the value of your vehicle, perform regular
maintenance using the proper materials and procedures. Be
sure to use only those materials and procedures that meet your
local environmental pollution control regulations. Choose the
materials you will use carefully, to be sure that they do not con-
tain corrosives. If you are not sure, contact an authorized Mit-
subishi Motors dealer for help in choosing these materials.
CAUTION
!�Cleaning products can be dangerous. Some are poi-
sonous. Others are highly flammable. Some are dan-
gerous if you breathe their fumes in a closed space.
When you use anything in a container to clean your
vehicle, be sure to follow the instructions. Always
open your vehicle doors or windows when you’re
cleaning the inside. Never use the following chemi-
cals to clean your vehicle:
• Gasoline
• Carbon Tetrachloride
• Benzine
• Kerosene
• Naphtha
• Acetone
• Turpentine
• Paint Thinner
• Lacquer Thinner
• Nail Polish Remover
BK0121600US.book 57 ページ 2010年4月12日 月曜日 午前10時39分

N00943600398
To r e m o v e1. Remove the six clips (A) by turning them counterclock-
wise or prying them, and remove the screw (")