Page 41 of 274

Seat............................................................................................... 2-02
Seat arrangement .......................................................................... 2-03
Seat adjustment ............................................................................. 2-04
Front seat ...................................................................................... 2-04
Head restraints .............................................................................. 2-06
Making a luggage area .................................................................. 2-08
Seat belts ....................................................................................... 2-10
Pregnant women restraint ............................................................. 2-12
Seat belt pretensioner system and force limiter system ................2-13
Child restraint ............................................................................... 2-13
Seat belt inspection ....................................................................... 2-22
Supplemental restraint system (SRS) - airbag ..............................2-22Seat and seat belts2
Page 42 of 274
SeatE004001013801-Front seat
lTo adjust forward or backward
® p. 2-04
l To recline the seatback
® p. 2-05
l To adjust seat height*
® p. 2-05
l To get in and out of the rear seat (3-door models)
® p. 2-05
l Heated seats*
® p. 2-06
2-Rear seat
l Folding the rear seat
® p. 2-08
Seat and seat belts
2-02
2
Page 43 of 274
Seat arrangementE00400200603
By operating the seats select the desired seats arrangement.
Normal usageHow to stow large articles (Folding the rear seat)Seat and seat belts
2-03
2
Page 44 of 274

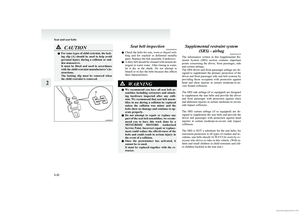
Seat adjustmentE00400300486
Adjust the driver’s seat so that you are comfortable
and that you can reach the pedals, steering wheel,
switches etc. while retaining a clear field of vision.WARNINGl Do not attempt to adjust the seat while
driving. This can cause loss of vehicle con-
trol and result in an accident. After ad-
justments are made, ensure the seating is
locked in position by attempting to move
the seat forward and rearward without us-
ing the adjusting mechanism.
l It is extremely dangerous to ride in the
luggage area of a vehicle. Also, the lug-
gage area and rear seats should never be
used as a play area by children. In a colli-
sion, people or children riding unrestrain-
ed in these areas are more likely to be se-
riously injured or killed.
Do not allow people or children to ride in
any area of your vehicle that is not equip-
ped with seats and seat belts, and make
sure that everyone travelling in your vehi-
cle is in a seat and wearing a seat belt, or
in the case of a child is strapped in a child
restraint.WARNINGl To minimize the risk of personal injury
in the event of a collision or sudden brak-
ing, the seatbacks should always be in the
almost upright position while the vehicle
is in motion. The protection provided by
the seat belts may be reduced significant-
ly when the seatback is reclined. There is
greater risk that the passenger will slide
under the seat belt, resulting in serious in-
jury, when the seatback is reclined.CAUTIONl Make sure the seat is adjusted by an
adult or with adult supervision for cor-
rect and safe operation.
l Do not place a cushion or the like be-
tween your back and the seatback while
driving. The effectiveness of the head re-
straints will be reduced in the event of an
accident.
l When sliding the seats, be careful not to
catch your hand or foot.
l When sliding or reclining the seat rear-
ward, pay careful attention to the rear
seat passengers.Front seat E00400400012To adjust forward or backward E00400500505
Pull the seat adjusting lever and adjust the seat for-
ward or backward to the desired position. After ad-
justment, release the adjusting lever to lock the seat
in position.
WARNINGl To ensure the seat is locked securely, try
to move the seat forward or backward
without using the adjusting lever.
Seat and seat belts
2-04
2
Page 45 of 274

To recline the seatbackE00400600623
In order to recline the seatback, lean forward slight-
ly, pull the seatback lock lever up, and then lean
backward to the desired position and release the lev-
er. The seatback will lock in that position.CAUTIONl The reclining mechanism of the seatback
is spring loaded, causing it to return to
the vertical position when the lock lever
is operated. When operating the lever, sit
close to the seatback or hold it with your
hand to control its return motion.To adjust seat height* E00400700578
Adjust the seat height by repeatedly operating the
lever.
1- Raise
2- Lower
To get in and out of the rear seat (3-
door models) E00401000060
The lever (A) can be used to make getting in and
out easier.
Fold the seatback forward, then slide the entire seat
forward.
To return the seat, slide the entire seat rearward
and then raise the seatback rearward to lock the
seat in position.WARNINGl Do not drive the vehicle with the seatback
folded forward. The seat is not retained
with the seatback in this position, so seri-
ous injuries could be suffered in the event
of hard braking or a collision.CAUTIONl The reclining mechanism of the seatback
is spring loaded, causing it to return to
the vertical position when the lock lever
is operated. When operating the lever, sit
close to the seatback or hold it with your
hand to control its return motion.
Seat and seat belts
2-05
2
Page 46 of 274

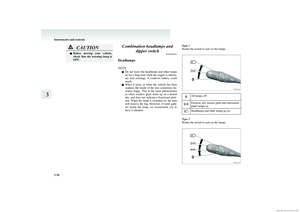
Heated seats*E00401100625
The heated seats can be operated with the ignition
switch in the “ON” position.
1- Heater high (for quick heating).
2- Heater off.
3- Heater low (to keep the seat warm).
The indication lamp (A) will illuminate while the
heater is on.
CAUTIONl Operate in the high position for quick heat-
ing. Once the seat is warm, set the heater
to low to keep it warm. Slight variations
in seat temperature may be felt while us-
ing the heated seats. This is caused by the
operation of the heater’s internal thermo-
stat and does not indicate a malfunction.
l If the following types of persons use the
heated seats, they might become too hot
or receive minor burns (red skin, heat blis-
ters, etc.):CAUTION• Children, elderly or ill people
• People with sensitive skin
• Excessively tired people
• People under the influence of alcohol
or sleep inducing medication (cold
medicine, etc.)
l Do not use a blanket, cushion, or other ma-
terial with high heat insulation properties
on the seat while using the heater; this
might cause the heater element to over-
heat.
l Turn the heater off immediately if it ap-
pears to be malfunctioning during use.
NOTE
l Do not place heavy objects on the seat or
stick pins, needles, or other pointed objects
into it.
l When cleaning the seat, do not use benzine,
kerosene, petrol, alcohol, or other organic sol-
vents; these might damage the surface of the
seat and also the heater element.
l If water or any other liquid is spilled on the
seat, allow it to dry thoroughly before attempt-
ing to use the heater.
Head restraints E00403301181WARNINGlDriving without the head restraints in
place can cause you and your passengers
serious injury or death in an accident. To
reduce the risk of injury in an accident, al-
ways make sure the head restraints are in-
stalled and properly positioned when the
seat is occupied.
l Never place a cushion or similar device
on the seatback. This can adversely affect
head restraint performance by increasing
the distance between your head and the
restraint.
l When a person sits in the seating position
of the rear seats, pull up the head re-
straint to a height at which it locks in po-
sition. Be sure to make this adjustment be-
fore starting to drive. Serious injuries
could otherwise be suffered in the result
of an impact.
Seat and seat belts
2-06
2
Page 47 of 274

To adjust height
Adjust the head restraint height so that the centre
of the restraint is as close as possible to eye level to
reduce the chances of injury in the event of colli-
sion. Any person too tall for the restraint to reach
their seated eye level, should adjust the restraint as
high as possible.
To raise the head restraint, move it upward. To low-
er the restraint, move it downward while pushing
the height adjusting knob (A) in the direction of the
arrow. After adjustment, push the head restraint
downward and make sure that it is locked.To remove
Lift the head restraint with the height adjusting
knob (A) pushed in.
To install
Confirm that the head restraint is facing the correct
direction, and then insert it into the seatback while
pressing the height adjusting knob (A) in the direc-
tion indicated by the arrow.
CAUTIONl Confirm that the height adjusting knob
(A) is correctly adjusted as shown in the
illustration, and also lift the head re-
straints to ensure that they do not come
out of the seatback.CAUTIONl The head restraints for the front and rear
seats differ in size. When installing head
restraints, make sure the front and rear
head restraints are fitted in their respec-
tive seats.
Failure to do so could cause serious in-
jury if involved in an accident.
Seat and seat belts
2-07
2
Page 48 of 274

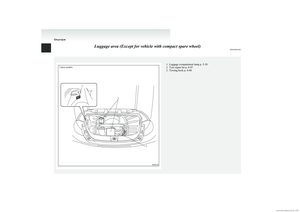
Making a luggage areaE00403400244WARNINGlIf required, always operate the seating be-
fore the vehicle is in motion.
l After seat operations are made, ensure
the seating is locked in position by attempt-
ing to move the seat and seatback for-
ward and rearward without using the ad-
justing mechanism.
l The luggage area in the rear of the vehi-
cle should never be used as a play area by
children. Children should be seated with
seat belts fastened when the vehicle is in
motion. Be sure that the rear seatbacks
are returned to their fully upright posi-
tion and locked in place.CAUTIONl Do not stack luggage above the seatback
height.
Secure the luggage firmly.
Otherwise, serious accidents could result
due to restricted rear vision or unrestrain-
ed objects entering the passenger compart-
ment during sudden braking.
l Make sure that the seat is operated by an
adult. If it is operated by a child, an unex-
pected accident might occur.
l When folding the seat be sure not to
catch your hand or leg.Folding the seatback forward (5-door
models except for vehicles with turbo-
charger) E00414500014
Front seat
To fold
Pull the seatback lock lever and fold the seatback
forward until it is held securely.WARNINGl With the seatback folded forward, do not
allow anyone to sit on that seat and do
not allow a child to play on it. Otherwise,
any sudden braking could result in seri-
ous injuries.
To replace
1.Pull the seatback lock lever and raise the seat-
back until it locks securely into place.
2. Push lightly on the seatback to confirm that
it has actually been secured.
Folding the rear seat E00403700335
To create luggage space, you can fold the rear seat.
NOTE l Each side of the rear seat can be folded inde-
pendently of the other.
To fold 1.Move the front seat to a position forward of
the middle of its fore-aft adjustment range.
(Refer to “To adjust forward or backward”
on page 2-04.)
2. Place each rear seat head restraint in its low-
est position. (Refer to “Head restraints” on
page 2-06.)
3. Pull the strap (A) on the rear of the cushion
to flip the cushion forward. Ensure the cush-
ion is in the front most position until it touch-
es the floor.
4. Pull the seatback lock lever (B) and fold the
seatback forward.
Seat and seat belts
2-08
2 OK