2011 MERCEDES-BENZ SLS fuse
[x] Cancel search: fusePage 13 of 436

Exterior rear view mirrors ................ 246
Fold-in function .............................. 248
Parking position ............................. 247
Power-folding ................................. 248
Switching fold-in function on or
off .................................................. 287
Synchronizing ................................ 248
Exterior view of vehicle ...................... 32
External audio or video devices main system .......................... 197, 205
voice control with .......................... 225
F
Fastening the seat belts ..................... 54
Fast forward audio playback ............................... 187
video playback ............................... 202
Film selection, DVD ........................... 203
First aid kit ......................................... 362
Flat tire ............................................... 402
Preparing the vehicle .....................402
TIREFIT (tire repair kit) ...................402
Floormat (driver’s side) .................... 317
Fluids Brake fluid ..................................... 425
Capacities ...................................... 425
Engine coolant ............................... 425
Engine oil ....................................... 425
Power steering fluid .......................425
Transmission fluid ..........................425
Washer and headlamp cleaning
system ........................................... 425
Folders
MP3 mode, selecting .....................187
Fold-in function for exterior rear
view mirrors ...................................... 248
Formats, audio .................................. 178
Forward track skip ............................ 187
Front air bags see Air bags
Fuel ..................................................... 320
Additives ........................................ 427
Capacity, fuel tank .........................425
Drive sensibly–safe fuel .................348
Fuel consumption statistics ...........276
Fuel filler flap and cap ...................321
Fuel tank reserve warning lamp .....394
Premium unleaded gasoline ... 425, 427
Refueling ........................................ 320
Requirements ................................ 427
Fuel filler flap ..................................... 321
Fuel gauge ......................................... 271
Fuels, coolants, lubricants etc. ........ 425
Fuel tank Capacity ........................................ 425
Fuel filler flap and cap ...................321
Refueling ........................................ 320
Full-screen map ................................. 106
Fuses .................................................. 417
G
Garage door opener .......................... 313
Gasoline see Fuel
GAWR (Gross Axle Weight Rating) ... 345
Gear range ......................................... 266
Indicator ........................................ 266
Limiting .......................................... 268
Shifting into optimal ......................268
Gear selector lever ............................ 263
Cleaning ......................................... 359
Gearshift pattern ........................... 263
Shifting procedure .........................264
Transmission position indicator .....265
Transmission positions ..................265
Generator
see Alternator
Geo-coordinates, displaying ............. 110
Global locking/unlocking see Key, SmartKey
Global voice control commands ...... 207
Glove box ........................................... 304
Google Maps ®
.................................... 125
GPS reception .................................... 103
displaying geo-coordinates ............110
Gracenote ®
Media database ............................. 188
Gross Axle Weight Rating
see GAWR
Gross Vehicle Weight
see GVW
Gross Vehicle Weight Rating
see GVWR
GSM network coverage .................... 148
Index11BA 197 USA, CA Edition A 2011; 1; 27, en-UShereepeVersion: 3.0.3.52010-03-24T15:31:10+01:00 - Seite 11
Page 358 of 436

Have paintwork repairs performed at an
authorized Mercedes-Benz Center.
Have stone chipping repairs as soon as
possible.
Remove the following immediately if possible.
Do not apply strong force.
R Soak insect remains with insect remover
and rinse them of with water afterwards.
Use a soft bristle toothbrush for remains
that have not come off.
R Soak bird droppings with water and rinse
them of with water afterwards. Use a soft
bristle toothbrush for remains that have not
come off.
R Remove tree resins, grease, oil, wax, and
gasoline with commercially available
benzine.
R Dab off tar splashes or tar stains with tar
remover.
Engine cleaning
Prior to cleaning the engine compartment,
make sure to protect electrical components
and connectors from contact with water and
cleaning agents.
Corrosion protection, such as MB
Anticorrosion Wax should be applied to the
engine compartment after every engine
cleaning. Before applying, all control linkage
bushings and joints should be lubricated. The
poly-V-belt and all pulleys should be
protected from any wax.
Vehicle washing
In the winter, thoroughly remove all traces of
road salt as soon as possible.
When washing the vehicle underbody, do not
forget to clean the inner sides of the wheels.
GWarning!
After washing the vehicle, braking efficiency
may be reduced. Reduced braking efficiency
could cause an accident.
Brake the vehicle significantly after washing
the vehicle. Observe the traffic situation when
doing so. The brake discs will warm up and
dry faster. Drive carefully after washing the
vehicle until the brakes have dried and you
can notice that brake efficiency has been
restored.
Hand-washXDo not use hot water or wash your vehicle
in direct sunlight.XOnly use a soft, wet cloth or sponge to
clean the vehicle.XOnly use a mild vehicle wash detergent,
such as Mercedes-Benz approved Car
Shampoo.XThoroughly spray the vehicle with a
diffused jet of water.XDo not spray directly towards the
ventilation intake.XUse plenty of water and rinse the sponge
and chamois frequently.XRinse with clean water and dry with a
chamois thoroughly.
Do not allow cleaning agents to dry on the
finish.
Automatic car wash
You can have your vehicle washed in an
automatic car wash from the start. Brushless
car washes are preferable.
XTo protect the filter system, activate the air
recirculation mode using button g on
the climate control panel.
! Do not clean your vehicle in an automatic
touchless car wash which uses caustic
spray. Caustic spray will damage the paint
or ornamental moldings.
If the vehicle is very dirty, prewash it before
running it through the automatic car wash.
! Make sure the combination switch is set
to wiper setting $. Otherwise, the rain
sensor could activate and cause the wipers
to move unintentionally. This may lead to
vehicle damage.
356Vehicle careOperation
BA 197 USA, CA Edition A 2011; 1; 27, en-UShereepeVersion: 3.0.3.52010-03-24T15:31:10+01:00 - Seite 356
Page 363 of 436

Vehicle equipment ............................362
Where will I find...? ...........................362
Vehicle status messages in the
multifunction display .......................364
What to do if... ................................... 388
Unlocking/locking manually ...........397
Replacing SmartKey battery ............399
Replacing bulbs ................................. 400
Replacing wiper blades ....................400
Flat tire .............................................. 402
Wheel change .................................... 405
Battery ............................................... 410
Jump starting .................................... 413
Towing the vehicle ............................415
Fuses .................................................. 417361Practical hintsBA 197 USA, CA Edition A 2011; 1; 27, en-UShereepeVersion: 3.0.3.52010-03-24T15:31:10+01:00 - Seite 361
Page 365 of 436

XTo remove jack C from storage well casing
E, loosen hook and loop fastener D.
XRemove jack C with storage well casing
E.
FFuse chartGWheel wrenchHTowing eye bolt
Collapsible wheel chock
The collapsible wheel chock serves to secure
the vehicle, e.g. while changing a wheel.
XTake the collapsible wheel chock from the
vehicle tool kit (Y page 362).
XSetting up: Tilt both plates upward :.XFold the lower plate outward ;.XGuide the tabs of the lower plate all the way
into the openings of base plate =.
For information on where to place wheel
chocks when changing a wheel, see
“Preparing the vehicle” (Y page 405).
Jack GWarning!
Only use the jack supplied with your vehicle
to lift the vehicle briefly for wheel changes. If
you use the jack for any other purpose, you or
others could be injured, as the jack is
designed only for the purpose of changing a
wheel.
When using the jack, observe the safety notes
in the “Removing the wheel” section and the
notes on the jack.
XTake the jack from the vehicle tool kit
(Y page 362).
Storage position
XTurn the crank handle in the direction of
arrow as far as it will go.
Operational position
XTurn the crank handle clockwise.Where will I find...?363Practical hintsBA 197 USA, CA Edition A 2011; 1; 27, en-UShereepeVersion: 3.0.3.52010-03-24T15:31:10+01:00 - Seite 363Z
Page 419 of 436

Leave the engine running under all
circumstances.
Removing the SmartKey from the starter
switch or opening a door with the ignition
switched off will automatically shift the into
park position P.XStart the engine ( Y page 259).XWith the vehicle at a standstill, depress the
brake pedal and keep it pressed.XShift the transmission into neutral position
N .XCheck the transmission position in the
instrument cluster ( Y page 265).XRelease the brake pedal.XIf engaged, release the electronic parking
brake.XSwitch on the hazard warning flasher
( Y page 252).XLeave the engine running throughout the
entire towing procedure.
! The vehicle may be towed only for
distances up to 30 miles (50 km) and at a
speed not to exceed 30 mph (50 km/h).
! Make sure the electronic parking brake is
released. If the electronic parking brake is
malfunctioning, contact an authorized
Mercedes-Benz Center.
! While towing, check the temperature of
the transmission fluid via the control
system in the AMG menu. The transmission
fluid temperature may not rise above 248‡
(120†). Otherwise, the towing procedure
must be stopped immediately.
i While being towed with the hazard
warning flasher in use, use the combination
switch in the usual manner to signal turns.
Only the selected turn signal will operate.
Upon canceling the turn signal, the hazard
warning flasher will operate again.
Fuses
Introduction
The electrical fuses in your vehicle serve to
switch off malfunctioning power circuits.
If a fuse is blown, the components and
systems secured by that fuse will stop
operating.
GWarning!
Only use fuses approved by Mercedes-Benz
with the specified amperage for the system in
question and do not attempt to repair or
bridge a blown fuse. Using other than
approved fuses or using repaired or bridged
fuses may cause an overload leading to a fire,
and/or cause damage to electrical
components and/or systems. Have the cause
determined and remedied by an authorized
Mercedes-Benz Center.
A blown fuse must be replaced by an
appropriate spare fuse (recognizable by its
color or the fuse rating given on the fuse) of
the amperage recommended in the fuse
chart. Any Mercedes-Benz Center will be glad
to advise you on this subject.
i In case of a blown fuse contact Roadside
Assistance or an authorized Mercedes-
Benz Center.
If a newly inserted fuse blows again, have the
cause determined and rectified by an
authorized Mercedes-Benz Center.
The fuse chart is located in the trunk with the
vehicle tool kit ( Y page 362). The fuse chart
explains the fuse allocation and fuse
amperages.
Before replacing fuses
XEngage the electronic parking brake.XMake sure the transmission is in park
position P.XSwitch off all electrical consumers.XTurn off the engine.Fuses417Practical hintsBA 197 USA, CA Edition A 2011; 1; 27, en-UShereepeVersion: 3.0.3.52010-03-24T15:31:10+01:00 - Seite 417Z
Page 420 of 436

XKEYLESS-GO: Open the driver’s door (this
puts the starter switch in position 0, same
as with the SmartKey removed from the
starter switch). The driver’s door then can
be closed again.
XRemove the SmartKey from the starter
switch.
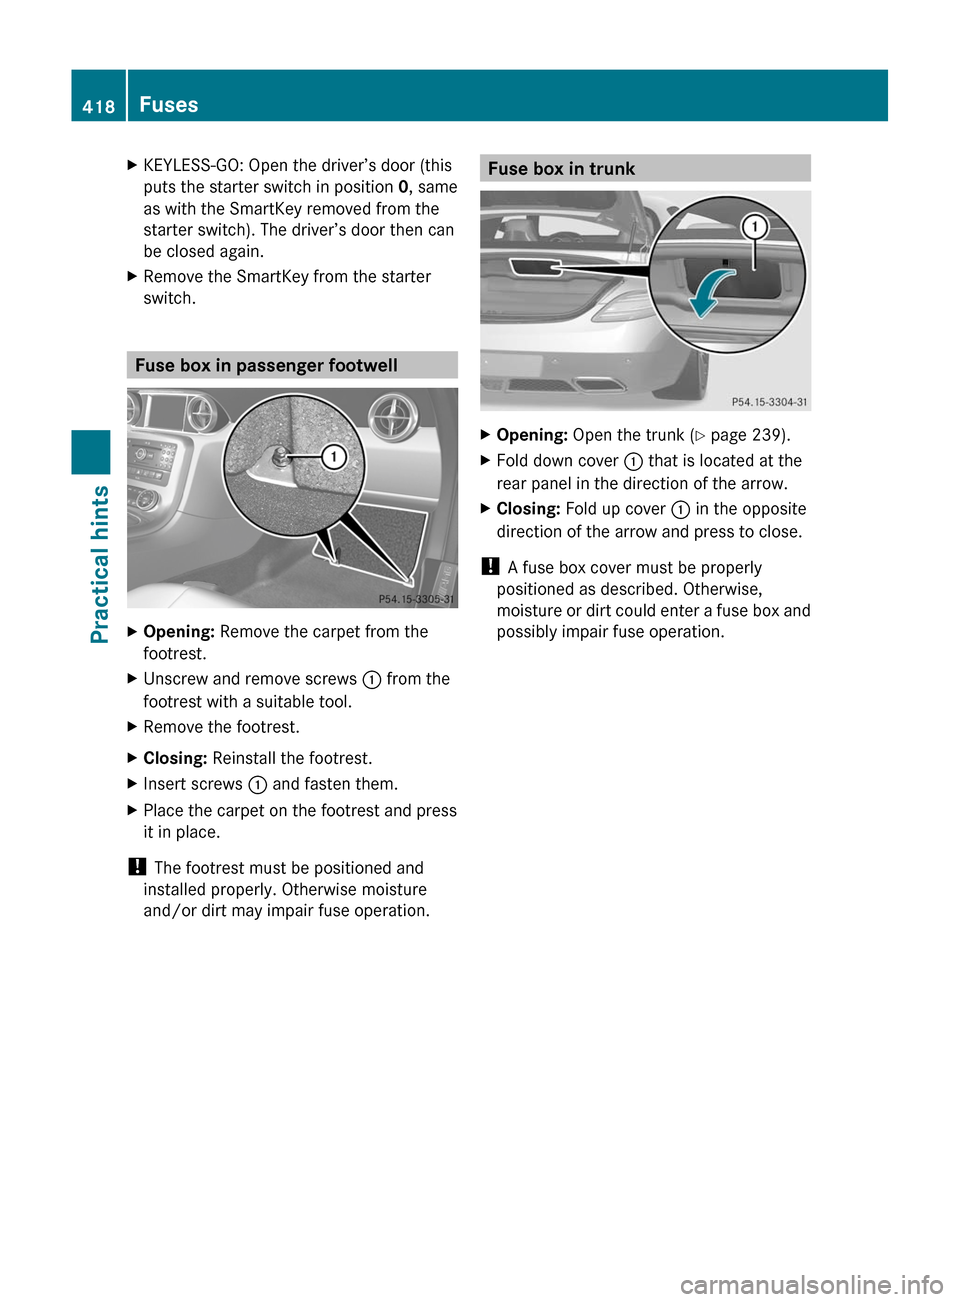
Fuse box in passenger footwell
XOpening: Remove the carpet from the
footrest.
XUnscrew and remove screws : from the
footrest with a suitable tool.
XRemove the footrest.XClosing: Reinstall the footrest.XInsert screws : and fasten them.XPlace the carpet on the footrest and press
it in place.
! The footrest must be positioned and
installed properly. Otherwise moisture
and/or dirt may impair fuse operation.
Fuse box in trunkXOpening: Open the trunk (Y page 239).XFold down cover : that is located at the
rear panel in the direction of the arrow.
XClosing: Fold up cover : in the opposite
direction of the arrow and press to close.
! A fuse box cover must be properly
positioned as described. Otherwise,
moisture or dirt could enter a fuse box and
possibly impair fuse operation.
418FusesPractical hints
BA 197 USA, CA Edition A 2011; 1; 27, en-UShereepeVersion: 3.0.3.52010-03-24T15:31:10+01:00 - Seite 418