2011 MERCEDES-BENZ SLS glove box
[x] Cancel search: glove boxPage 13 of 436

Exterior rear view mirrors ................ 246
Fold-in function .............................. 248
Parking position ............................. 247
Power-folding ................................. 248
Switching fold-in function on or
off .................................................. 287
Synchronizing ................................ 248
Exterior view of vehicle ...................... 32
External audio or video devices main system .......................... 197, 205
voice control with .......................... 225
F
Fastening the seat belts ..................... 54
Fast forward audio playback ............................... 187
video playback ............................... 202
Film selection, DVD ........................... 203
First aid kit ......................................... 362
Flat tire ............................................... 402
Preparing the vehicle .....................402
TIREFIT (tire repair kit) ...................402
Floormat (driver’s side) .................... 317
Fluids Brake fluid ..................................... 425
Capacities ...................................... 425
Engine coolant ............................... 425
Engine oil ....................................... 425
Power steering fluid .......................425
Transmission fluid ..........................425
Washer and headlamp cleaning
system ........................................... 425
Folders
MP3 mode, selecting .....................187
Fold-in function for exterior rear
view mirrors ...................................... 248
Formats, audio .................................. 178
Forward track skip ............................ 187
Front air bags see Air bags
Fuel ..................................................... 320
Additives ........................................ 427
Capacity, fuel tank .........................425
Drive sensibly–safe fuel .................348
Fuel consumption statistics ...........276
Fuel filler flap and cap ...................321
Fuel tank reserve warning lamp .....394
Premium unleaded gasoline ... 425, 427
Refueling ........................................ 320
Requirements ................................ 427
Fuel filler flap ..................................... 321
Fuel gauge ......................................... 271
Fuels, coolants, lubricants etc. ........ 425
Fuel tank Capacity ........................................ 425
Fuel filler flap and cap ...................321
Refueling ........................................ 320
Full-screen map ................................. 106
Fuses .................................................. 417
G
Garage door opener .......................... 313
Gasoline see Fuel
GAWR (Gross Axle Weight Rating) ... 345
Gear range ......................................... 266
Indicator ........................................ 266
Limiting .......................................... 268
Shifting into optimal ......................268
Gear selector lever ............................ 263
Cleaning ......................................... 359
Gearshift pattern ........................... 263
Shifting procedure .........................264
Transmission position indicator .....265
Transmission positions ..................265
Generator
see Alternator
Geo-coordinates, displaying ............. 110
Global locking/unlocking see Key, SmartKey
Global voice control commands ...... 207
Glove box ........................................... 304
Google Maps ®
.................................... 125
GPS reception .................................... 103
displaying geo-coordinates ............110
Gracenote ®
Media database ............................. 188
Gross Axle Weight Rating
see GAWR
Gross Vehicle Weight
see GVW
Gross Vehicle Weight Rating
see GVWR
GSM network coverage .................... 148
Index11BA 197 USA, CA Edition A 2011; 1; 27, en-UShereepeVersion: 3.0.3.52010-03-24T15:31:10+01:00 - Seite 11
Page 35 of 436

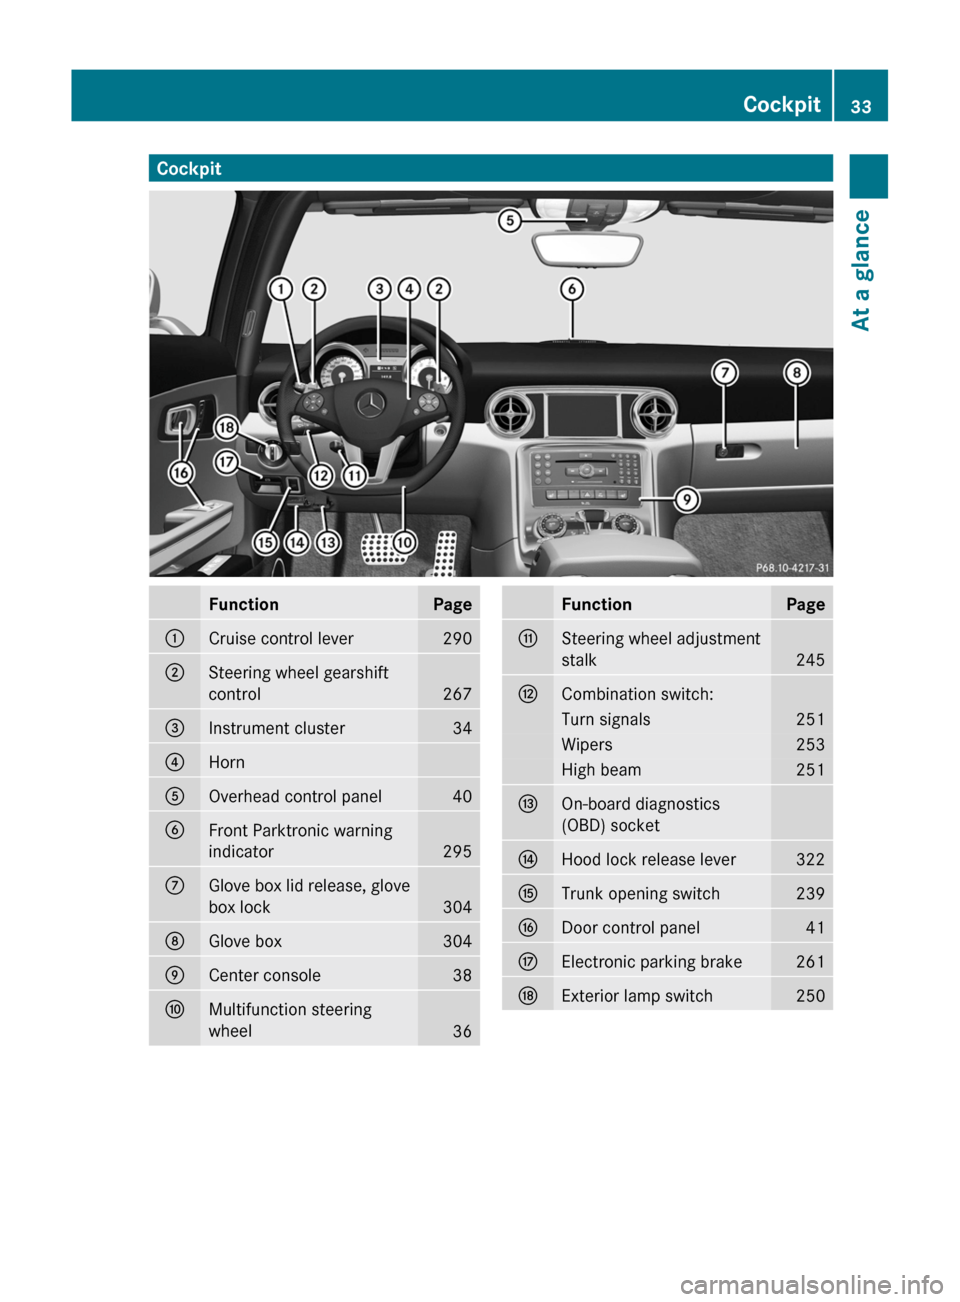
CockpitFunctionPage:Cruise control lever290;Steering wheel gearshift
control
267
=Instrument cluster34?HornAOverhead control panel40BFront Parktronic warning
indicator
295
CGlove box lid release, glove
box lock
304
DGlove box304ECenter console38FMultifunction steering
wheel
36
FunctionPageGSteering wheel adjustment
stalk
245
HCombination switch:Turn signals251Wipers253High beam251IOn-board diagnostics
(OBD) socketJHood lock release lever322KTrunk opening switch239LDoor control panel41MElectronic parking brake261NExterior lamp switch250Cockpit33At a glanceBA 197 USA, CA Edition A 2011; 1; 27, en-UShereepeVersion: 3.0.3.52010-03-24T15:31:10+01:00 - Seite 33
Page 50 of 436

weight category as identified by the Occupant
Classification System (OCS) (Y page 49).
The lighter the passenger-side occupant, the
higher the vehicle deceleration rate required
for second stage inflation of the passenger
front air bag.
The air bags will not deploy in impacts which
do not exceed the system’s preset
deployment thresholds. You will then be
protected by the fastened seat belts.
The front air bags will not deploy in the event
of a rollover unless the vehicle’s rate of
longitudinal deceleration or acceleration
exceeds the preset deployment threshold for
the front air bags.
The passenger air bag will only be deployed if
Rthe system, based on OCS weight sensor
readings, detects that the passenger seat
is occupied
Rthe 4 5 indicator lamp in the center
console is not lit
Rthe impact exceeds a preset deployment
threshold
Knee bags
The knee bags are designed to provide
increased protection for the driver and
passenger against the risk of injuries to the
knees, thighs and lower legs.
Driver side knee bag : is located on the
driver side lower instrument panel. Passenger
side knee bag ; is located on the passenger
side below the glove box. They are designed
to operate together with the front air bags in
certain frontal impacts if the system
determines that air bag deployment can offer
additional protection to that provided by the
seat belt. The knee bags operate best in
conjunction with properly positioned and
fastened seat belts.
Side impact air bags
GObserve Safety notes, see page 45.GWarning!
Only use seat covers which have been tested
and approved by Mercedes-Benz for your
vehicle model. Using other seat covers may
interfere with or prevent the deployment of
the side impact air bags. Contact an
authorized Mercedes-Benz Center for
availability.
GWarning!
The pressure sensors for side impact air bag
control are located in the doors. Do not
modify any components of the doors or door
trim panels including, for example, the
addition of door speakers.
Improper repair work on the doors or the
modification or addition of components to the
doors create a risk of rendering the side
impact air bags inoperative or causing
unintended air bag deployment. Work on the
doors must therefore only be performed by
qualified technicians. Contact an authorized
Mercedes-Benz Center.
Side impact air bags : are designed to
provide increased protection for the thorax
48Occupant safetySafety and security
BA 197 USA, CA Edition A 2011; 1; 27, en-UShereepeVersion: 3.0.3.52010-03-24T15:31:10+01:00 - Seite 48
Page 199 of 436

This function is not available within
playlists, for example.XSelect a category, e.g. artists.
The available artists appear.XPress the corresponding number key once
or repeatedly to select the initial letter of
the desired artist. For example, to select an
artist whose name begins with C, press the
number key "2" three times.
You see the available letters at the bottom
edge of the display.
After a message, the first entry in the list
which matches the letter entered is
highlighted.
i If there is no entry which matches the
letter which has been entered, the last
entry in the list which matches a previous
letter is highlighted.
USB Devices
i This function is available for directories
which are arranged in alphabetical order.
This function is not available within
playlists.
XPress the number key in question once or
repeatedly in a directory to select the initial
letter of the desired artist.
For example, to select an artist whose
name begins with C, press the number key
“2” three times.
You see the available letters at the bottom
edge of the display.
If the directory only contains folders,
COMAND searches for folders. The first
entry in the list that matches the letter is
highlighted.
If this does not happen, COMAND searches
for tracks. After a message, the first entry
in the list which matches the letter entered
is highlighted.
i If there is no entry which matches the
letter which has been entered, the last
entry in the list which matches a previous
letter is highlighted.
Selecting the Active Partition (USB
Devices Only)
You can select this function for USB devices
when the storage device is partitioned. Up to
four partitions (primary or logical and FAT-
formatted) are supported.
i The Windows formatting program
supports FAT partitions with either FAT16
or FAT32.
XSelect Media Interface £ Select
Active partition .
Playback Options
The following options are available to you:
R Normal Track Sequence:
You hear the tracks in their normal order
(numerical or alphabetical).
R Random Tracks:
You hear all tracks in random order.
R Random Categories or Random Folder
(in the case of USB devices when Folder
has been selected):
You hear the tracks in the current active
category or folder and any subfolders in
random order.
XTo select an option: Select Media
Interface in the basic display.
The option list appears. A R dot indicates
the option selected.XSelect an option.
Audio Aux
An external audio source (Aux) can be
connected to COMAND via the adapter
socket 1 located inside the glovebox.
Audio197COMAND APSBA 197 USA, CA Edition A 2011; 1; 27, en-UShereepeVersion: 3.0.3.52010-03-24T15:31:10+01:00 - Seite 197Z
Page 207 of 436

Setting the Language and Audio Format
iThis function is not available on all DVDs.
Where available, you can set the DVD menu
language and the audio language or audio
format. The number of possible settings is
dependent on the DVD content. It is
possible that the settings may also be
accessed in the DVD menu (Y page 203).
XDisplay the menu system if necessary
(Y page 202).
XSelect DVD-Video £ DVD Functions.XSelect Menu Language or Audio
Language.
Both of these will bring up a selection menu
after a few seconds. The R dot in front of
an entry indicates the currently selected
language.
XTo change the setting: Rotate y m z or
slide q m r until the desired setting is
reached.
XTo save the setting: Press n.
Subtitles and Camera Angle
iThese functions are not available on all
DVDs. The number of subtitle languages
and camera angles available depends on
the content of the DVD. The settings may
also be accessed in the DVD menu
(Y page 203).
XDisplay the menu system if necessary
(Y page 202).
XSelect DVD-Video £ DVD Functions.XSelect Subtitles or Camera Angle.
Both of these will bring up a selection
menu. The R dot in front of an entry
indicates the current setting.
XTo change the setting: Rotate y m z or
slide q m r until the desired setting is
reached.
XTo save the setting: Press n.Interactive Content
DVDs may have interactive content (e.g. a
video game).
In a video game, for example, you can control
the play by selecting or triggering actions. The
type and number of actions is dependent on
the DVD.
XTo select an action: Slide q m r or
o m p.
XTo trigger an action: Press n.
A menu appears and the first entry,
Select, is highlighted.
XPress n.
or
XIn DVD Video mode, if necessary display
the control menu (Y page 202).
XSelect Menu £ DVD-Video £ DVD
Functions.
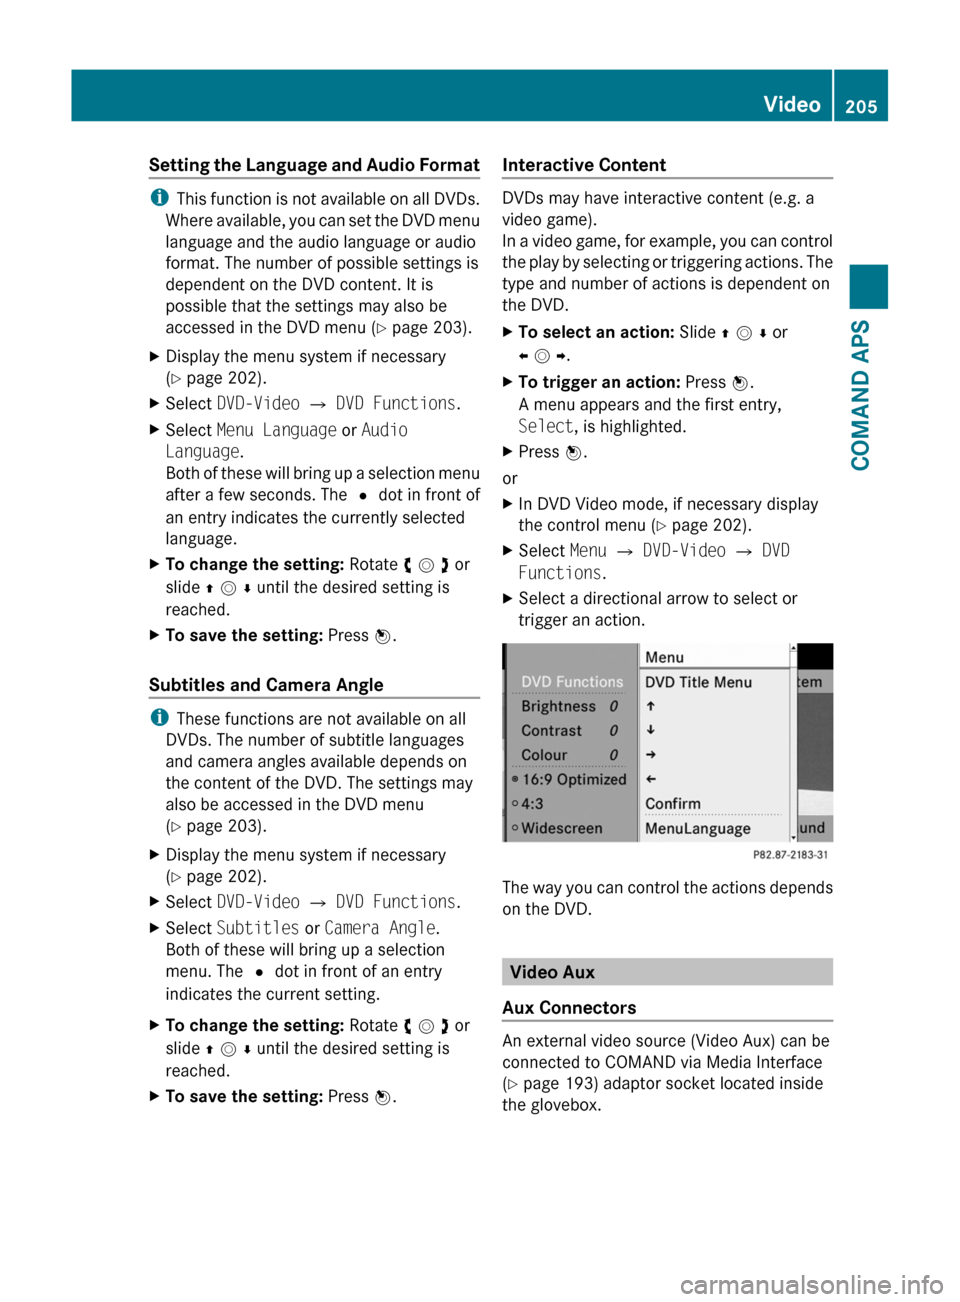
XSelect a directional arrow to select or
trigger an action.
The way you can control the actions depends
on the DVD.
Video Aux
Aux Connectors
An external video source (Video Aux) can be
connected to COMAND via Media Interface
(Y page 193) adaptor socket located inside
the glovebox.
Video205COMAND APSBA 197 USA, CA Edition A 2011; 1; 27, en-UShereepeVersion: 3.0.3.52010-03-24T15:31:10+01:00 - Seite 205Z
Page 306 of 436

XActivating: Adjust the air temperature, air
volume and air distribution.
XPress button ¸.
The indicator lamp in the button comes on.
The driver-side settings are used for the
passenger side.
XDeactivating: Press button ¸ again.
The indicator lamp in the button goes out.
Rear window defroster
GWarning!
Any accumulation of snow and ice should be
removed from the rear window before driving.
Visibility could otherwise be impaired,
endangering you and others.
The rear window defroster uses a large
amount of power. To keep the battery drain
to a minimum, switch off the defroster as
soon as the rear window is clear. The
defroster is switched off automatically after
some time of operation depending on the
outside temperature.
XSwitch on the ignition.XSwitching on: Press button ¤.
The indicator lamp in the button comes on.
XSwitching off: Press button ¤ again.
The rear window defroster switches off when
the battery voltage is too low. Too many
electrical consumers may be operating
simultaneously.
XSwitch off consumers that are currently not
needed if required.
Loading and storing
Parcel net
GWarning!
The parcel net is intended for storing light-
weight items only, such as road maps, mail,
etc.
Heavy objects, objects with sharp edges, or
fragile objects may not be transported in the
parcel net. In an accident, during hard
braking, or sudden maneuvers, they could be
thrown around inside the vehicle and cause
injury to vehicle occupants.
The parcel net cannot protect transported
goods in the event of an accident.
A parcel net is located in the passenger
footwell.
Storage compartments
GWarning!
To help avoid personal injury during a collision
or sudden maneuver, exercise care when
storing objects in the vehicle. Put luggage or
cargo in the trunk if possible.
Keep compartment lids closed. This will help
to prevent stored objects from being thrown
about and injuring vehicle occupants during
Rbraking
Rvehicle maneuvers
Ran accident
Glove box
Depending on vehicle equipment, an AUX
socket or a media interface is located in the
glove box. For information on Audio AUX
mode, see (Y page 197) and for media
interface, see (Y page 192).
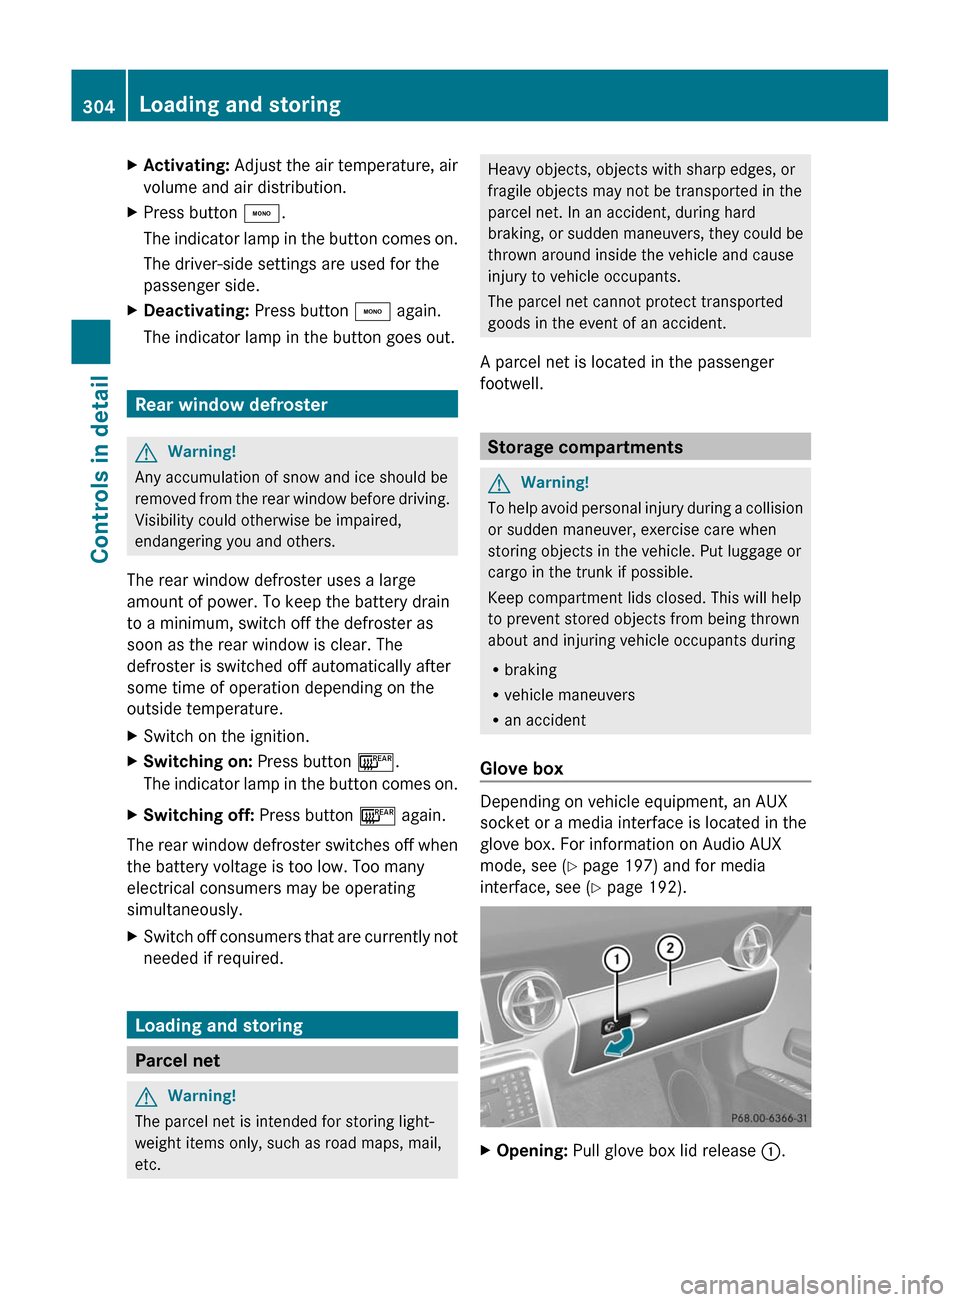
XOpening: Pull glove box lid release :.304Loading and storingControls in detail
BA 197 USA, CA Edition A 2011; 1; 27, en-UShereepeVersion: 3.0.3.52010-03-24T15:31:10+01:00 - Seite 304
Page 307 of 436

XClosing: Push glove box lid ; upwards
until it engages.
Locking/unlocking the glove box
separately
You can lock the glove box, e.g. when the
vehicle is in the shop for service.
The glove box can only be locked or unlocked
with the mechanical key.
XRemove the mechanical key from the
SmartKey (Y page 397).
XInsert the mechanical key into the glove
box lock.
XLocking: Turn mechanical key to position
2.
XUnlocking: Turn mechanical key to
position 1.
XRemove mechanical key from the glove box
lock.
Front storage compartment in center
console
Depending on vehicle equipment, your
vehicle may equipped with an ashtray instead
of a storage compartment.
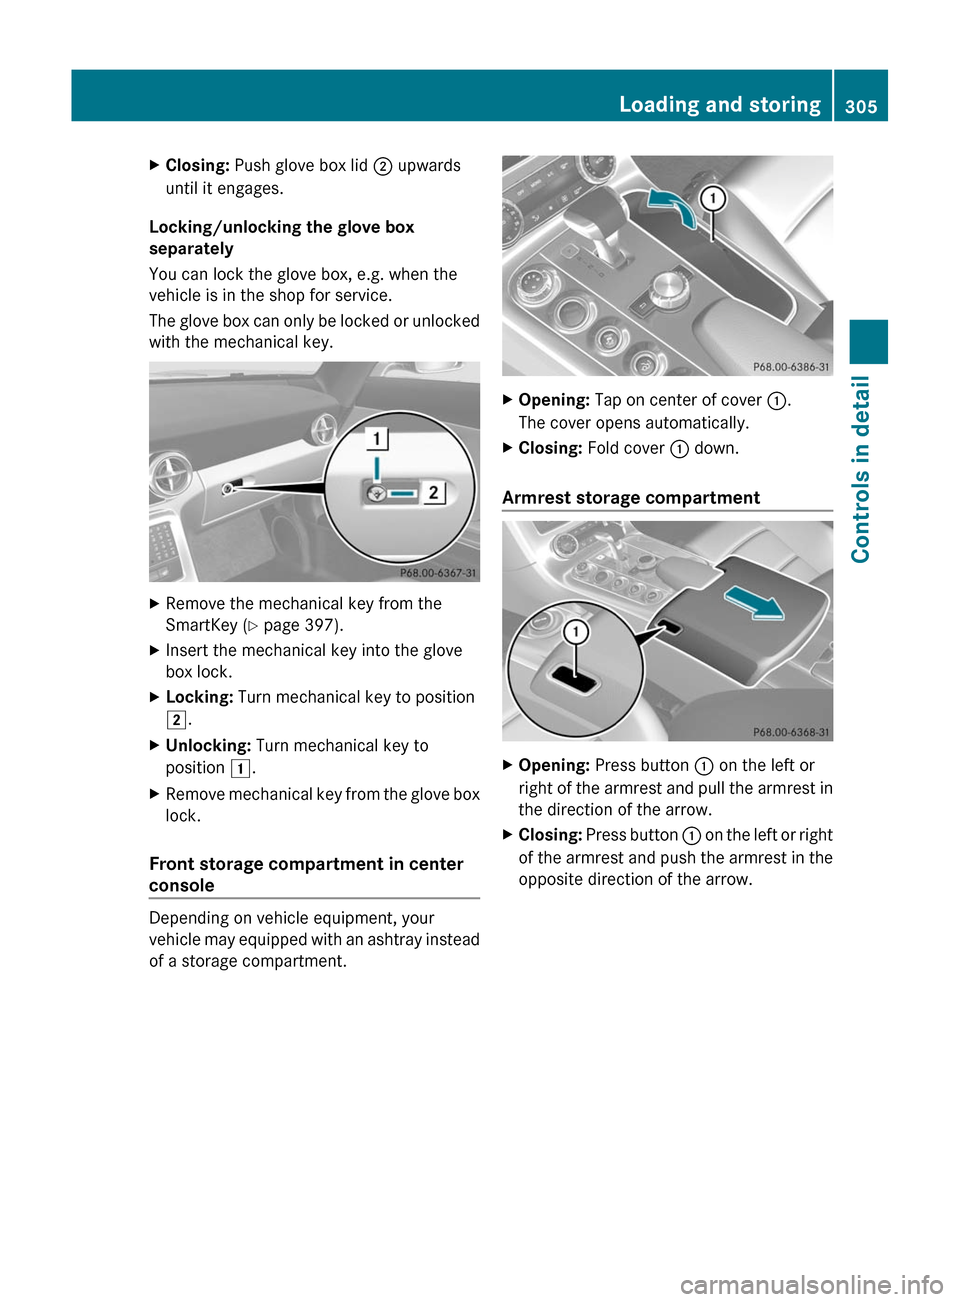
XOpening: Tap on center of cover :.
The cover opens automatically.
XClosing: Fold cover : down.
Armrest storage compartment
XOpening: Press button : on the left or
right of the armrest and pull the armrest in
the direction of the arrow.
XClosing: Press button : on the left or right
of the armrest and push the armrest in the
opposite direction of the arrow.
Loading and storing305Controls in detailBA 197 USA, CA Edition A 2011; 1; 27, en-UShereepeVersion: 3.0.3.52010-03-24T15:31:10+01:00 - Seite 305Z
Page 310 of 436

If the engine is off and the cigarette lighter is
being used extensively, the vehicle battery
may become discharged.
XSwitch on the ignition.XOpening: Tap on center of cover :.
The cover opens automatically.
XPush in cigarette lighter ;.
Cigarette lighter ; will pop out
automatically when hot.
XTake out cigarette lighter ;.XReinsert cigarette lighter ; in its socket
after use.
Power outlet
The power outlets can be used to
accommodate 12V DC electrical accessories
(e.g. auxiliary lamps, mobile phone chargers)
up to a maximum of 15 A (180 W).
If the engine is off and the power outlets are
being used extensively, the vehicle battery
may become discharged.
XSwitch on the ignition.
Power outlet in glove box
XOpen the glove box (Y page 304).:Power outlet
Power outlet in center console
Depending on vehicle equipment, your
vehicle may equipped with a cigarette lighter
instead of a power outlet.
XOpening: Tap on center of cover :.
The cover opens automatically.
XFlip up cover ; and insert electrical plug
(cigarette lighter type).
mbrace
In Canada, the system is referred to as Tele
Aid (Telematic Alarm Identification on
Demand).
! In order to activate the mbrace system, a
subscriber agreement must be completed.
To ensure your system is activated and
operational, please press Information
button ï to perform the acquaintance
call. Failure to complete either of these
308Useful featuresControls in detail
BA 197 USA, CA Edition A 2011; 1; 27, en-UShereepeVersion: 3.0.3.52010-03-24T15:31:10+01:00 - Seite 308