2011 MERCEDES-BENZ SLS buttons
[x] Cancel search: buttonsPage 178 of 436

Entering a Channel Number DirectlyXSelect SatRadio £ Enter Channel in
the SatRadio menu.
An input dialog appears.
or
XPress õ on the control unit.XTo enter a channel: Press corresponding
number buttons on the control unit.
COMAND will tune to the channel entered.
iYou can only select numbers that are
currently permissible.
Selecting a Channel from the SatRadio
Channel List
XSelect SatRadio £ Channel List in the
SatRadio menu.
The channel list appears.
XTo select a channel: Rotate y m z or slide
q m r
XTo tune to the selected channel:
Press n.
Memory Functions
iThere are 10 presets available.
You can use the following functions:
RStoring channels
RSelecting a channel from the Satellite
preset memory
Storing Channels
XPress n if the main area is highlighted.
or
XSelect Presets on the SatRadio submenu
bar.
In both cases, the channel memory will
appear. The dot R in front of a preset
indicates that the currently tuned channel
is stored there.
Channel Memory
XTo select a preset: Rotate y m z or slide
q m r.
XTo store a channel to a selected preset:
Press and hold n until a signal tone
sounds.
or
XPress and hold a number key, e.g. 4, until
a signal tone sounds.
The channel is stored.
Selecting a Channel from the Memory List
XTo call up the channel list: In the
submenu rotate y m z or slide o m p until
Presets is highlighted.
The presets list appears.
XTo select a channel: Rotate y m z or slide
q m r.
XTo tune to the selected channel:
Press n.
or
XPress a number key, e. g. 4 on the control
unit.
Displaying Information
XIn the submenu rotate y m z or slide
o m p until Info is highlighted.
XPress n.
Information about the current program
appears.
176AudioCOMAND APS
BA 197 USA, CA Edition A 2011; 1; 27, en-UShereepeVersion: 3.0.3.52010-03-24T15:31:10+01:00 - Seite 176
Page 189 of 436
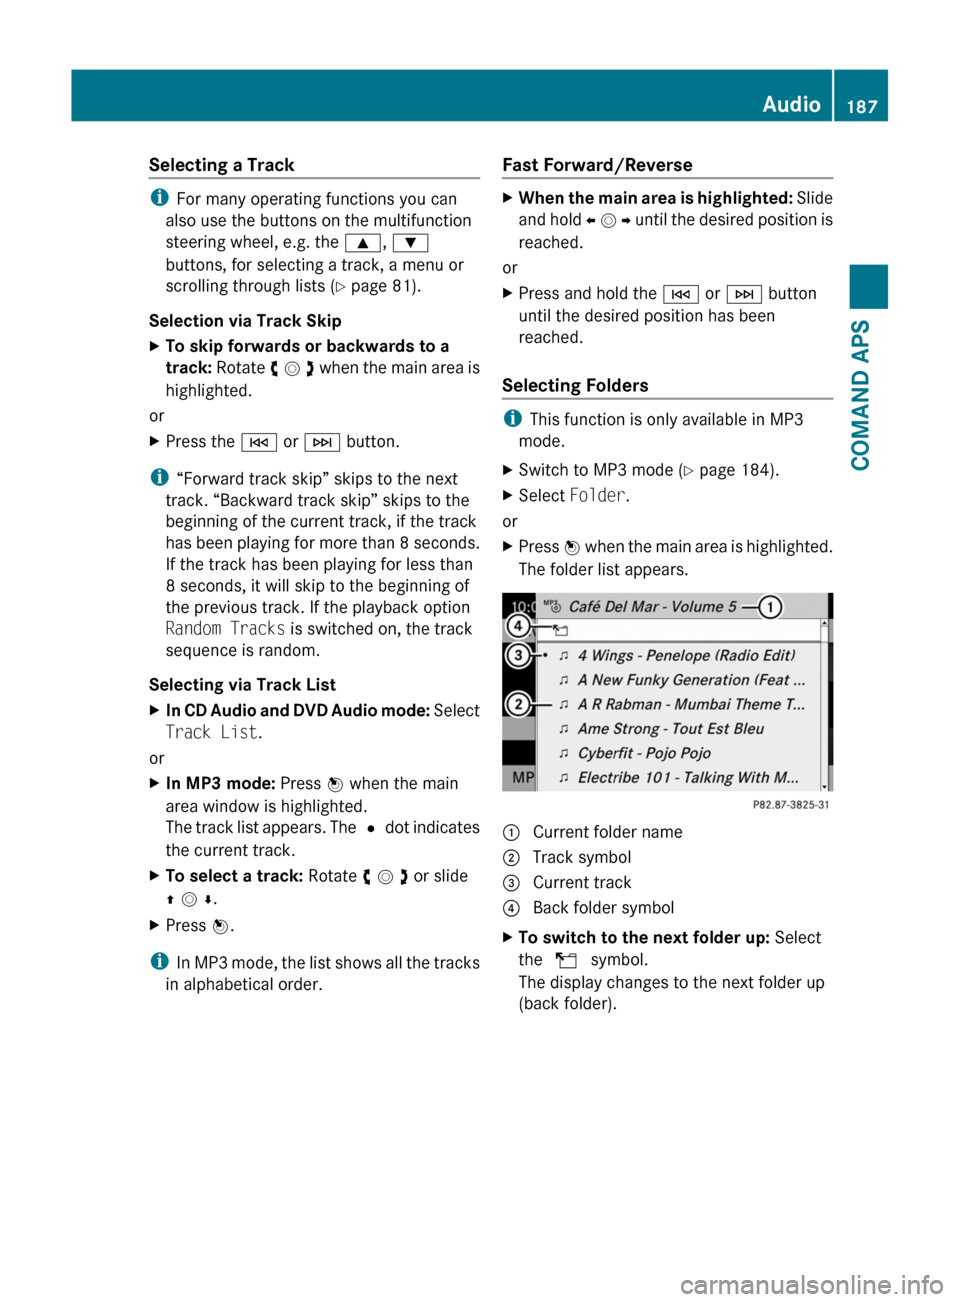
Selecting a Track
iFor many operating functions you can
also use the buttons on the multifunction
steering wheel, e.g. the 9, :
buttons, for selecting a track, a menu or
scrolling through lists (Y page 81).
Selection via Track Skip
XTo skip forwards or backwards to a
track: Rotate y m z when the main area is
highlighted.
or
XPress the E or F button.
i“Forward track skip” skips to the next
track. “Backward track skip” skips to the
beginning of the current track, if the track
has been playing for more than 8 seconds.
If the track has been playing for less than
8 seconds, it will skip to the beginning of
the previous track. If the playback option
Random Tracks is switched on, the track
sequence is random.
Selecting via Track List
XIn CD Audio and DVD Audio mode: Select
Track List.
or
XIn MP3 mode: Press n when the main
area window is highlighted.
The track list appears. The R dot indicates
the current track.
XTo select a track: Rotate y m z or slide
q m r.
XPress n.
iIn MP3 mode, the list shows all the tracks
in alphabetical order.
Fast Forward/Reverse XWhen the main area is highlighted: Slide
and hold o m p until the desired position is
reached.
or
XPress and hold the E or F button
until the desired position has been
reached.
Selecting Folders
iThis function is only available in MP3
mode.
XSwitch to MP3 mode (Y page 184).XSelect Folder.
or
XPress n when the main area is highlighted.
The folder list appears.
1 Current folder name2 Track symbol3 Current track4 Back folder symbolXTo switch to the next folder up: Select
the Q symbol.
The display changes to the next folder up
(back folder).
Audio187COMAND APSBA 197 USA, CA Edition A 2011; 1; 27, en-UShereepeVersion: 3.0.3.52010-03-24T15:31:10+01:00 - Seite 187Z
Page 239 of 436

The product label with FCC ID and IC
certification number can be found in the
battery case.
i Canada only:
This device complies with RSS-210 of
Industry Canada. Operation is subject to
the following two conditions:
1. This device may not cause interference,
and
2. this device must accept any interference
received, including interference that may
cause undesired operation of the device.
Any unauthorized modification to this
device could void the user’s authority to
operate the equipment.
The product label with FCC ID and IC
certification number can be found in the
battery case.
Factory setting XGlobal unlocking: Press button %.
Unless you open a door or the trunk within
approximately 40 seconds after unlocking
the vehicle:
R The vehicle will be locked again.
R The anti-theft alarm system will be
rearmed.
XGlobal locking: Press button &.
Selective setting
If you frequently travel alone, you may wish
to reprogramm the SmartKey. Pressing
button % will then only unlock the driver’s
door and the fuel filler flap.
XSwitching on/off: Press and hold buttons
% and & simultaneously for
approximately 6 seconds until the battery
check lamp ( Y page 237) flashes twice.
The SmartKey will then function as follows:
XUnlocking driver’s door and fuel filler
flap: Press button % once.XGlobal unlocking: Press button %
twice.XGlobal locking: Press button &.
Checking SmartKey battery
XPress button & or % on the
SmartKey.
Battery check lamp : comes on briefly to
indicate that the SmartKey battery is in
order.
If the battery check lamp does not come on
briefly during check, the SmartKey battery is
discharged.
XReplace the battery ( Y page 399).
i
You can obtain the required battery at any
authorized Mercedes-Benz Center.
i If the battery is checked within signal
range of the vehicle, pressing button
& or % will lock or unlock the vehicle
accordingly.
Loss of the SmartKey
If you lose your SmartKey or mechanical key,
you should do the following:
Locking and unlocking237Controls in detailBA 197 USA, CA Edition A 2011; 1; 27, en-UShereepeVersion: 3.0.3.52010-03-24T15:31:10+01:00 - Seite 237
Page 248 of 436

The easy-entry/exit feature can be activated
or deactivated in the Convenience submenu
of the control system ( Y page 286).GWarning!
You must make sure no one can become
trapped or injured by the moving steering
wheel when the easy-entry/exit feature is
activated.
To stop steering wheel movement, move
steering wheel adjustment stalk or press one
of the memory position buttons.
Do not leave children unattended in the
vehicle, or with access to an unlocked vehicle.
Children could open the driver’s door and
unintentionally activate the easy-entry/exit
feature, which could result in an accident
and/or serious personal injury.
With the easy-entry/exit feature activated,
the steering wheel will return to its last set
position when
R you close the driver’s door with the ignition
switched on
R when you insert the SmartKey into the
starter switch or press the KEYLESS-GO
start/stop button once with the driver’s
door closed
i The last set steering wheel position is
stored when the ignition is switched off or
the position is stored in memory
( Y page 249).
With the easy-entry/exit feature activated,
the steering wheel tilts upwards when
R you remove the SmartKey from the starter
switch
R when you open the driver’s door with the
KEYLESS-GO start/stop button in position
1 or the SmartKey in starter switch position
0 or 1
i When the current position for the steering
wheel is in the uppermost tilt position, the
steering wheel will no longer be able to
move upward when the easy-entry/exit
feature is activated.
The adjustment procedure is briefly
interrupted when the engine is started.GWarning!
Let the system complete the adjustment
procedure before setting the vehicle in
motion. All steering wheel adjustment must
be completed before setting the vehicle in
motion. Driving off with the steering wheel
still adjusting could cause the driver to lose
control of the vehicle.
Crash-responsive exit aid
When you open the driver’s door after an
accident has occurred, the steering column
moves up. The position of the SmartKey in the
starter switch is insignificant. This function
facilitates exiting as well as rescue of vehicle
occupants.
The crash-responsive exit aid can only be
triggered when the easy-entry/exit feature is
activated via the control system.
Mirrors
Notes
Adjust the interior and exterior rear view
mirrors before driving so that you have a good
view of the road and traffic conditions.
Interior rear view mirror
XAdjust the interior rear view mirror
manually.
Exterior rear view mirrors
GWarning!
Exercise care when using the passenger-side
exterior rear view mirror. The mirror surface
is convex (outwardly curved surface for a
wider field of view). Objects in mirror are
closer than they appear. Check your interior
246MirrorsControls in detail
BA 197 USA, CA Edition A 2011; 1; 27, en-UShereepeVersion: 3.0.3.52010-03-24T15:31:10+01:00 - Seite 246
Page 255 of 436
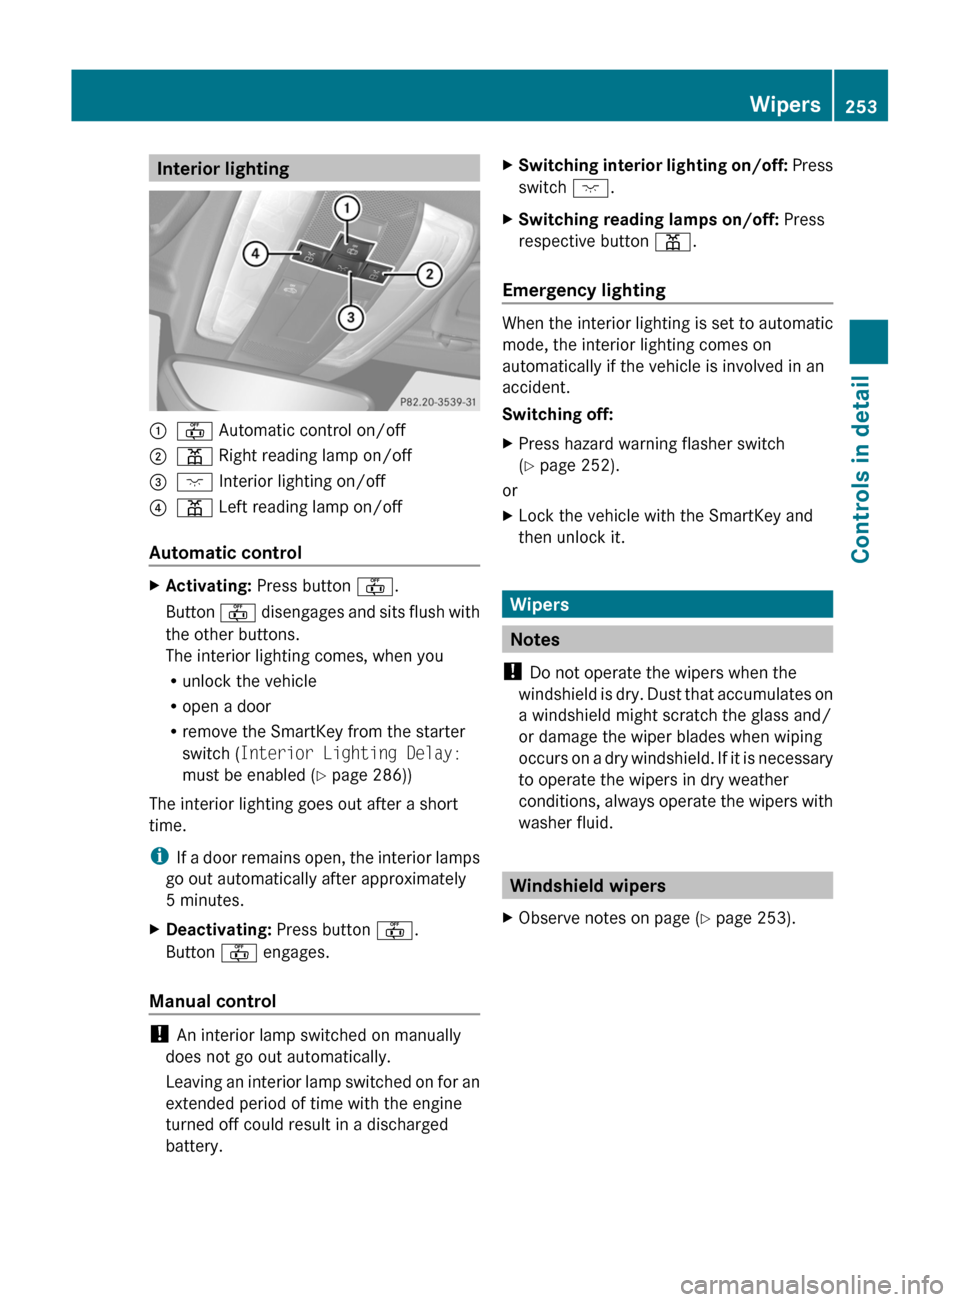
Interior lighting:~ Automatic control on/off;p Right reading lamp on/off=c Interior lighting on/off?p Left reading lamp on/off
Automatic control
XActivating: Press button ~.
Button ~ disengages and sits flush with
the other buttons.
The interior lighting comes, when you
Runlock the vehicle
Ropen a door
Rremove the SmartKey from the starter
switch (Interior Lighting Delay:
must be enabled (Y page 286))
The interior lighting goes out after a short
time.
iIf a door remains open, the interior lamps
go out automatically after approximately
5 minutes.
XDeactivating: Press button ~.
Button ~ engages.
Manual control
! An interior lamp switched on manually
does not go out automatically.
Leaving an interior lamp switched on for an
extended period of time with the engine
turned off could result in a discharged
battery.
XSwitching interior lighting on/off: Press
switch c.
XSwitching reading lamps on/off: Press
respective button p.
Emergency lighting
When the interior lighting is set to automatic
mode, the interior lighting comes on
automatically if the vehicle is involved in an
accident.
Switching off:
XPress hazard warning flasher switch
(Y page 252).
or
XLock the vehicle with the SmartKey and
then unlock it.
Wipers
Notes
! Do not operate the wipers when the
windshield is dry. Dust that accumulates on
a windshield might scratch the glass and/
or damage the wiper blades when wiping
occurs on a dry windshield. If it is necessary
to operate the wipers in dry weather
conditions, always operate the wipers with
washer fluid.
Windshield wipers
XObserve notes on page (Y page 253).Wipers253Controls in detailBA 197 USA, CA Edition A 2011; 1; 27, en-UShereepeVersion: 3.0.3.52010-03-24T15:31:10+01:00 - Seite 253Z
Page 274 of 436
Control system
Introduction
The control system is activated as soon as the
starter switch is in position 2.
The control system enables you to call up
information about your vehicle and to change
vehicle settings.
For example, you can use the control system
to find out when your vehicle is next due for
maintenance service, to call up statistical
data on your vehicle, and much more.
GWarning!
A driver’s attention to the road and traffic
conditions must always be his/her primary
focus when driving.
For your safety and the safety of others,
selecting features through the multifunction
steering wheel should only be done by the
driver when traffic and road conditions permit
it to be done safely.
Bear in mind that at a speed of just 30 mph
(approximately 50 km/h), your vehicle is
covering a distance of 44 feet (approximately
14 m) every second.
The control system relays information to the
multifunction display.
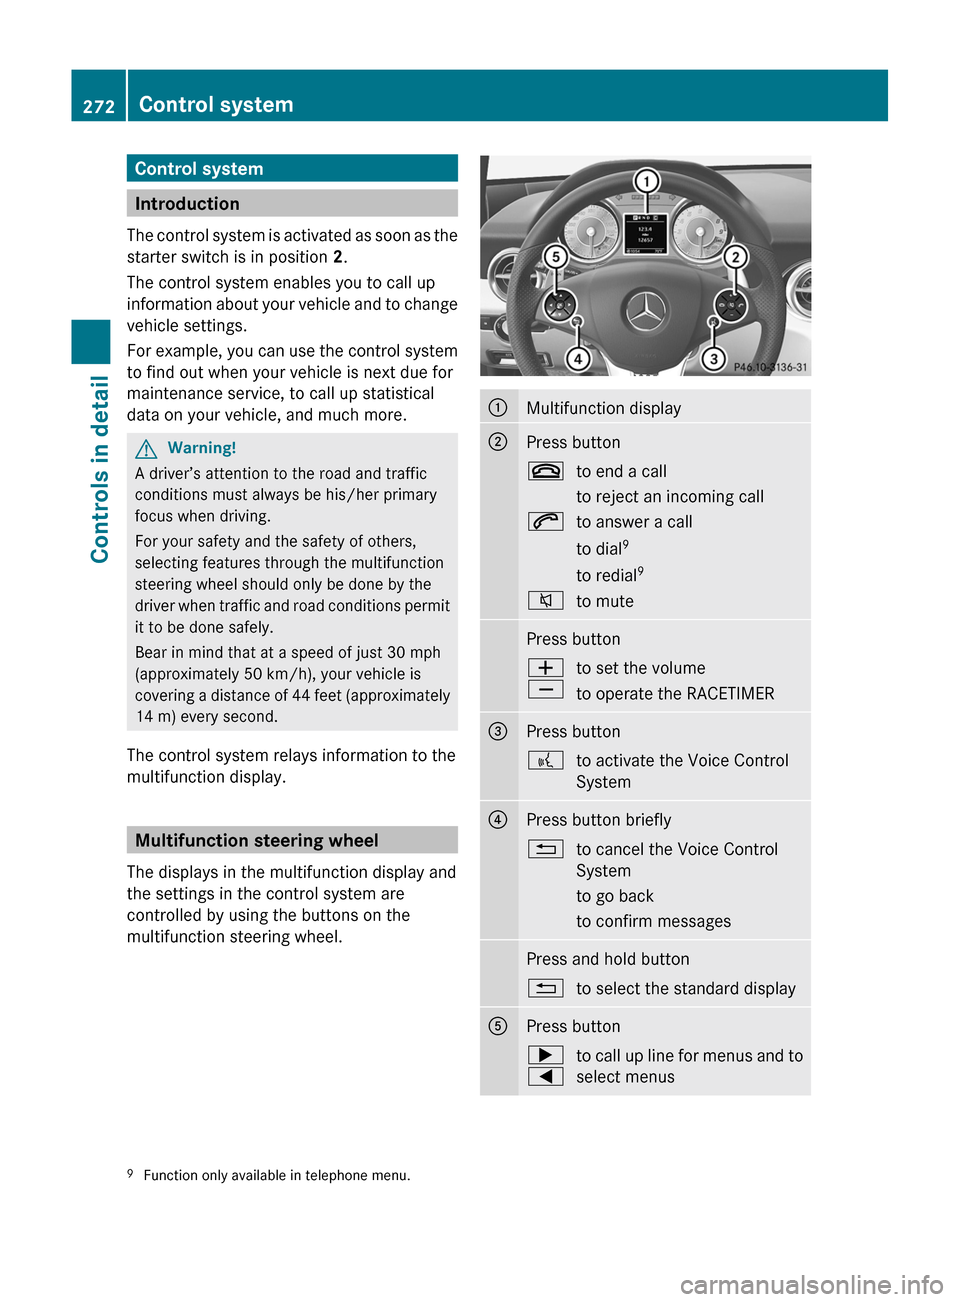
Multifunction steering wheel
The displays in the multifunction display and
the settings in the control system are
controlled by using the buttons on the
multifunction steering wheel.
:Multifunction display;Press button~to end a call
to reject an incoming call6to answer a call
to dial 9
to redial 98to mutePress buttonW
Xto set the volume
to operate the RACETIMER=Press button?to activate the Voice Control
System?Press button briefly%to cancel the Voice Control
System
to go back
to confirm messagesPress and hold button%to select the standard displayAPress button;
=to call up line for menus and to
select menus9 Function only available in telephone menu.272Control systemControls in detail
BA 197 USA, CA Edition A 2011; 1; 27, en-UShereepeVersion: 3.0.3.52010-03-24T15:31:10+01:00 - Seite 272
Page 275 of 436
Press button briefly9
:to select submenu or scroll
through lists
within Audio menu to select
previous or next track, scene or
stored station
within Tel menu to switch to
the phone book and select a
name or numberPress and hold button9
:within Audio menu to select a
track or scene with quick
search or to select previous or
next station in station list or
wave band
within Tel menu to start the
quick search in the phone bookPress buttonato confirm selection or
messages
Depending on the selected menu, pressing
the buttons on the multifunction steering
wheel will alter what appears in the
multifunction display.
The information available in the multifunction
display is arranged in menus and
accompanying functions and submenus.
The individual functions are then found within
the relevant menu (radio or CD operations
under Audio, for example). These functions
serve to call up relevant information or to
customize the settings for your vehicle.
It is helpful to think of the menus, and the
functions within each menu, as being
arranged in a circular pattern.
In the Settings menu, instead of functions,
you will find a number of submenus for calling
up and changing settings. For instructions on
using these submenus, see “Settings menu”
( Y page 282).
The number of menus available in the system
depends on which optional equipment is
installed in your vehicle.
Using the control systemXTo select a menu: Press button =
or ; .XTo select a submenu: Press button :
or 9 .XTo go to the next higher menu level:
Press button %.XTo select the standard display: Press
button % repeatedly until the standard
display featuring the odometer and
speedometer appears.
or
XPress and hold button % until the
standard display featuring the trip
odometer and the main odometer appears.XTo confirm selection: Press button a.XTo confirm display message: Press
button a or % .
The control system saves certain display
messages. Calling up display messages
( Y page 282).
For information about warning and
malfunction messages appearing in the
multifunction display ( Y page 364).
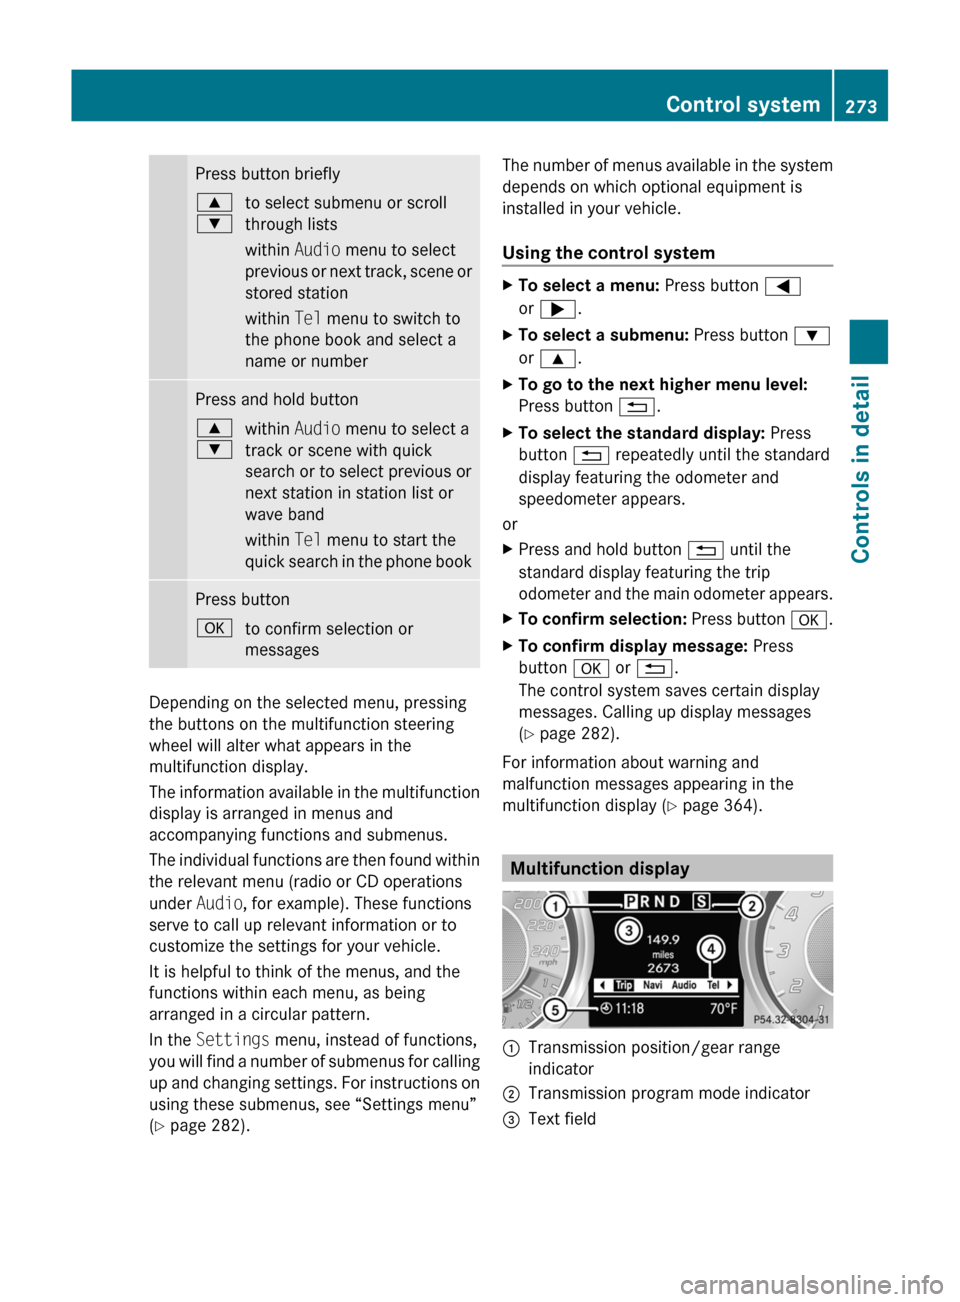
Multifunction display
:Transmission position/gear range
indicator;Transmission program mode indicator=Text fieldControl system273Controls in detailBA 197 USA, CA Edition A 2011; 1; 27, en-UShereepeVersion: 3.0.3.52010-03-24T15:31:10+01:00 - Seite 273Z
Page 289 of 436
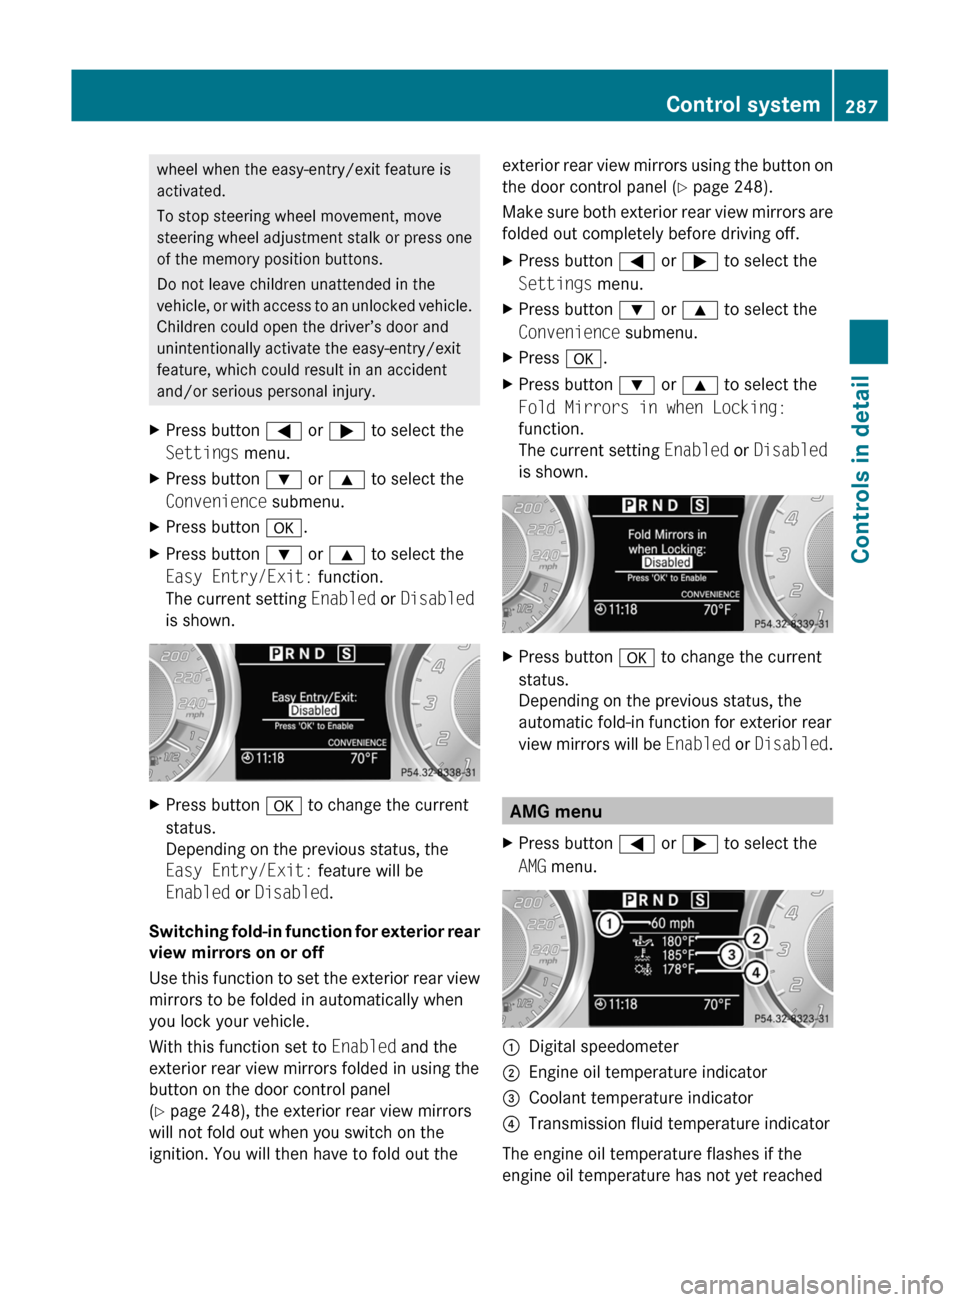
wheel when the easy-entry/exit feature is
activated.
To stop steering wheel movement, move
steering wheel adjustment stalk or press one
of the memory position buttons.
Do not leave children unattended in the
vehicle, or with access to an unlocked vehicle.
Children could open the driver’s door and
unintentionally activate the easy-entry/exit
feature, which could result in an accident
and/or serious personal injury.XPress button = or ; to select the
Settings menu.XPress button : or 9 to select the
Convenience submenu.XPress button a.XPress button : or 9 to select the
Easy Entry/Exit: function.
The current setting Enabled or Disabled
is shown.XPress button a to change the current
status.
Depending on the previous status, the
Easy Entry/Exit: feature will be
Enabled or Disabled .
Switching fold-in function for exterior rear
view mirrors on or off
Use this function to set the exterior rear view
mirrors to be folded in automatically when
you lock your vehicle.
With this function set to Enabled and the
exterior rear view mirrors folded in using the
button on the door control panel
( Y page 248), the exterior rear view mirrors
will not fold out when you switch on the
ignition. You will then have to fold out the
exterior rear view mirrors using the button on
the door control panel ( Y page 248).
Make sure both exterior rear view mirrors are
folded out completely before driving off.XPress button = or ; to select the
Settings menu.XPress button : or 9 to select the
Convenience submenu.XPress a.XPress button : or 9 to select the
Fold Mirrors in when Locking:
function.
The current setting Enabled or Disabled
is shown.XPress button a to change the current
status.
Depending on the previous status, the
automatic fold-in function for exterior rear
view mirrors will be Enabled or Disabled .
AMG menu
XPress button = or ; to select the
AMG menu.:Digital speedometer;Engine oil temperature indicator=Coolant temperature indicator?Transmission fluid temperature indicator
The engine oil temperature flashes if the
engine oil temperature has not yet reached
Control system287Controls in detailBA 197 USA, CA Edition A 2011; 1; 27, en-UShereepeVersion: 3.0.3.52010-03-24T15:31:10+01:00 - Seite 287Z