2011 MERCEDES-BENZ SLS battery
[x] Cancel search: batteryPage 238 of 436
Vehicle equipment
i This Operator’s Manual describes all
features, standard or optional, potentially
available for your vehicle at the time of
purchase. Please be aware that your
vehicle might not be equipped with all
features described in this manual.
Locking and unlocking
Notes
GObserve Safety notes, see page 57.
When unlocking or locking the vehicle with
the SmartKey an acoustic signal sounds. You
can switch the acoustic signal on and off via
the control system ( Y page 286).
When unlocking the vehicle, all turn signal
lamps flash once. An acoustic signal sounds
once, and the locking knobs in the doors
move up.
The outside door handles move out.
The anti-theft alarm system is disarmed.
When locking the vehicle, all turn signal lamps
flash three times. An acoustic signal sounds
three times, and the locking knobs in the
doors move down.
The outside door handles retract.
The anti-theft alarm system is armed.
All doors and the trunk must be closed.
If you cannot lock or unlock the vehicle with
the SmartKey, the battery in the SmartKey is
discharged, the SmartKey is malfunctioning,
or the vehicle battery is drained.
XCheck the battery in the SmartKey
( Y page 237) and replace them if
necessary.XUse the mechanical key to unlock the
driver’s door ( Y page 398) and the trunk
( Y page 398).XUse the mechanical key to lock the vehicle
( Y page 398).XHave the vehicle battery and the vehicle
battery connections checked at an
authorized Mercedes-Benz Center.
If the SmartKey is malfunctioning, contact
Roadside Assistance or an authorized
Mercedes-Benz Center.
SmartKey
Your vehicle comes supplied with two
SmartKeys, each with remote control and a
removable mechanical key.
The SmartKey centrally locks and unlocks
R the doors
R the trunk lid
R the fuel filler flap
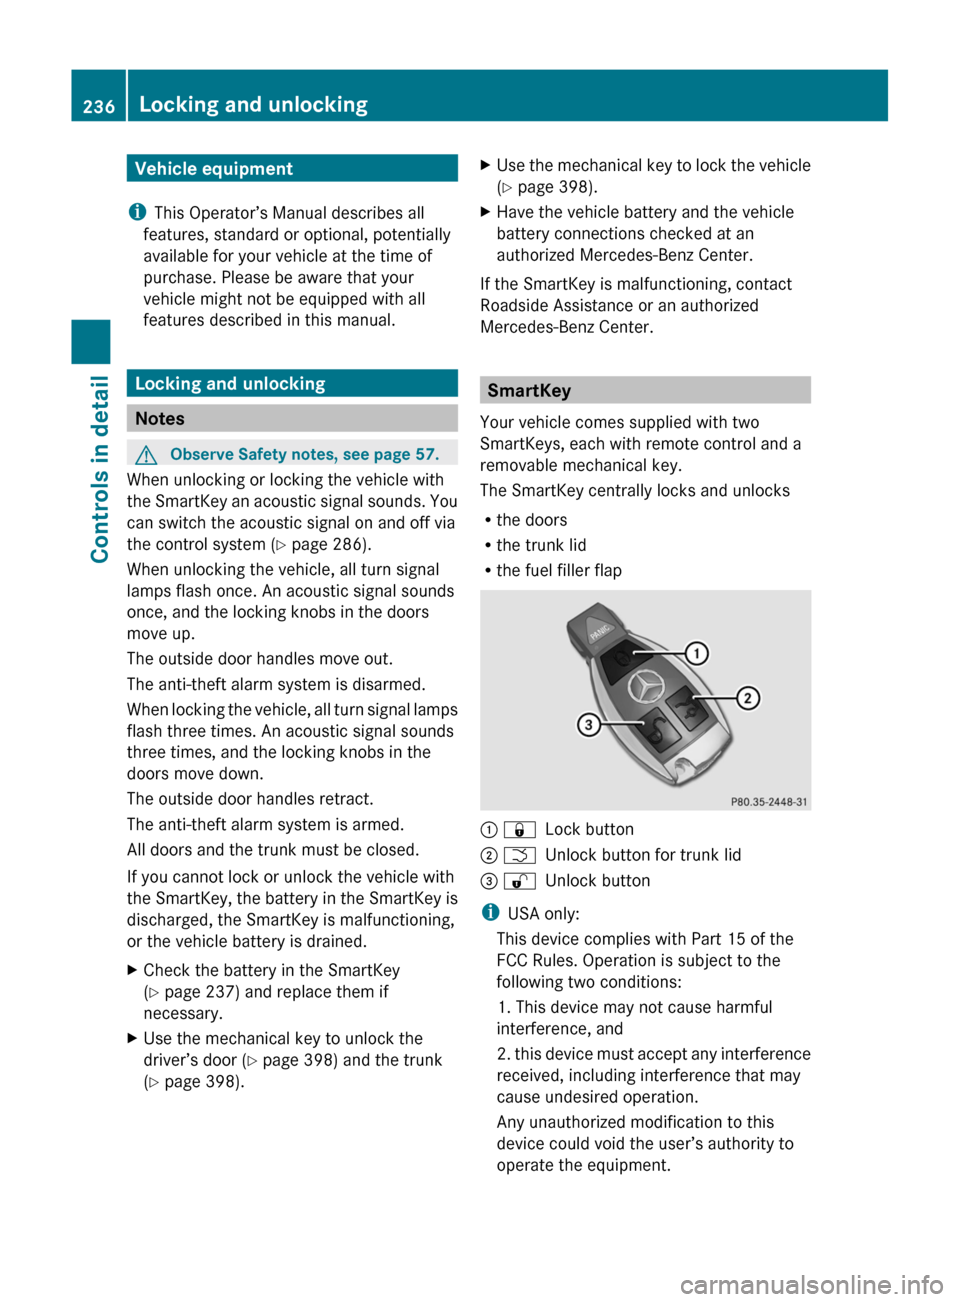
: &Lock button; FUnlock button for trunk lid= %Unlock button
i
USA only:
This device complies with Part 15 of the
FCC Rules. Operation is subject to the
following two conditions:
1. This device may not cause harmful
interference, and
2. this device must accept any interference
received, including interference that may
cause undesired operation.
Any unauthorized modification to this
device could void the user’s authority to
operate the equipment.
236Locking and unlockingControls in detail
BA 197 USA, CA Edition A 2011; 1; 27, en-UShereepeVersion: 3.0.3.52010-03-24T15:31:10+01:00 - Seite 236
Page 239 of 436

The product label with FCC ID and IC
certification number can be found in the
battery case.
i Canada only:
This device complies with RSS-210 of
Industry Canada. Operation is subject to
the following two conditions:
1. This device may not cause interference,
and
2. this device must accept any interference
received, including interference that may
cause undesired operation of the device.
Any unauthorized modification to this
device could void the user’s authority to
operate the equipment.
The product label with FCC ID and IC
certification number can be found in the
battery case.
Factory setting XGlobal unlocking: Press button %.
Unless you open a door or the trunk within
approximately 40 seconds after unlocking
the vehicle:
R The vehicle will be locked again.
R The anti-theft alarm system will be
rearmed.
XGlobal locking: Press button &.
Selective setting
If you frequently travel alone, you may wish
to reprogramm the SmartKey. Pressing
button % will then only unlock the driver’s
door and the fuel filler flap.
XSwitching on/off: Press and hold buttons
% and & simultaneously for
approximately 6 seconds until the battery
check lamp ( Y page 237) flashes twice.
The SmartKey will then function as follows:
XUnlocking driver’s door and fuel filler
flap: Press button % once.XGlobal unlocking: Press button %
twice.XGlobal locking: Press button &.
Checking SmartKey battery
XPress button & or % on the
SmartKey.
Battery check lamp : comes on briefly to
indicate that the SmartKey battery is in
order.
If the battery check lamp does not come on
briefly during check, the SmartKey battery is
discharged.
XReplace the battery ( Y page 399).
i
You can obtain the required battery at any
authorized Mercedes-Benz Center.
i If the battery is checked within signal
range of the vehicle, pressing button
& or % will lock or unlock the vehicle
accordingly.
Loss of the SmartKey
If you lose your SmartKey or mechanical key,
you should do the following:
Locking and unlocking237Controls in detailBA 197 USA, CA Edition A 2011; 1; 27, en-UShereepeVersion: 3.0.3.52010-03-24T15:31:10+01:00 - Seite 237
Page 243 of 436

XBriefly press emergency release
button :.
The trunk lid unlocks and opens slightly.
XPush up the trunk lid to fully open.
The emergency release button unlocks the
trunk while the vehicle is standing still or in
motion.
Illumination of the emergency release button:
RThe button flashes for 30 minutes after
opening the trunk.
RThe button flashes for 60 minutes after
closing the trunk.
The emergency release button does not
unlock the trunk, if the vehicle battery is
discharged or disconnected.
If the vehicle has previously been locked
centrally with the SmartKey, opening the
trunk from the inside using the emergency
release button will trigger the anti-theft alarm
system.
To cancel the alarm, see (Y page 67).
Valet locking
You can lock the trunk separately with the
mechanical key. This denies unauthorized
access to the trunk, e.g. when you valet park
the vehicle.
XLeave only the SmartKey less its
mechanical key with the vehicle.
XValet locking: Close the trunk
(Y page 240).
XRemove the mechanical key from the
SmartKey (Y page 397).
XOpen the rear storage compartment in the
center console (Y page 304).
XInsert the mechanical key into trunk lid
lock :.
XTurn the mechanical key clockwise as far
as it will go.
XIn this position, pull out the mechanical
key.
XCheck whether the trunk is locked.
The trunk remains locked even when the
vehicle is centrally unlocked.
You can then only open the trunk with the
mechanical key.
XCanceling: Insert the mechanical into
trunk lid lock :.
XTurn the mechanical key counterclockwise
as far as it will go.
XIn this position, pull out the mechanical
key.
You can now open the trunk.
Starter switch positions
KEYLESS-GO
GObserve Safety notes, see page 57.
You can start the engine and turn it off again
using the KEYLESS-GO start/stop button.
The KEYLESS-GO start/stop button is located
in the center console. The KEYLESS-GO
start/stop button is illuminated when the
vehicle is unlocked.
The SmartKey must be located in the vehicle.
It will, however, not be detected in the trunk.
Pressing the KEYLESS-GO start/stop button
without depressing the brake pedal
Starter switch positions241Controls in detailBA 197 USA, CA Edition A 2011; 1; 27, en-UShereepeVersion: 3.0.3.52010-03-24T15:31:10+01:00 - Seite 241Z
Page 245 of 436
beam headlamp indicator lamp, high-beam
headlamp indicator lamp, and the turn signal
indicator lamps will only come on if activated.
If a lamp in the instrument cluster fails to
come on when the ignition is switched on,
have it checked and replaced if necessary. If
a lamp in the instrument cluster remains on
after starting the engine or comes on while
driving, refer to “Lamps in instrument cluster”
( Y page 388).XAlways remove the SmartKey from the
starter switch when the engine is not in
operation.
This will help to prevent accelerated vehicle
battery discharge or a completely
discharged vehicle battery.
If the SmartKey cannot be turned in the
starter switch, the vehicle battery may not be
sufficiently charged.
XCheck the vehicle battery and charge it if
necessary ( Y page 410).
or
XGet a jump start ( Y page 413).
i
If the SmartKey does not belong to the
vehicle, the SmartKey can be turned in the
starter switch. However, the ignition does
not switch on and the engine does not start.
Seats
Safety notes
GWarning!
In order to avoid possible loss of vehicle
control the following must be done before the
vehicle is put into motion:
R seat adjustment
R steering wheel adjustment
R rear view mirror adjustment
R fastening of seat belts
GWarning!
Do not adjust the driver’s seat while driving.
Adjusting the seat while driving could cause
the driver to lose control of the vehicle.
Never ride in a moving vehicle with the seat
backrest in an excessively reclined position as
this can be dangerous. You could slide under
the seat belt in a collision. If you slide under
it, the seat belt would apply force at the
abdomen or neck. That could cause serious
or fatal injuries. The seat backrest and seat
belts provide the best restraint when the
wearer is in a position that is as upright as
possible and seat belts are properly
positioned on the body.
GWarning!
Your seat must be adjusted so that you can
correctly fasten your seat belt.
Observe the following points:
R Adjust the seat backrest until your arms are
slightly angled when holding the steering
wheel.
R Adjust the seat to a comfortable seating
position that still allows you to reach the
accelerator/brake pedal safely. The
position should be as far back as possible
with the driver still able to operate the
controls properly.
R Never place hands under the seat or near
any moving parts while a seat is being
adjusted.
Failure to do so could result in an accident
and/or serious personal injury.
GWarning!
The power seats can be operated at any time.
Therefore, do not leave children unattended
in the vehicle, or with access to an unlocked
vehicle. A child’s unsupervised access to a
vehicle could result in an accident and/or
serious personal injury.
Seats243Controls in detailBA 197 USA, CA Edition A 2011; 1; 27, en-UShereepeVersion: 3.0.3.52010-03-24T15:31:10+01:00 - Seite 243Z
Page 250 of 436

XPress button ;, to select the passenger-
side exterior rear view mirror.
XAdjust the passenger-side exterior rear
view mirror with adjustment button = so
that you see the rear wheel and the road
curb.
The exterior rear view mirror parking
position is stored.
iIf the exterior rear view mirror does move,
repeat the above steps. After the setting is
stored, you can move the exterior rear view
mirror again.
Calling up the parking position
XSwitch on the ignition.XShift the transmission into reverse gear R.
The passenger-side exterior rear view
mirror moves to the stored parking
position.
The passenger-side exterior rear view mirror
returns to its previously stored driving
position
R10 seconds after you have shift the
transmission out of reverse gear R
Rimmediately once your vehicle exceeds a
speed of approximately 6 mph (10 km/h)
Rimmediately when you press button : to
select the driver’s side exterior rear view
mirror
Power-folding exterior rear view
mirrors
! Before you drive the vehicle through an
automatic car wash, fold in the exterior rear
view mirrors. Otherwise they may get
damaged.
Folding in and out manually
iThe mirrors do not fold out if they have
been folded in manually. Please make sure
both mirrors are folded out before driving
off.
The exterior rear view mirrors can vibrate if
they are not folded out completely.
XSwitch on the ignition.XFolding in: Briefly press button :.
Both exterior rear view mirrors fold in.
iAt speeds above approximately 30 mph
(47 km/h), you will not be able to fold the
exterior mirrors in.
XFolding out: Briefly press button :.
Both exterior rear view mirrors fold out.
Synchronizing
The power-folding rear view mirrors may have
to be synchronized after the vehicle battery
has been disconnected or discharged. If the
exterior rear view mirrors do not fold properly
upon locking or unlocking the vehicle, do the
following:
XMake sure the power-folding function in the
control system is activated (Y page 286).
XSwitch on the ignition.XBriefly press button :.
When the exterior rear view mirrors fold
properly upon locking the vehicle, the exterior
mirrors are synchronized. Otherwise repeat
the above steps.
Folding in and out automatically
The function must be activated in the
Convenience submenu (Y page 287).
The exterior rear view mirrors fold in
automatically as soon as the vehicle is locked
from the outside.
248MirrorsControls in detail
BA 197 USA, CA Edition A 2011; 1; 27, en-UShereepeVersion: 3.0.3.52010-03-24T15:31:10+01:00 - Seite 248
Page 252 of 436
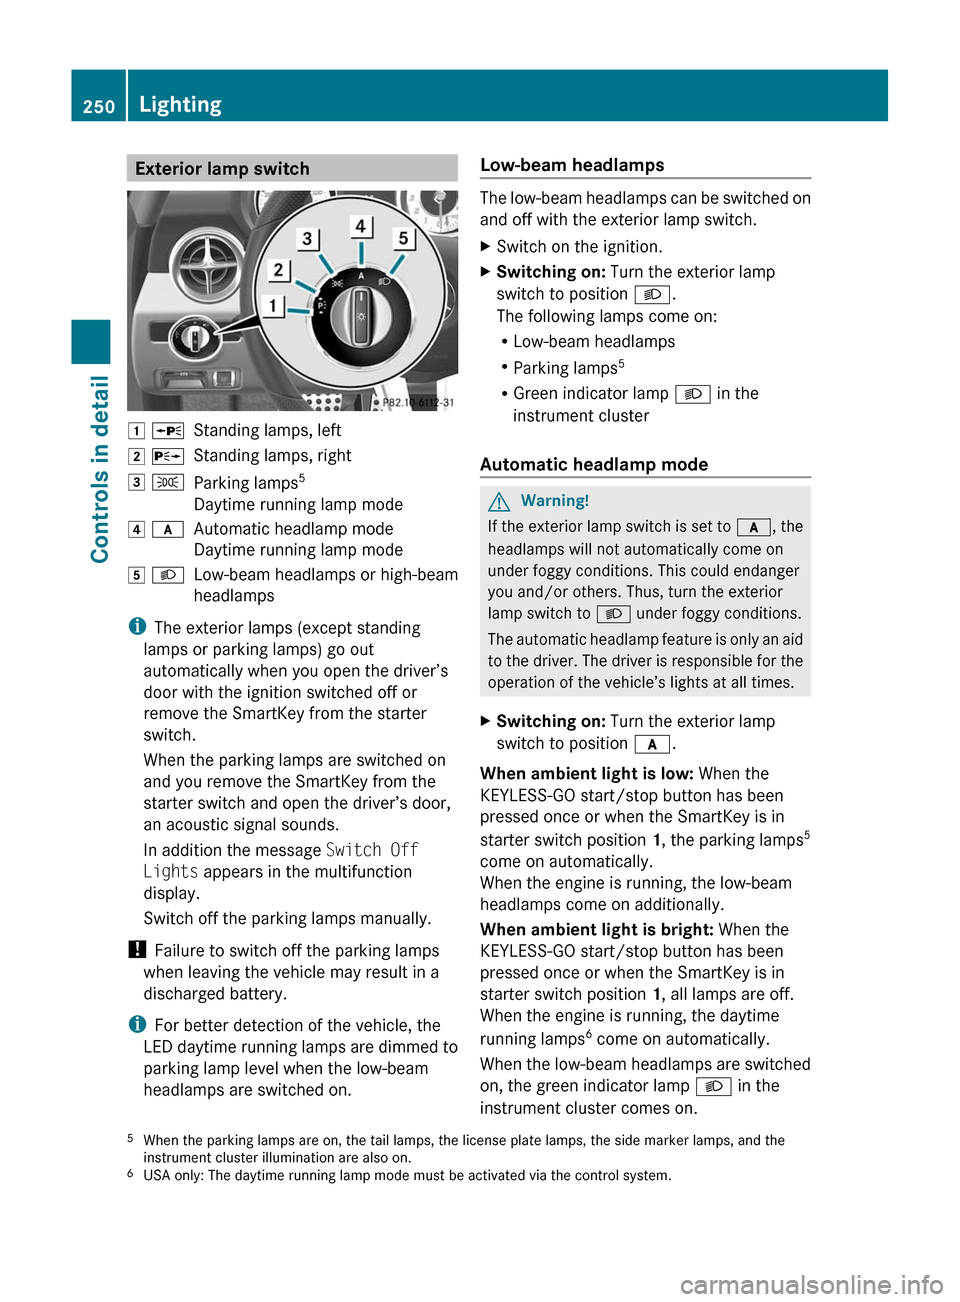
Exterior lamp switch1 WStanding lamps, left2 XStanding lamps, right3 TParking lamps 5
Daytime running lamp mode4 cAutomatic headlamp mode
Daytime running lamp mode5 LLow-beam headlamps or high-beam
headlamps
i The exterior lamps (except standing
lamps or parking lamps) go out
automatically when you open the driver’s
door with the ignition switched off or
remove the SmartKey from the starter
switch.
When the parking lamps are switched on
and you remove the SmartKey from the
starter switch and open the driver’s door,
an acoustic signal sounds.
In addition the message Switch Off
Lights appears in the multifunction
display.
Switch off the parking lamps manually.
! Failure to switch off the parking lamps
when leaving the vehicle may result in a
discharged battery.
i For better detection of the vehicle, the
LED daytime running lamps are dimmed to
parking lamp level when the low-beam
headlamps are switched on.
Low-beam headlamps
The low-beam headlamps can be switched on
and off with the exterior lamp switch.
XSwitch on the ignition.XSwitching on: Turn the exterior lamp
switch to position L.
The following lamps come on:
R Low-beam headlamps
R Parking lamps 5
R Green indicator lamp L in the
instrument cluster
Automatic headlamp mode
GWarning!
If the exterior lamp switch is set to c, the
headlamps will not automatically come on
under foggy conditions. This could endanger
you and/or others. Thus, turn the exterior
lamp switch to L under foggy conditions.
The automatic headlamp feature is only an aid
to the driver. The driver is responsible for the
operation of the vehicle’s lights at all times.
XSwitching on: Turn the exterior lamp
switch to position c.
When ambient light is low: When the
KEYLESS-GO start/stop button has been
pressed once or when the SmartKey is in
starter switch position 1, the parking lamps 5
come on automatically.
When the engine is running, the low-beam
headlamps come on additionally.
When ambient light is bright: When the
KEYLESS-GO start/stop button has been
pressed once or when the SmartKey is in
starter switch position 1, all lamps are off.
When the engine is running, the daytime
running lamps 6
come on automatically.
When the low-beam headlamps are switched
on, the green indicator lamp L in the
instrument cluster comes on.
5 When the parking lamps are on, the tail lamps, the license plate lamps, the side marker lamps, and the
instrument cluster illumination are also on.
6 USA only: The daytime running lamp mode must be activated via the control system.250LightingControls in detail
BA 197 USA, CA Edition A 2011; 1; 27, en-UShereepeVersion: 3.0.3.52010-03-24T15:31:10+01:00 - Seite 250
Page 255 of 436
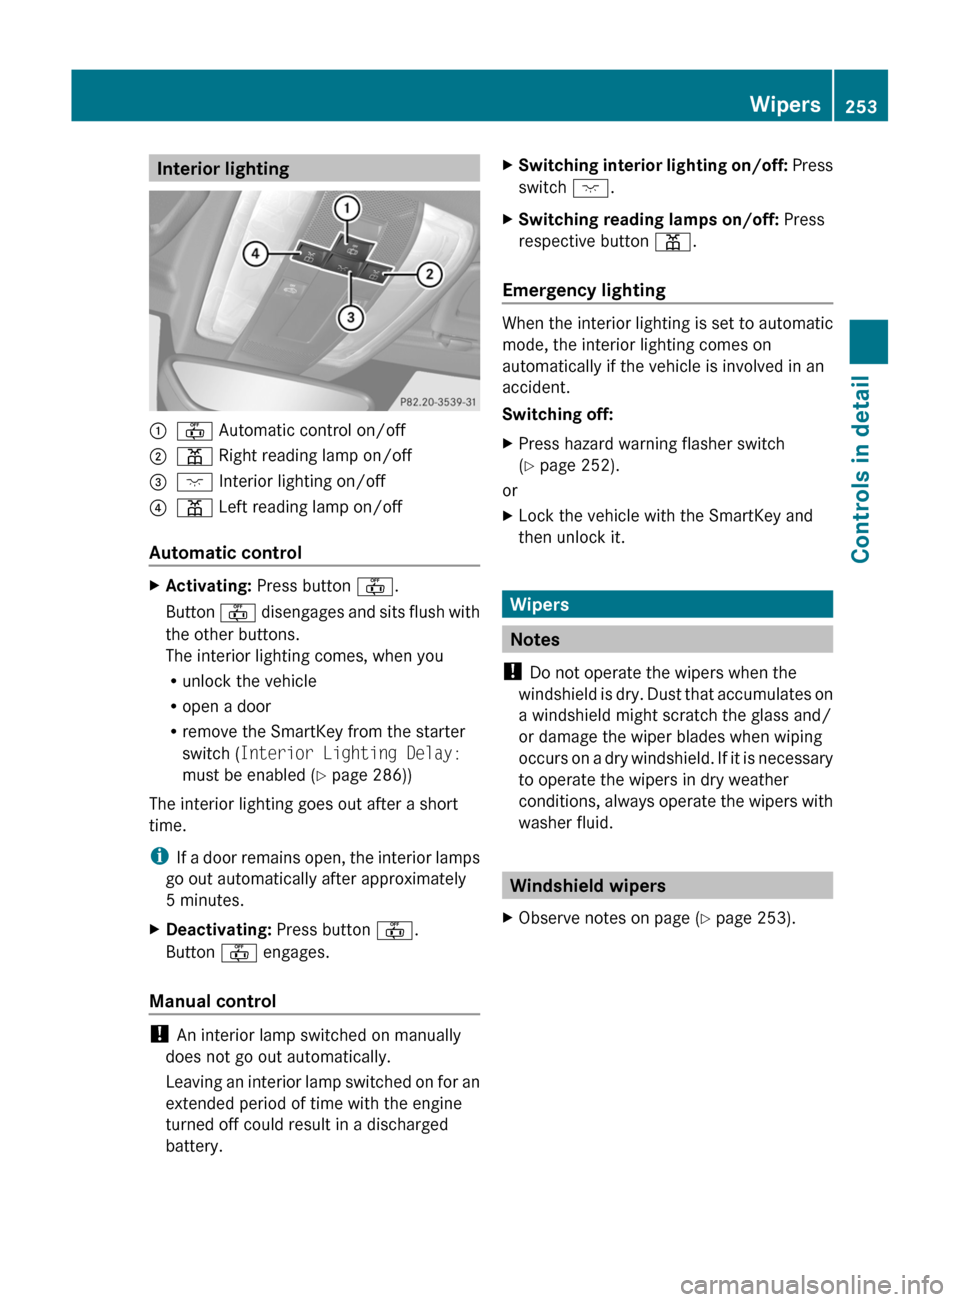
Interior lighting:~ Automatic control on/off;p Right reading lamp on/off=c Interior lighting on/off?p Left reading lamp on/off
Automatic control
XActivating: Press button ~.
Button ~ disengages and sits flush with
the other buttons.
The interior lighting comes, when you
Runlock the vehicle
Ropen a door
Rremove the SmartKey from the starter
switch (Interior Lighting Delay:
must be enabled (Y page 286))
The interior lighting goes out after a short
time.
iIf a door remains open, the interior lamps
go out automatically after approximately
5 minutes.
XDeactivating: Press button ~.
Button ~ engages.
Manual control
! An interior lamp switched on manually
does not go out automatically.
Leaving an interior lamp switched on for an
extended period of time with the engine
turned off could result in a discharged
battery.
XSwitching interior lighting on/off: Press
switch c.
XSwitching reading lamps on/off: Press
respective button p.
Emergency lighting
When the interior lighting is set to automatic
mode, the interior lighting comes on
automatically if the vehicle is involved in an
accident.
Switching off:
XPress hazard warning flasher switch
(Y page 252).
or
XLock the vehicle with the SmartKey and
then unlock it.
Wipers
Notes
! Do not operate the wipers when the
windshield is dry. Dust that accumulates on
a windshield might scratch the glass and/
or damage the wiper blades when wiping
occurs on a dry windshield. If it is necessary
to operate the wipers in dry weather
conditions, always operate the wipers with
washer fluid.
Windshield wipers
XObserve notes on page (Y page 253).Wipers253Controls in detailBA 197 USA, CA Edition A 2011; 1; 27, en-UShereepeVersion: 3.0.3.52010-03-24T15:31:10+01:00 - Seite 253Z
Page 260 of 436
Starting the engineGWarning!
Inhalation of exhaust gas is hazardous to your
health. All exhaust gas contains carbon
monoxide (CO), and inhaling it can cause
unconsciousness and possible death.
Do not run the engine in confined areas (such
as a garage) which are not properly ventilated.
If you think that exhaust gas fumes are
entering the vehicle while driving, have the
cause determined and corrected
immediately. If you must drive under these
conditions, drive only with at least one
window fully open at all times.
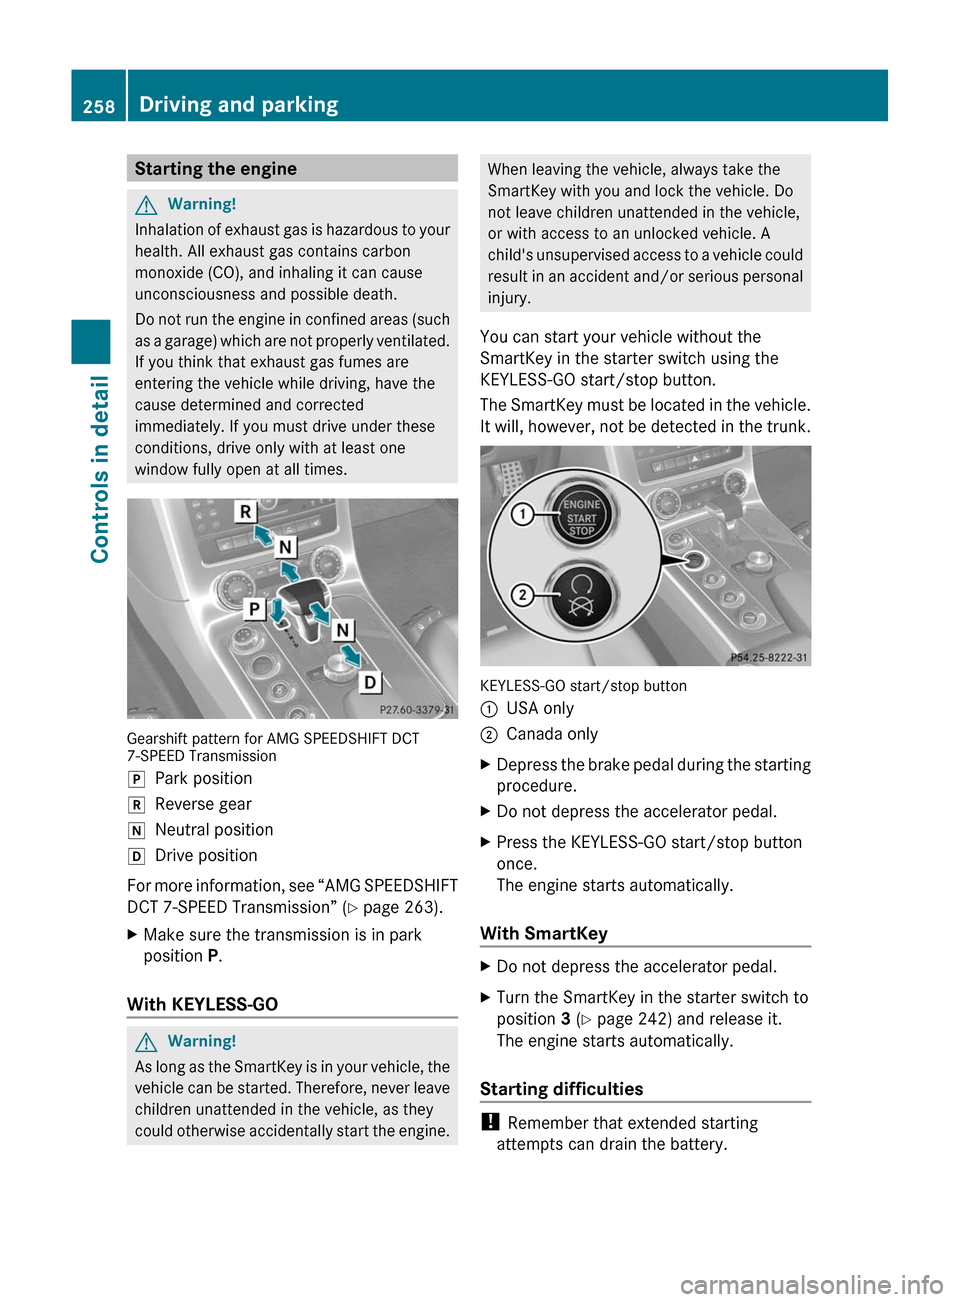
Gearshift pattern for AMG SPEEDSHIFT DCT7-SPEED Transmission
jPark positionkReverse geariNeutral positionhDrive position
For more information, see “AMG SPEEDSHIFT
DCT 7-SPEED Transmission” (Y page 263).
XMake sure the transmission is in park
position P.
With KEYLESS-GO
GWarning!
As long as the SmartKey is in your vehicle, the
vehicle can be started. Therefore, never leave
children unattended in the vehicle, as they
could otherwise accidentally start the engine.
When leaving the vehicle, always take the
SmartKey with you and lock the vehicle. Do
not leave children unattended in the vehicle,
or with access to an unlocked vehicle. A
child's unsupervised access to a vehicle could
result in an accident and/or serious personal
injury.
You can start your vehicle without the
SmartKey in the starter switch using the
KEYLESS-GO start/stop button.
The SmartKey must be located in the vehicle.
It will, however, not be detected in the trunk.
KEYLESS-GO start/stop button
:USA only;Canada onlyXDepress the brake pedal during the starting
procedure.
XDo not depress the accelerator pedal.XPress the KEYLESS-GO start/stop button
once.
The engine starts automatically.
With SmartKey
XDo not depress the accelerator pedal.XTurn the SmartKey in the starter switch to
position 3 (Y page 242) and release it.
The engine starts automatically.
Starting difficulties
! Remember that extended starting
attempts can drain the battery.
258Driving and parkingControls in detail
BA 197 USA, CA Edition A 2011; 1; 27, en-UShereepeVersion: 3.0.3.52010-03-24T15:31:10+01:00 - Seite 258