2011 MERCEDES-BENZ SLS ESP
[x] Cancel search: ESPPage 389 of 436
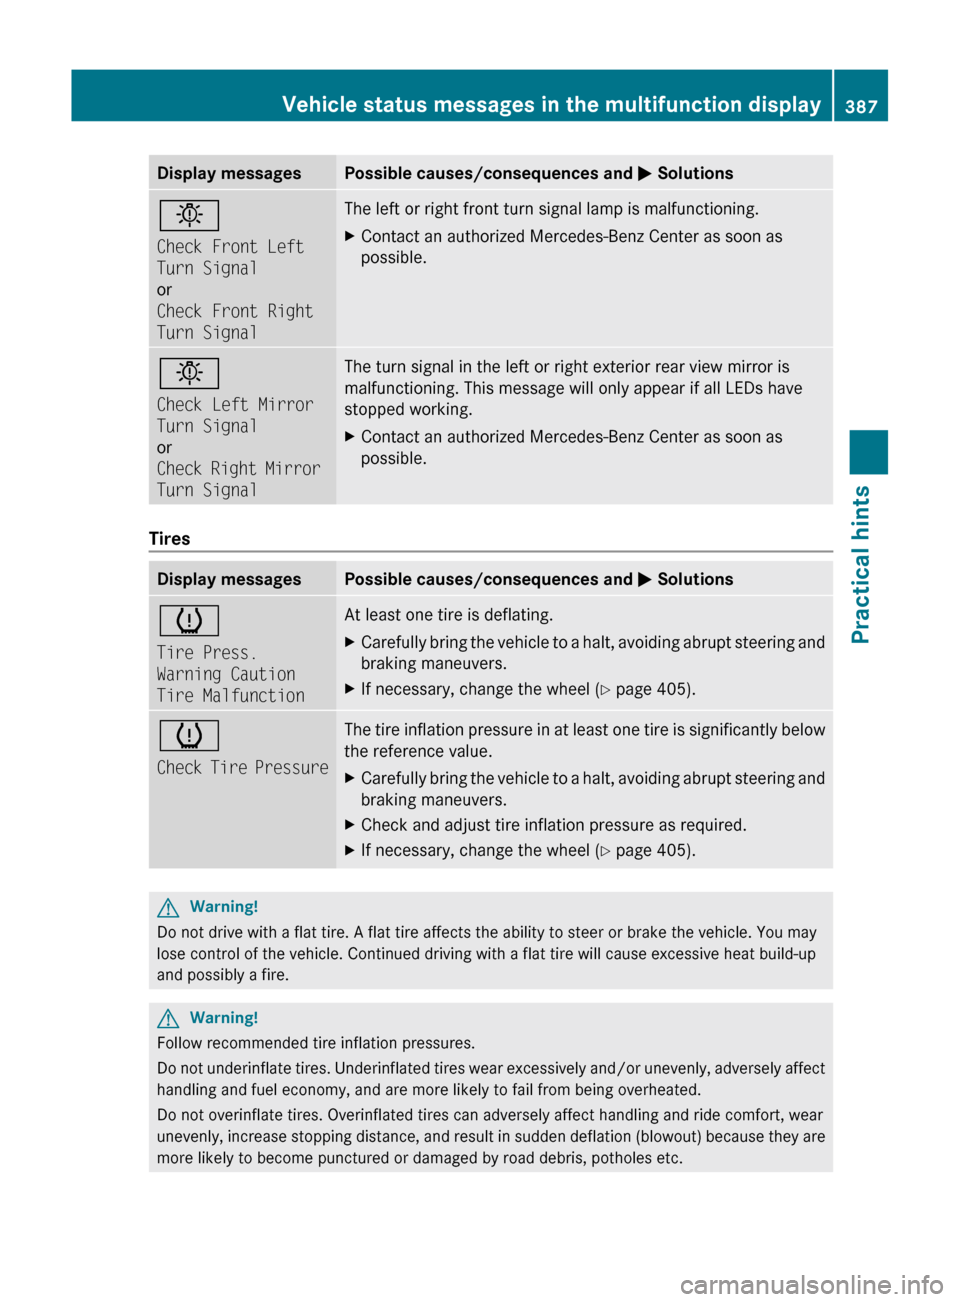
Display messagesPossible causes/consequences and M Solutionsb
Check Front Left
Turn Signal
or
Check Front Right
Turn SignalThe left or right front turn signal lamp is malfunctioning. XContact an authorized Mercedes-Benz Center as soon as
possible.b
Check Left Mirror
Turn Signal
or
Check Right Mirror
Turn SignalThe turn signal in the left or right exterior rear view mirror is
malfunctioning. This message will only appear if all LEDs have
stopped working.XContact an authorized Mercedes-Benz Center as soon as
possible.
Tires
Display messagesPossible causes/consequences and M Solutionsh
Tire Press.
Warning Caution
Tire MalfunctionAt least one tire is deflating.XCarefully bring the vehicle to a halt, avoiding abrupt steering and
braking maneuvers.XIf necessary, change the wheel ( Y page 405).h
Check Tire PressureThe tire inflation pressure in at least one tire is significantly below
the reference value.XCarefully bring the vehicle to a halt, avoiding abrupt steering and
braking maneuvers.XCheck and adjust tire inflation pressure as required.XIf necessary, change the wheel ( Y page 405).GWarning!
Do not drive with a flat tire. A flat tire affects the ability to steer or brake the vehicle. You may
lose control of the vehicle. Continued driving with a flat tire will cause excessive heat build-up
and possibly a fire.
GWarning!
Follow recommended tire inflation pressures.
Do not underinflate tires. Underinflated tires wear excessively and/or unevenly, adversely affect
handling and fuel economy, and are more likely to fail from being overheated.
Do not overinflate tires. Overinflated tires can adversely affect handling and ride comfort, wear
unevenly, increase stopping distance, and result in sudden deflation (blowout) because they are
more likely to become punctured or damaged by road debris, potholes etc.
Vehicle status messages in the multifunction display387Practical hintsBA 197 USA, CA Edition A 2011; 1; 27, en-UShereepeVersion: 3.0.3.52010-03-24T15:31:10+01:00 - Seite 387Z
Page 390 of 436
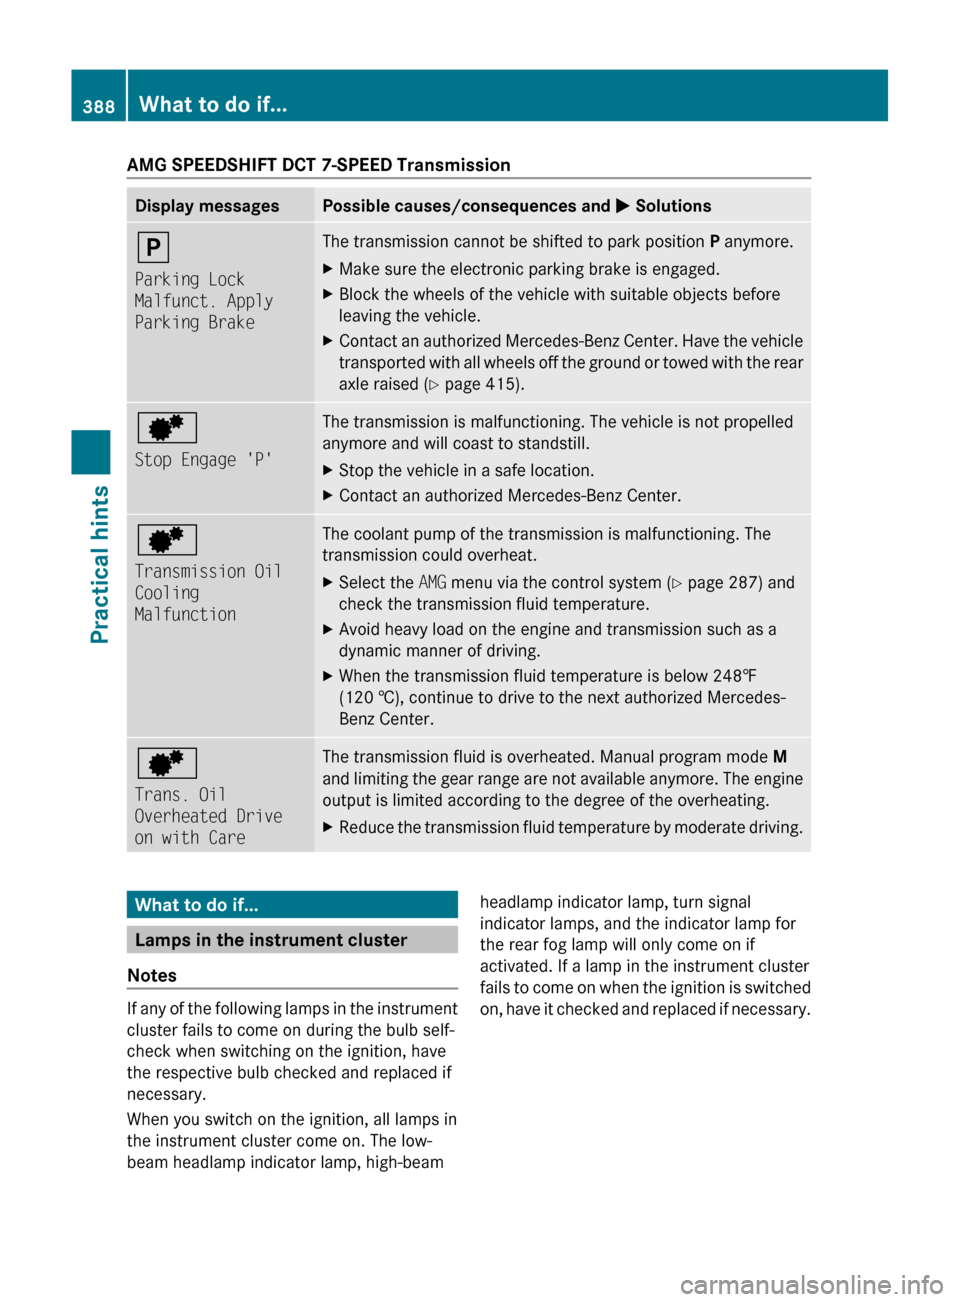
AMG SPEEDSHIFT DCT 7-SPEED TransmissionDisplay messagesPossible causes/consequences and M Solutionsj
Parking Lock
Malfunct. Apply
Parking BrakeThe transmission cannot be shifted to park position P anymore.XMake sure the electronic parking brake is engaged.XBlock the wheels of the vehicle with suitable objects before
leaving the vehicle.XContact an authorized Mercedes-Benz Center. Have the vehicle
transported with all wheels off the ground or towed with the rear
axle raised ( Y page 415).d
Stop Engage 'P'The transmission is malfunctioning. The vehicle is not propelled
anymore and will coast to standstill.XStop the vehicle in a safe location.XContact an authorized Mercedes-Benz Center.d
Transmission Oil
Cooling
MalfunctionThe coolant pump of the transmission is malfunctioning. The
transmission could overheat.XSelect the AMG menu via the control system ( Y page 287) and
check the transmission fluid temperature.XAvoid heavy load on the engine and transmission such as a
dynamic manner of driving.XWhen the transmission fluid temperature is below 248‡
(120 †), continue to drive to the next authorized Mercedes-
Benz Center.d
Trans. Oil
Overheated Drive
on with CareThe transmission fluid is overheated. Manual program mode M
and limiting the gear range are not available anymore. The engine
output is limited according to the degree of the overheating.XReduce the transmission fluid temperature by moderate driving.What to do if...
Lamps in the instrument cluster
Notes
If any of the following lamps in the instrument
cluster fails to come on during the bulb self-
check when switching on the ignition, have
the respective bulb checked and replaced if
necessary.
When you switch on the ignition, all lamps in
the instrument cluster come on. The low-
beam headlamp indicator lamp, high-beam
headlamp indicator lamp, turn signal
indicator lamps, and the indicator lamp for
the rear fog lamp will only come on if
activated. If a lamp in the instrument cluster
fails to come on when the ignition is switched
on, have it checked and replaced if necessary.388What to do if...Practical hints
BA 197 USA, CA Edition A 2011; 1; 27, en-UShereepeVersion: 3.0.3.52010-03-24T15:31:10+01:00 - Seite 388
Page 391 of 436
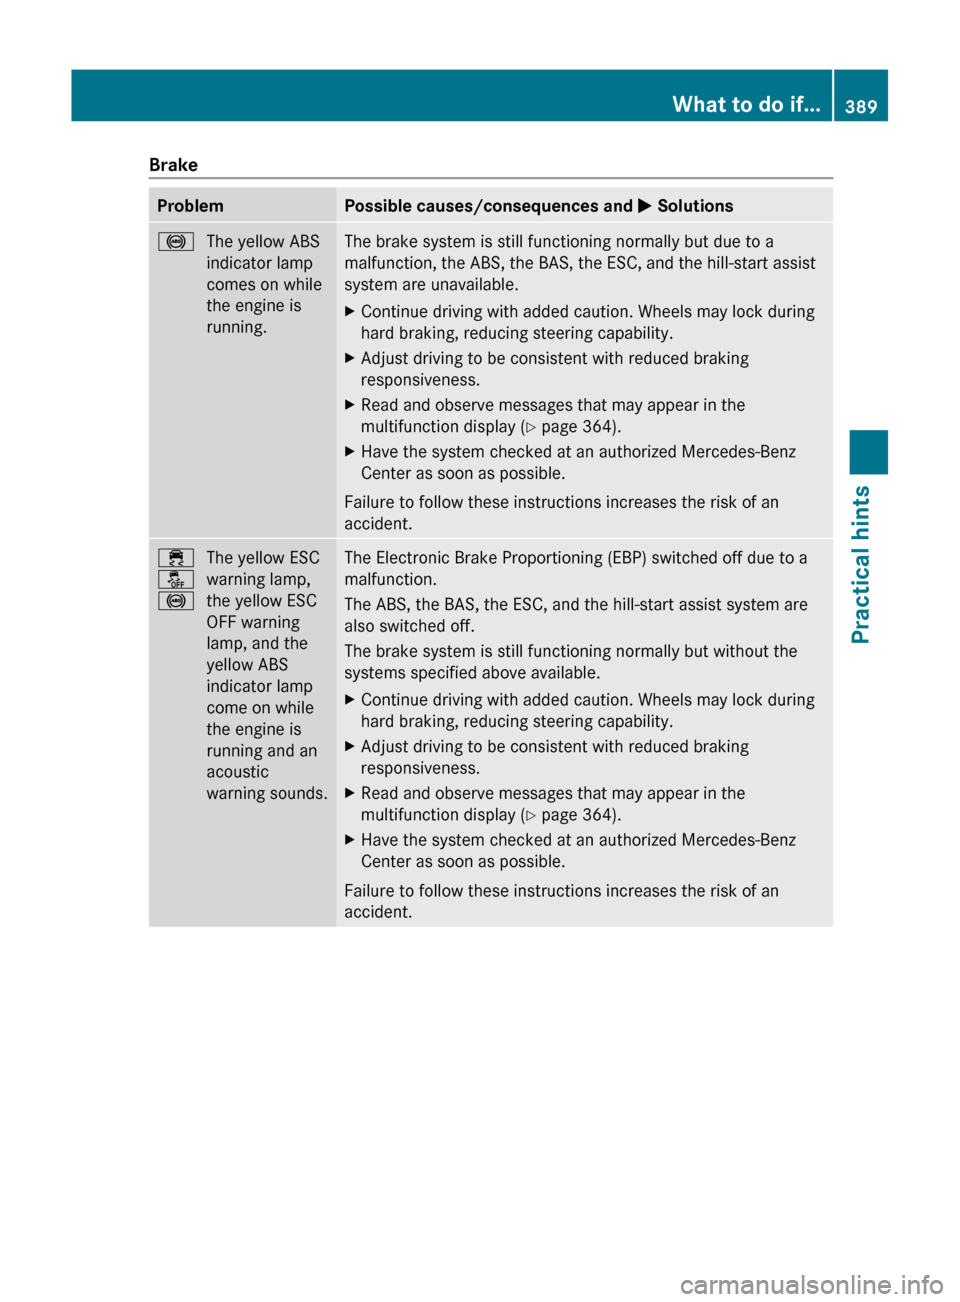
BrakeProblemPossible causes/consequences and M Solutions!The yellow ABS
indicator lamp
comes on while
the engine is
running. The brake system is still functioning normally but due to a
malfunction, the ABS, the BAS, the ESC, and the hill-start assist
system are unavailable.XContinue driving with added caution. Wheels may lock during
hard braking, reducing steering capability.XAdjust driving to be consistent with reduced braking
responsiveness.XRead and observe messages that may appear in the
multifunction display ( Y page 364).XHave the system checked at an authorized Mercedes-Benz
Center as soon as possible.
Failure to follow these instructions increases the risk of an
accident.
÷
å
!The yellow ESC
warning lamp,
the yellow ESC
OFF warning
lamp, and the
yellow ABS
indicator lamp
come on while
the engine is
running and an
acoustic
warning sounds.The Electronic Brake Proportioning (EBP) switched off due to a
malfunction.
The ABS, the BAS, the ESC, and the hill-start assist system are
also switched off.
The brake system is still functioning normally but without the
systems specified above available.XContinue driving with added caution. Wheels may lock during
hard braking, reducing steering capability.XAdjust driving to be consistent with reduced braking
responsiveness.XRead and observe messages that may appear in the
multifunction display ( Y page 364).XHave the system checked at an authorized Mercedes-Benz
Center as soon as possible.
Failure to follow these instructions increases the risk of an
accident.
What to do if...389Practical hintsBA 197 USA, CA Edition A 2011; 1; 27, en-UShereepeVersion: 3.0.3.52010-03-24T15:31:10+01:00 - Seite 389Z
Page 397 of 436

GWarning!
Driving when your engine is overheated can cause some fluids which may have leaked into the
engine compartment to catch fire. You could be seriously burned.
Steam from an overheated engine can cause serious burns which can occur just by opening the
engine hood. Stay away from the engine if you see or hear steam coming from it.
Stop the vehicle in a safe location away from other traffic. Turn off the engine, get out of the
vehicle and do not stand near the vehicle until the engine has cooled down.
! The engine should not be operated with the engine oil temperature above 140†. Doing
so may cause serious damage which is not covered by the Mercedes-Benz Limited Warranty.
Tires
ProblemPossible causes/consequences and M SolutionshUSA only:
Combination
low tire pressure
telltale/TPMS
malfunction
telltale for the
Advanced TPMS
illuminates
continuously.
Canada only:
Low tire
pressure telltale
for the
Advanced TPMS
illuminates
continuously.The Advanced TPMS detects a loss of pressure in at least one tire.XCarefully bring the vehicle to a halt, avoiding abrupt steering and
braking maneuvers. Observe the traffic situation around you.XRead and observe messages in the multifunction display
( Y page 364).
If the tire inflation pressure in the respective tire(s) has (have) been
corrected, the combination low tire pressure/TPMS malfunction
telltale goes out after a few minutes of driving.
hUSA only:
Combination
low tire pressure
telltale/TPMS
malfunction
telltale for the
Advanced TPMS
flashes 60
seconds and
then stays
illuminated.There is a malfunction in the Advanced TPMS.XRead and observe messages in the multifunction display
( Y page 364).XHave the Advanced TPMS checked at an authorized Mercedes-
Benz Center.
After the malfunction has been remedied, the combination low tire
pressure/TPMS malfunction telltale goes out after a few minutes
of driving.
What to do if...395Practical hintsBA 197 USA, CA Edition A 2011; 1; 27, en-UShereepeVersion: 3.0.3.52010-03-24T15:31:10+01:00 - Seite 395Z
Page 398 of 436
GWarning!
Each tire, including the spare (if provided), should be checked at least once a month when cold
and inflated to the inflation pressure recommended by the vehicle manufacturer on the Tire and
Loading Information placard on the driver’s door B-pillar or the tire inflation pressure label on the
inside of the fuel filler flap. If your vehicle has tires of a different size than the size indicated on
the Tire and Loading Information placard or the tire inflation pressure label, you should determine
the proper tire inflation pressure for those tires.
As an added safety feature, your vehicle has been equipped with a tire pressure monitoring
system (TPMS) that illuminates a low tire pressure telltale when one or more of your tires are
significantly underinflated. Accordingly, when the low tire pressure telltale illuminates, you should
stop and check your tires as soon as possible, and inflate them to the proper pressure. Driving
on a significantly underinflated tire causes the tire to overheat and can lead to tire failure.
Underinflation also reduces fuel efficiency and tire tread life, and may affect the vehicle’s handling
and stopping ability. Please note that the TPMS is not a substitute for proper tire maintenance,
and it is the driver’s responsibility to maintain correct tire pressure, even if underinflation has
not reached the level to trigger illumination of the TPMS low tire pressure telltale.
USA only:
Your vehicle has also been equipped with a TPMS malfunction indicator to indicate when the
system is not operating properly. The TPMS malfunction indicator is combined with the low tire
pressure telltale. When the system detects a malfunction, the telltale will flash for approximately
1 minute and then remain continuously illuminated. This sequence will continue upon subsequent
vehicle start-ups as long as the malfunction exists. When the malfunction indicator is illuminated,
the system may not be able to detect or signal low tire pressure as intended.
TPMS malfunctions may occur for a variety of reasons, including the installation of incompatible
replacement or alternate tires or wheels on the vehicle that prevent the TPMS from functioning
properly. Always check the TPMS malfunction telltale after replacing one or more tires or wheels
on your vehicle to ensure that the replacement or alternate tires and wheels allow the TPMS to
continue to function properly.
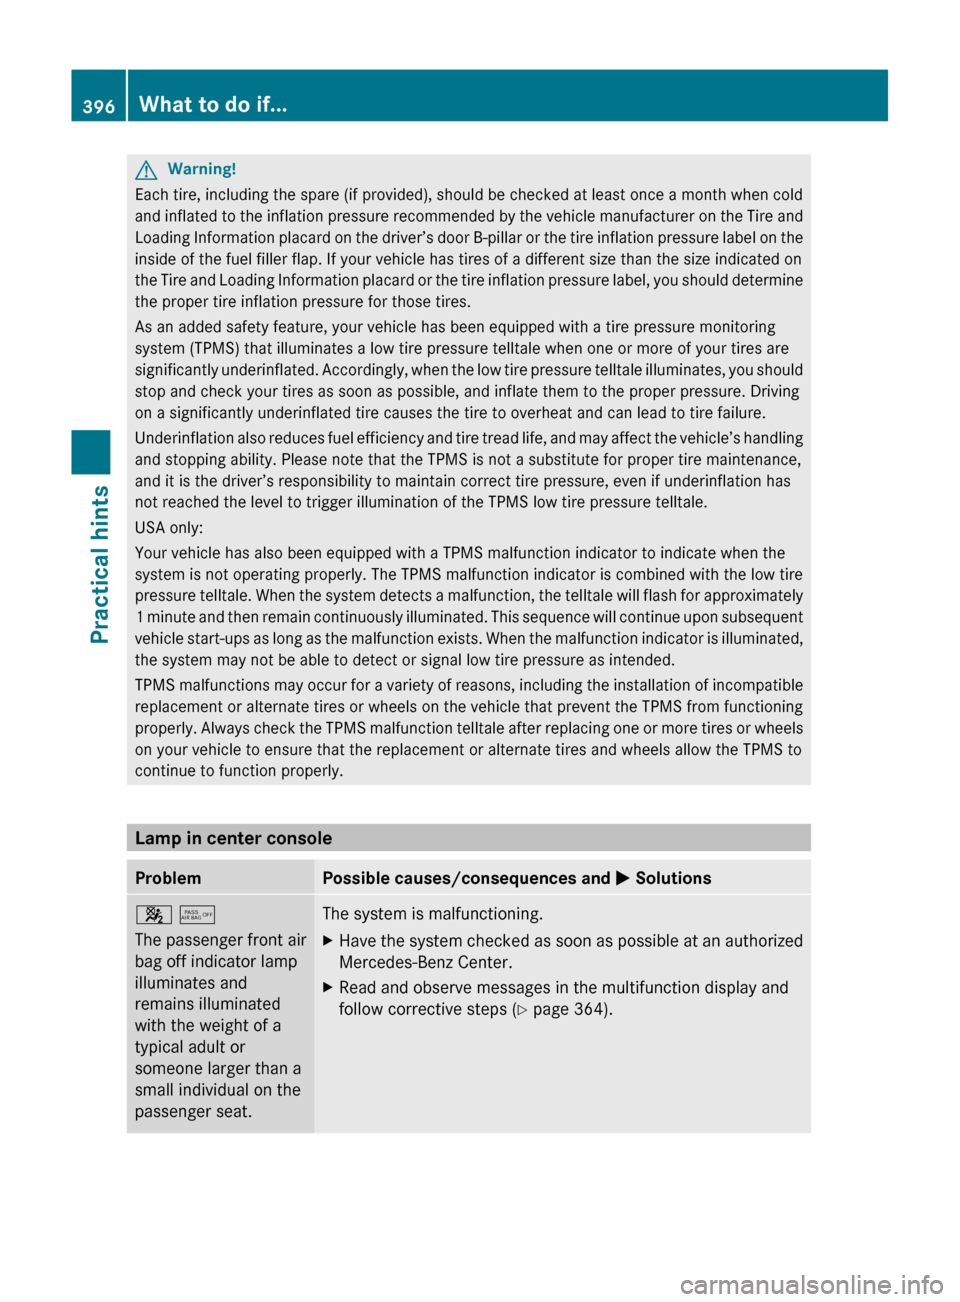
Lamp in center console
ProblemPossible causes/consequences and M Solutions4 5
The passenger front air
bag off indicator lamp
illuminates and
remains illuminated
with the weight of a
typical adult or
someone larger than a
small individual on the
passenger seat. The system is malfunctioning.XHave the system checked as soon as possible at an authorized
Mercedes-Benz Center.XRead and observe messages in the multifunction display and
follow corrective steps ( Y page 364).396What to do if...Practical hints
BA 197 USA, CA Edition A 2011; 1; 27, en-UShereepeVersion: 3.0.3.52010-03-24T15:31:10+01:00 - Seite 396
Page 402 of 436
Replacing bulbs
Safety notes
Safe vehicle operation depends on proper
exterior lighting and signaling to a large
degree.
Correct headlamp adjustment is extremely
important. Have headlamps checked and
readjusted at regular intervals and when a
bulb has been replaced. Contact an
authorized Mercedes-Benz Center for
headlamp adjustment.
GWarning!
Bulbs and bulb sockets can be very hot. Allow
the lamp to cool down before changing a bulb.
Keep bulbs out of reach of children.
Halogen lamps contain pressurized gas. A
bulb can explode if you
R touch or move it when hot
R drop the bulb
R scratch the bulb
Wear eye and hand protection.
Because of high voltage in Xenon lamps, it is
dangerous to replace the bulb or repair the
lamp and its components. We recommend
that you have such work done by a qualified
technician.
i Since replacing bulbs is a technically
highly demanding process, we recommend
to have them replaced at an authorized
Mercedes-Benz Center.
i If the headlamps are fogged up on the
inside as a result of high humidity, driving
the vehicle a distance with the lights on
should clear up the fogging.
Replacing bulbs for front lamps
You cannot replace the bulbs in the front
lamps yourself. Contact an authorized
Mercedes-Benz Center or a qualified
workshop.
Replacing bulbs for rear lamps
Except for the license plate lamp bulbs, you
cannot replace the bulbs in the rear lamps
yourself.
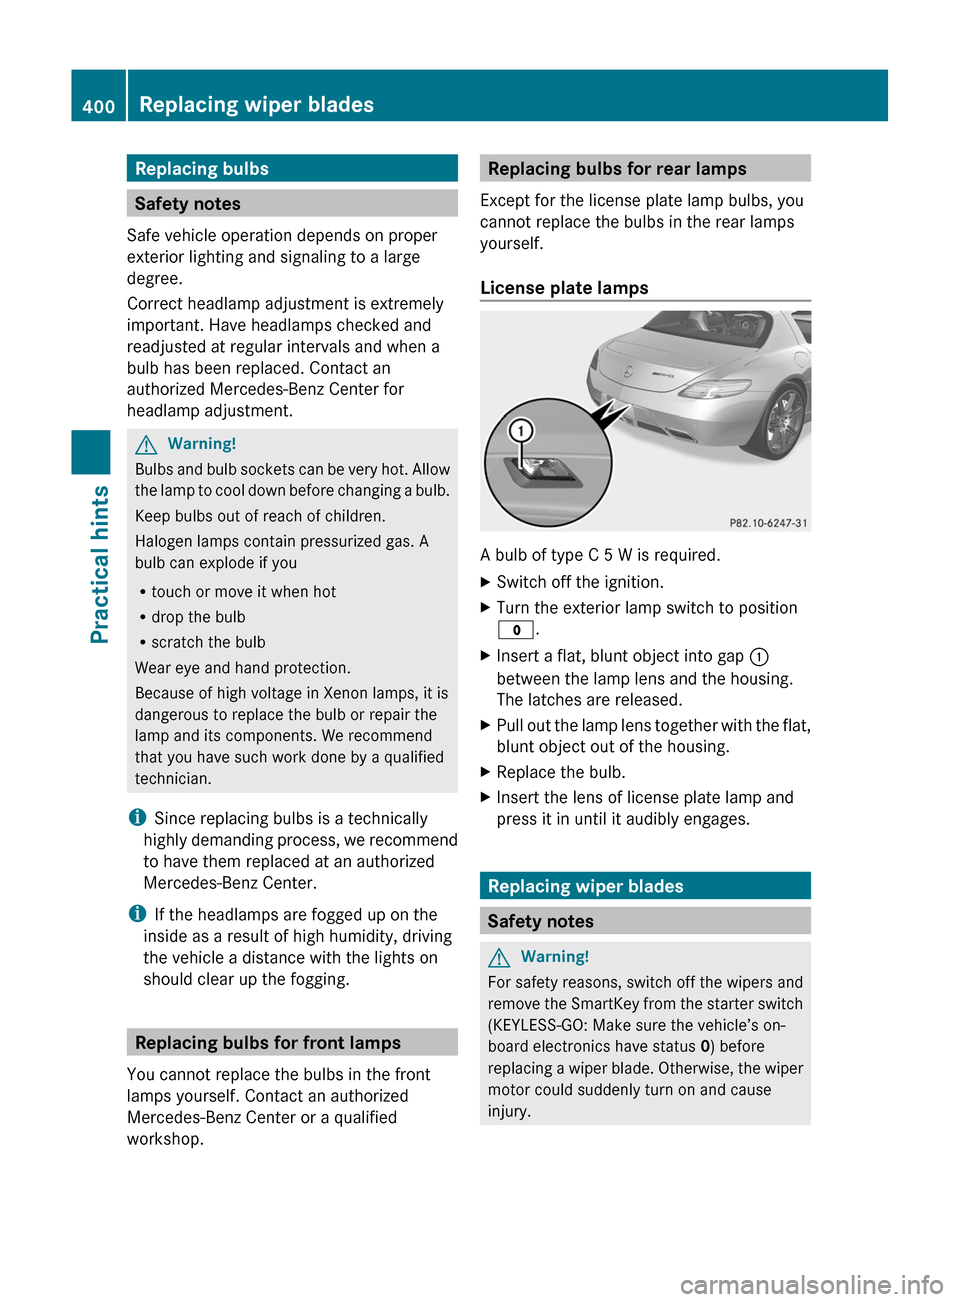
License plate lamps
A bulb of type C 5 W is required.
XSwitch off the ignition.XTurn the exterior lamp switch to position
$ .XInsert a flat, blunt object into gap :
between the lamp lens and the housing.
The latches are released.XPull out the lamp lens together with the flat,
blunt object out of the housing.XReplace the bulb.XInsert the lens of license plate lamp and
press it in until it audibly engages.
Replacing wiper blades
Safety notes
GWarning!
For safety reasons, switch off the wipers and
remove the SmartKey from the starter switch
(KEYLESS-GO: Make sure the vehicle’s on-
board electronics have status 0) before
replacing a wiper blade. Otherwise, the wiper
motor could suddenly turn on and cause
injury.
400Replacing wiper bladesPractical hints
BA 197 USA, CA Edition A 2011; 1; 27, en-UShereepeVersion: 3.0.3.52010-03-24T15:31:10+01:00 - Seite 400
Page 404 of 436

Flat tire
Notes
Your vehicle is equipped with a TIREFIT kit
(Y page 362).
Preparing the vehicle
XWhenever possible, park the vehicle in a
safe distance from moving traffic on a hard,
flat surface.
XTurn on the hazard warning flasher.XTurn the steering wheel so that the front
wheels are in a straight-ahead position.
XEngage the electronic parking brake.XShift the transmission into park position P.XTurn off the engine.XKEYLESS-GO: Open the driver’s door (this
puts the starter switch in position 0, same
as with the SmartKey removed from the
starter switch). The driver’s door can then
be closed again. Open doors only when
conditions are safe to do so.
or
XRemove the SmartKey from the starter
switch.
XHave any passenger exit the vehicle at a
safe distance from the roadway. Open
doors only when conditions are safe to do
so.
Sealing tires with TIREFIT
Small tire punctures, particularly those in the
tread, can be sealed with TIREFIT.
TIREFIT can be used in ambient temperatures
down to -40‡ (-40†).
GWarning!
TIREFIT is a limited repair device. TIREFIT
cannot be used for cuts or punctures larger
than approximately 0.16 in (4 mm) and tire
damage caused by driving with extremely low
tire inflation pressure, or on a flat tire, or a
damaged wheel.
Do not drive the vehicle under such
circumstances.
Contact the nearest authorized Mercedes-
Benz Center for assistance or call Roadside
Assistance.
XForeign objects (e.g. screws or nails)
should not be removed from the tire.
XTake the TIREFIT kit, the sticker, and the
electric air pump out of the trunk
(Y page 362).
XOpen the TIREFIT kit.XAttach upper part of sticker D where it will
be easily seen by the driver on the
instrument cluster.
XAttach lower part of sticker D to the
damaged tire (close to the tire valve).
GWarning!
Take care not to allow the contents of TIREFIT
to come in contact with hair, eyes or clothing.
TIREFIT is harmful if inhaled, swallowed or
absorbed through the skin - causes skin, eye
and respiratory irritation.
Any contact with eyes or skin should be
flushed immediately with plenty of water.
If clothing comes in contact with TIREFIT,
change clothing as soon as possible.
In case of allergic reaction or rash, consult a
physician immediately.
402Flat tirePractical hints
BA 197 USA, CA Edition A 2011; 1; 27, en-UShereepeVersion: 3.0.3.52010-03-24T15:31:10+01:00 - Seite 402
Page 408 of 436

Rcollapsible wheel chock
Rjack
Rwheel wrench
Ralignment bolt
For information on where to find the
respective items, see “Where will I find ...?”
(Y page 362).
XPrevent the vehicle from rolling away by
blocking wheels with wheel chocks or other
sizeable objects.
One wheel chock is included with the
vehicle tool kit (Y page 362). For
information on setting up a collapsible
wheel chock, see (Y page 363).
GWarning!
Only jack up the vehicle on level ground or on
slight inclines/declines. Otherwise, the
vehicle could fall off the jack and injure you or
others.
Changing a wheel on a level surface
Changing rear wheel on passenger side (exampleillustration)
XPlace a wheel chock or other sizeable
object in front of and another wheel chock
or other sizeable object behind the wheel
that is diagonally opposite to the wheel
being changed.
Changing a wheel on a slight decline
Always try lifting the vehicle using the jack on
a level surface. However, should
circumstances require you to do so on a slight
decline:
Changing wheel on passenger side (exampleillustration)
XPlace wheel chocks or other sizeable
objects on the downhill side in front of both
wheels on the side opposite to the side on
which the wheel is to be changed.
Changing a wheel on a slight incline
Always try lifting the vehicle using the jack on
a level surface. However, should
circumstances require you to do so on a slight
incline:
Changing wheel on passenger side (exampleillustration)
XPlace wheel chocks or other sizeable
objects on the downhill side in front of both
wheels on the side opposite to the side on
which the wheel is to be changed.
406Wheel changePractical hints
BA 197 USA, CA Edition A 2011; 1; 27, en-UShereepeVersion: 3.0.3.52010-03-24T15:31:10+01:00 - Seite 406