2011 MERCEDES-BENZ S-Class buttons
[x] Cancel search: buttonsPage 352 of 524

stationary and cannot check whether Night
View Assist Plus is working.
When you activate Night View Assist Plus,
speed display A in the multifunction display
changes. Speed display A is shown as a bar
at the bottom edge of the multifunction
display. This line is no longer available for
basic menus. You have to deactivate Night
View Assist Plus if you wish to change a
setting using the buttons on the multifunction
steering wheel.
Pedestrian recognition
The Night View Assist Plus recognizes
pedestrians using typical characteristics, i.e.
a silhouette in the shape of a person.
Pedestrian recognition is then switched on
automatically if:
R Night View Assist Plus is activated.
R you are driving above
approximately 6 mph (10 km/h).
R the surroundings are dark, e.g. when
driving outside built-up areas without
street lighting.
If pedestrian recognition is active,
symbol ? appears. If a pedestrian is now
recognized, they are framed = and thereby
highlighted. If the pedestrian recognition
system has brought a pedestrian to your
attention, look through the windshield to
evaluate the situation. The actual distance to
objects and pedestrians cannot be gauged
accurately by looking at a screen.
It may be the case that objects are highlighted
as well as pedestrians.
GWarning!
The pedestrian detection may be impaired or
unavailable when
R pedestrians are obstructed fully or in part
by other objects such as parking vehicles
R the silhouette in the Night View Assist Plus
image is displayed incomplete or
interrupted, e.g. by significant light
reflection
R a pedestrian's silhouette is not rich enough
in contrast compared to the background
R pedestrians are not in erected position but,
for example, sit, crouch down, or lie
i Animals are not identified by pedestrian
recognition.
Setting the brightness of the
multifunction displayXTo make brighter or dimmer : make sure
that Night View Assist Plus is activated.XTurn control : counterclockwise or
clockwise.
Fogged up or dirty windshield
If the windshield in front of the camera is
fogged up or dirty on the inside or outside, the
Night View Assist Plus display is affected.
GWarning!
Please do not forget that your primary
responsibility is to drive the vehicle. A driver's
attention to the road must always be his/her
primary focus when driving. For your safety
and the safety of others, stop before trying to
remove window fogging or cleaning the
windshield in front of the Night View Assist
Plus camera.
Bear in mind that at a speed of just 30 mph
(approximately 50 km/h), your vehicle is
covering a distance of 44 feet
(approximately 14 m) every second.
350Driving systemsDriving and parking
Page 367 of 524

The coolant temperature gauge is in the
instrument cluster on the left-hand side.
Under normal operating conditions and with
the specified coolant level, the coolant
temperature may rise to 248 ‡ (120 †).
! If the coolant temperature is too high a
display message is shown.
If the coolant temperature rises above
248 ‡(120 †), do not drive any further as
this could damage the engine.
Tachometer
The red band in the tachometer indicates the
engine's overrevving range.
! Do not drive in the overrevving range, as
this could damage the engine.
The fuel supply is interrupted to protect the
engine when the red band is reached.
Outside temperature display
The outside temperature display is in the
multifunction display.
GWarning!
The outside temperature indicator is not
designed to serve as an ice-warning device
and is therefore unsuitable for that purpose.
Indicated temperatures just above the
freezing point do not guarantee that the road
surface is free of ice. The road may still be icy,
especially in wooded areas or on bridges.
Changes in the outside temperature are
displayed after a short delay.
Operating the on-board computer
The on-board computer is activated as soon
as you turn the key to position 2 in the ignition
lock.
You can control the multifunction display and
the settings in the on-board computer using
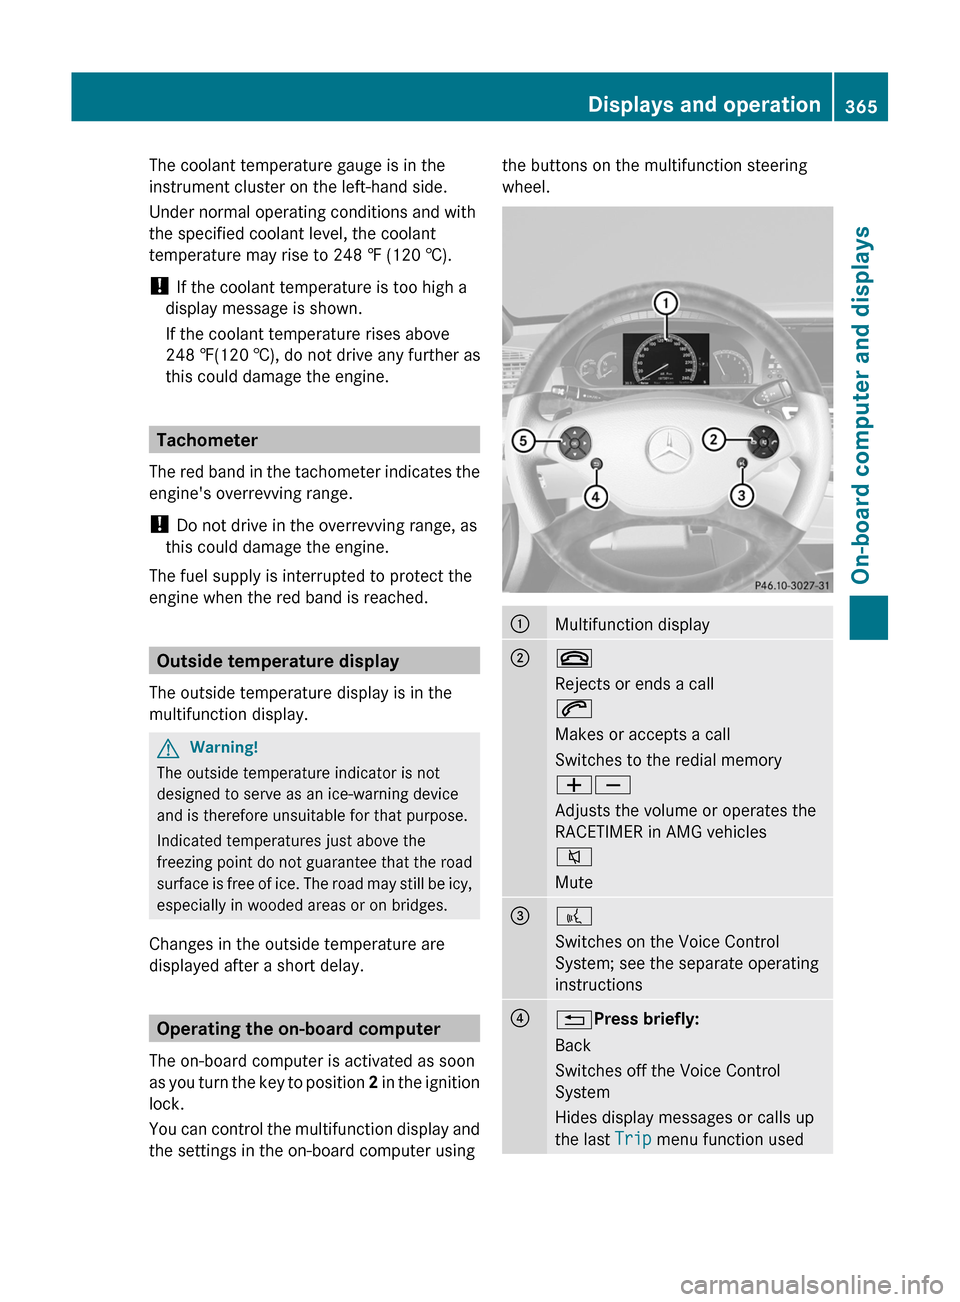
the buttons on the multifunction steering
wheel.
:Multifunction display;~
Rejects or ends a call
6
Makes or accepts a call
Switches to the redial memory
WX
Adjusts the volume or operates the
RACETIMER in AMG vehicles
8
Mute
=?
Switches on the Voice Control
System; see the separate operating
instructions
?%Press briefly:
Back
Switches off the Voice Control
System
Hides display messages or calls up
the last Trip menu function used
Displays and operation365On-board computer and displaysZ
Page 374 of 524

Upshift indicator up ; indicates that the
engine has reached the overrevving range
when in the manual gearshift program.
Upshift indicator up ; fades out other
messages until you have shifted up.
When the engine oil temperature is below
80 †, the oil temperature is shown in blue.
Avoid driving at full engine output during this
time.
RACETIMER
Displaying and starting RACETIMER
GWarning
The RACETIMER feature is only for use on
roads and in conditions where high speed
driving is permitted. Racing on public roads is
prohibited under all circumstances. The driver
is and must always remain responsible for
following posted speed limits.
You can use the RACETIMER to store lap
times.
When RACETIMER is displayed, you cannot
adjust the volume using the W and X
buttons on the steering wheel.
XPress = or ; on the steering wheel
to select the AMG menu.
XPress the 9 button repeatedly until the
RACETIMER is shown.
:Gear indicator;Seconds indicator=RACETIMER?LapYou can start the RACETIMER when the
engine is running or if the key is in position
2 in the ignition lock.
XTo start: press the W button to start the
RACETIMER.
XTo display the intermediate time: press
X to show the intermediate time.
The intermediate time is displayed for five
seconds.
XTo stop: press the W button to stop the
RACETIMER.
The RACETIMER interrupts timing when you
stop the vehicle and turn the key to position
1 in the ignition lock. When you turn the key
to position 2 or 3 and then press the W
button, timing is continued.
Storing the lap time and starting a new lap
It is possible to store a maximum of sixteen
laps.
XPress the X button on the steering
wheel to show the intermediate time during
timing.
The intermediate time is displayed for five
seconds.
XPress the X button again within five
seconds.
The displayed intermediate time is stored
as a lap time.
Timing starts for a new lap. The new lap is
timed from when the intermediate time is
called up.
:Gear indicator;RACETIMER=Fastest lap time (best lap)372Menus and submenusOn-board computer and displays
Page 442 of 524

interference that may cause undesired
operation.
Unauthorized modification of this device
could void the user's authority to legally
operate the device.
Programming the remote control
Programming
GWarning!
Only press the transmitter button on the
integrated remote control if there are no
persons or objects present within the sweep
of the garage door. People could otherwise be
injured by the movement of the door.
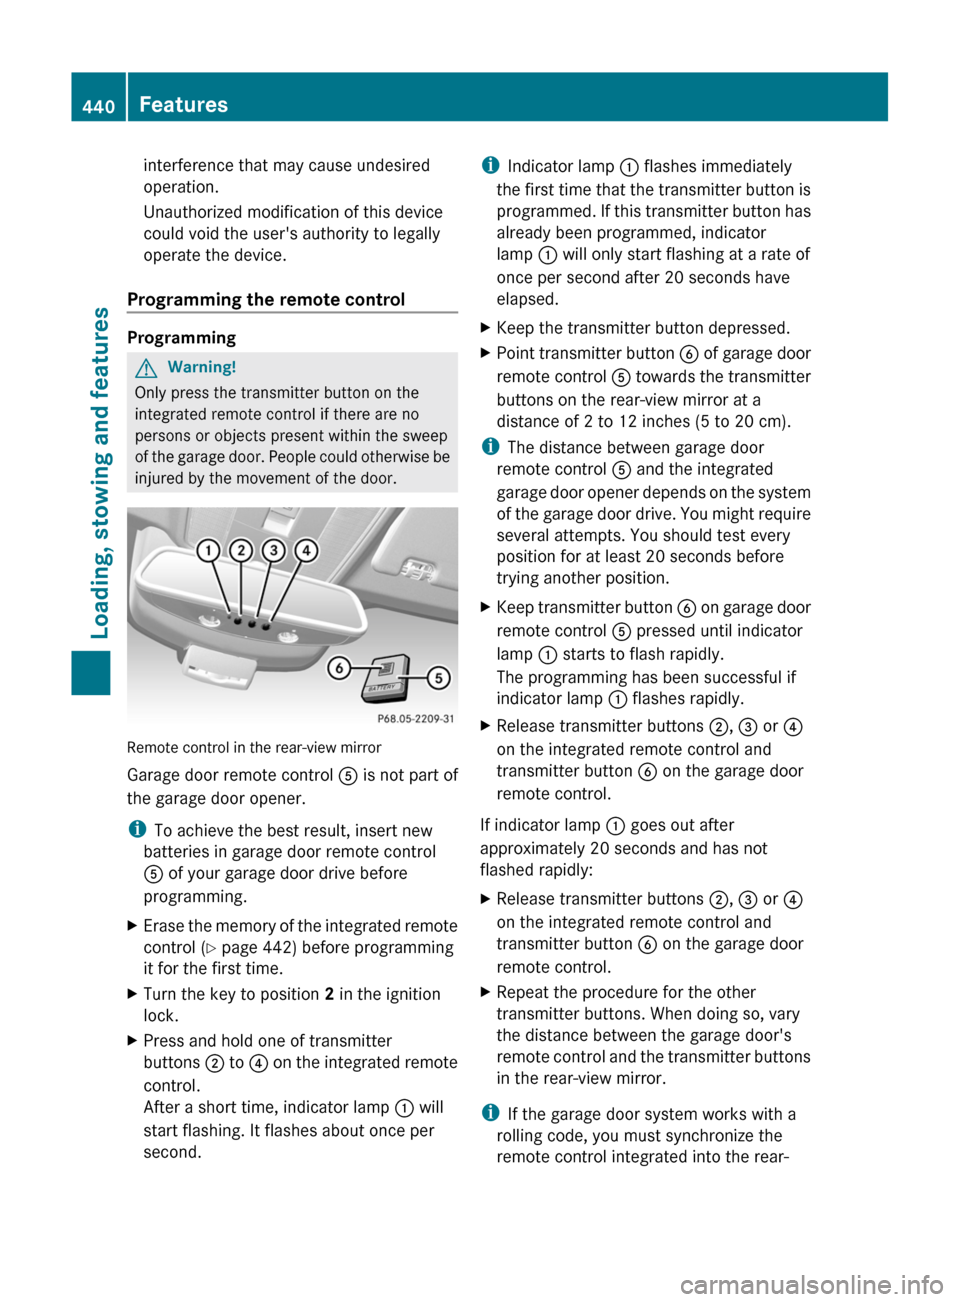
Remote control in the rear-view mirror
Garage door remote control A is not part of
the garage door opener.
iTo achieve the best result, insert new
batteries in garage door remote control
A of your garage door drive before
programming.
XErase the memory of the integrated remote
control (Y page 442) before programming
it for the first time.
XTurn the key to position 2 in the ignition
lock.
XPress and hold one of transmitter
buttons ; to ? on the integrated remote
control.
After a short time, indicator lamp : will
start flashing. It flashes about once per
second.
iIndicator lamp : flashes immediately
the first time that the transmitter button is
programmed. If this transmitter button has
already been programmed, indicator
lamp : will only start flashing at a rate of
once per second after 20 seconds have
elapsed.
XKeep the transmitter button depressed.XPoint transmitter button B of garage door
remote control A towards the transmitter
buttons on the rear-view mirror at a
distance of 2 to 12 inches (5 to 20 cm).
iThe distance between garage door
remote control A and the integrated
garage door opener depends on the system
of the garage door drive. You might require
several attempts. You should test every
position for at least 20 seconds before
trying another position.
XKeep transmitter button B on garage door
remote control A pressed until indicator
lamp : starts to flash rapidly.
The programming has been successful if
indicator lamp : flashes rapidly.
XRelease transmitter buttons ;, = or ?
on the integrated remote control and
transmitter button B on the garage door
remote control.
If indicator lamp : goes out after
approximately 20 seconds and has not
flashed rapidly:
XRelease transmitter buttons ;, = or ?
on the integrated remote control and
transmitter button B on the garage door
remote control.
XRepeat the procedure for the other
transmitter buttons. When doing so, vary
the distance between the garage door's
remote control and the transmitter buttons
in the rear-view mirror.
iIf the garage door system works with a
rolling code, you must synchronize the
remote control integrated into the rear-
440FeaturesLoading, stowing and features
Page 444 of 524

Garage door system with rolling code:
indicator lamp : flashes briefly and then
lights up for approximately two seconds.
This is repeated for up to 20 seconds.
iThe transmitter will transmit a signal for
as long as the transmitter button is being
pressed. The transmission will be halted
after a maximum of 20 seconds and
indicator lamp : will flash. Press the
transmitter button again, if necessary.
Clearing the remote control memory
XTurn the SmartKey to position 2 in the
ignition lock.
XPress and hold transmitter buttons ;
and ? for approximately 20 seconds until
indicator lamp : flashes rapidly.
The memory is cleared.
iYou should clear the remote control
memory before selling the vehicle.
Floormat on the driver's side
GWarning!
Whenever you are using a floormat, make sure
there is enough clearance and that the
floormat is securely fastened.
The floormat should always be securely
fastened using the fastening equipment.
Before driving off, check that the floormat is
securely in place and adjust it if necessary. A
loose floormat could slip and hinder proper
functioning of the pedals.
Do not place several floormats on top of each
other as this may impair pedal movement.
XSlide seat backwards.XTo install: place the floormat in position.XPress floormat eyelets : onto retainer
pins ;.
XTo remove: pull the floormats off
retainers ;.
XRemove the floormat.
Infrared reflective windshield
The infrared reflecting glass prevents the
vehicle interior from becoming too hot. It also
blocks radio waves up into the gigahertz
range.
Vehicles without Night View Assist Plus
:Areas permeable to radio waves (to the
left and right of the rain sensor cover)
;Rain sensor cover=Areas permeable to radio waves442FeaturesLoading, stowing and features