2011 MERCEDES-BENZ S-Class buttons
[x] Cancel search: buttonsPage 108 of 524

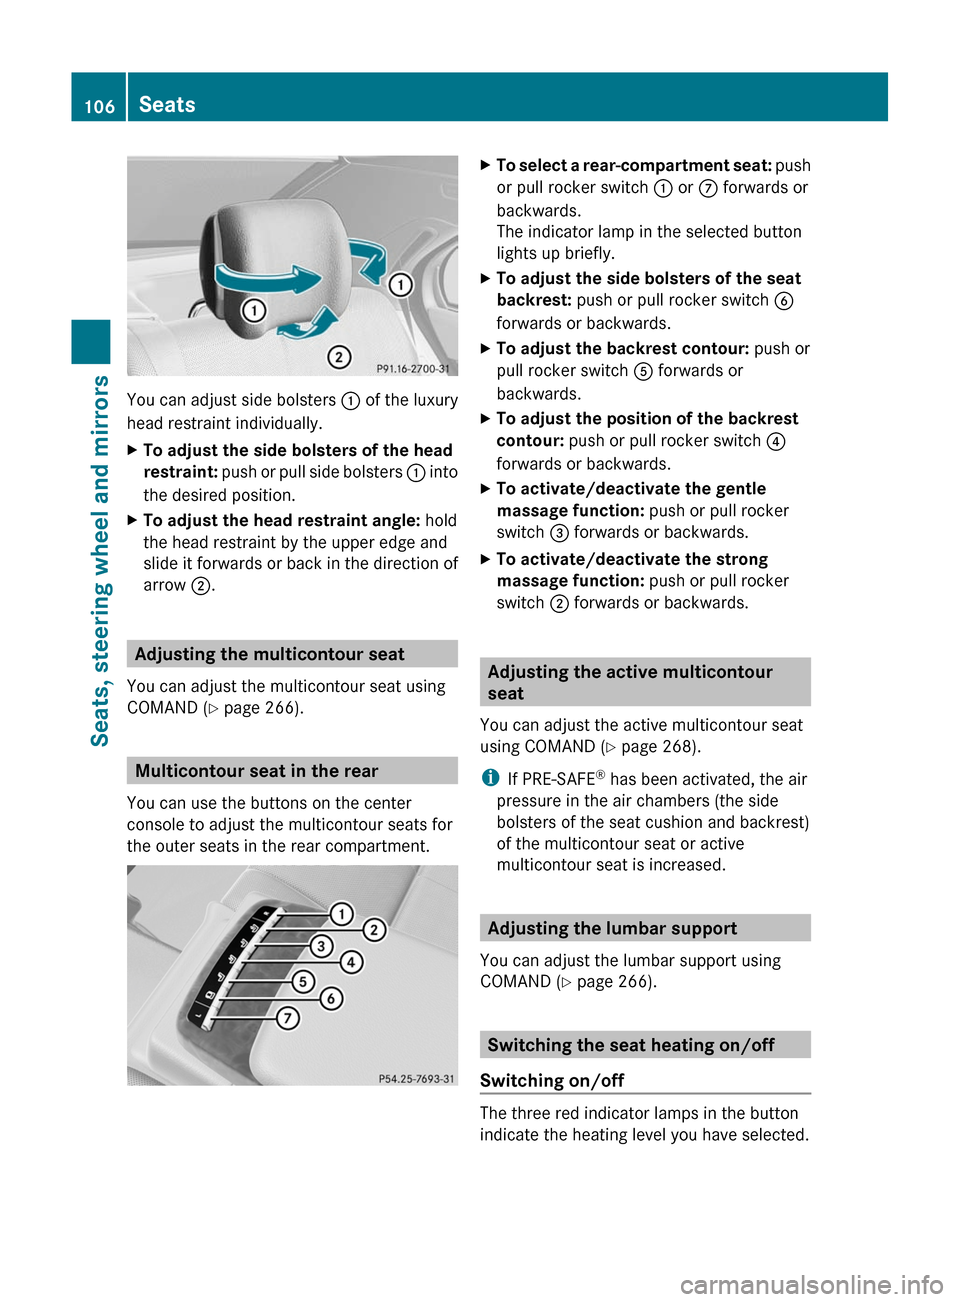
You can adjust side bolsters : of the luxury
head restraint individually.
XTo adjust the side bolsters of the head
restraint: push or pull side bolsters : into
the desired position.
XTo adjust the head restraint angle: hold
the head restraint by the upper edge and
slide it forwards or back in the direction of
arrow ;.
Adjusting the multicontour seat
You can adjust the multicontour seat using
COMAND (Y page 266).
Multicontour seat in the rear
You can use the buttons on the center
console to adjust the multicontour seats for
the outer seats in the rear compartment.
XTo select a rear-compartment seat: push
or pull rocker switch : or C forwards or
backwards.
The indicator lamp in the selected button
lights up briefly.
XTo adjust the side bolsters of the seat
backrest: push or pull rocker switch B
forwards or backwards.
XTo adjust the backrest contour: push or
pull rocker switch A forwards or
backwards.
XTo adjust the position of the backrest
contour: push or pull rocker switch ?
forwards or backwards.
XTo activate/deactivate the gentle
massage function: push or pull rocker
switch = forwards or backwards.
XTo activate/deactivate the strong
massage function: push or pull rocker
switch ; forwards or backwards.
Adjusting the active multicontour
seat
You can adjust the active multicontour seat
using COMAND (Y page 268).
iIf PRE-SAFE® has been activated, the air
pressure in the air chambers (the side
bolsters of the seat cushion and backrest)
of the multicontour seat or active
multicontour seat is increased.
Adjusting the lumbar support
You can adjust the lumbar support using
COMAND (Y page 266).
Switching the seat heating on/off
Switching on/off
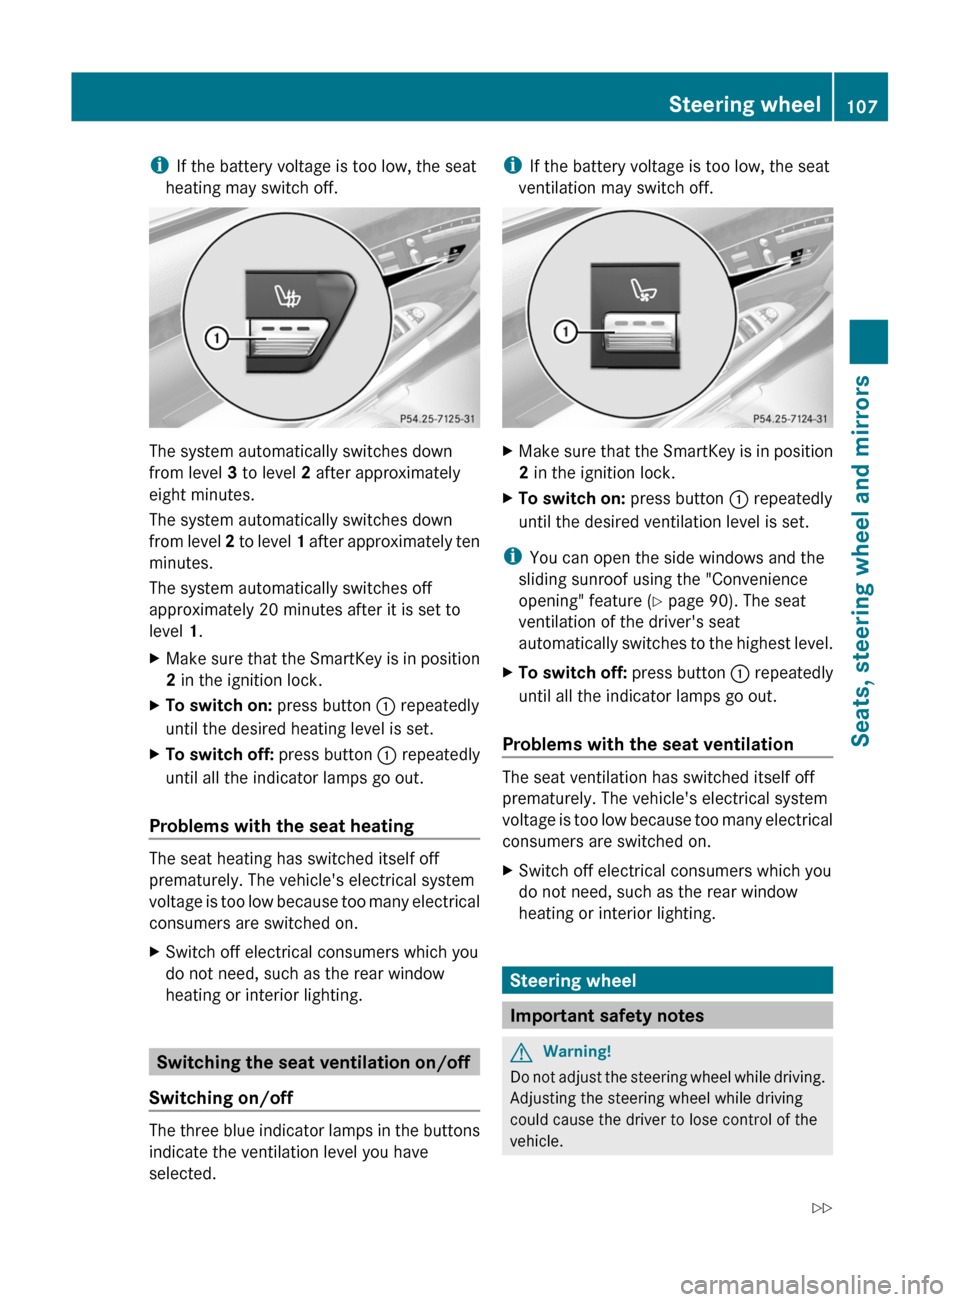
The three red indicator lamps in the button
indicate the heating level you have selected.
106SeatsSeats, steering wheel and mirrors
Page 109 of 524

iIf the battery voltage is too low, the seat
heating may switch off.
The system automatically switches down
from level 3 to level 2 after approximately
eight minutes.
The system automatically switches down
from level 2 to level 1 after approximately ten
minutes.
The system automatically switches off
approximately 20 minutes after it is set to
level 1.
XMake sure that the SmartKey is in position
2 in the ignition lock.
XTo switch on: press button : repeatedly
until the desired heating level is set.
XTo switch off: press button : repeatedly
until all the indicator lamps go out.
Problems with the seat heating
The seat heating has switched itself off
prematurely. The vehicle's electrical system
voltage is too low because too many electrical
consumers are switched on.
XSwitch off electrical consumers which you
do not need, such as the rear window
heating or interior lighting.
Switching the seat ventilation on/off
Switching on/off
The three blue indicator lamps in the buttons
indicate the ventilation level you have
selected.
iIf the battery voltage is too low, the seat
ventilation may switch off.
XMake sure that the SmartKey is in position
2 in the ignition lock.
XTo switch on: press button : repeatedly
until the desired ventilation level is set.
iYou can open the side windows and the
sliding sunroof using the "Convenience
opening" feature (Y page 90). The seat
ventilation of the driver's seat
automatically switches to the highest level.
XTo switch off: press button : repeatedly
until all the indicator lamps go out.
Problems with the seat ventilation
The seat ventilation has switched itself off
prematurely. The vehicle's electrical system
voltage is too low because too many electrical
consumers are switched on.
XSwitch off electrical consumers which you
do not need, such as the rear window
heating or interior lighting.
Steering wheel
Important safety notes
GWarning!
Do not adjust the steering wheel while driving.
Adjusting the steering wheel while driving
could cause the driver to lose control of the
vehicle.
Steering wheel107Seats, steering wheel and mirrorsZ
Page 111 of 524

To stop steering wheel and seat movement,
do one of the following:
R move the seat adjustment switch.
R move the steering column adjustment
switch.
R press one of the memory function position
buttons or memory button M.
Do not leave children unattended in the
vehicle, or with access to an unlocked vehicle.
Children could open the driver's door and
unintentionally activate the EASY-ENTRY/
EXIT feature. This could result in an accident
and/or serious personal injury.GWarning
Let the system complete the adjustment
procedure before setting the vehicle in
motion. All steering wheel adjustment must
be completed before setting the vehicle in
motion. Driving off with the steering wheel
still adjusting could cause the driver to lose
control of the vehicle.
! Do not activate the EASY-ENTRY/EXIT
feature, if the seat backrest is reclined too
far backwards. This can damage the front
or rear seats. You must first move the
backrest to a vertical position.
Position of the steering wheel and the
driver's seat when the EASY-ENTRY/
EXIT feature is active
The steering wheel tilts upwards and the
driver's seat moves backwards when you:
R remove the SmartKey from the ignition lock
R open the driver's door when the SmartKey
is in the ignition lock or KEYLESS-GO is in
position 1
i The steering wheel only moves upwards if
it has not already reached the upper end
stop. The driver's seat only moves
backwards if it is not already in the
rearmost position.
Position of the steering wheel and the
driver's seat for driving
If you insert the SmartKey into the ignition
lock with the driver's door closed, depending
on the setting, the position of the steering
wheel and the driver's seat will be changed to
the previously set position.
The last position of the steering wheel or seat
is stored when:
R the ignition is switched off or
R the setting is stored with the memory
function.
Crash-responsive EASY-EXIT feature
If the crash-responsive EASY-EXIT feature is
triggered in an accident, the steering column
will move upwards when the driver's door is
opened. This occurs irrespective of the
position of the SmartKey in the ignition lock.
This makes it easier to exit the vehicle and
rescue the occupants.
The crash-responsive EASY-EXIT feature is
only operational if the EASY-EXIT/ENTRY
feature is activated in the on-board computer.
Mirrors
Exterior mirrors
Adjusting the exterior mirrors
GWarning
Exercise care when using the passenger-side
exterior rear view mirror. The mirror surface
is convex (outwardly curved surface for a
wider field of view). Objects in mirror are
closer than they appear. Check your interior
rear view mirror and glance over your
shoulder before changing lanes.
The exterior mirrors are automatically heated
if the rear window heating is switched on and
the outside temperature is low.
Mirrors109Seats, steering wheel and mirrorsZ
Page 118 of 524

At a glance
COMAND operating system
Overview
FunctionPage:COMAND display120;COMAND controller and
function buttons116
=Telephone keypad118
Components of COMAND
COMAND consists of:
Rthe COMAND display/SPLITVIEW
Rthe DVD changer
Rthe COMAND controller
Rthe COMAND function buttons
Rthe telephone keypad
Rconnections in the glove box (USB,
additional USB, jack plug and iPod®
connection)
Ra remote control for the front passenger
and for use with the Rear Seat
Entertainment System
Rtwo sets of cordless headphones for the
Rear Seat Entertainment System
Rcordless headphones for the front
passenger
Rtwo screens (Rear Seat Entertainment
System)
RCD/DVD drive (Rear Seat Entertainment
System)
Raudio/video connections on the screen
(Rear Seat Entertainment System)
Raudio/video connections on the drive (Rear
Seat Entertainment System)
You can use COMAND to operate the
following main functions:
Rthe navigation system
Rthe audio functions in radio, SatRadio, disc
(audio CD/DVD and MP3 mode) SD
memory card (MP3 mode), MUSIC
REGISTER mode, Bluetooth® audio mode,
Media Interface mode and audio AUX mode
Rthe telephone and the address book
Rthe video function in video DVD and video
AUX mode
Rthe system settings
You can call up the main functions:
Rusing the corresponding buttons
Rusing the main function bar in the COMAND
display
COMAND controller
You can use the COMAND controller to select
the menu items in the COMAND display.
You can call up menus and lists, scroll through
menus or lists and exit menus and lists.
116At a glanceCOMAND
Page 119 of 524

The COMAND controller can be:
Rpressed briefly or pressed and held W
Rturned clockwise or counter-clockwise
cVd
Rslid left or right XVY
Rslid forwards or back ZVÆ
Rslid diagonally aVb
In the instructions, operating sequences are
described as follows:
XPress the R button.
Audio mode is activated.
XSelect Audio by sliding VÆ and turning
cVd the COMAND controller and press
W to confirm.
The audio menu appears.
Back button
:Back buttonXTo exit the menu: press back button :
briefly.
COMAND changes to the next higher menu
level in the current operating mode.
iYou can also exit a menu by sliding the
COMAND controller XVY or ZVÆ.
XTo switch to the basic display: press and
hold back button :.
COMAND changes to the basic display of
the current operating mode.
Function buttons
The COMAND function buttons allow you to
select a main function directly.
:Function button for roller sunblind;Function button for radio and CD/DVD or
SD card
=Back button?Lumbar support/multicontour seatAFunction button for telephone and
navigation system
BOn/off button for COMANDCVolume controlDProgrammable button (Y page 118)
Example:
XTo select the radio or CD menu
directly: press the R button ; once or
twice.
At a glance117COMANDZ
Page 124 of 524

removed, the settings on the front-passenger
side are saved for approximately 30 minutes
longer. After this period, reactivation on the
front-passenger side means that the settings
from the driver's side will be used.
Cordless headphones for the front
passenger
There are different cordless headphones for
the front passenger and the rear
compartment.
The cordless headphones for the front
passenger can be identified by SPLITVIEW
symbol : on the headband.
The cordless headphones for the front
passenger cannot be used in the rear
compartment. Equally, the headphones for
the rear compartment cannot be used by the
front passenger.
Swiveling the COMAND display and
setting the brightness
! Do not place any objects in front of or
behind the COMAND display and/or do not
secure any objects to the COMAND
display. Movement could otherwise be
prevented when folding the display in/out.
You can swivel the COMAND display7. The
buttons are located beside the COMAND
display.
Swiveling:To swivel the display to the left;To swivel the display to the right
Setting the brightness
:Brightness of the instrument cluster
lighting
;Brightness of the COMAND display
Brighter or dimmer:
XTurn control : or ; clockwise or counter-
clockwise.
iIf Night View Assist Plus is activated, only
the brightness of the multifunction display
is adjusted with control :.
Display design
When the default settings are selected, the
display automatically switches between day
design and night design.
You can change these settings using
COMAND (Y page 141).
7Not with SPLITVIEW.122At a glanceCOMAND
Page 126 of 524

ECOMAND: e.g. to select a station from
presets, select a track, enter directly,
enter a phone number. Rear Seat
Entertainment System: to select a
track, enter directlyFTo leave the menu (back)XPoint the remote control at the
corresponding screen and execute the
functions by pressing the corresponding
button.
i The remote control's function may be
restricted depending on the angle at which
it is pointed at the respective screen.
Selecting the screen for the remote
control
XTurn thumbwheel = until the desired
display is highlighted in the window.
Switching the screen on/off (Rear Seat
Entertainment System only)
If the key is in position 0 or 1 in the ignition
lock (see vehicle Operator's Manual), or the
key is not inserted, the screens in the rear will
switch off after 30 minutes. Before the
screens switch off, they show a message to
this effect.
You can switch the screens back on,
However, this will discharge the starter
battery.
XPoint the remote control at the rear-
compartment screen which has been
selected for remote operation.XPress button : on the remote control.
The respective rear screen switches on or
off.
i You can only switch the screens on using
the remote control if the ignition is
switched on.
Switching button lighting on/offXPress button ; on the remote control.
Depending on the previous status, the
button lighting is switched on or off.
i If you do not use the remote control for
about 15 seconds, the button lighting
switches off automatically.
Mute
XPress button B on the remote control.
The sound is switched on/off.
Adjusting the volume
This function is available for COMAND and for
the Rear Seat Entertainment System in
conjunction with corded headphones.
XPress one of buttons C on the remote
control.
The volume of the currently selected audio
or video source changes.
For COMAND, you can also adjust the
volume for phone calls and navigation
announcements.
Selecting a menu/menu item and
confirming your selection
XSelect a menu/menu item using the
=;9: buttons and press
the 9 button to confirm.124At a glanceCOMAND
Page 131 of 524

You see which character can be entered with
the button. Each time the button is pressed,
the next character is selected.
Example: key p:
Rpress once = M
Rpress twice = N
Rpress three times = O
XWait until the character display goes out.
The entries matching your input are shown
in the list.
XEnter E, W, space, Y using the corresponding
buttons.
iEnter the space using number button 9.
Further functions in the list with
character bar
XTo delete characters: select F by sliding
VÆ and turning cVd the COMAND
controller and press W to confirm.
XTo delete an entry: select F and press
and hold W the COMAND controller until
the entire entry has been deleted.
XTo switch the character set: select
B and press W to confirm.
XTo cancel an entry: select the & symbol
in the bottom left of the character bar and
press W to confirm.
or
XPress the % back button.
The address entry menu appears.
XTo accept the first list entry: press and
hold the COMAND controller W until the
address entry menu appears.
The accepted list entry is shown there.
Calling up the list as a selection list
Select the desired city from the selection list.
If there are several entries for a city or if
several cities of the same name are stored,
then ¬ is highlighted in the character bar.
XPress the W COMAND controller.It is also possible to switch the city list to the
selection list at any time during character
input.
XSlide the COMAND controller W
repeatedly until the city list appears as a
selection list.
or
XSelect ¬ in the character bar by turning
cVd the COMAND controller and press
W to confirm.
Option 2: city list as selection list
COMAND either shows the selection list
automatically or you can call up the selection
list from the list with character bar.
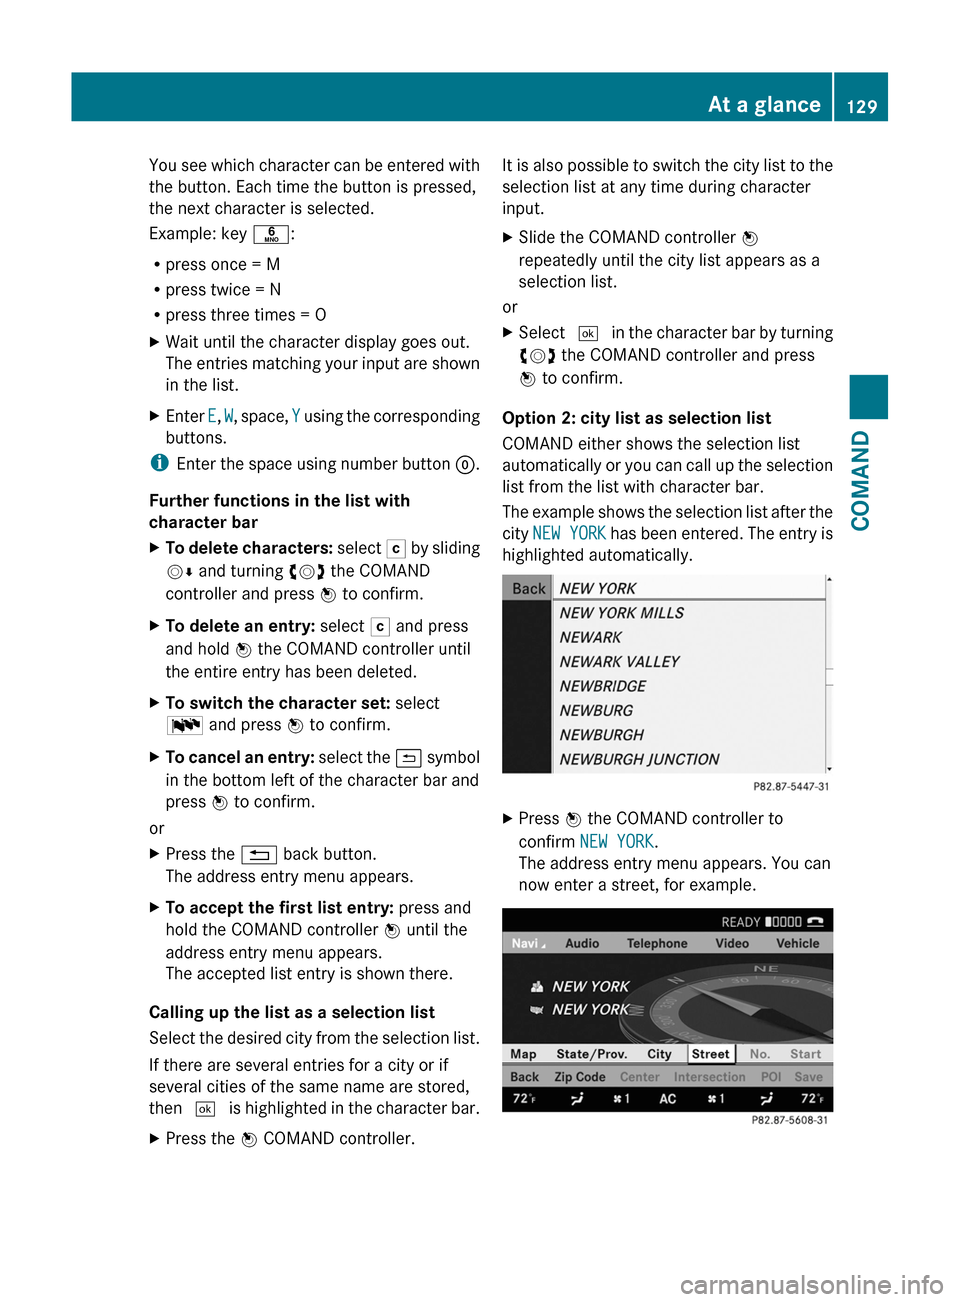
The example shows the selection list after the
city NEW YORK has been entered. The entry is
highlighted automatically.
XPress W the COMAND controller to
confirm NEW YORK.
The address entry menu appears. You can
now enter a street, for example.
At a glance129COMANDZ