Page 193 of 364

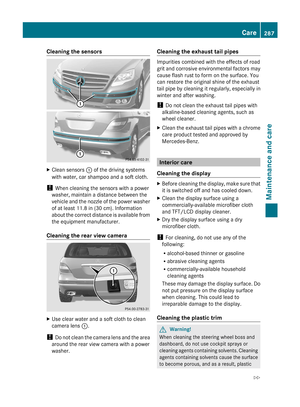
Guide lines ; and = show the approximate
distance from the rear of the vehicle. Yellow
guide line ; indicates a distance of
approximately 3 ft (1 m) and red guide line
= indicates a distance of approximately
10 in (0.25 m). The distance only applies to
objects at ground level. Blue line : depicts
the width required for the vehicle. It is used
to align the vehicle with the edge of the road,
e.g. the curb.
Blind Spot Assist
Important safety guidelines
Blind Spot Assist uses a radar sensor system
to monitor the areas on both sides of your
vehicle. It is active at speeds above
approximately 20 mph (30 km/h). A warning
display in the exterior mirrors draws your
attention to vehicles in the monitored area. If
you then indicate a turn towards that side
before changing lane, you will also receive
visual and audible collision warnings. For this
purpose, Blind Spot Assist uses sensors in the
rear bumper.
GWarning
Blind Spot Assist is only an aid designed to
assist driving. It may fail to detect some
vehicles and is no substitute for attentive
driving.
Blind Spot Assist cannot detect road and
traffic conditions. It may fail to detect narrow
vehicles, such as motorcycles or bicycles, or
may only detect them too late.
Monitoring may be affected by dirty sensors,
strong spray or poor visibility caused by snow,
rain or mist, for example. In this case, vehicles
are detected late or not at all.
Always pay attention to traffic conditions and
your surroundings. Otherwise, you may fail to
recognize dangers in time, cause an accident
and injure yourself and others.
iUSA only:
This device has been approved by the FCC
as a "Vehicular Radar System." The radar
sensor is intended for use in an automotive
radar system only. Removing, tampering
with, or altering the device will void any
warranties, and is not permitted by the
FCC. Do not tamper with, alter, or use in
any non-approved way.
Any unauthorized modification to this
device could void the user’s authority to
operate the equipment.
For Blind Spot Assist to assist you when
driving, the radar sensor system must be
switched on (Y page 208) and operational.
Monitoring range of the sensors
Blind Spot Assist monitors the area up to 10 ft
(3 m) behind your vehicle and directly next to
your vehicle as shown in the diagram.
Driving systems191Driving and parkingBA 251 USA, CA Edition A 2011; 1; 3, en-USd2sboikeVersion: 3.0.3.52010-04-16T14:31:55+02:00 - Seite 191Z
Page 194 of 364

GWarning
Blind Spot Assist monitors certain areas in the
immediate vicinity of your vehicle. Vehicles
that approach and drive past at high speeds
are not detected. There is no display and no
warning.
If the lanes are very wide, it may not be
possible to monitor the complete width of the
neighboring lane. For this reason, vehicles in
the next lane may not be detected, especially
if they are driving in a staggered formation.
This may be the case if vehicles are driving at
that edge of their lane which is furthest away
from your vehicle.
Always pay attention to traffic conditions and
your surroundings. Otherwise, you may fail to
recognize dangers in time, cause an accident
and injure yourself and others.
If the lanes are narrow, the system may be
unable to distinguish the neighboring lane
from the one beyond it. For this reason, the
system may indicate vehicles in the farther
lane, especially if the vehicles are driving in a
staggered formation in different lanes. In
particular, this may be the case if the vehicles
are driving at that edge of their lane which is
nearest your vehicle.
Due to the nature of the system:
R warnings may be issued unnecessarily
when driving close to crash barriers or
similar solid lane borders.
R the warning may be interrupted when
traveling next to long vehicles for extended
periods.
The two sensors for Blind Spot Assist are
integrated into the sides of the rear bumper.
Make sure that the bumper is free of dirt, ice
or slush around the sensors. For example, the
radar sensors must not be covered by bicycle
racks or overhanging loads. In the event of a
severe impact or damage to the bumpers,
have the function of the radar sensors
checked at a qualified specialist workshop,
e.g. an authorized Mercedes-Benz Center.
Blind Spot Assist may otherwise not work
properly.
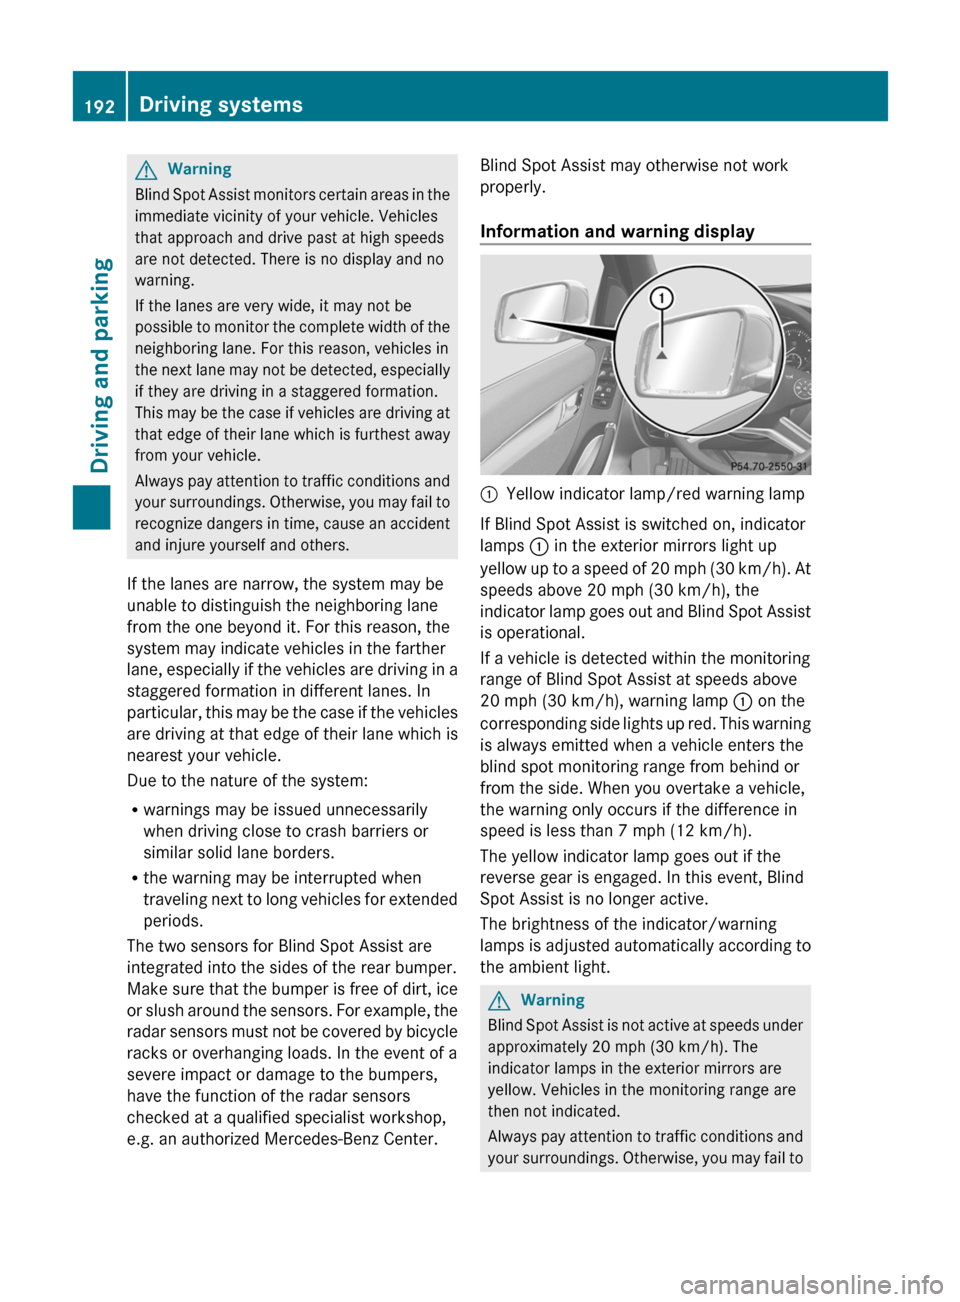
Information and warning display:Yellow indicator lamp/red warning lamp
If Blind Spot Assist is switched on, indicator
lamps : in the exterior mirrors light up
yellow up to a speed of 20 mph (30 km/h). At
speeds above 20 mph (30 km/h), the
indicator lamp goes out and Blind Spot Assist
is operational.
If a vehicle is detected within the monitoring
range of Blind Spot Assist at speeds above
20 mph (30 km/h), warning lamp : on the
corresponding side lights up red. This warning
is always emitted when a vehicle enters the
blind spot monitoring range from behind or
from the side. When you overtake a vehicle,
the warning only occurs if the difference in
speed is less than 7 mph (12 km/h).
The yellow indicator lamp goes out if the
reverse gear is engaged. In this event, Blind
Spot Assist is no longer active.
The brightness of the indicator/warning
lamps is adjusted automatically according to
the ambient light.
GWarning
Blind Spot Assist is not active at speeds under
approximately 20 mph (30 km/h). The
indicator lamps in the exterior mirrors are
yellow. Vehicles in the monitoring range are
then not indicated.
Always pay attention to traffic conditions and
your surroundings. Otherwise, you may fail to
192Driving systemsDriving and parking
BA 251 USA, CA Edition A 2011; 1; 3, en-USd2sboikeVersion: 3.0.3.52010-04-16T14:31:55+02:00 - Seite 192
Page 195 of 364

recognize dangers in time, cause an accident
and injure yourself and others.
Collision warning
If a vehicle is detected in the monitoring range
of Blind Spot Assist and you switch on the turn
signal, a double warning tone sounds. Red
warning lamp : flashes. If the turn signal
remains on, detected vehicles are indicated
by the flashing of red warning lamp :. There
are no further warning tones.
Switching on Blind Spot Assist
XMake sure that the radar sensor system
( Y page 208) and Blind Spot Assist
( Y page 210) are activated in the on-board
computer.XTurn the key to position 2 in the ignition
lock.
Warning lamps : light up red in the
exterior mirrors for approximately 1.5
seconds and then turn yellow.
Towing a trailer
When you attach a trailer, make sure you have
correctly established the electrical
connection. This can be accomplished by
checking the trailer lighting. In this event,
Blind Spot Assist is deactivated. The indicator
lamp lights up yellow in the exterior mirrors
and the message: Blind Spot Assist
Currently Unavailable See
Operator's Manual appears in the
multifunction display.
i The indicator lamps in the exterior mirrors
can be switched off.
To do this, you must deactivate Blind Spot
Assist when:
R the key is in position 2 in the ignition
lock.
R the engine is not running.
R the electrical connection to the trailer
has been established.
Towing a trailer
Notes on towing a trailer
Important safety instructions
GWarning!
Failure to use proper equipment and driving
technique can result in a loss of vehicle
control when towing a trailer.
Improper towing or failure to follow the
instructions in this manual can result in
vehicle damage and/or serious personal
injury. Follow the guidelines below carefully
to assure safe trailer operation.
Contact an authorized Mercedes-Benz Center
should you require an explanation of
information contained in this manual.
General information
R Only install an approved trailer coupling on
your vehicle.
Further information on availability and on
installation is available from any authorized
Mercedes-Benz Center.
R The bumpers of your vehicle are not
suitable for installing detachable trailer
couplings.
R Do not install hired trailer couplings or
other detachable trailer couplings on the
bumpers of your vehicle.
R To reduce the risk of damage to the ball
coupling, remove it from the ball coupling
recess when not in use.
Coupling up a trailer
GWarning!
Vehicles with AIRMATIC: While you are
coupling or decoupling a trailer, make sure
nobody locks or unlocks the vehicle and/or
opens or closes doors or the tailgate.
The vehicle’s level could change and you
could endanger yourself and/or others as a
result.
Towing a trailer193Driving and parkingBA 251 USA, CA Edition A 2011; 1; 3, en-USd2sboikeVersion: 3.0.3.52010-04-16T14:31:55+02:00 - Seite 193Z
Page 196 of 364

Make sure that you do not operate the ADS
switch or the vehicle level control system
when coupling/decoupling the trailer.
Observe the maximum permissible trailer
dimensions (width and length).
Most federal states and all Canadian
provinces require by law:
R safety chains between the towing vehicle
and the trailer. The chains should be cross-
wound under the trailer drawbar. They must
be fastened to the vehicle's trailer
coupling, not to the bumper or the axle.
Allow for enough play in the chains to
facilitate turning tight corners.
R a separate brake system for certain types
of trailer.
R a safety switch for braked trailers. Check
the specific legal requirements applicable
to your federal state.
If the trailer detaches from the towing
vehicle, the safety switch applies the
trailer's brakes.
! Do not connect the trailer's brake system
(if featured) to the hydraulic brake system
of the towing vehicle, as the latter is
equipped with an anti-lock brake system.
Doing so will result in a loss of function of
the brake systems of both the vehicle and
the trailer.
i The vehicle's wiring harness features a
line to the brake indicator lamp.XMake sure that the automatic transmission
is set to position P.XApply the vehicle's parking brake.XStart the engine.XVehicles with the AIRMATIC package:
select highway level and set ADS to
AUTO or COMF .XSwitch off the engine.XClose all doors and the tailgate.XCouple up the trailer.XEstablish all electrical connections.i
Vehicles with the AIRMATIC package:
with a trailer attached, the vehicle will
always remain at highway level. When
coupling up a trailer, please observe the
following:
R if highway level has not been set
manually, the vehicle will automatically
sink to highway level as soon as it
reaches a speed of 5 mph (8 km/h).
R high-speed level is not available.
These restrictions apply to all accessories
powered through a connection to the trailer
power socket of your vehicle, e.g. a bicycle
carrier.
Towing a trailer
There are numerous legal requirements
concerning the towing of a trailer, e.g. speed
restrictions. Make sure that your vehicle/
trailer combination complies with the local
requirements not only in your area of
residence but also at any location to which
you are traveling. The police and local
authorities can provide reliable information.
Please observe the following when towing a
trailer:
R To acquaint yourself with driving with a
trailer and with the resulting changes to
handling, you should practice cornering,
stopping and reversing in a traffic-free
location.
R Before driving, check:
- the trailer coupling
- the safety switch for braked trailers
- the safety chains
- the electrical connections
- the lights
- the wheels
R Adjust the exterior mirrors to provide an
unobstructed view of the rear section of the
trailer.
R If the trailer features electronically
controlled brakes, pull away the vehicle/
194Towing a trailerDriving and parking
BA 251 USA, CA Edition A 2011; 1; 3, en-USd2sboikeVersion: 3.0.3.52010-04-16T14:31:55+02:00 - Seite 194
Page 197 of 364

trailer combination carefully, manually
brake using the brake controller, and check
the brakes for correct function.
R Secure any objects on the trailer to prevent
the cargo from slipping when the vehicle is
in motion.
R If you couple up a trailer, regularly check
the cargo for secure fastening and make
sure that the trailer lamps and (if
applicable) the trailer brakes are
functioning correctly.
R Bear in mind that the handling will be less
stable when towing a trailer than when
driving without one. Avoid sudden steering
movements.
R The vehicle/trailer combination is heavier,
accelerates more slowly, has a decreased
gradient climbing capability and a longer
braking distance.
It is more susceptible to side winds and
requires more careful steering.
R If possible, avoid abrupt braking. Depress
the brake pedal moderately at first, so that
the trailer can activate its own brakes. Then
increase the pressure on the brake pedal.
R If the automatic transmission continues to
shift back and forth between two gears
when driving up or downhill, restrict the
shift range. Select shift range 4, 3, 2, or 1.
A lower gear and lower speed reduce the
risk of engine failure.
R When driving downhill, shift to a lower gear
to utilize the engine's braking effect.
Avoid continuous brake application as this
may overheat the vehicle brakes and, if
installed, the trailer brakes.
R If the coolant temperature increases
dramatically while the air-conditioning
system is switched on, switch off the air-
conditioning system.
Coolant heat can additionally be dissipated
by opening the windows and by setting theblower fan and the interior temperature to
maximum.
R When overtaking, pay particular attention
to the extended length of your vehicle/
trailer combination.
Due to the length of your vehicle/trailer
combination, you will have to travel an
additional distance beyond the vehicle you
are overtaking before returning to the
previous lane.
Decoupling a trailer
GWarning!
Vehicles with AIRMATIC: While you are
coupling or decoupling a trailer, make sure
nobody locks or unlocks the vehicle and/or
opens or closes doors or the tailgate.
The vehicle’s level could change and you
could endanger yourself and/or others as a
result.
Make sure that you do not operate the ADS
switch or the vehicle level control system
when coupling/decoupling the trailer.
XMake sure that the automatic transmission
is set to position P.XApply the vehicle's parking brake.XStart the engine.XClose all doors and the tailgate.XApply the trailer's parking brake.GWarning!
Vehicles with AIRMATIC: As soon as you
disconnect the electrical connection between
the trailer and the vehicle, the vehicle will
lower. To help avoid personal injury, make
sure no one is near the wheel housing or
underneath the vehicle before the electrical
connection is disconnected.
When you decouple the trailer, the vehicle is
temporarily raised because the springs are
relieved of load. Be especially careful during
this process, as you could otherwise injure
yourself and/or others. Make sure that any
Towing a trailer195Driving and parkingBA 251 USA, CA Edition A 2011; 1; 3, en-USd2sboikeVersion: 3.0.3.52010-04-16T14:31:55+02:00 - Seite 195Z
Page 198 of 364

persons remaining in the vehicle do not press
the switches for vehicle level control or the
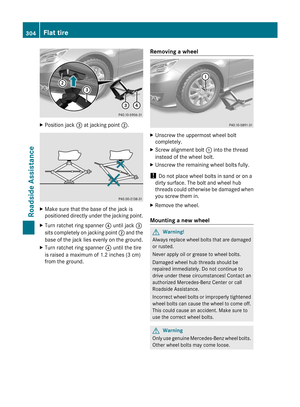
ADS.XDetach the trailer cable and decouple the
trailer.XDetach the trailer cable and decouple the
trailer.XSwitch off the engine.
Permissible trailer load and drawbar
noseweight
Weight specifications
The Gross Trailer Weight (GTW) is the
combined weight of the trailer together with
the cargo and equipment loaded on the
trailer. Permissible gross weight: 3500 lb
(1588 kg).
The permissible Trailer drawbar Weight
Rating (TWR) is the maximum weight
permitted on the trailer drawbar: 350 lb
(158 kg) limit for Mercedes-Benz-approved
trailer couplings.
Loading a trailer
R When loading a trailer, please note that
neither the permissible gross trailer weight
nor the permissible Gross Vehicle Weight
Rating (GVWR) may be exceeded. The
permissible Gross Vehicle Weight Rating
(GVWR) is specified on the type plate
located on the B-pillar on the driver's side
of your vehicle.
You can find the maximum permissible
values on the type plates of your vehicle
and the trailer. Always observe the lowest
respective value when determining the
maximum weight with which you can load
the vehicle and the trailer.
R The drawbar noseweight acting on the ball
coupling has to be added to the rear axle
weight in order to prevent the permissible
Gross Axle Weight Rating (GAWR) from
being exceeded. The permissible Gross
Vehicle Weight Rating (GVWR) is specified
on the type plate located on the B-pillar on
the driver's side of your vehicle.
i Mercedes-Benz recommends loading the
trailer so that the drawbar noseweight
remains between 8% and 10% of the
permissible gross trailer weight.
i The weight of additional accessories,
passengers, and cargo reduces the
permissible trailer load and drawbar
noseweight for your vehicle.
Checking the vehicle and trailer weight
R To check that the weights of the towing
vehicle and the trailer comply with the
maximum permissible values, have the
vehicle/trailer combination (including the
driver, passengers, and cargo with a fully
laden trailer) weighed on a calibrated
weighbridge.
R Check the permissible axle weight of the
front and rear axle, the Gross Trailer Weight
(GTW), and the drawbar noseweight.
Check the permissible axle weight of the
front and rear axle, the Gross Trailer Weight
(GTW), and the drawbar noseweight.
Trailer power supply
The trailer power socket of your vehicle is
designed for connecting the 7-pin connector
supplied as part of the Mercedes-Benz-
approved trailer coupling.
i Depending on your trailer, you may need
an adapter to connect your trailer to the
vehicle.
Further information is available from any
authorized Mercedes-Benz Center.
196Towing a trailerDriving and parking
BA 251 USA, CA Edition A 2011; 1; 3, en-USd2sboikeVersion: 3.0.3.52010-04-16T14:31:55+02:00 - Seite 196
Page 199 of 364
Vehicle equipment ............................198
Important safety guidelines ............198
Displays and operation ....................198
Menus and submenus ......................201
Display messages ............................. 213
Warning and indicator lamps in the
instrument cluster ............................236197On-board computer and displaysBA 251 USA, CA Edition A 2011; 1; 3, en-USd2sboikeVersion: 3.0.3.52010-04-16T14:31:55+02:00 - Seite 197
Page 200 of 364

Vehicle equipment
i This manual describes all the standard
and optional equipment of your vehicle
which was available at the time of
purchase. Country-specific differences are
possible. Bear in mind that your vehicle
may not feature all functions described
here. This also refers to safety-related
systems and functions.
Important safety guidelines
You will find an illustration of the instrument
cluster in the "At a glance" section
( Y page 28).
GWarning
A driver's attention to the road and traffic
conditions must always be his/her primary
focus when driving.
For your safety and the safety of others,
selecting features through the multifunction
steering wheel should only be done by the
driver when traffic and road conditions permit
it to be done safely.
Bear in mind that at a speed of just 30 mph
(approximately 50 km/h ), your vehicle is
covering a distance of 44 feet (approximately
14 m) every second.
GWarning!
No messages will be displayed if either the
instrument cluster or the multifunction
display is inoperative.
As a result, you will not be able to see
information about your driving conditions,
such as
R speed
R outside temperature
R warning/indicator lamps
R malfunction/warning messages
R failure of any systems
Driving characteristics may be impaired.
If you must continue to drive, do so with added
caution. Contact an authorized Mercedes-
Benz Center as soon as possible.GWarning
Malfunction and warning messages are only
indicated for certain systems and are
intentionally not very detailed. The
malfunction and warning messages are
simply a reminder with respect to the
operation of certain systems. They do not
replace the owner's and/or driver's
responsibility to maintain the vehicle's
operating safety. Have all required
maintenance and safety checks performed on
the vehicle. Bring the vehicle to an authorized
Mercedes-Benz Center to address the
malfunction and warning messages.
Displays and operation
Tachometer
The red band in the tachometer indicates the
engine's overrevving range.
! Do not drive in the overrevving range, as
this could damage the engine.
The fuel supply is interrupted to protect the
engine when the red band is reached.
Outside temperature display
The outside temperature display is in the
multifunction display.
GWarning!
The outside temperature indicator is not
designed to serve as an ice-warning device
and is therefore unsuitable for that purpose.
Indicated temperatures just above the
freezing point do not guarantee that the road
surface is free of ice. The road may still be icy,
especially in wooded areas or on bridges.
Changes in the outside temperature are
displayed after a short delay.
198Displays and operationOn-board computer and displays
BA 251 USA, CA Edition A 2011; 1; 3, en-USd2sboikeVersion: 3.0.3.52010-04-16T14:31:55+02:00 - Seite 198