Page 65 of 364

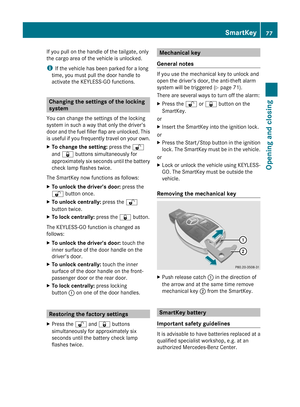
?Securing rings for the third row of seatsXInstall the ISOFIX child restraint system.
Comply with the manufacturer's
instructions when installing the ISOFIX
child restraint system.
Top Tether
TopTether anchorage
GWarning
Observe "Important safety instructions"
( Y page 59).
TopTether facilitates an additional
attachment point between the "LATCH" type
child seat mount (ISOFIX) child restraint
system and the rear bench seat. This can
further reduce the risk of injury.
The TopTether anchorages are:
R in the 2nd row of seats on the rear side of
the backrests of the outer seats and on the
vehicle floor behind the center seat
R in the 3rd row of seats on the rear side of
the rear seat backrests
Outer seats in the 2nd and 3rd row of
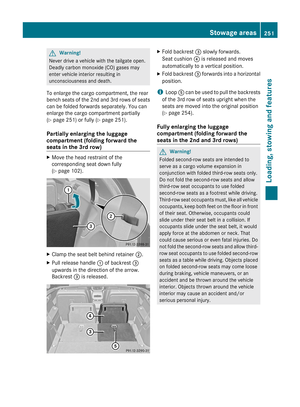
seatsXRemove corresponding protective cap :
from the TopTether anchorage.XSlide the head restraint upwards.XTilt the rear seat backrest forwards
( Y page 250).XRoute Top Tether belt ? under the head
restraint between both head restraint bars.XEngage TopTether hook = of TopTether
belt ? into TopTether anchorage ;.Children in the vehicle63SafetyBA 251 USA, CA Edition A 2011; 1; 3, en-USd2sboikeVersion: 3.0.3.52010-04-16T14:31:55+02:00 - Seite 63Z
Page 66 of 364

Make sure that:
R TopTether hook = is engaged in
TopTether anchorage ;, as illustrated
R TopTether belt ? is not twisted
R TopTether belt ? is routed between the
seat backrest and the cargo
compartment cover if the cargo
compartment cover is installed
R TopTether belt ? is routed between the
rear seat backrest and the cargo net if
the cargo net is installed.GWarning
Do not secure the Top Tether hook to the loop
underneath the Top Tether anchorage if you
are securing a child restraint system in the
third row of seats. The child restraint system
is not secured if you do so. An incorrectly
fitted child restraint system cannot perform
its intended protective function in the event
of an accident, and could lead to injuries.
XSwing back the rear seat backrest until it
engages ( Y page 250).
The outer seats of the 2nd row of seats are
only engaged when the lock verification
indicator is folded in and the warning tab is
barely visible ( Y page 250).GWarning
Make sure that the seats are locked and that
the backrests are locked in a vertical position
after fitting the Top Tether belt.
The outer seats in the second row are only
locked if the lock verification indicator is
folded in and the indicator area is barely
visible.
If the backrests are not locked, they could fold
forwards in the event of an accident, sudden
braking or a sudden change of direction.
Instead of restraining an occupant, they could
cause additional serious or even fatal injury.
XIf necessary, push the head restraint back
down slightly (Y page 102). Make sure thatthe routing of TopTether belt ? is not
impaired.XInstall the "LATCH" child seat mount with
TopTether. Always comply with the
manufacturer's installation instructions.
Make sure that TopTether belt ? sits taut.
Center seat in the 2nd row of seats
GWarning
Only secure a child restraint system on the
center seat in the second row when the belt
buckles of the outer seats are not obstructed
or overlapped by the child restraint system.
Not all child restraint systems, including some
Mercedes-Benz approved child restraint
systems, can be used in this seat position. For
further information contact an authorized
Mercedes-Benz Center.
Do not use the LATCH-type anchors (ISOFIX)
or seat belt buckles for the outer seats in
conjunction with a child seat in the second-
row center seat. Child seats in the center
seating position must only be secured by the
center seat position seat belt inserted into the
seat belt buckle for the second-row center
seat.
GWarning
Please be aware that installation of a child
seat in the second-row center seat position
can prevent the folding forward of the outer
second-row seats which can obstruct access
to and exit from the third-row seats. This
could affect the occupants' on the third-row
seats ability to exit the vehicle. In case of an
accident it will be difficult for occupants of the
third-row seats to leave the vehicle. Serious
injuries could be the result.
Install a child seat in one of the outer seating
positions according to the installation
instructions if access to the third-row seats is
required.
XSlide the head restraint upwards.64Children in the vehicleSafety
BA 251 USA, CA Edition A 2011; 1; 3, en-USd2sboikeVersion: 3.0.3.52010-04-16T14:31:55+02:00 - Seite 64
Page 67 of 364

XPull release loop : in the direction of the
arrow.XFold seat backrest ; forward in the
direction of seat cushion = until TopTether
anchorage ? is accessible.XRoute Top Tether belt B under the head
restraint between both head restraint bars.XEngage TopTether hook A of TopTether
belt B, into TopTether anchorage ?.Make sure
R TopTether hook A, as illustrated, is
engaged in TopTether anchorage ?
R TopTether belt B is not twisted
R TopTether belt B is routed between the
seat backrest and the cargo
compartment cover if the cargo
compartment cover is installed
R TopTether belt B is routed between the
rear seat backrest and the safety net, if
the safety net is installed.XSwing back the rear seat backrest until it
engages audibly ( Y page 250).GWarning
Always lock the rear seat backrests in their
upright position when the rear seats are
occupied by passengers. Lock the rear seat
backrests in their upright position after
installing the TopTether straps or when the
extended cargo compartment is not in use.
Make sure that rear seat backrests are
secured properly by pushing and pulling on
the seat backrests. If the seat backrest is not
locked properly, the seat backrest could fold.
The child restraint system is no longer
supported properly or held in position and can
no longer fulfill its function. That could cause
serious or even fatal injuries.
XIf necessary, push the head restraint back
down slightly (Y page 102). Make sure that
the routing of TopTether belt B is not
impaired.XInstall the "LATCH" child seat mount with
TopTether. Always comply with the
manufacturer's installation instructions.
Make sure that TopTether belt B sits taut.Children in the vehicle65SafetyBA 251 USA, CA Edition A 2011; 1; 3, en-USd2sboikeVersion: 3.0.3.52010-04-16T14:31:55+02:00 - Seite 65Z
Page 68 of 364

Child-proof locks
Child-proof locks for the rear doorsGWarning
Observe "Important safety instructions"
( Y page 59).
GWarning
Children could open a rear door from inside
the vehicle. This could result in serious
injuries or an accident. Therefore, when
children ride in the rear always secure the rear
doors with the child-proof locks.
You secure each door individually with the
child-proof locks on the rear doors. A door
secured with a child-proof lock cannot be
opened from inside the vehicle. When the
vehicle is unlocked, the door can be opened
from the outside.
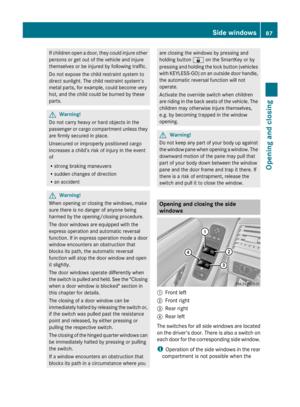
XTo activate: press the child-proof lock
lever down in the direction of arrow ;.XMake sure that the child-proof locks are
working properly.XTo deactivate: press the child-proof lock
lever up in the direction of arrow :.
Override feature for the rear side
windows
GWarning
Observe "Important safety instructions"
( Y page 59).
GWarning
When children ride on the vehicle's rear seats,
activate the override switch. Otherwise, the
children could be injured, e.g. by trapping
themselves in the rear side window.
XTo activate/deactivate: press switch :.
Switch : engages or extends. If the switch
is pushed in, it is only possible to operate
the side windows in the rear using the
switches on the driver's door.
Panic alarm
X To activate: press and hold !
button : for about one second.
An alarm sounds and the exterior lighting
flashes.XTo deactivate: press ! button :
again.
or
XInsert the SmartKey into the ignition lock.66Panic alarmSafety
BA 251 USA, CA Edition A 2011; 1; 3, en-USd2sboikeVersion: 3.0.3.52010-04-16T14:31:55+02:00 - Seite 66
Page 69 of 364

orXPress the KEYLESS-GO Start-Stop button.
The KEYLESS-GO key must be in the
vehicle.
i USA only:
This device complies with the part 15 of the
FCC regulations. Operation is subject to
the following two conditions:
1. This device may not cause interference,
and
2. This device must withstand any
interference received, including
interference that may cause undesired
operation.
Any unauthorized modification to this
device could void the user's authority to
operate the equipment.
i Canada only:
This device complies with the RSS-210
regulations of Industry Canada. Operation
is subject to the following two conditions:
1. This device may not cause interference,
and
2. This device must withstand any
interference received, including
interference that may cause undesired
operation of the device.
Any unauthorized modification to this
device could void the user's authority to
operate the equipment.
Driving safety systems
Overview of driving safety systems
In this section, you will find information about
the following driving safety systems:
R ABS ( Anti-lock Braking System)
R BAS ( Brake Assist System)
R ESP ®
(E lectronic Stability Program)
R EBD ( Electronic Brake-power Distribution)
Important safety guidelinesGWarning
The following factors increase the risk of
accidents:
R Excessive speed, especially in turns
R Wet and slippery road surfaces
R Following another vehicle too closely
The driving safety systems described in this
section cannot reduce these risks or prevent
the natural laws of physics from acting on the
vehicle. They cannot increase braking or
steering efficiency beyond that afforded by
the condition of the vehicle brakes and tires
or the traction afforded.
Only a safe, attentive, and skillful driver can
prevent accidents.
The capabilities of a vehicle equipped with the
driving safety systems described in this
section must never be exploited in a reckless
or dangerous manner which could jeopardize
the user's safety or the safety of others.
Always adjust your driving style to the
prevailing road and weather conditions and
keep a safe distance to other road users and
objects on the street.
If a driving system malfunctions, other driving
safety systems may also switch off. Observe
indicator and warning lamps that may come
on as well as messages in the multifunction
display that may appear.
i In wintry driving conditions, always use
winter tires (M+S tires) and if necessary,
snow chains. Only in this way will the
driving safety systems described in this
section work as effectively as possible.
ABS (Anti-lock Braking System)
Important safety information
GWarning
Observe "Important safety instructions"
( Y page 67).
Driving safety systems67SafetyBA 251 USA, CA Edition A 2011; 1; 3, en-USd2sboikeVersion: 3.0.3.52010-04-16T14:31:55+02:00 - Seite 67Z
Page 70 of 364

GWarning!
Do not pump the brake pedal. Use firm, steady
brake pedal pressure instead. Pumping the
brake pedal reduces the braking effect.
ABS regulates brake pressure in such a way
that the wheels do not lock when you brake.
This allows you to continue steering the
vehicle when braking.
ABS works from a speed of about
5 mph (8 km/h) upwards, regardless of road-
surface conditions. ABS works on slippery
surfaces, even when you only brake gently.
The ! warning lamp in the instrument
cluster lights up when the ignition is switched
on. It goes out when the engine is running.
Braking
If ABS intervenes when braking, you will feel
a pulsing in the brake pedal.
XIf ABS intervenes: continue to depress the
brake pedal with force until the braking
situation is over.XTo make a full brake application:
depress the brake pedal with full force.GWarning
If the ABS malfunctions, other driving systems
such as the BAS or the ESP ®
are also switched
off. Observe indicator and warning lamps that
may come on as well as messages in the
multifunction display that may appear.
If the ABS malfunctions, the wheels may lock
during hard braking, reducing the steering
capability and extending the braking distance.
The pulsating brake pedal can be an
indication of hazardous road conditions and
functions as a reminder to take extra care
while driving.
BAS (Brake Assist)GWarning
Observe "Important safety instructions"
( Y page 67).
BAS operates in emergency braking
situations. If you depress the brake pedal
quickly, BAS automatically boosts the braking
force, thus shortening the stopping distance.
XKeep the brake pedal firmly depressed until
the emergency braking situation is over.
ABS prevents the wheels from locking.
The brakes will function as usual once you
release the brake pedal. BAS is deactivated.
GWarning
If the BAS malfunctions, the brake system still
functions, but without the additional brake
boost available that the BAS would normally
provide in an emergency braking maneuver.
Therefore, the braking distance may increase.
ESP ®
(Electronic Stability Program)
Important safety guidelines
GWarning
Observe "Important safety instructions"
( Y page 67).
If ESP ®
detects that the vehicle is deviating
from the direction desired by the driver, one
or more wheels are braked to stabilize the
vehicle. If necessary, the engine output is also
modified to keep the vehicle on the desired
course within physical limits. ESP ®
assists
the driver when pulling away on wet or
slippery roads. ESP ®
can also stabilize the
vehicle during braking.
If ESP ®
intervenes, the d warning lamp
flashes in the instrument cluster.
68Driving safety systemsSafety
BA 251 USA, CA Edition A 2011; 1; 3, en-USd2sboikeVersion: 3.0.3.52010-04-16T14:31:55+02:00 - Seite 68
Page 71 of 364

GWarning
Never switch off the ESP®
when you see the
d warning lamp flashing in the instrument
cluster. In this case proceed as follows:
R When driving off, apply as little throttle as
possible.
R While driving, ease up on the accelerator
pedal.
R Adapt your speed and driving style to the
prevailing road conditions.
Failure to observe these guidelines could
cause the vehicle to skid. The ESP ®
cannot
prevent accidents resulting from excessive
speed.
! Only operate the vehicle for a maximum
of ten seconds on a brake test
dynamometer. Switch off the ignition.
Application of the brakes by ESP ®
may
otherwise destroy the brake system.
! Function or performance tests may only
be performed on a 2-axle dynamometer. If
you wish to operate the vehicle on such a
dynamometer, please consult an
authorized Mercedes-Benz Center
beforehand. You could otherwise damage
the drive train or the brake system.
i Only use wheels with the recommended
tire sizes. Only then will ESP ®
function
properly.
4ETS (Electronic Traction System)
GWarning
Observe "Important safety instructions"
( Y page 67).
Traction control is part of ESP ®
.
Traction control brakes the drive wheels
individually if they spin. This enables you to
pull away and accelerate on slippery surfaces,
for example if the road surface is slippery on
one side. In addition, more drive torque is
transferred to the wheel or wheels with
traction.
Traction control remains active, even if you
deactivate ESP ®
.
Deactivating/activating ESP ®GWarning
The ESP
®
should not be switched off during
normal driving other than in the
circumstances described below. Disabling
the system will reduce vehicle stability in
driving maneuvers.
Do not switch off the ESP ®
when a spare
wheel is mounted.
ESP ®
is activated automatically when the
engine is running.
It may be best to deactivate ESP ®
in the
following situations:
R when using snow chains
R in deep snow
R on sand or gravel
GWarning!
Activate ESP ®
as soon as the situations
described above no longer apply. ESP ®
will
otherwise not be able to stabilize the vehicle
if the vehicle starts to skid or a wheel starts
to spin.
When you deactivate ESP ®
:
R ESP ®
no longer improves driving stability.
R the engine's torque is no longer limited and
the drive wheels can spin. The spinning of
the wheels results in a cutting action, which
provides better grip.
R traction control is still activated.
R ESP ®
still provides support when you
brake.
If ESP ®
is deactivated and one or more wheels
start to spin, the d warning lamp in the
instrument cluster flashes. In such situations,
ESP ®
will not stabilize the vehicle.
Driving safety systems69SafetyBA 251 USA, CA Edition A 2011; 1; 3, en-USd2sboikeVersion: 3.0.3.52010-04-16T14:31:55+02:00 - Seite 69Z
Page 72 of 364

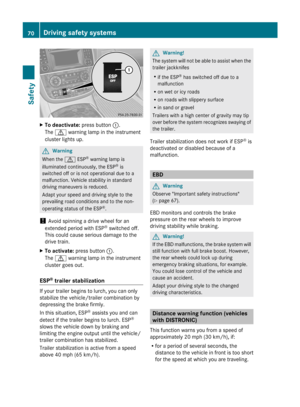
XTo deactivate: press button :.
The d warning lamp in the instrument
cluster lights up.GWarning
When the d ESP®
warning lamp is
illuminated continuously, the ESP ®
is
switched off or is not operational due to a
malfunction. Vehicle stability in standard
driving maneuvers is reduced.
Adapt your speed and driving style to the
prevailing road conditions and to the non-
operating status of the ESP ®
.
! Avoid spinning a drive wheel for an
extended period with ESP ®
switched off.
This could cause serious damage to the
drive train.
XTo activate: press button :.
The d warning lamp in the instrument
cluster goes out.
ESP ®
trailer stabilization
If your trailer begins to lurch, you can only
stabilize the vehicle/trailer combination by
depressing the brake firmly.
In this situation, ESP ®
assists you and can
detect if the trailer begins to lurch. ESP ®
slows the vehicle down by braking and
limiting the engine output until the vehicle/
trailer combination has stabilized.
Trailer stabilization is active from a speed
above 40 mph (65 km/h).
GWarning!
The system will not be able to assist when the
trailer jackknifes
R if the ESP ®
has switched off due to a
malfunction
R on wet or icy roads
R on roads with slippery surface
R in sand or gravel
Trailers with a high center of gravity may tip
over before the system recognizes swaying of
the trailer.
Trailer stabilization does not work if ESP ®
is
deactivated or disabled because of a
malfunction.
EBD
GWarning
Observe "Important safety instructions"
( Y page 67).
EBD monitors and controls the brake
pressure on the rear wheels to improve
driving stability while braking.
GWarning!
If the EBD malfunctions, the brake system will
still function with full brake boost. However,
the rear wheels could lock up during
emergency braking situations, for example.
You could lose control of the vehicle and
cause an accident.
Adapt your driving style to the changed
driving characteristics.
Distance warning function (vehicles
with DISTRONIC)
This function warns you from a speed of
approximately 20 mph (30 km/h), if:
R for a period of several seconds, the
distance to the vehicle in front is too short
for the speed at which you are traveling.
70Driving safety systemsSafety
BA 251 USA, CA Edition A 2011; 1; 3, en-USd2sboikeVersion: 3.0.3.52010-04-16T14:31:55+02:00 - Seite 70