Page 161 of 214

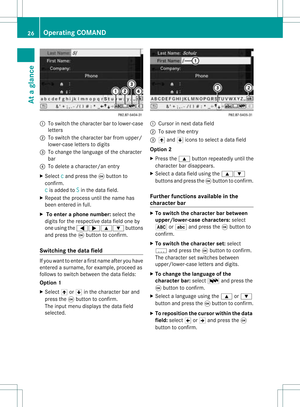
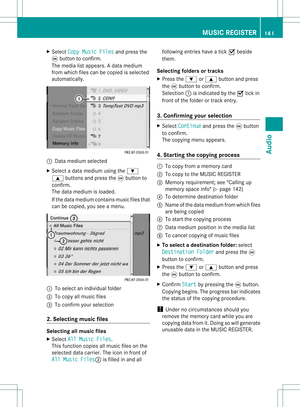
Aud
io/vid eosocke t
: Videopor t(V)
; Audio port(L)
= Audio port(R)
i Tofacilitate correctplayback, itmay be
necessary toset asuitab levideo standard
in the external videosource.
X Connect theexternal deviceto
corresponding port:,;or=.
COMAND activatesthedevice. Switchi
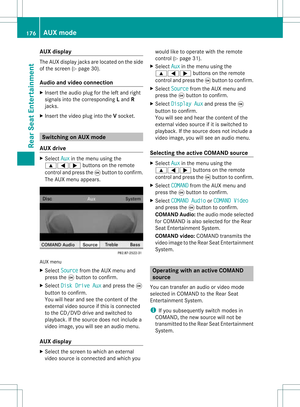
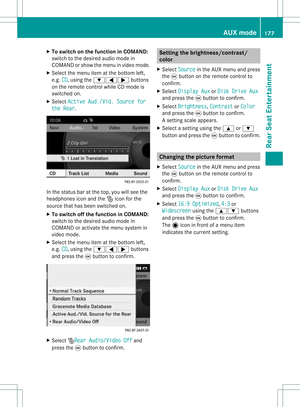
ngon video AUXmode
X Select Video in
the main function barusing
the 9=; buttonsandpress the
9 button toconfirm.
If video AUXmode wasthelast mode
selected, itwill now beactive.
If another videosource isswitched on,you
can now switch tovideo AUXmode inthe
video menu.
X Select Video and
press the9button to
confirm.
X Select Aux and
press the9button to
confirm.
The video AUXmenu appears.You willhear
and seetheconten tof the external video
source ifthis isconnect edand switched to
play back. Video
AUXmode
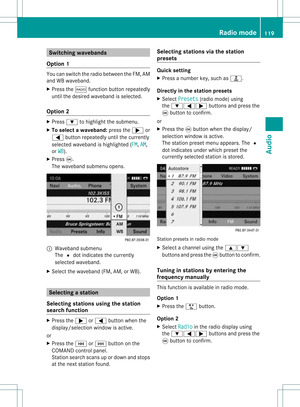
For detail son how tooperate theexternal
video source, seetherespective device's
operating instructions.
Ext ernal video sources mayhave different
aud iooutput volume. Youcanselect two
different inputvolume levelsforthe AUX
connect ion:
R Standard Ext
ernal sources withamediu mtohigh
audio output volume.
R Boost Ex
tern alsources withalow audio output
volume. X
Setting thedesired inputvolume:
Select Volume using
the
9:=; buttonsand press
the 9button toconf irm.
X Select Standard or
Boost and
press the
9 button toconf irm. Video
AUXoperat ion
159Video Z
Page 162 of 214
Showing/
hidingthemenu
X To show: pressthe9button.
X To hide: press the9 button, select
Full Screen and
press the9button to
conf irm. Volume
andsound settings
You willfind details onvolume (Ypage 27)
and sound (Ypage 28)settin gsinthe "Ata
glance" section. G
Warning!
Ext ernal video sources mayhave different
volumes, whichcanmean thatsystem
messages suchastraffic announcem entsand
navigation systemannouncem entsaremuch
louder. Ifnecessary, pleasedeactivate the
system messages oradjust theirvolume
manually .
i Itmay bethe case thatadevice whichis
conn ected asan extern alvideo source
seems quieter orlouder inthe vehicle, or
that theusua lmaximum volumecannotbe
reached. Thevolume ofsome devices can
be set separately. Inthis case, startata
medium volumeandthen raise itslowly .
This enables youtohear ifthe system can
play themusic without distortion evenat
high volumes. 160
Video
AUXoperat ionVideo
Page 163 of 214
Vehi
cle equi pmen t<0023002300230023002300230023002300230023002300230023002300230023
002300230023002300230023002300230023002300230023> 162
General information<0023002300230023002300230023002300230023002300230023002300230023
002300230023002300230023002300230023> 162
Basic functions <0023002300230023002300230023002300230023002300230023002300230023
0023002300230023002300230023002300230023002300230023002300230023
0023> 163
System settings <0023002300230023002300230023002300230023002300230023002300230023
0023002300230023002300230023002300230023002300230023002300230023> 165
CD/DVD audioand MP3 mode ........ 166
Video DVDmode <0023002300230023002300230023002300230023002300230023002300230023
002300230023002300230023002300230023002300230023002300230023> 171
AUX mode <0023002300230023002300230023002300230023002300230023002300230023
0023002300230023002300230023002300230023002300230023002300230023
0023002300230023002300230023002300230023> 175 161Rear
SeatEntert ainment
Page 164 of 214

Vehi
cle equi pmen t
i TheseOpe rating Instru ctionsdescri beall
sta nda rdand optio nal equipme ntava ilab le
for your veh icleat the time ofpurcha se.
Pl ea se note thatyour vehicle maynotbe
equipped withallfeatures described. General
information Changing
thebatt eries
Notes Both
theremote controland thetwo sets of
wireless headphones requirebatteries. G
War
ning!
Keep thebatteries outofthe reach of
children. Consultadoctor immediately ifa
child should swallow abattery.
Do not dismantle, short-circuit orburn a
battery. H
Environmental
note
Dispose ofdischarged batteriesinan
environ mentallyresponsible manner. In
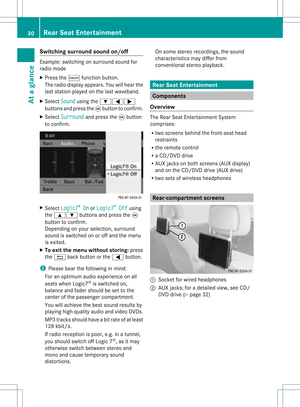
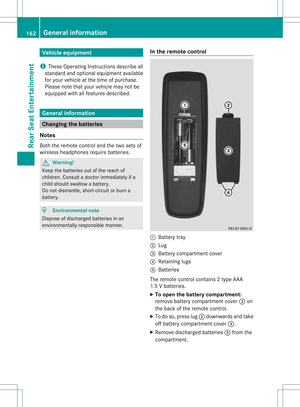
the remot econtrol :
Batt erytray
; Lug
= Batt erycompartm entcover
? Retaining lugs
A Batt eries
The remote controlcont ains 2type AAA
1.5 Vbatteries.
X To open thebatt erycompar tment:
remove batterycompartm entcover =on
the back ofthe remote control.
X To do so, press lug;downwards andtake
off battery compartm entcover =.
X Remove discharged batteriesAfrom the
compartm ent. 162
General
informationRearSeatEntert ainment
Page 165 of 214

X
Insert newbatteries. Observethepola rity
marking onthe batteries andinthe battery
compartment whendoing so.
Left-hand battery:thepositive pole(+)
must faceupwards.
Rig ht-hand battery: thepositive pole(+)
must facedownwa rds.
X To clo sethe battery compartment: first
pla cebattery compartment cover=into
the battery compartment withretaining
lug s? and allow lug ;toclip into place.
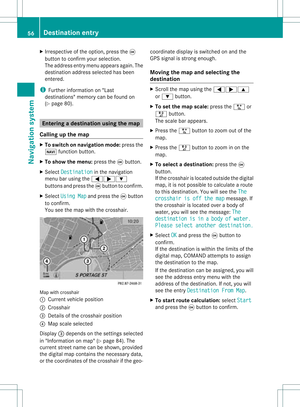
In the wirel essheadphones The
battery compartment coverislocated on
the left head phone. :
Battery compartment cover
The wirel esshead phones contain 2type AAA
1. 5V bat terie s.
X To ope nth ebat tery com partme nt:fo ld
th ebat tery compar tmentco ver :
upwar ds.Whe ndoing so,hold theleft
headphone asshown toprevent the
insert edbatteries fromfalling out.
X Remove thedischarged batteriesfromthe
compart ment.
X Insert newbatteries. Observethepolarity
marking onthe batteries andinthe battery
compart mentwhen doing so.
Left- hand battery: thepositive pole(+)
must faceupwards. Right-hand
battery:thepositive pole(+)
must facedownwards.
X To close thebatt erycompar tment:
press thebattery compartm entlid
downwards untilitclips intoplace.
If the batteries havebeen insert ed
correc tly,the indicator lampwilllight up
green whentheheadphones areswitched
on. Basic
functions Using
headphones
You canusethewireless headphones
supplied and/oruptotwo sets ofwired
headphones connected tothe correspon ding
jack ofthe rear-com partmentscreen s
(Y page 30).
Infor mation on:
R switching thewireless headphones on/off
R adjusting thevolume ofthe headphones
R selecting ascreen forthe headphones
can befound inthe "Wireless headphones"
section (Ypage 33). Using
themain loudspeaker s
You canusethevehicle loudspeakers to
listen toadisc insert edinthe rear-
compart mentdrive. Todo so, atleast oneof
the rear-com partmentscree nsmus tbeset to
disc mode.
X Sett ingusing COMAND: press,for
example, the$ function button to
switch onanaudio mode.
X Select Audio using
the9 button and
press the9button tocon firm.
The audio menu (Ypage 21)appears.
X Select Rear using
the9: buttons
and press the9button tocon firm.
i The headphones' volumesettingdoes not
affect themain loudspeakers. Ba
sic functions
163RearSeatEntert ainment Z
Page 166 of 214

Adj
usting thesoun dsettings
You canselec tthe sound settingsinthe audi o
CD/DV D/MP3, TV,video DVDandAUX
modes.
X Switch onanoperating mode(e.g.CD
mode).
X Select Treble or
Bass using
the :=; buttonsonthe remote
cont roland press the9button toconfirm .
As etting scale appears.
X Select asett ingusing the9:
button sand press the9button tocon firm. Several
users
Simult aneous useofthe rear -
compa rtment drive i
The two rear-c ompartm entscreen scan
be operated almostentirely independen tly
from oneanoth er.However, therecan bea
con flict insome menus ifthe two screen s
are used atthe same time.
If the rear-c ompartm entdrive isbeing used
for both screen ssimultaneously, selecting
cert ainmenus orsett ings onone ofthe
screen salso affect sthe other screen .
The following functionsaffect bothscreen s:
R changin gplayback options
R select ingatrac k(from thetrac klist ora
folder)
R using play,pause andstop
R fast forward/r ewindorscrollin g
R calling upthe DVD menu andnavigatin g
within it
R sett ingthe language, subtitlesandcamera
angle
R calling upinteract iveDVD content The
following functionsaffect onlyone
screen :
R audio andvideo functionsas well aspicture
sett ings
R switch ingbetween fullscreen andthe
screen showing themenu
Switching betweenoperatingmodes The
curren tsett ings aresaved whenyouexit
an operatin gmode (e.g.audio CDmode). If
you callupthis operatin gmode againlater,
ther eare two possibilities:
R the operatin gmode hasbeen adjusted on
the other screen .
R the operatin gmode hasnotbeen adjusted.
In the first case, theoperatin gmode appears
as shown onthe other screen .
In the secon dcase, thesett ingappears onthe
screen asitwas when youlast exitedthe
operatin gmode. Pictur
esettings
Overview You
canselect thesesettings invideo DVD
and AUX mode. Instruct ions forAUX mode
(Y page 32).
Adju sting thebright ness,contra stand
color X
Switc hon video DVDmode.
X To show themenu: pressthe9button
on the remot econ trol.
or
X Select Menu while
thenavigation menu
(Y page 154)is shown andpress the9
button tocon firm.
X Select DVD-Vid eo using
the :=; buttonsand press the
9 button tocon firm. 164
Ba
sic functionsRear SeatEntert ainment
Page 167 of 214

X
Sel ect Bright ness ,
Con trast or
Col or and
pressthe 9button toconfi rm.
As etting scale appears.
X Select thesett ingand press the9button
to con firm.
Changing thepictu reform at X
To show themenu: pressthe9button
on the remot econ trol.
or
X Select Menu while
thenavigation menu
(Y page 154)is shown andpress the9
button tocon firm.
X Select DVD-Vid eo using
the :=; buttonsand press the
9 button tocon firm.
The äicon infron tof the 16:9 Optimiz
ed ,
4:3 or
Widescr een menu
item
indicat esthe curren tlyselect edformat .
X Select theformat andpress the9button
to con firm. System
settings Notes
You cansetallsystem settings individually for
each screen without affectingthe other
screen .You make these settings using the
remote control(Ypage 31). Selecting
thedisplay language
X Select System using
the9=;
button son the remote controland press
the 9button toconf irm.
The system menuwillappear onthe
selected rear-compartmentscreen . System
menu
X Select Settings using
the: button
and press the9button toconf irm.
X Select Language using
the9:
button sand press the9button toconf irm.
The listoflanguages appears.The#dot
indicates thecurrent setting.
X Select alanguage usingthe9:
button sand press the9button toconf irm.
The Rear SeatEntert ainment System
activates theselected language. Toggling
thedisplay design
X Select Settings in
the system menuusing
the : button andpress the9button
to conf irm.
X Select DayMode ,
Night Mode or
Automatic using
the9: buttons
and press the9button toconf irm.
The äicon indicates thecurrent setting. System
settings
165RearSeatEntert ainment Z
Page 168 of 214

Design Exp
lanation Day
Mode The
displayisset
per man ently to day
des ign. Nig
htMode The
displayisset
per man ently to
ni ght design. Aut
omatic The
displaydes ign
ch ang esdepe nding
on theveh icle
in st rum entclu ster
illum inati on. Set
ting thebr igh tness
X Se lec tSet tings in
thesyst emmen uusin g
th e: buttona nd pre ssthe 9button
to confi rm.
X Sel ect Brightness us
ing the 9:
bu ttons andpressthe 9button toconfi rm.
As caleap pea rs.
X Adju stthe brightne ssusing the 9:
bu ttons andpressthe 9button toconfi rm.
The brightne ssbarm oves upordown. The
image dimsorbrightens according tothe
bar position onthe scale. Hiding/showing
thepictur e
X To hide thepictur e:select Display Off in
the system menuusingthe:;
button sand press the9button toconf irm.
The picture ishidden.
X To display thepictur e:press the9
button . CD/D
VDaudio andMP3 mode Import
antsafety notes G
War
ning!
The CD/D VDdrive isaclass 1laser product.
You must noto pen thecasing. Thereisarisk
of exposure toinvisible laserradiation ifyou
open thecasing orifthe casing isfaulty or
damaged.
The Rear SeatEntert ainmen tSystem contains
no parts which youcan repair yourself. For
safety reasons ,all maint enanc ework must be
carried outbyqualified aftersales
tec hnic ians. G
War
ning
The driver should notwear aRear Seat
En tert ainmen theadset whileoperatin gthe
vehicle underanycircumstan ces.Theuseof
a headset whiledriving thevehicle could
drastic allyimpair theability toreact toaudible
traff iccon ditions (e.g.emergen cysirens from
police/fir e/ambulance, anothercar’s horn,
etc .). G
War
ning
When notinuse, headsets orext ernal video
sources shouldbestor edinas afe locatio n
(e. g.on eof theveh icle’sstorag e
com partmen ts)so that they are notloose
within thepassenger compartmentduring
braking, vehiclemaneuvers oratraffic
accident .Object smoving withinthe
passenger compartmentcould cause serious
personal injurytovehicle occupant s. G
War
ning
Due toapotent ialchokin ghazar d,wired
heads etusage bychildre nshould onlyoccur
with adultsuper vision . 166
CD/DVD
audio and MP3 modeRearSe at Ent ertai nme nt