Page 113 of 214

Input
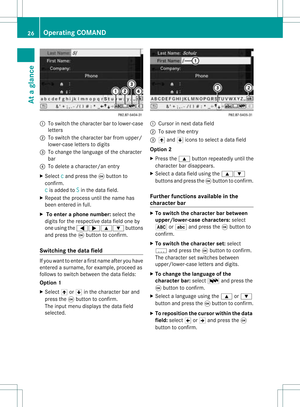
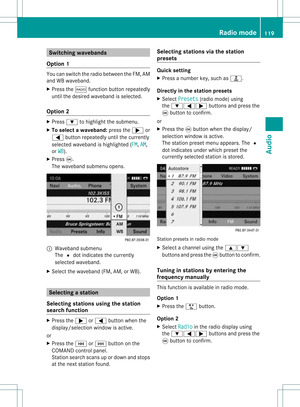
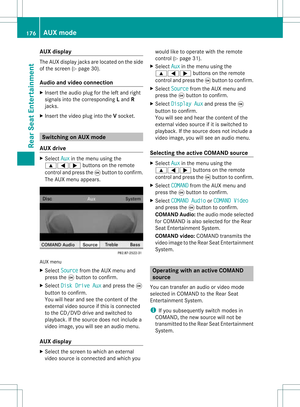
menu withdata fields
: Selected datafieldwithcursor
; Cha racter bar
i IfCOMAND isnot equi pped withahard
disk, youcan only editdata fieldswith
telepho nenumbers.
X Ent ercharacters andsave theentry.
Proceed asdescribe dunder "Entering
characters" inthe "Entering characters in
the addre ssand phone books" section
(Y page 23). De
leting anaddr essbookentry
X Opt ion 1:select Delete in
the address
book using the:=; buttons
and press the9button tocon firm.
X Opt ion2:search foranaddress bookentry
(Y page 110).
X Select Options using
the; button and
press the9button tocon firm.
X Select Delete and
press the9button to
con firm.
Irrespec tiveofthe option used,aprompt
will appear.
X Select Yes or
No and
press the9button
to con firm.
If you select Yes ,
the entrywill bedeleted.
If you select No ,
the process willbe
canc eled. i
Delet ingamobile phonebookentryonly
deletes theentryinthe address book,not
on the mobile phone. Displaying
detailsabout anadd ress
book entry
Selecting anentry X
Search foranaddress bookentryand
select itin the listusing the9:
button s(Y page 110).
or
X Select anaddress bookentryby browsing
(Y page 110).
X In both cases, pressthe9button .
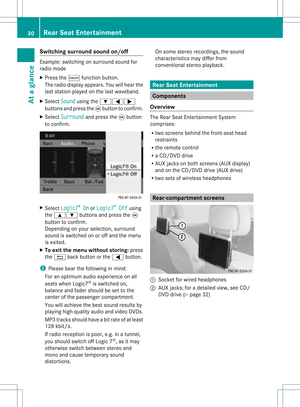
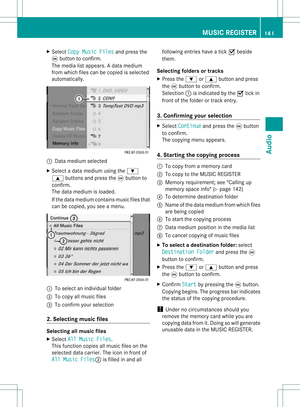
The detailed viewappears. Det
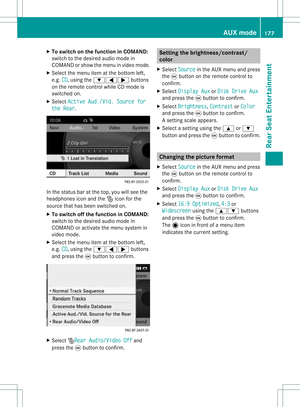
ailed display forhome details
: Togo back tothe previous menu
; Select eddata field
= Icon @forhome details
? Tocall upoption s
A Icon \forbusiness details
X Select adata fieldusing the9:
button sand press the9button tocon firm.
X To close thedeta iledview: select Back and
press the9button tocon firm. Using
theadd ress book
111Telephone Z
Page 114 of 214

Showing
thedetails ofan add ress book
entry X
Select Options using
the; button and
press the9button toconf irm.
X Select Details and
press the9button to
conf irm.
The display isshown infull.
X To close thedetailed view:pressthe
=, ;, %or9 button. Changing
anadd ress book entry
Changing anentry X
Option 1:search foranaddress bookentry
and select itfrom thelistusing the
9: buttons(Ypage 110).
X Select Options using
the; button and
press the9button toconf irm.
X Select Change and
press the9button to
conf irm.
X Option 2:call upthe detailed viewforan
address bookentry(Y page 111).
X Select Options using
the; button and
press the9button toconf irm.
X Select Change Entry and
press the9
button toconf irm.
Irrespect iveofthe option, theinput menu
cont aining datafields appears.
X Proceed asdescribed under"Entering
characters" inthe "Ent ering characters in
the address andphone books" section
(Y page 23).
Changing thecategory ofatelephone
number datafield X
Display thedetailed viewforanaddress
book entry(Y page 111)andhighlight the
telephone numberdatafield.
X Select Options using
the; button and
press the9button toconf irm. X
Select Change Category and
press the
9 button toconf irm.
X Select anumber category, e.g.Home .
X Select atelephone category,e.g.Mobile Phone .
X Select Preferred if
desired andpress the
9 button toconf irm.
Depending onthe previous state,switch
the option onO oroff ª.T hephone
number isdispla yedasthe first number in
the phone bookandcanbediale d
immediately.
X Select Save and
press the9button to
confirm .
The new category isstored. Calling
anumber storedinan entry
Co nditio ns The
mobi lephone mustbeconnected viathe
Blue tooth ®
interface .
Option 1 X
Displ aythe detai ledview foranadd ress
book entry (Ypag e111).
X Select thetelep hone numbe rdata field
usin gth e9: buttons and pres sth e
9 buttonto confirm .
The callismade. Thedispl ayswit ches to
te lepho nemod e.
Opt ion 2 X
Dis play thedet ailed viewforanaddre ss
book entry.
X Sel ect thete lepho nenum berdatafiel d
usin gth e9: buttons .
X Sel ect Opt ions usin
gth e; buttona nd
pre ssthe 9button toconfi rm.
X Sel ect Call and
pressthe 9button to
confi rm.
The callis ma de. 11
2 Us
ingthe addres sbo okTel epho ne
Page 115 of 214

Opt
ion 3 X
Select anaddress bookentryinthe list
using the9: buttons.
X Press the6 button .
The callismade. Sta
rting rout eguidance toan entry
Opt ion 1 X
Search foranaddress bookentry
(Y page 110)with the ¤icon andselec tit
from thelist.
X Displ aythe detai ledview foranadd ress
book entry (Ypag e112).
X Select theaddress data fieldu sing the
9: buttonsandpress the9button
to confirm.
Option 2 X
Search foranaddress bookentry
(Y page 110)withthe¤icon andselect it
from thelist.
X Select Options using
the; button and
press the9button toconfirm.
X Select Navigate and
press the9button
to confirm.
Once theaddress dataiscomplete andifit
matches thedigital map,route guidance
starts.
Subseque ntoperation willdepend onhow
complete theaddress dataitems areand
whether theycorrespond withthedata in
the digital mapinthe navigation system.
They donot correspond, forexample, if
they arenot written inthe same wayasthe
destination entry. Voice
tags
Adding orchanging avoice tag You
canentervoic etag svia theVoic eCont rol
Syst em(see thesepar ateoper ating
ins truct ions).Onceyou have assign edavoic e
tag toan addre ssbook entry,you can verbally
call upthis ent ryand dialaphon enum ber,for
exam ple.You canadd onevoic etag per
addre ssbook entry.
X Sear chfor anaddre ssbook entrywith or
with outavoic etag (¦ icon)
(Y page 110).
X Sele ctOpt ions usin
gth e; buttonand
pres sth e9 butt ontocon firm.
X Sele ctVoi ceName and
pres sth e9
butt ontocon firm.
X Sele ctAdd or
Cha nge and
pres sth e9
butt ontocon firm.
Subs equen toperation isvoice- controlled.
The Voice ControlSyst emthen guides you
thr ough thedialogs.
Deleting avoice tag X
Sear chfor anaddre ssbook entrywith a
voic etag (Ypage 110).
X Sele ctOpt ions usin
gth e; buttonand
pres sth e9 butt ontocon firm.
X Sele ctVoi ceName and
pres sth e9
butt ontocon firm.
X Sele ctDel ete and
pres sth e9 butt onto
con firm.
Ad eletion prompt appears.
X Select Yes or
No and
press the9button
to con firm.
If you select Yes ,
COMAND deletesthe
voice tag.
If you select No ,
the process willbe
canc eled. Using
theadd ress book
113Telephone Z
Page 116 of 214

List
ening toav oice tag X
Sear chfor anaddre ssbook entrywith a
voic etag (Ypage 110).
X Sele ctOpt ions usin
gth e; buttonand
pres sth e9 butt ontocon firm.
X Sele ctVoi ceName and
pres sth e9
butt ontocon firm.
X Sele ctLis ten and
pres sth e9 butt onto
con firm.
You hear thevoic etag . Imp
orting conta cts
Condit ions You
canimpo rtcon tactsto theaddre ssbook
fr om anext ern alBluet ooth®
devic eor an SD
mem orycard.
The Bluet ooth®
devic enee dstobe inside the
veh icle and hastobe swit chedon ,act ivat ed,
and auth orized. Itmust beable totrans mit
con tactsand/ orvCard sviaBluet ooth®
.
Imp orting conta cts X
Start the data exchang eon the extern al
devic e(see theextern aldevic e'soperat ing
inst ruct ions ).
or
X Insert anSD memo rycard .
X Selec tAddr essBook in
the address book
using the:=; buttons and
press the9butt ontocon firm .
X Selec tDown load Contacts and
press the
9 butt ontocon firm .
Am enu appears. X
Select FromMobile Phone ,
From The Memory
Card or
Receive Business Card(s) and
press the9button to
con firm.
The contact sare import ed.
Deleting contacts X
With theaddress bookshown, select
Address Book and
press the9button to
con firm.
Am enu appears.
X Select Delete Contacts and
press the
9 button tocon firm.
X Select oneofthe following options:
R Interna lContact s R
From Mobile Phone R
From TheMemory Card R
Receive dBusines sCards R
Delete All Ap
rompt correspo ndingtoyou rselection
appears.
X Select Yes or
No and
press the9button
to con firm.
If you select Yes ,
the contact sare deleted
accor dingtoyour select ion.
If you select No ,
the process willbe
canc eled. 114
Using
theadd ress bookTelephone
Page 117 of 214

Opera
tingthetelephone usingthe
mult ifunction steeringwheel Telephone
menu
Introd uction You
canoperate thetelephon eusing the
function sin the "Tele phone" menu,provided
you have connected itto the Mercedes-Benz
hands-free system.
The displa yin the "Tele phone" menudepends
on the status ofthe telephone.
X Switch onthe telephone andCOMAND.
X Press theV orU button toselect the
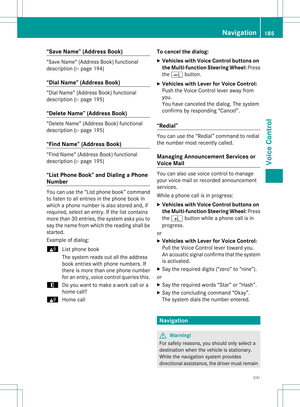
TEL displa
y.
Telephone isready toreceive calls Bluetooth
®
interface telephony: whetherthe
network provider's nameisdispla yed
depends onthe telephone connected. Acc
epting acall
You may accep tacallat any time provided
the telepho neisrea dytorece ivecalls.Whe n
a cal lis incom ing,yousee thename or
tele pho nenumb erinthe multifunction
di spl ay.
X Pre ssthe 6 button onthe multifunction
stee ring wheel . Reje
cting orendin gac all
X Press the~ button onthe multifunctio n
steeri ngwhe el. Cal
linganumbe rfrom theCOM AND
phone book
You may select and diala numbe rfrom the
COMAND phonebookatany time, provid ed
you rmobile phone isready toreceive calls. i
Ifyou have imported contacts
(Y page 114), youcan select thephone
book entriesofthe mobile phonebyusing
the multifunct ionsteerin gwheel.
X Press theV orU button toselect the
TEL display
.
X Press the& or* button toopen the
phone bookinthe multifunct iondisplay .
X Press the& or* button untilthe
desired entryhas been highlighted.
The stored names aredisplay ed
alphabe tically.
i Ifyou press andhold the& or*
button forlonger thanonesecond, the
multifunct iondisplay willskip from thefifth
entr yto the first entryfound forthe next
letter. Skipping stopsassoon asyou
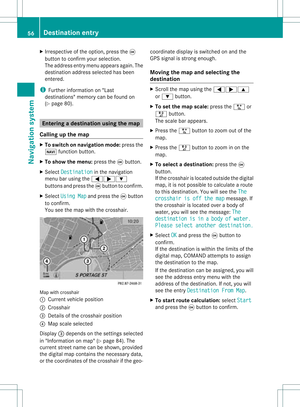
release thebutton again. :
Operating mode
; Name ofthe participant
X To connec tacall:press the6 button
on the multifunctio nstee ring wheel.
i Ifthe rearese ver alnum bers for this
nam e,youse ealist of sub-e ntri es.
X Pre ssthe 6 button again.
Th eCon nectingCal l... mes
sage
ap pe arsin the multifu nctio ndisplay along
with thenumb erbeing dialed andthe
name ,if it is stored inthe phon ebook .
The phon enumb erdialed isstored inthe
appropr iatecalllist.
X To exit withou tconnect ingacall: press
the ~ button onthe multifunctio n
steeri ngwhe el. Operating
thetelephone usingthe multifunc tionsteering wheel
115Tele phone Z
Page 118 of 214
Redi
als
X Pre ssthe V orU button tosel ect the
TEL di
spl ay.
X Pre ssthe 6 button.
Yo usee thelast cal ldi aled.
X To scrol lin the list of cal lsmad e:pre ssthe
& or* button untilthe desirede ntry
is displ ayed .
X To make acal l:pre ssthe 6 button. 11
6 Ope
ratin gthe telepho neusing the multi function ste ering wheelTel epho ne
Page 119 of 214

Vehi
cle equi pmen t<0023002300230023002300230023002300230023002300230023002300230023
002300230023002300230023002300230023002300230023> 118
Rad iomode ........ .......... .................. .... 118
HD Rad io<0023002300230023002300230023002300230023002300230023002300230023
0023002300230023002300230023002300230023002300230023002300230023
002300230023002300230023002300230023002300230023> 122
Sat ellite radio<0023002300230023002300230023002300230023002300230023002300230023
0023002300230023002300230023002300230023002300230023002300230023
0023002300230023> 123
CD/DVD audioand MP3 mode ........ 128
MUSIC REGISTER<0023002300230023002300230023002300230023002300230023002300230023
00230023002300230023002300230023002300230023002300230023> 139
Media Interfacemode <0023002300230023002300230023002300230023002300230023002300230023
002300230023002300230023> 143
Audio AUXmode <0023002300230023002300230023002300230023002300230023002300230023
002300230023002300230023002300230023002300230023002300230023> 149 117Audio
Page 120 of 214

Vehi
cle equi pmen t
i Thisma nua lde scri besal lthe standa rd
and optio nal equipme ntofyour veh icle
wh ich wasava ilab leat the time of
pu rcha se.Country -specificd iffe ren ces are
possible .Bear inmind thatyour vehicle
may notfeature allfunc tionsdescribed
here. Thisalso refers tosafety- related
systems andfunc tions. Rad
iomode General
information
i Portable electronicdevices inthe vehicle
may seriously impairradiorecept ion. Switching
onrad iomode
Opt ion 1 X
Press the$ function button .
The radio display appears.
Rad iomode: youwillhear thelast station
played onthe last waveband.
i Repeatedly pressingthe$ function
button switchesthrough thewavebands in
the order FM,AM, WB(Ypage 119)and
SatRadio. Pressingthe button againtakes
you back toFM radio mode.
Opt ion 2 X
Select Audio in
the main functionbarusing
the 9=; buttonsand press the
9 button tocon firm.
If radio mode wasthelast mode selected,
it will now beactive.
If anoth eraudio mode isswitch edon, you
can now switch toradio mode inthe audio
menu.
X Select Audio using
the9 button and
press the9button tocon firm.
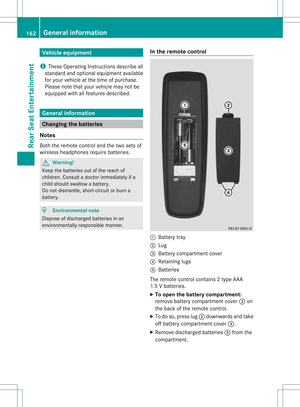
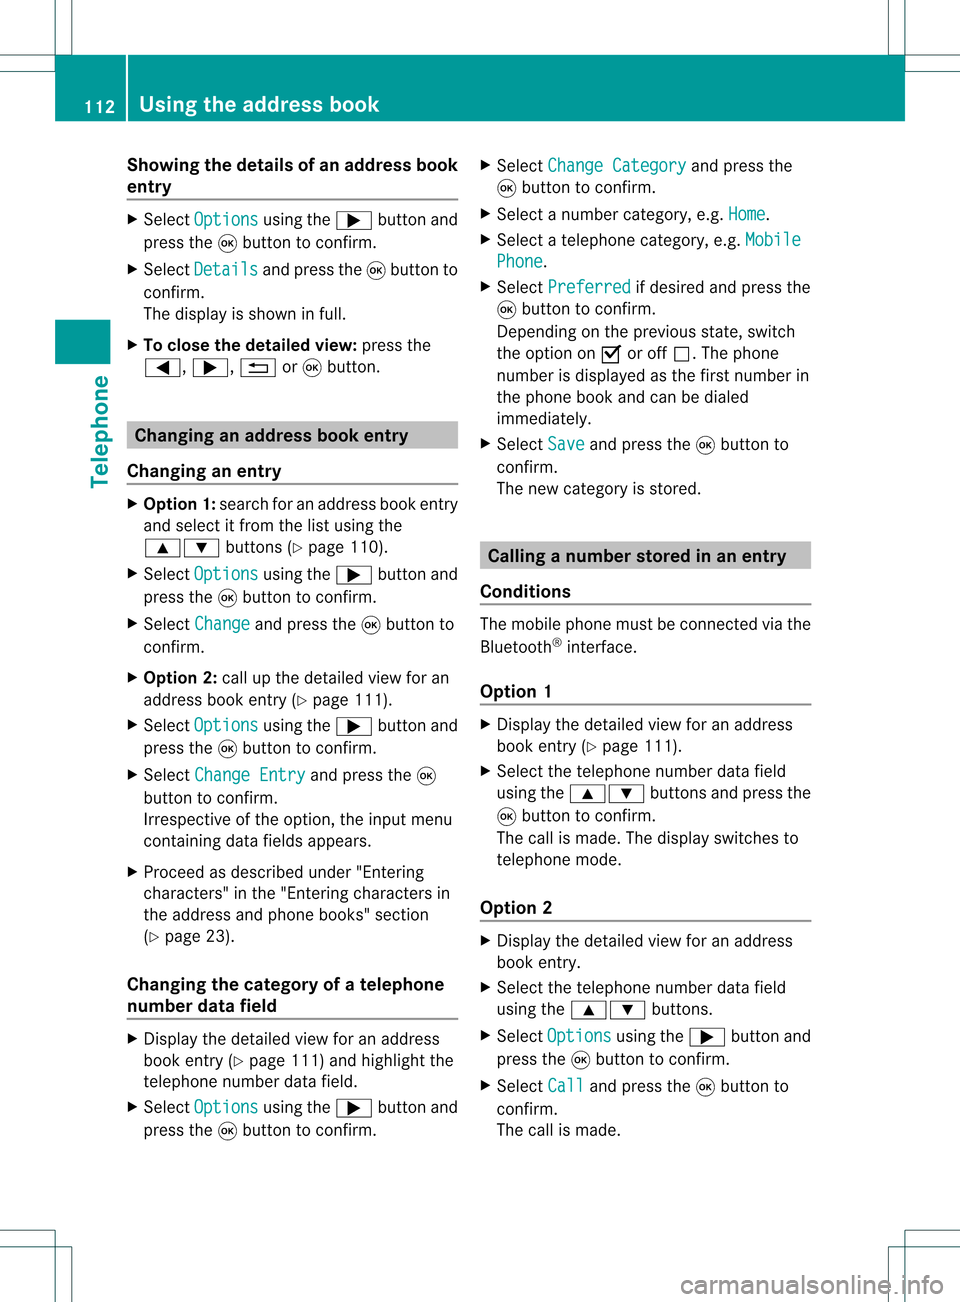
The audio menu appears. :
Main function bar
; Current audiooperatin gmode
= Audio menu
X Select Radio (radio
mode) usingthe
9: buttonsand press the9button
to con firm. Radio
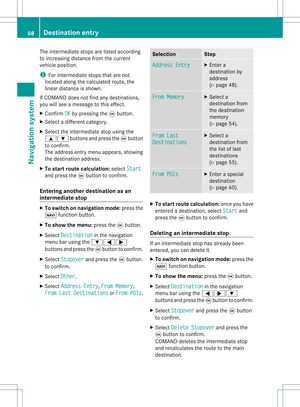
display
: Display window withstationselect ion
; Preset position ofthe select edstat ion
= Name ofthe select edstat ion
? Frequenc yof the select edstat ion
A Sound settings
B Waveband submenu(FM,AM,WB)
C Todisplay radiotext(FM and AMdigita l
only )
D Memo ryfuncti ons
E Radio functi ons 118
Radio
modeAudio