2011 MERCEDES-BENZ M-CLASS SUV tow
[x] Cancel search: towPage 307 of 389

Inserting th
ebracket sintot he loading
rail X
Insert bracket :into th ecentr eofl oading
rail ?.
X Press release button ;and push
bracket :intothe desired position in load-
ing rail ?.
X Let go of rel ease button ;.
X Press locking button =.
Bracket :is locked in loading rail ?.
X If necessary, fol dlashin geyelet A
upwards. G
WARNING
Distribute the loa donthe lashing eyelets
evenly.
Otherwise, vehicle occupants could be
injured by objects being thrown around if you:
R brake shar ply
R chang edirection suddenly
R are involved in an accident
Please observe the loading guidelines.
Luggage holder The luggage holder can be use
dtosecure
ligh tloads against the side wall of the luggage
compartment to prev entthem from moving
around.
! Only use the luggage holder to secure
loads with amaximum weight of 7kgand
with dimensions that the luggage holder
can safel yand securely contain. X
To install: insert two brackets Ainto the
left or right loading rail (Y page303).
X Press releas ebutton :of the luggage
holder and pull the strap out slightly.
X Insert luggag eholder ;intob rackets A
and ,while doing so, press release button
= and push the luggage holder downwards
until it engages.
X Press release button :of the luggage
holder and pull the strap out in the direction
of the arrow.
X Plac ethe load between the strap and the
luggage compartment side wall.
X Using one hand, press locking button :of
the luggage holder.
X With your other hand, let the strap go slowly
until the load is secured.
X Make sur ethat locking button ?on brack-
ets Ais pressed.
This keeps brackets Ain plac eonthe
loading rail.
X To remove: press release button =on
respective bracket Aand remove luggage
holder ;by pulling upwards and out.
Telescopic rod The telescopic rod can be used to secure the
load against the rea
rseats to prevent it from
moving around. 304
Stowage areasStowing and features
Page 308 of 389
X
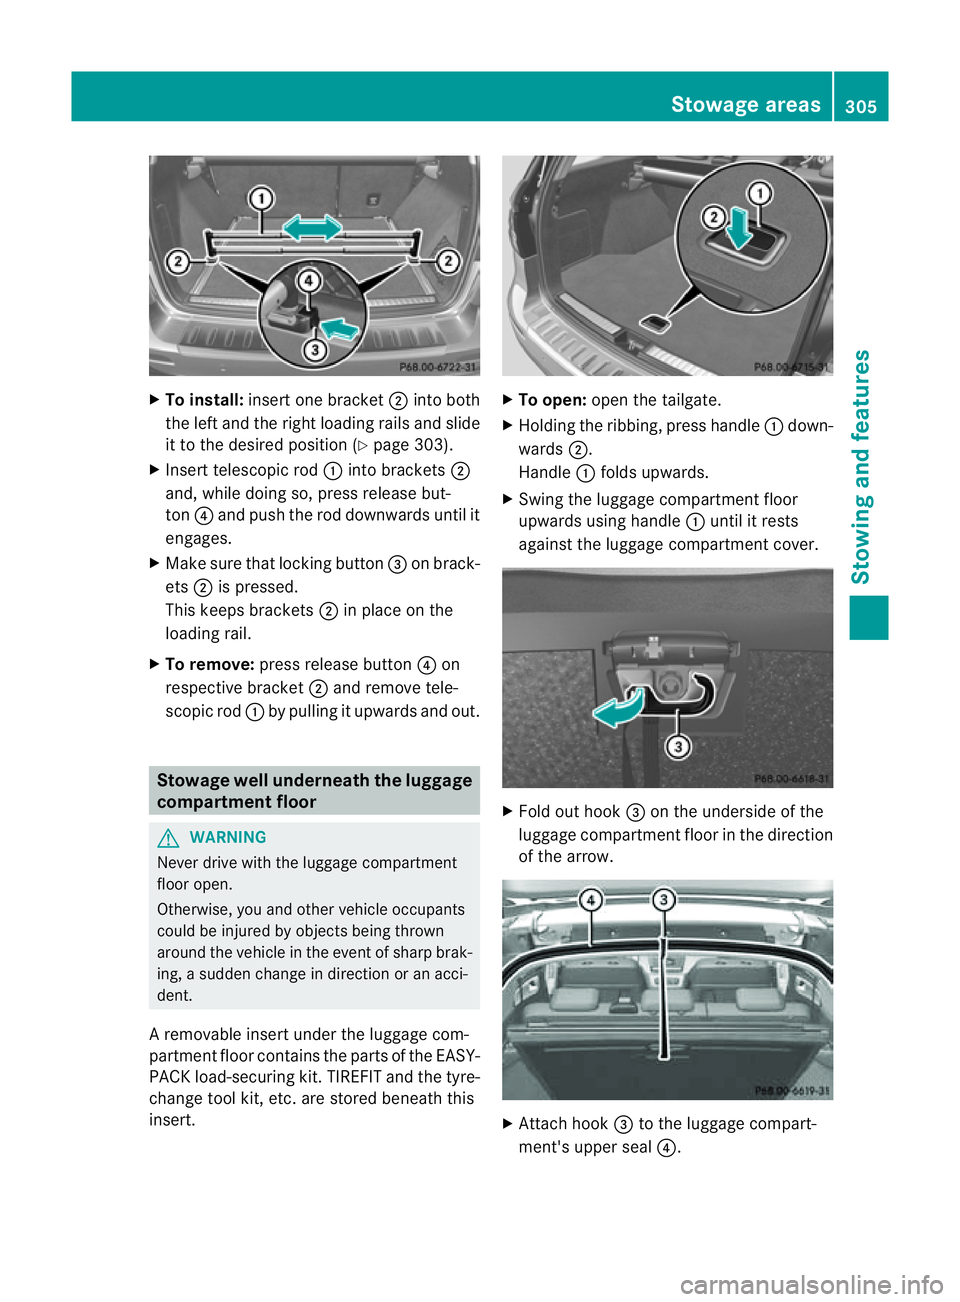
To install: insert one bracket ;into both
the left and the right loading rai lsand slide
it to the desired positio n(Ypage 30 3).
X Insert telescopic rod :into brackets ;
and ,while doing so, press release but-
ton ?and push the rod downwards until it
engages.
X Make sur ethat locking button =on brack-
ets ;is pressed.
This keeps brackets ;in plac eonthe
loading rail.
X To remove: press release button ?on
respe ctive bracket ;and remov etele-
scopic rod :by pullin gitupwards and out. Stowage well unde
rneath the luggage
compartment floor G
WARNING
Never drive with the luggage compar tment
floor open.
Otherwise, you and other vehicle occupants
could be injured by objects being thrown
around the vehicle in the event of sharp brak-
ing, asudden change in direction or an acci-
dent.
Ar emovable inser tunder the luggage com-
partmen tfloor contain sthe par tsof the EASY-
PACK load- securingkit.T IREFIT and th etyre-
change tool kit, etc. are stored beneath this
insert. X
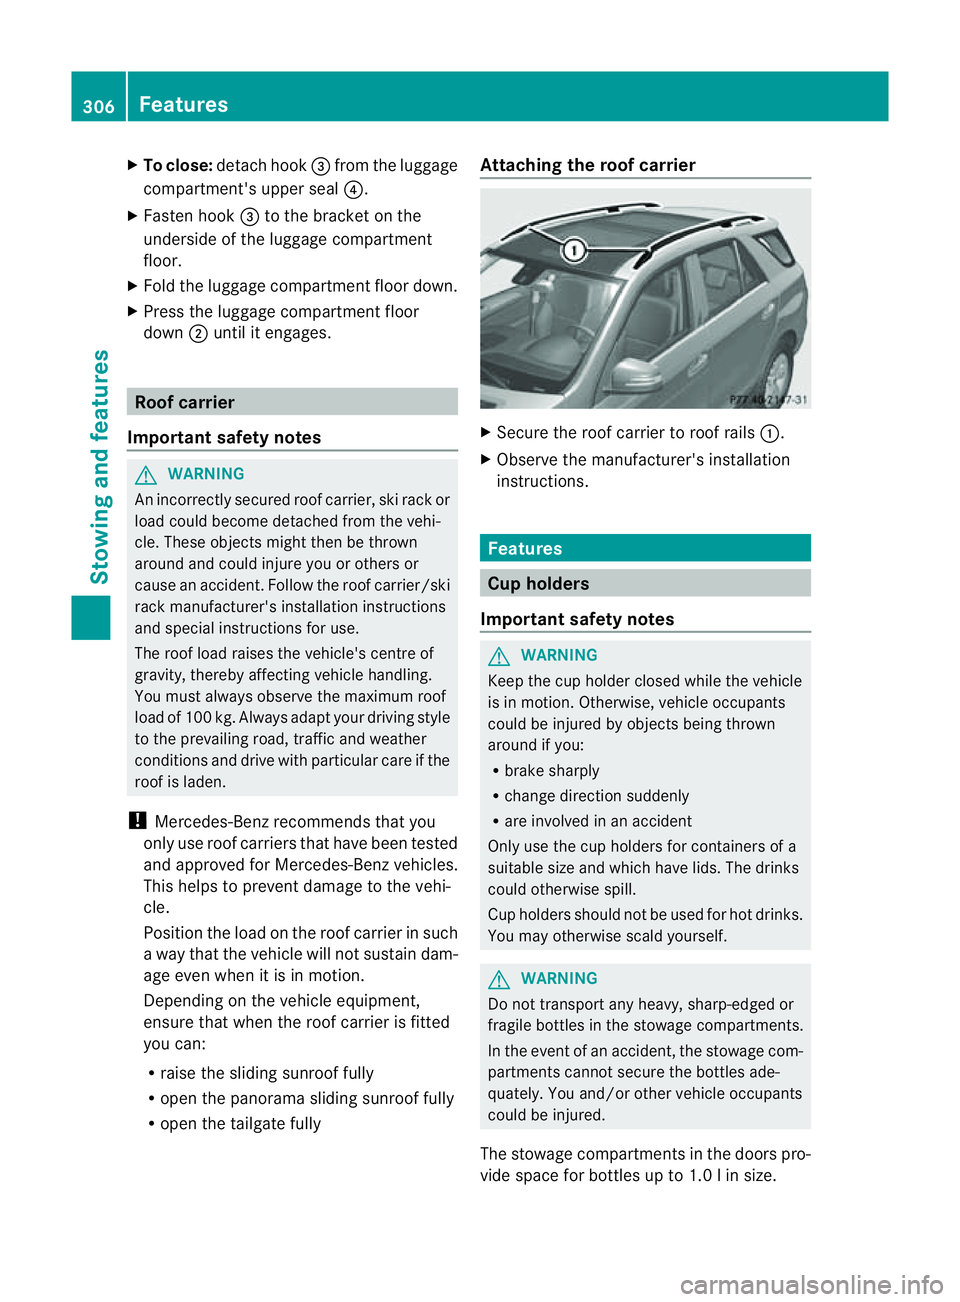
To open: openthe tailgate.
X Holding the ribbing, press handle :down-
wards ;.
Handle :folds upwards.
X Swing the luggage compartment floor
upwards usin ghandle :until it rests
against the luggage compartment cover. X
Fold out hook =on the underside of the
luggage compartment floor in the direction
of the arrow. X
Attach hook =to the luggage compart-
ment' supper seal ?. Stowage areas
305Stowingandfeatures Z
Page 309 of 389
X
To close: detach hook =from the luggage
compartment's uppe rseal ?.
X Fasten hook =to the brac ketont he
underside of the luggage compar tment
floor.
X Fold the luggage compartmen tfloor down.
X Press the luggage compar tment floor
down ;until it engages. Roof car
rier
Important safet ynotes G
WARNING
An incorrectly secured roof carrier, ski rack or
load could become detached from the vehi-
cle. These objects might then be thrown
around and could injur eyou or other sor
caus eana ccident.F ollow the roof carrier /ski
rack manufacturer's installation instructions
and special instructions for use.
The roof load raises the vehicle's centre of
gravity, thereb yaffecting vehicl ehandling.
You must alway sobserv ethe maximum roof
load of 10 0kg. Always adapt your driving style
to the prevailin groad, traffic and weather
condition sand drive with particula rcare if the
roof is laden.
! Mercedes -Benz recommends that you
only use roof carrier sthat hav ebeen tested
and approved for Mercedes-Benz vehicles.
This helps to preven tdamage to the vehi-
cle.
Position the load on the roof carrier in such
aw ay that the vehicle will not sustain dam-
age even when it is in motion.
Depending on the vehicle equipment,
ensure that when the roof carrier is fitted
you can:
R raise the sliding sunroof fully
R open the panorama sliding sunroof fully
R open the tailgate fully Attaching the roof carrier
X
Secure the roof carrier to roof rails :.
X Observe the manufacturer' sinstallation
instructions. Features
Cup holders
Important safety notes G
WARNING
Keep the cup holder closed whil ethe vehicle
is in motion. Otherwise, vehicle occupants
coul dbei njured by object sbeing thrown
around if you:
R brak esharply
R change direction suddenly
R arei nvolved in an accident
Only use the cup holders for container sofa
suitable size and whic hhave lids. The drinks
could otherwise spill.
Cup holders shoul dnot be used for hot drin ks.
You may otherwise scald yourself. G
WARNING
Do not transport any heavy, sharp-edged or
fragile bottles in the stowage compar tments.
In the event of an accident, the stowage com-
partments can notsecur ethe bottles ade-
quately. You and/or other vehicle occupan ts
coul dbei njured.
The stowage compartments in the doors pro-
vide space for bottles up to 1.0 linsize. 306
FeaturesStowin
gand features
Page 310 of 389
The bottles are neither secured nor prevented
from tippin gover. Therefore ,donot plac eany
ope ndrink con tainers in the stowage com-
partments.
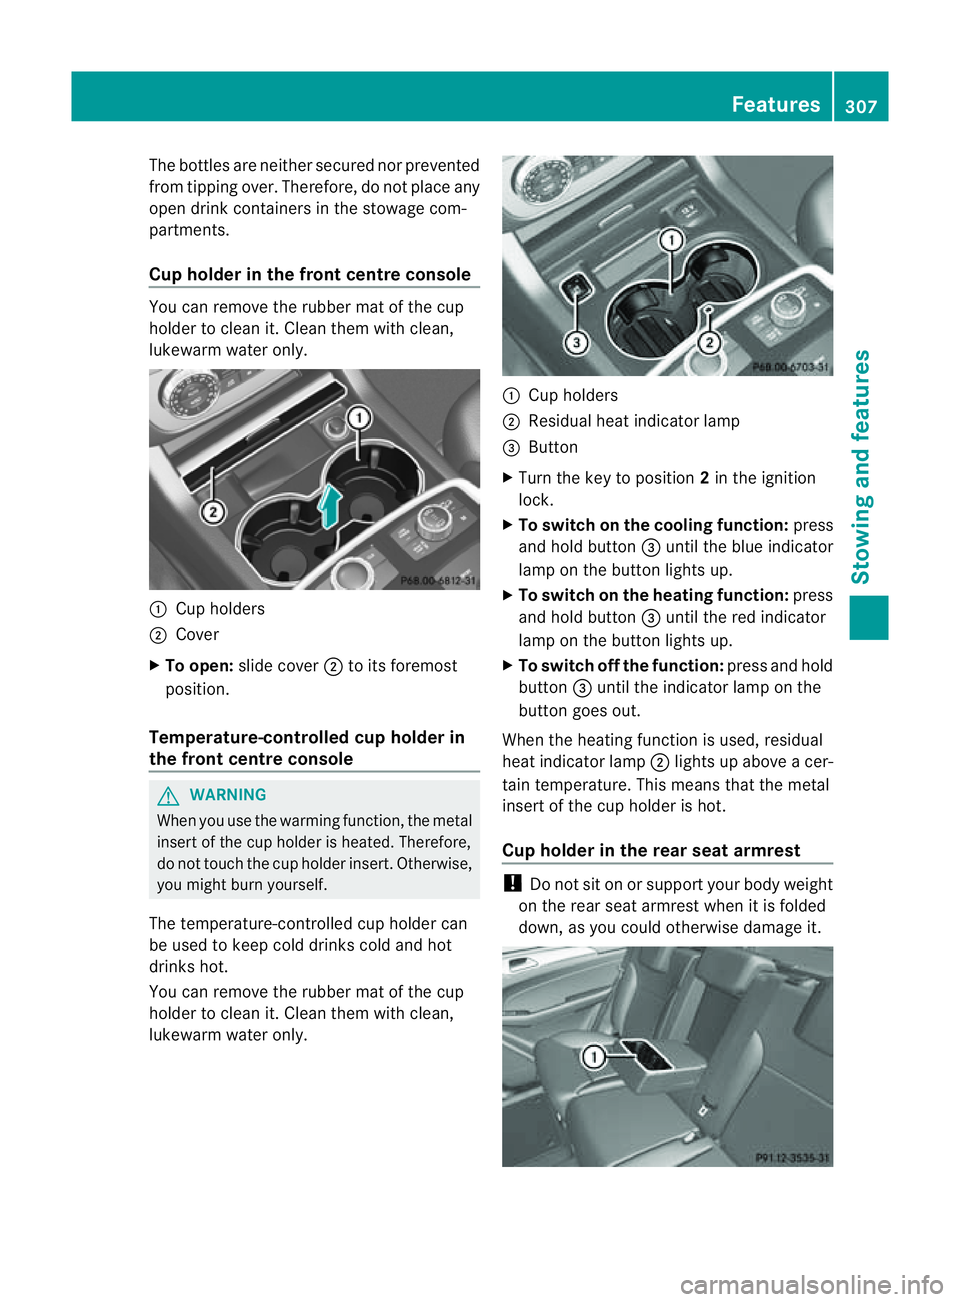
Cup holder in the front centre console You can remov
ethe rubber ma tofthe cup
holder to clea nit. Clean them with clean,
lukewarm water only. :
Cup holders
; Cover
X To open: slidecover ;to its foremost
position.
Tem perature-controlled cup holder in
the front centre console G
WARNING
When you use the warming function, the metal
insert of the cup holder is heated. Therefore,
do not touch the cup holder insert. Otherwise,
you might burn yourself.
The tem perature-c ontrolle dcup holde rcan
be used to keep cold drinks cold and hot
drinks hot.
You can remove the rubber mat of the cup
holder to clean it. Clean them with clean,
lukewar mwater only. :
Cup holders
; Residua lheat indicator lamp
= Button
X Tur nthe key to position 2in the ignition
lock.
X To switch on th ecooling function: press
and hold button =until the blue indicator
lamp on the button lights up.
X To switch on the heating function: press
and hold button =until the red indicator
lamp on the button lights up.
X To switch off the function: press and hold
button =until the indicator lamp on the
button goes out.
When the heating func tion is used, residual
heat indicator lamp ;lights up abov eacer-
tain temperature. This mean sthat the metal
inser tofthe cup holder is hot.
Cu ph older in the rear seat armrest !
Do not sit on or support your body weight
on the rear seat armrest when it is folded
down, as you could otherwise damage it. Features
307Stowingandfeatu res Z
Page 311 of 389
X
Fold do wnthe rear seat armrest.
Cu ph older :is in the rea rseat armrest. Sun visors
Sun visor overview G
WARNING
Keep the mirror sinthe sun visor scovered
while driving. You coul dotherwis ebedazzled,
which may impair your view of traffic condi-
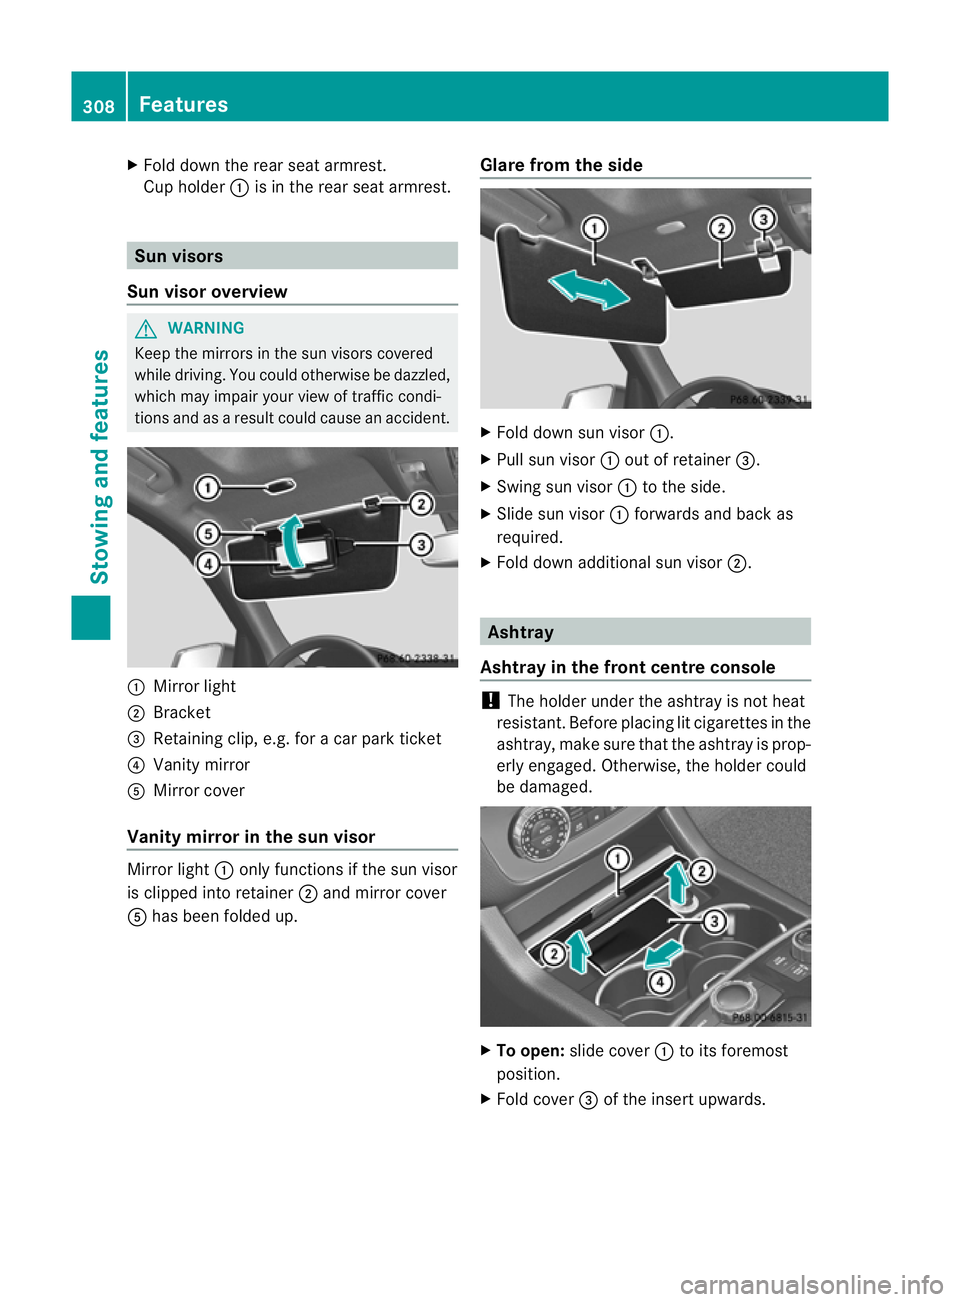
tions and as aresult could cause an accident. :
Mirror light
; Bracket
= Retaining clip, e.g. for acar park ticket
? Vanity mirror
A Mirror cover
Vanity mirror in the sun visor Mirror light
:only functions if the sun visor
is clipped into retainer ;and mirror cover
A has been folded up. Glare from the side X
Fold down sun visor :.
X Pull sun visor :out of retainer =.
X Swing sun visor :to the side.
X Slide sun visor :forwards and back as
required.
X Fold down additional sun visor ;. Ashtray
Ashtray in the front centre console !
The holde runder the ashtray is not heat
resistant. Before placing lit cigarettes in the
ashtray, make sure that the ashtray is prop-
erly engaged .Otherwise, the holder could
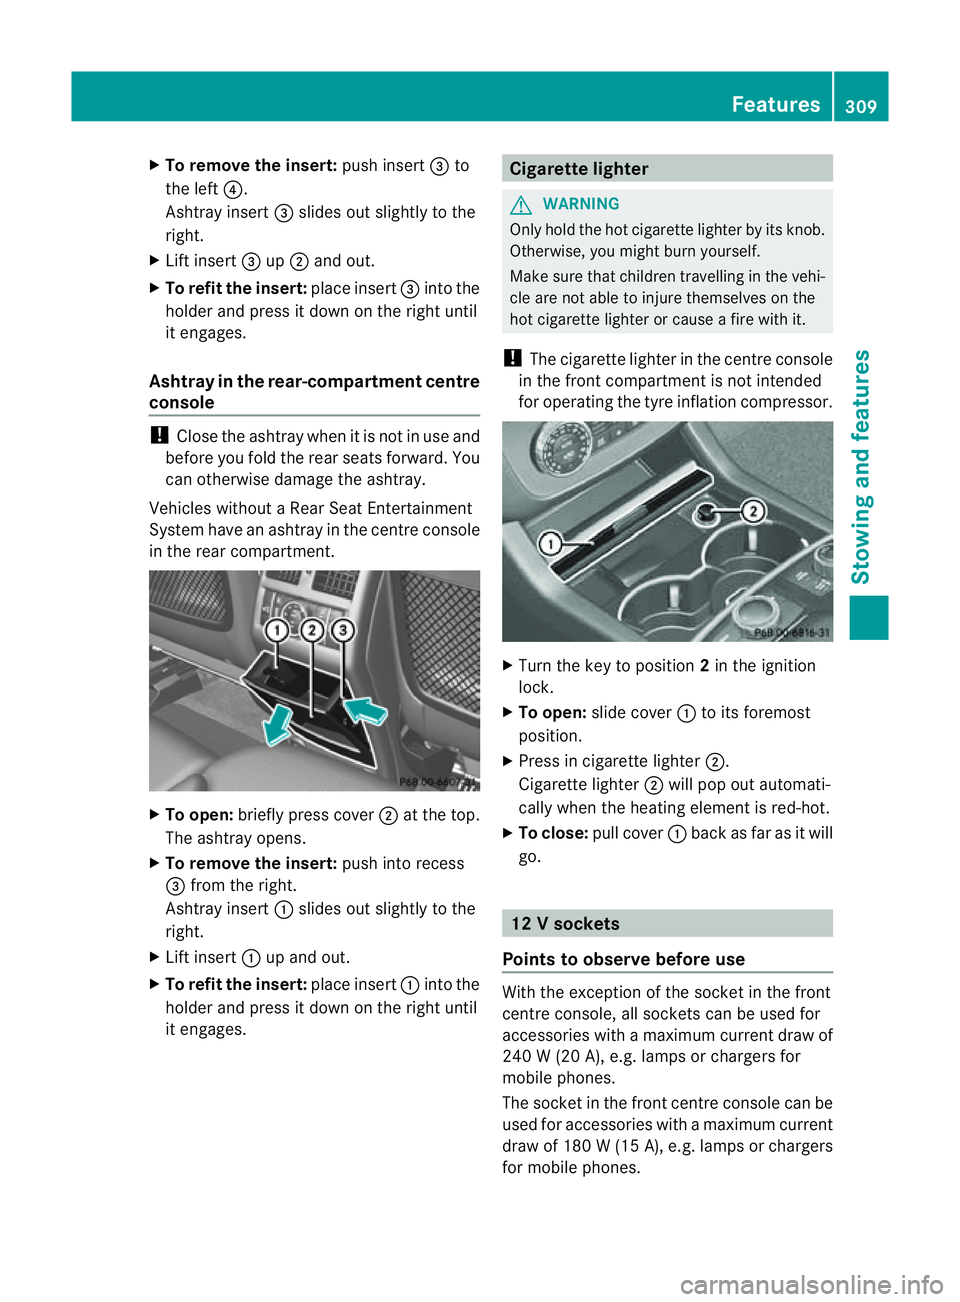
be damaged. X
To open: slidecover :to its foremost
position.
X Fold cover =of the inser tupwards. 308
FeaturesStowing and features
Page 312 of 389
X
To remove the insert: push insert=to
the left ?.
Ashtray insert =slides ou tslightly to the
right.
X Lif tinsert =up; and out.
X To refit th einsert: place insert =intothe
holder and press it down on the right until
it engages.
Ash tray in therear-compartme nt centre
console !
Close th eashtra ywhen it is no tinuse and
before you fol dthe rea rseats forward. You
can otherwise damage the ashtray.
Vehicles without aRear Seat Entertainment
System have an ashtra yinthe cen tre console
in the rear compartment. X
To open: briefly pres scover ;at the top.
The ashtray opens.
X To remove th einsert: push into recess
= from the right.
Ashtray insert :slides out slightly to the
right.
X Lif tinsert :up and out.
X To refit the insert: place insert:into the
holder and pres sitdown on the right until
it engages. Cigarette lighter
G
WARNING
Only hold the hot cigarette lighte rbyits knob.
Otherwise, you might burn yourself.
Make sure that children travelling in the vehi-
cle are not able to injure themselves on the
hot cigarette lighter or cause afire with it.
! The cigarette lighter in the centre console
in the front compartment is not intended
for operating the tyre inflation compressor. X
Turn the key to position 2in the ignition
lock.
X To open: slide cover :to its foremost
position.
X Press in cigarette lighter ;.
Cigarette lighter ;will pop out automati-
cally when the heating element is red-hot.
X To close: pull cover :back as far as it will
go. 12
Vsockets
Point stoo bserve befo reuse With the exception of the so
cket in th efront
centr econsole, all socket scan be used for
accessories with amaximum curren tdraw of
240 W(20 A) ,e.g. lamp sorchargers for
mobi lephones.
The socket in the front centre console can be
used for accessories with amaximum current
draw of 18 0W(15A ), e.g .lam ps or chargers
for mobil ephones. Features
309Stowing and features Z
Page 313 of 389
If yo
uuse the sockets for long periods when
the engine is switched off ,the battery may
discharge.
X Tur nthe key to positi on1in the ignition
lock.
i An emergenc ycut-off ensures that the on-
board voltage does not drop too low. If the
on-board voltage is too low, the powe rto
the sockets is automaticall ycut. This
ensure sthat there is sufficien tpower to
star tthe engine.
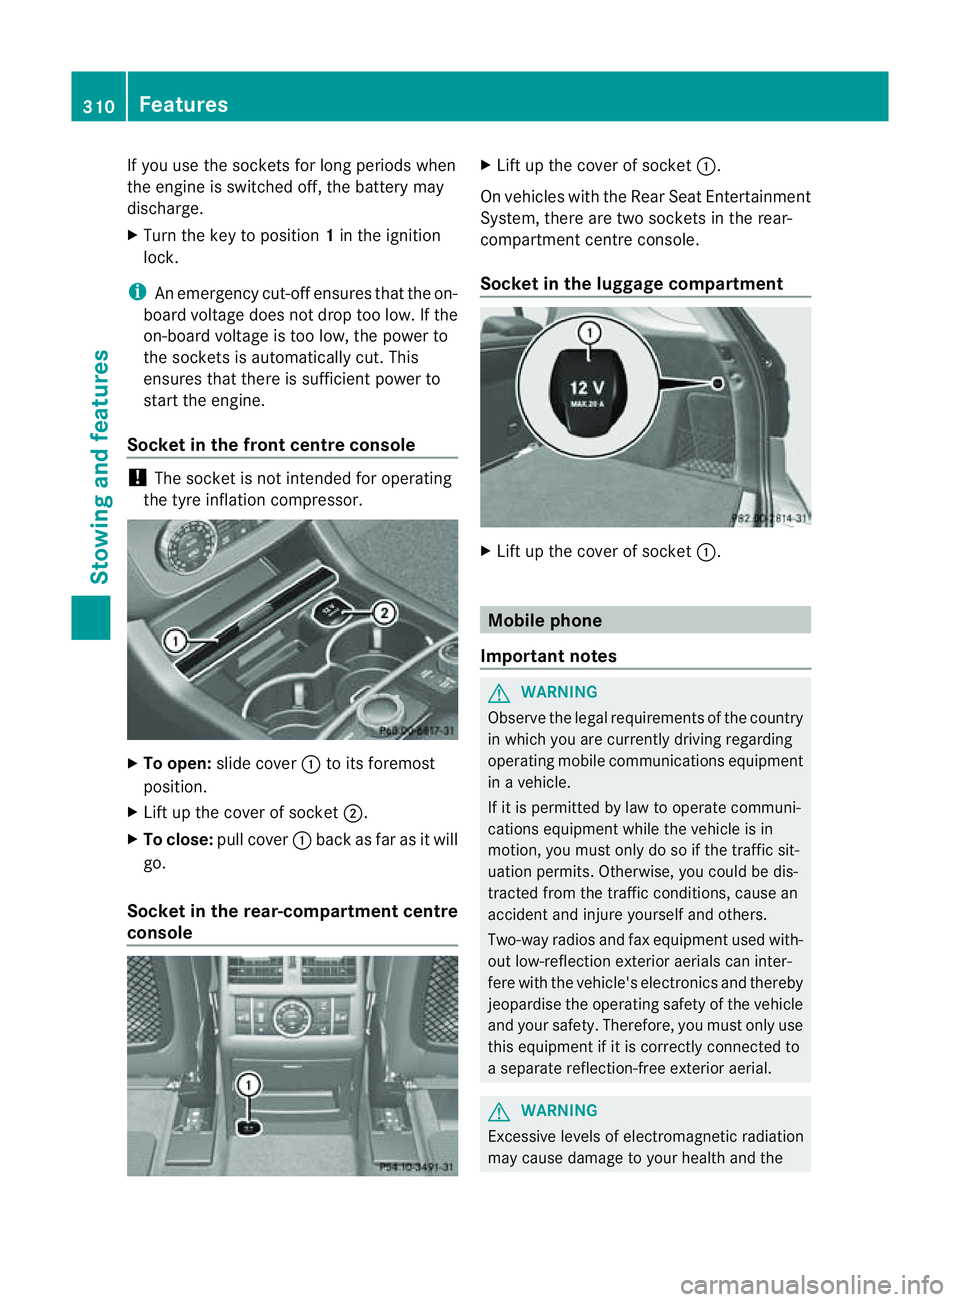
Socket in th efront centre console !
The socke tisn ot intended for operating
the tyr einflation compresso r.X
To open: slide cover :to its foremost
position.
X Lift up the cover of socket ;.
X To clos e:pull cover :back as far as it will
go.
Socket in the rear-compartment centre
console X
Lift up the cover of socket :.
On vehicles with the Rear Seat Entertainment
System, there are two sockets in the rear-
compartment centre console.
Socket in the luggage compartment X
Lift up the cover of socket :. Mobile phone
Important notes G
WARNING
Observe the legal requirements of the country
in which you are currently driving regarding
operating mobile communications equipment
in av ehicle.
If it is permitted by law to operat ecommuni-
cations equipment while the vehicle is in
motion ,you must only do so if the traffic sit-
uation permits. Otherwise, you coul dbedis-
trac tedf rom th etraffic conditions ,cause an
accident and injure yourself and others.
Two-way radios and fax equipment used with-
out low-reflection exterior aerials can inter-
fere with the vehicle's electronics and thereby
jeopardise the operating safety of the vehicle
and your safety. Therefore, you must only use
this equipment if it is correctly connected to
as eparate reflection-f reee xterior aerial. G
WARNING
Excessive level sofelectromagnetic radiation
may cause damage to your health and the 310
FeaturesStowing and features
Page 314 of 389

healt
hofothers. Using an exterior aerial takes
into account current scientific discussions
relating to the possibl ehealth risk posed by
electromagnetic fields.
Mercedes-Ben zrecom mends the use of an
approved exterior aerial .This ensures:
R optimal mobile phone reception quality in
the vehicle
R mutua linfluences between the vehicle
electronics and mobil ephones ar emini-
mised
An exterior aerial has the following advan-
tages:
R it conducts the electromagnetic fields gen-
erated by awireless device to the exterior.
R the field strengt hinthe vehicle interior is
lower than in avehicle that does not have
an exterior aerial.
i There are various mobile phone brac kets
that may be fitted to your vehicle ;insome
cases, these ar ecountry-specific.
i Even if your vehicle is equipped with con-
venience telephony, you can connec ta
Blueto oth®
capable mobil ephone to Audio
20 or COMAND Online via the Bluetooth ®
interfac e.
More information on suitabl emobilephones,
mobile phone brackets and on connecting
Bluetooth ®
capable mobile phones to Audio
20 or COMAND Online can be obtained:
R at your Merc edes-Ben zServ iceC entre
R on the Internet at http://www.mercedes-
benz.com/connect
i The functions and service savailab lewhen
you use the phone depend on you rmobile
phone model and service provider. Inserting th
emobile phone X
Open the telephone compartment
(Y page 298).
X If required by the design of the mobile
phone bracket ,instal lthe slidin gadapter
(Y page 312).
X Insert the mobile phone into the mobile
phone bracket (see the separat emobile
phone bracke tinstallatio ninstructions).
If the mobil ephone is inser tedint he mobile
phone bracket ,you can speak to the person
you ar ecalling using the hands-free system.
i On some mobile phone brackets, you first
have to connect the mobile phone via Blue-
tooth ®
to am obile phone bracke t(see the
separate operating inst ructions for the
mobile phone bracke t).
On these mobile phone brackets, the
mobile phone does not hav etobeinserted
into the bracket for you to be able to use
the telephone functions .Inthis case ,the
charging func tion and aerial func tion are
not available.
Operating th emobile phone You can operate the telephone using the
6 and~ button sonthe multifunc tion
steering wheel. You can operate other mobile
phone func tions via the on-boar dcomputer
(Y page 242).
If you tak ethe key out of the ignition lock ,the
mobile phone stay sonb ut you can no longer
use the hands-free system.
If you are making acall and you would like to
take the key out of the ignition lock, first
remove the mobile phone from the bracket.
Otherwise, the call will be ended.
i When amobile phone bracke tisu sed that
is con nected to the mobile phone via Blue-
tooth ®
:ify ou wan ttocontinue acall in
"Private mode", you have to perform the
necessary steps on the mobile phone (see Features
311Stowingandfeatures Z