2011 MERCEDES-BENZ M-CLASS SUV spare wheel
[x] Cancel search: spare wheelPage 14 of 389

Exterior mirrors
Adjustin g....................................... 100
Anti-dazzle mod e(automatic) ........102
Fol ding in/ou t(automatically )....... 101
Fol ding in/ou t(electrically) ...........101
Fol ding in whe nlocki ng(on-board
computer) ...................................... 251
Ou tofp osition (troubleshooting) ...101
Parking positio n............................. 102
Resetting ....................................... 101
Storing settings (memory func-
tion) ............................................... 103F
Faul tmessage
see Display messages
Filler cap
see Fuel filler flap
Fire extinguisher ............................... 332
First-aid kit ......................................... 332
Flat tyre Changing awheel/fitting the
spare wheel ................................... 337
MOExtende drun-flat sy stem......... 342
Pre paring th evehicle ..................... 334
Rais ingt he vehicle ......................... 339
TIREFIT kit ...................................... 335
Floormat ............................................ .316
Foglamps (extende drang e).............. 110
Foldin gthe rear be nchs eat for-
wards/back ....................................... 299
Fording Off-road ......................................... 164
On flo oded roads ........................... 164
Frequencies
Garage door opene r....................... 316
Mobile phone ................................. 371
Tw o-way radio ................................ 371
Fron twindscreen
see Windscreen
Fuel
Consumption statistic s.................. 239
Displaying the curren tconsum p-
tion ................................................ 239
Displaying the rang e...................... 239
Fue lgauge ....................................... 30
Important safety notes ..................374Note
sabout consum ption ............. 374
Pro blem (malfunction) ................... 156
Refuellin g....................................... 152
Tank content/reserve fuel .............374
Fue lfiller flap
Opening/closing ............................ 154
Fue lfilter (white display mess age) .2 68
Fue llevel
Calling up the range (on-board
computer) ...................................... 239
Gaug e.............................................. 30
Fue lreserve
see Fuel
Fuel tank
Capacity ........................................ 374
Pro blem (malfunction) ................... 156
Fuses
Allocation chart ............................. 353
Before changing ............................. 353
Dashboard fus ebox....................... 353
Fus ebox in the engin ecompart-
men t.............................................. 353
Fus ebox under rear bench seat ....353
Important safety notes ..................352 G
Garage door opener Clearing the memory .....................315
Freq uencies ................................... 316
Note s............................................. 313
Opening/closing the garage door ..314
Programming (b utton in the rear-
view mirror) ................................... 313
Gear or se lector lever (cleaning
instructions) ...................................... 329
Genuine Mercedes-Benz parts .........370
Glove compartment ..........................297 H
Handbrake seeP arking brake
Hazard warning lamps ......................109
Headlamp Clean ings ystem (function) ............108 Index
11
Page 21 of 389
Points to observ
ebefor euse......... 309
Rea rcompartmen t......................... 310
Spar ewheel
Storag elocation ............................ 334
se eE mergenc yspare wheel
Specialist workshop ............................ 24
Spectacle scom partment ................. 297
Spe ed,cont rolling
see Cruise control
Spee dLimit Assist
Activating/deactivatin gthe warn-
ing function .................................... 244
Displayi ng...................................... 244
Display message ............................ 272
Display message in the multifunc-
tio nd ispla y.................................... 204
Important safety notes ..................203
Spe ed limi ter
SPEEDTRONIC ............................... 172
Spe edometer
Digita l............................................ 239
In the Instrumen tcluster ................. 30
Segment s...................................... 235
Sel ecting the unit of measure-
ment .............................................. 246
se eI nstrument cluster
SPEEDTRONIC
Activating variabl e......................... 173
Deactivating variabl e..................... 174
Display message ............................ 276
Function/notes ............................. 172
Important safety notes ..................172
LIM ind icator lamp ......................... 173
Permanen t..................................... 174
Sel ecting ........................................ 173
Variab le......................................... 173
SRS (Supplemental Restrain tSys-
tem) Disp laym essage ............................ 261
Introduction ..................................... 41
Warn ingl am p................................. 290
Warning lamp (function) ................... 41
Startin g(engine) ................................ 140
Station seeR adio
STEER CON TROL .................................. 68
Ste ering (display message) ..............281Ste
ering wheel
Adjustin g(electrically )..................... 98
Adjusting (manually )........................ 98
Butto noverview ............................... 33
Clean ing. ........................................ 329
Gearshift paddle s........................... 149
Important safety note s.................... 98
Steering wh eelh eating .................... 99
Storing settings (memory func-
tion) ............................................... 103
Ste erin gwheel gearshift paddles ....149
Ste ering wheel heating
Problem (malfunction) .....................99
Switch ingo n/off .............................. 99
Stowage compartment
Spectacles compartment ...............297
Sto wage compartments
Armrest (under) ............................. 298
Centre consol e.............................. 297
Centre consol e(rear) ..................... 298
Cu ph older ..................................... 306
Glove comp artment ....................... 297
Important safety informatio n......... 296
Luggag enet................................... 298
Summer opening
seeC onv enience opening feature
Summer tyres .................................... 357
Sun visor ............................................ 308
Supplement Restrain tSyst em
se eS RS (Supplemental Restraint
System)
Surround lighting (on-board com-
puter) ................................................. .248
Switchi ngoff the alarm (ATA) ............68 T
Tail gate
Disp laym essage ............................ 280
Emergency unl ocking ....................... 82
Important safety notes ....................79
Limiting the opening ang le ...............82
Opening/closing (automatically
from insi de)...................................... 82
Opening/closing (automatically
from outs ide) ................................... 8118
Index
Page 198 of 389
procedure is calculated, e. g. overhanging
loads, tail sections or loading ramps of goods
vehicles. In some cir
cumstances, Active Park-
ing Assist may therefore guide you into the
parking space too early. Thi smay lead to a
collision. For this reason, you shoul davoid
using Active Parking Assist in such situatio ns.G
WARNING
Th ef ront of th evehicle will veer out in the
direc tion of the oncomin gtraffic during the
parking operatio n. Insome cases the vehicle
will also take you onto section softhe oncom-
ing lan eduring the parking procedure.
You are responsible for safety at all times and
must pay attention to any road users
approaching or passing. Stop the vehicle if
necessary or cancel the Active Parking Assist
parking procedure. G
WARNING
Make sure that no persons or animals are in
the manoeuvring range. Otherwise, they
could be injured.
Use Active Parking Assis tfor parkin gspaces:
R that are parallel to the direction of travel
R that are on straight roads, not bends
R that are on the same level as the road, e.g.
not on the pavement
Parking tips:
R on narrow roads, driv easclosely as possi-
ble past the parkin gspace.
R parking spaces that are littered, overgrown
or partially occupied by trailer drawbars
might be identified incor rectly or not at all.
R snowfall or heavy rain may lea dtoap arking
space being measured inaccurately.
R pay attention to the PARKTRONIC
(Y page 192 )warning message sduring the
parking procedure.
R you can intervene in the steering procedure
to correc titatany time. Active Parking
Assist will then be cancelled. R
whe ntransporting aload which protrudes
from your vehicle, you should not use
Active Parkin gAssist.
R never use Ac tive Parkin gAssist when snow
chains or an emergenc yspare wheel are
fit ted.
R mak esure that the tyre pressures are
always correct. This has adirec tinfluence
on the parking characteristics of the vehi-
cle.
R the wa yyourv ehicle is positioned in the
parking space after parking is dependent
on various factor s. Theseinclude the posi-
tion and shape of the vehicles parked in
front and behind it and the conditions of the
location. In some cases, Active Parking
Assist may guid eyou too far int oaparking
space, or not far enough into it. In some
cases, it may also lead you across or onto
the kerb. If necessary, you should abort the
parking procedure with Active Parking
Assist.
R you can also engage forward gear prema-
turely. The vehicle redirects and does not
drive as far into the parking space. Should
ag ear be changed too earl ytoa chieve a
sensible parkin gposition ,the parkin gpro-
cedure wil lbeaborted.
! If unavoidable, you should driv eover
obstacles such as kerb sslowly and not at
as har pangle .Otherwise, you may damage
the wheels or tyres.
Detectin gparking spaces Active Parking Assis
tiss witched on automat-
ically when driving forwards. The system is
operational at speed sofuptoa pproximately
35 km/h. While in operation, the system inde-
pendently locates and measures parking
spaces on both sides of the vehicle. When
driving at speeds below 30 km/ h,you will see
the parking symbol as astatus indicato rinthe
instrumen tcluster. Activ eParking Assist only
displays parking spaces on the front-
passe nger side as standar d.Parking spaces
on the driver' sside are displayed as soon as Driving systems
195Drivingand parking Z
Page 336 of 389
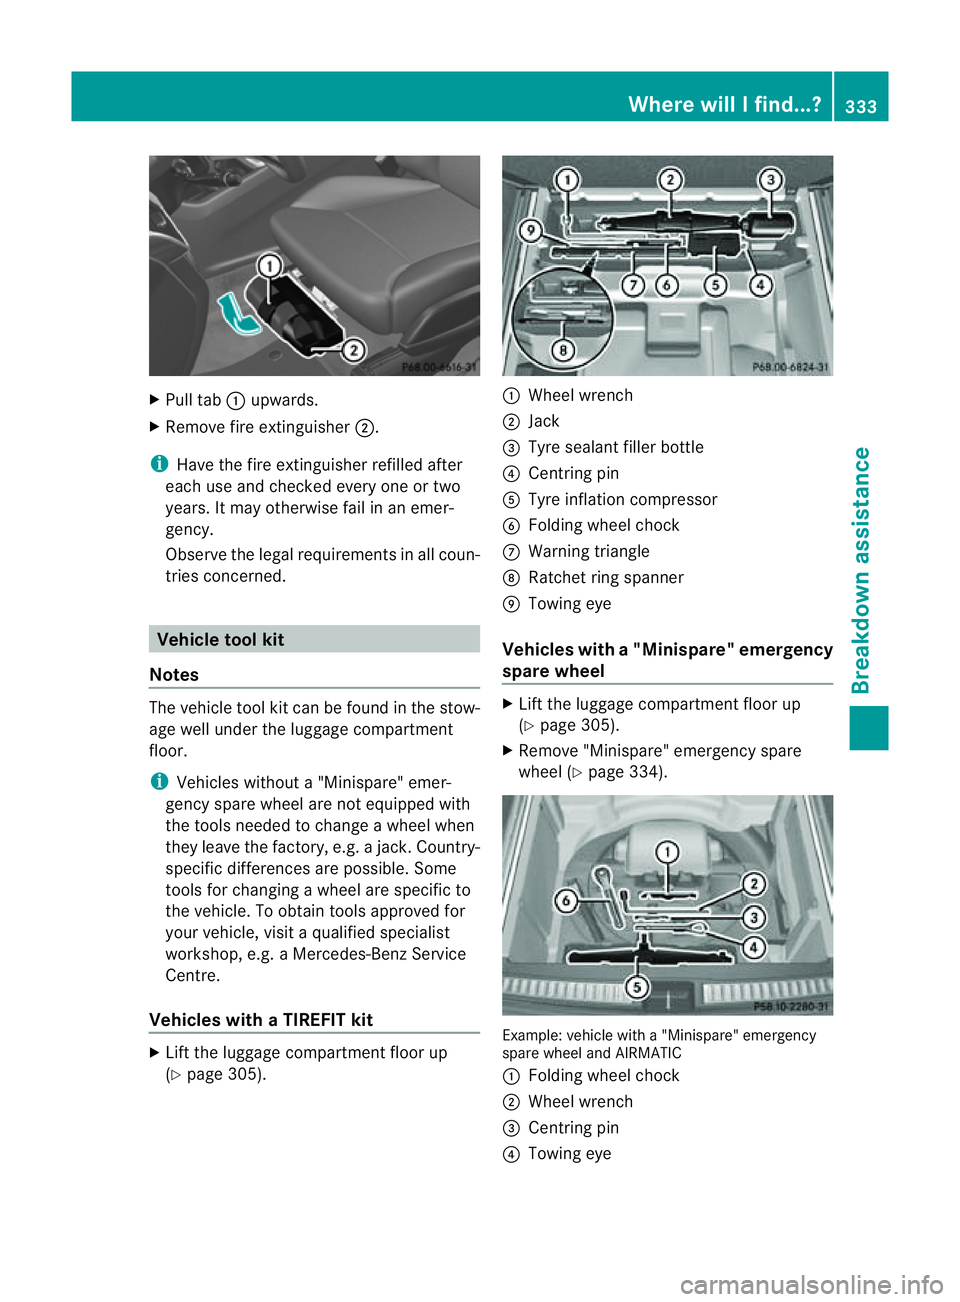
X
Pull tab :upwards.
X Remove fir eextinguisher ;.
i Have the fire extinguisher refille dafter
each us eand checked every one or two
years. It may otherwis efail in an emer-
gency.
Observe the legal requirement sinall coun-
tries concerned. Vehicle tool kit
Notes The vehicle tool kit can be foun
dinthe stow-
age well under the luggage compar tment
fl oor.
i Vehi cles without a"Minispare" emer-
gency spar ewheel ar enot equipped with
the tools needed to change awheel when
the yleave the fac tory, e.g .ajack. Country-
spe cificd ifferences are possible. Some
tools for changing awheel ar especific to
the vehicle. To obtain tools approved for
your vehicle, visit aqualified specialist
workshop, e.g. aMercedes-Benz Service
Centre.
Vehicles with aTIREFIT kit X
Lif tthe luggage compartmen tfloor up
(Y page 305). :
Wheel wrench
; Jack
= Tyre sealant filler bottle
? Centrin gpin
A Tyre inflation compressor
B Foldin gwheel chock
C War ning triangle
D Ratchet rin gspanner
E Towing eye
Vehicles with a"Min ispare" emerg ency
spare wheel X
Lift the luggage compartm entfloor up
(Y pag e305).
X Remove "M inispare" emergency spare
whee l(Ypag e334). Example
:vehicle with a"Minispare" emergency
spar ewheel and AIRMATIC
: Foldin gwheel chock
; Wheel wrench
= Cent ring pin
? Towing eye Where wil
lIfind...?
333Breakdownassista nce
Page 337 of 389

A
Jack
B Ratchet rin gspanner "M
inispare" emergency spare wheel
The "Minispare" emergency spar ewheel can
be fou ndin th estowage well unde rthe lug-
gage compartmen tfloor.
X Lif tthe luggage compar tment floor up
(Y page 30 5). X
Tur nemergency spare whee lretainer ;
anti-clockwise and rem ove it.
X Remove "Minis pare" emergency spare
wheel :.
For fur ther information on changing awheel
and fittin gthe spar ewheel, see
(Y page 33 4). Flat tyre
Preparing th
evehicle
Your vehicle may be equipped with:
R aT IREFIT kit
R an eme rgency spare wheel
R MOExtende dtyre s(tyres with run-flat char-
acteristics) (Y page 342)
i Vehicle preparation is not necessary on
vehicles with MOExtended tyres.
i Vehicles with MOExtended tyre sare not
equippe dwithaTIREFIT kit at th efactory. It is therefore recommended that you addi-
tionally equip your vehicle with
aTIREFIT kit
if yo ufit tyre sthat do not fea ture run-flat
prope rties, e.g. winter tyres. ATIREFIT kit
can be obtaine dfrom aMercedes-Benz
Servic eCentre.
X Make sure that highway level is selec-
ted 22
(Y page 183).
X Stop the vehicle as far away as possible
from traffic on solid, non-slippery and level
ground.
X Switch on the hazar dwarning lamps.
X Apply the electric parking brake manually
(Y page 161).
X Bring the front wheels into the straight-
ahead position.
X Move the DIRECT SELECT lever to P.
X Switch off the engine.
X Vehicles without KEYLESS-GO: remove
the key from the ignition lock.
X Vehicles with KEYLESS-GO: open the
driver' sdoor.
The on-boar delectronics have status 0,
which is the same as the key having been
removed.
X Vehicles with KEYLESS-GO: removethe
Star t/Stop butto nfrom th eignition lock
(Y page 139).
X All occupants must get out of the vehicle.
Make sure that they ar enot endangered as
they do so.
X Make sure that no one is near the danger
area whilst awheel is being changed. Any-
one who is not directly assisting in the
wheel change should, for example, stand
behind the barrier.
X Get out of the vehicle. Pay attention to traf-
fic condition swhen doing so.
X Close the driver's door.
22 Vehicles wit hthe ON&OFFROAD package. 334
Flat tyreBreakdown assistance
Page 340 of 389

tems mus
tbec arrie dout at aquali fieds pe-
cialist workshop.
Ty re pressure of 180 kPa (1.8 bar/
26 psi) is reached X
Switch off the tyre inflation compressor.
X Unscrew the fille rhose from the valve of
the faulty tyre.
! Afteru se, excess TIREFIT ma yrun out of
the filler hose. This may cause stains.
Therefore, place the filler hos einthe plastic
bag whic hcontained the TIREFIT kit.
X Stow the tyr esealan tbottle, the tyr einfla-
tion compresso rand the warning triangle.
X Pull away immediately. G
WARNING
Do not exceed the maximum speed of
80 km/h.
The "max. 80 km/h" labe lmust be affixed in
the driver's field of vision.
The vehicle's handling characteristic smay be
affected.
X Stop after driving for approximately ten
minutes and check the tyre pressure with
the tyre inflation compressor. G
WARNING
If the tyre pressure is less than 130 kPa
(1.3 bar/2 0psi), the tyr eistoo severely dam-
aged. Do not driv eany further. Consult a
qualified specialis tworkshop which has the
necessary specialist knowledge and tools to
carry out the work required .Mercedes-Benz
recommends that you use aMercedes-Benz
Ser vice Centre for thi spurpose. In particular,
work relevant to safety or on safety-related
systems must be carried out at aqualified
specialist workshop.
X Correct the tyre pressure if it is still at least
130 kPa (1.3 bar/20 psi) (for the values,
see the fuel filler flap). X
To increase the tyr epressure: switchon
the tyre inflation compressor. E
Pressure releas ebutton
F Pressure gauge
X To reduce the tyr epressur e:press pres-
sure release button Eon the filler hose.
X Stow the tyr esealan tbottle, the tyr einfla-
tion compresso rand the warning triangle.
X Drive to the neares tworkshop and have the
tyr ec hange dthere.
X Hav ethe tyr esealan tbottle replaced as
soon as possible at aqualified specialist
workshop, e.g. at aMercedes-Benz Ser vice
Centre. H
Environmental note
Have the use dtyre sealant bottle dispose dof
professionally, e.g. at aMercedes-Benz
Ser vice Centre.
X Have the tyre sealant bottle replaced every
four years at aqualified specialist work-
shop, e.g. aMercedes-Benz Ser vice
Centre. Changing
awhee land fitting th espare
wheel
Preparing the vehicle G
WARNING
The wheel and tyre size of the emergency
spare wheel/s pare wh eelm ay differ to tha tof
the damaged wheel. Whe nusing an emer- Flat ty
re
337Breakd ownassistance
Z
Page 341 of 389
genc
yspare wheel/spar ewheel the handling
characteristic softhe vehicle ma ychange.
Adap tyour style of driving accordingly.
Never operate the vehicle with mor ethan one
emergenc yspare wheel/spar ewheel that dif-
fer sins ize.
Only use an emergenc yspare wheel/spare
wheel of adiffering size briefly and do not
switch off ESP ®
.
When using an emergenc yspare wheel you
must not exceed the maximum speed of
80 km/h. G
WARNING
Hav ethe emergenc yspare wheel/spare
wheel replaced with anew wheel as soon as
possible at aqualified specialist workshop
which has the necessary specialist knowledge
and tools to carry out the work required.
Mercedes-Benz recommends that you use a
Mercedes-Benz Service Centre for this pur-
pose .Inp articular, work relevant to safety or
on safety-related systems must be carried out
at aq ualified specialist workshop.
i Vehicles withou tanemergency spare
wheel/spare whee lare not equippe dwith
wheel-changing tools at the factory. For
more information on which tools are
required to perfor mawheel change on your
vehicle, e.g. wheel chock ,wheel wrenc hor
centring pin, consult aMercedes-Benz
Servic eCentre.
X Prepar ethe vehicle as described
(Y page 334).
X Ifat railer is coupled to th evehicle, uncou-
ple it.
X Remov ethe followin gitems (depending on
the vehicle's equipment) from the stowage
well under the luggage compartment floor:
R the emergency spare wheel 23
R the whee lwrench
R thef olding wheel chock
R the jack R
the ratchet rin gspanner
R the centrin gpin
X Secur ethe vehicle to preven titfrom rolling
awa y.
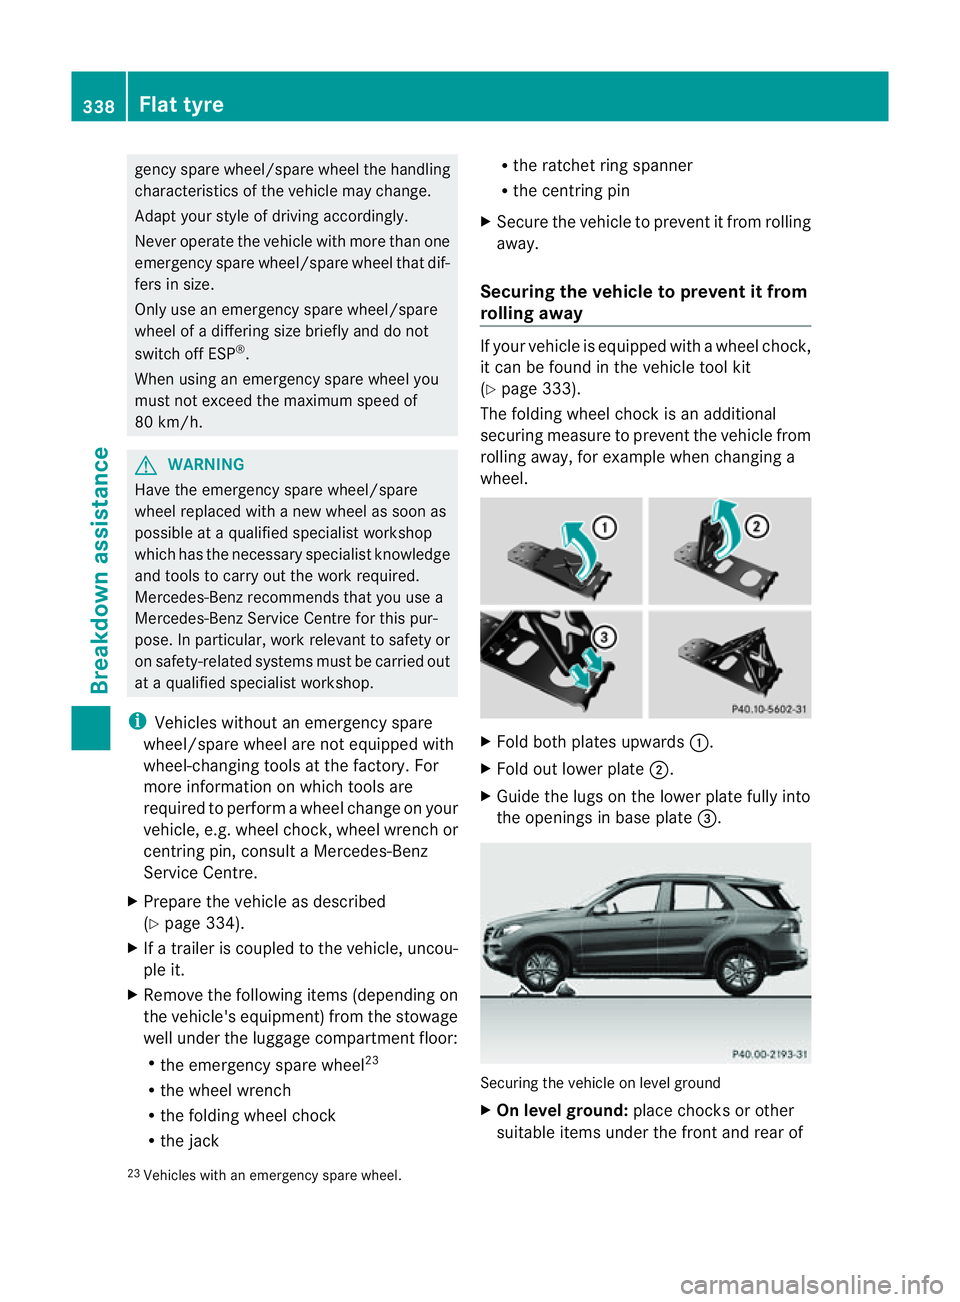
Se curing the vehicle to prevent it from
rolling away If your vehicle is equippe
dwithaw heel choc k,
it can be found in the vehicle tool kit
(Y page 333).
The folding wheel chock is an additional
securing measure to prevent the vehicle from
rolling away, for example when changing a
wheel. X
Fold both plates upwards :.
X Fold out lower plate ;.
X Guide the lugs on the lower plate fully into
the openings in base plate =. Securing the vehicle on level ground
X
On level ground: place chocksorother
suitable items under the front and rear of
23 Vehicles with an emergenc yspare wheel. 338
Flat tyreBreakdown assistance
Page 344 of 389

sons, Mercedes-Benz recommends that you
only use wheel bolts whic hhave been
approved for Mercedes-Benz vehicles and the
respective wheel. Other wheel bolts could
work loos eordamage the brake system.
Do not tighten the wheel bolts completely
while the vehicle is still jacked up. The vehicle
could topple off the jack. :
Whee lbolts for all wheels supplied by the
factory
2 Wheel bolts for the "Minispare" emer-
genc yspare wheel
! Always use wheel bolts ;to fit the col-
lapsible emergency spare wheel. Using
other wheel bolts to fit the collapsible
emergency spare wheel could damage the
brak esystem.
X Clea nthe wheel and wheel hub con tact
surfaces. X
Slid ethe emergenc yspare wheel onto the
centrin gpin and push it on. X
Tighten the wheel bolts until they are fin-
ger-tight.
X Unsc rewt he cen tring pin.
X Tighten the last wheel bol tuntil it is finger-
tight.
Lowerin gthe vehicle X
Place th eratchet ring spanner onto the
hexago nnut of the jack so that the letters
AB are visible.
X Turn the ratchet ring spanner until the vehi-
cle is once again standing firmly on the
ground.
X Place the jack to one side. X
Tighten the wheel bolts evenly in across-
wis epattern in the sequence indicated
(: toA ). The tightening torque must be
150 Nm. G
WARNING
Have the tightening torque checked immedi-
ately after awheel is changed. The wheels
coul dwork loose if they are not tightened to
at orqu eof150 Nm.
X Turn the jack back to its initia lposition and
stor eitt ogether with the rest of the tyre-
change tool kit in the luggage compart-
ment.
Vehicles with an emergenc yspare wheel:
X Wrap the faulty wheel in the protec tive film
included with the emergenc yspare wheel Flat ty
re
341Breakd ownassistance Z