2011 MERCEDES-BENZ M-CLASS SUV ignition
[x] Cancel search: ignitionPage 234 of 389
X
To switc hthe conn ected powe rsupply
on or off: turn thekey in the ignition lock
to position 2or 0respectivel y. Bulb failure indi
cator for LE Dlamps
i If LED lamps are fitte dinthe trailer, an
error message ma yappear in the multi-
function display even if there is no fault. The
reason for the error message may be that
the current has fallen below the minimum
of 50 milliamper es(mA).
To ensure reliabl eoperation of the bul bfailure
indicator, each LED chai ninthe trailer lighting
must be guaranteed aminimum current of
50 mA. Trailer with 7-pin connector
Genera linforma tion If your trailer has
a7-pin connector, you can
connect it to the 13-pin socket on the ball
coupling using an adapter or, if necessary, an
adapter cable .Both of these can be obtained
at aq ualified specialist workshop, e.g. at a
Mercedes-Ben zService Centre.
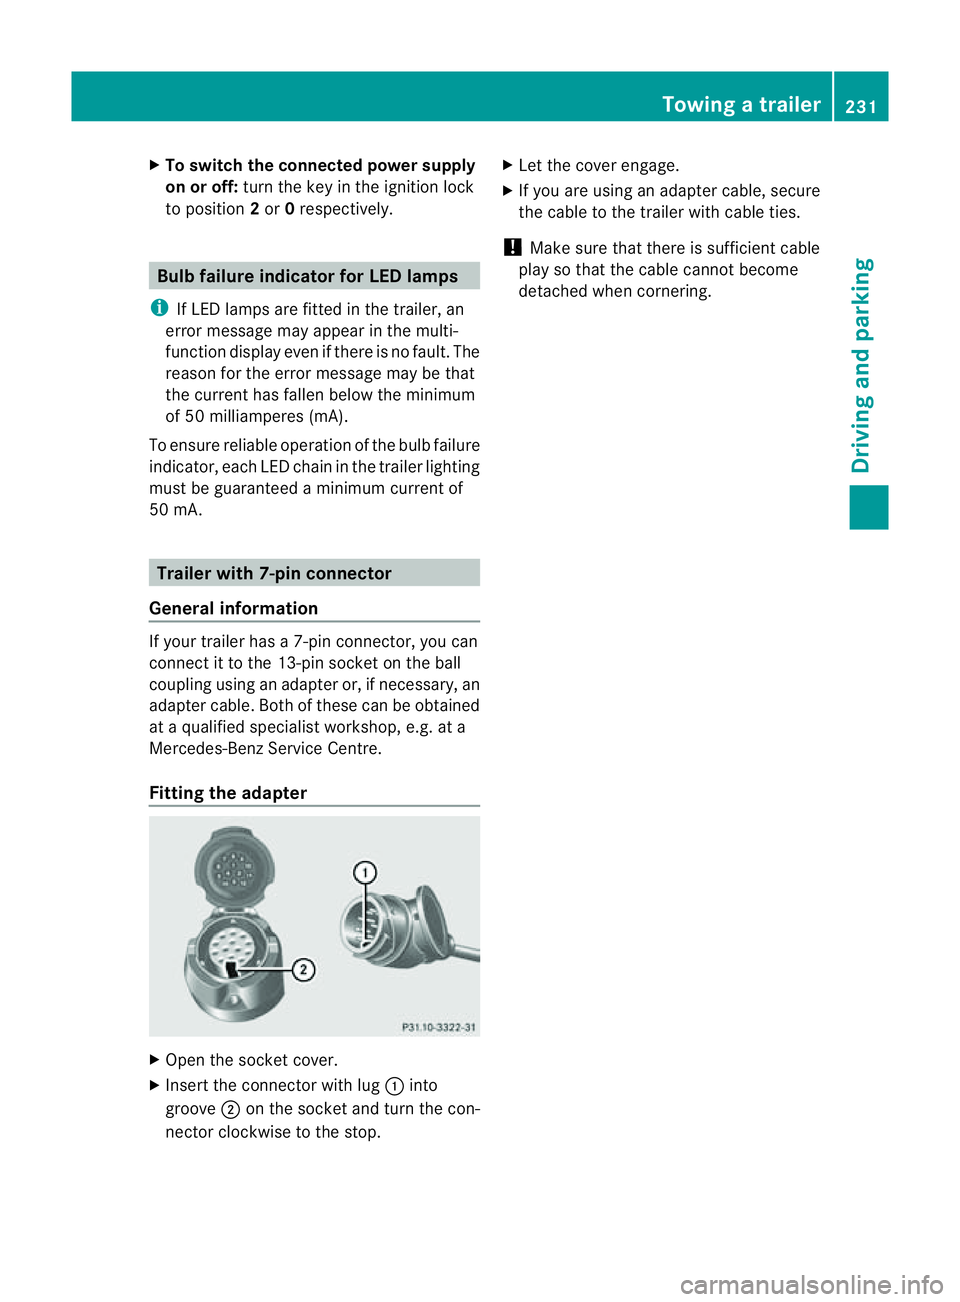
Fitting the adapter X
Open the socket cover.
X Insert the connector with lug :into
groove ;on the socket and tur nthe con-
nec torc lockwise to the stop. X
Let the cover engage.
X If you are using an adapter cable, secure
the cable to the trailer with cable ties.
! Make sure that there is sufficient cable
play so that the cable cannot become
detached when cornering. Towing
atrailer
231Driving andparki ng Z
Page 238 of 389
or on bridges. If you do not adapt your driving
style to the conditions, the vehicle coul dskid.
For this reason, adapt your driving style and
speed to the weather conditions.
Changes in the outside temperature are dis-
playe dafter ashort delay. Speedometer wit
hsegments
The segment sinthe speedometer indicate
whic hspeed range is available.
Cruise control (Y page 170) activated:
The segment slight up from the stored speed
to the maximum speed.
Variable SPEEDTRONI C(Ypage 172) activa-
ted:
The segment slight up from the start of the
scale to the selected limit speed.
DISTRONIC PLU S(Ypage 174) activated:
One or two segment sinthe set speed range
light up.
DI ST RONIC PLUS detects avehicle in front:
The segment sbetween the speed of the vehi-
cle in front and the stored speed light up. Opera
ting th eon-board computer
Overview The on-board computer is activated as soon
as you tur nthe key to position 1in the ignition
lock.
You can con trol the multifunc tion display and
the settings in the on-boar dcomputer using
the button sonthe multifunc tion steering
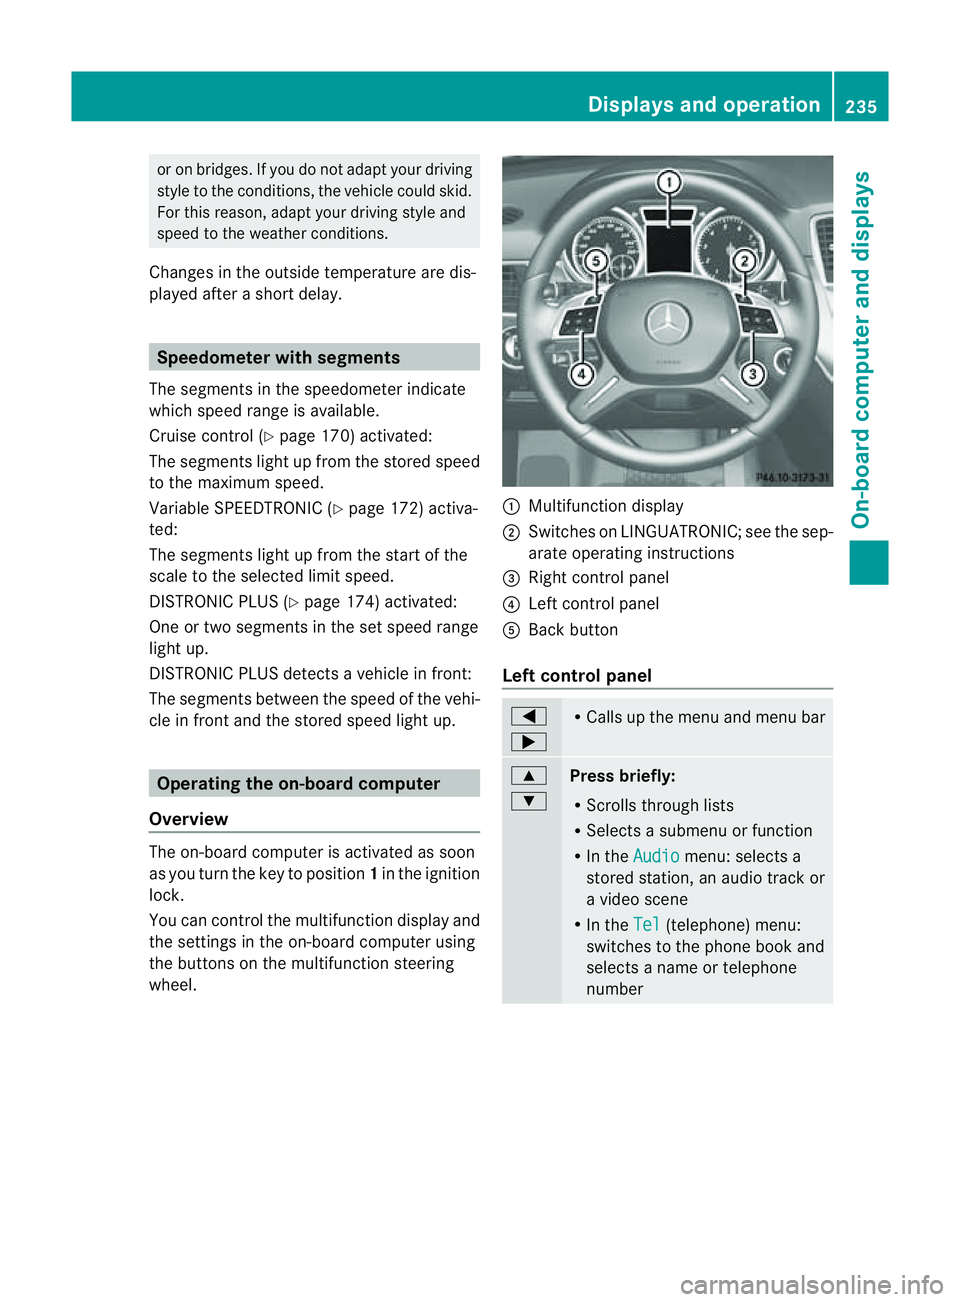
wheel. :
Multifunc tion display
; Switches on LINGUATRONIC ;see the sep-
arate operating instructions
= Right control panel
? Leftcontrol panel
A Bac kbutton
Left control panel =
; R
Call supt he men uand menu bar 9
:
Pres
sbriefly:
R Scrolls throug hlists
R Select sasubmenu or function
R In the Audio menu: selects a
stored station, an audio track or
av ideo scene
R In the Tel (telephone) menu:
switches to the phone book and
selects aname or telephone
number Displays and operation
235On-boardcomputer and displays Z
Page 242 of 389

The
Audio ,
Navi and
Tel menus differ slightly in vehicles with an audio system and vehicles
with COMAN DOnline. The example sgiven in this Owner' sManual apply to vehicles equipped
with COMAND Online. Trip menu
Standard display X
Press and hold the %button on the
steering wheel until the Trip menu with
total distance recorder :and trip
meter ;is shown.
Trip computer "From start" or "From
reset" The values in the
From start submenu are
calculated from the start of ajourney, whilst
the values in the From reset submenu are
calculated from the last tim ethe submenu
was reset (Y page 240).
X Press the =or; button on the steer-
ing wheel to selec tthe Trip menu.
X Press 9or: to select From start or
From reset .
Tri
pc omputer "From star t"(example)
: Distance
; Time
= Average speed
? Average fuel consumption The
From start trip computer is reset auto-
matically when:
R the ignition has been switched off for more
than four hours.
R 999 hours have been exceeded.
R 999 9kilometres have been exceeded.
The From reset trip computer is reset if the
trip exceeds 999 9hour sor9 9,999 kilome-
tres.
Displaying the rang eand cur rent fuel
consumption X
Press the =or; button on the steer-
ing wheel to select the Trip menu.
X Press the 9or: button to select
curren tfuel consumption and approximate
range. :
Approximate range
; Current fuel consumption
Approximate range :is calculated accord-
ing to curren tdriving style and th eamount of
fue lint he tank. If ther eisonlyasmal lamount
of fue lleft in the fuel tank ,the display shows
av ehicle being refuelled Cinstead of
range :.
Digital speedometer X
Press the =or; button on the steer-
ing whee ltoselect the Trip menu.
X Press the 9or: button to select the
digital speedometer. Menus and submenus
239On-boardcomputer and displays Z
Page 248 of 389
tio
nd isplay shows the Äsymbol when the
ignition is switched on.
Showing distance display This function is only available with DIS-
TRONI CPLUS.
X Press =or; on thesteerin gwheel
to selec tthe Assist. menu.
X Press the 9or: button to select
Distance display .
X Press a.
The DI STRONIC PLUS distance display
(Y page 177) appears in the multifunction
display.
Activating/deactivatin gthe PRE-SAFE ®
Brake PRE-SAFE
®
Brake is onl yavail able in vehicles
with DISTRONIC PLUS.
X Press =or; on the steering wheel
to select the Assist. menu.
X Press 9or: to select PRE-SAFE Brake .
X Press the abutton.
The current selection is displayed.
X To activate/deactivate: pressa
again.
When PRE-SAFE ®
Brake (Y page 66) is acti-
vated, the multifunction displa yshows the
Ä symbol as long as the HOL Dfunction is
not activated (Y page 187).
Vehicles with Active Parking Assist: if
PARKTRONIC is activated and you are driving
at as peed under 35 km/h, the jActive
Parking Assist symbol is shown instead of the
Ä symbol. Activating/deactivating ATTENTION
ASSIST X
Press =or; on the steerin gwheel
to selec tthe Assist. menu.
X Press the 9or: button to select
Attentio nAsst. .
X Press a.
Th ec urrent selection is displayed.
X To activate/deactivate: pressa
again.
When ATTENTION ASSIST (Y page 202)is
activated, the Àsymbol appears in the
multifunction displ aywhen the ignition is on.
Activating/deactivating Blind Spot
Assist You can use the
Blind Spot Asst. func
tion
to activate or deactivate Blin dSpot Assist
(Y page 208) or Active Blin dSpot Assist
(Y page 212).
X Press =or; on the steerin gwheel
to selec tthe Assist. menu.
X Press 9or: to select Blind Spot
Asst. .
X Press a.
The curren tselection is displayed.
X To activate/deactiva te:press a
again.
Activating/deactivating Lane Keeping
Assist You can use the
Lane Keep. Asst. function
to activate/deac tivate Lane Keeping Assist
(Y page 210) or Active Lane Keeping Assist
(Y page 215).
X Press =or; on the steering wheel
to select the Assist. menu.
X Press 9or: to select Lane Keep.
Asst. .
X Press a.
The current selection is displayed.
X Press the abutton to confirm. Menus and submenus
245On-boardcomputerand disp lays Z
Page 249 of 389

X
Press :or9 to set Off ,
Standard or
Adaptive .
X Press the abutton to save the setting.
When Lane Keeping Assist or Active Lane
Keeping Assist is activa ted, the Ãsymbol
appear sint he multifunction displa ywhen the
ignition is on. Servic
emenu In the
Service menu you can:
R call up display messages (Y page 253)
R reset the tyre pressure loss warnin gsystem
(Y page 360) or check the tyre pressure
electronically (Y page 361)
R call up the service due date (Y page 322)Settings menu
Introduction The
Settings menu can be used for:
R changing the instrument cluster settings
R changing the ligh tsettings
R changin gthe vehicle settings
R changin gthe auxiliary heating settings
R changin gthe con venience set tings
R resto ring the factory settings Instrument cluster Selectin
gthe uni tofmeasurement for dis-
tance
The Displa yunit Speed-/odometer: function allows yo
utochoose whether cer-
tai nd isplays appear in kilometres or miles.
The selected unit of measurement for dis-
tanc eapplies to:
R the digital speedometer in the Trip menu
R the total distanc erecorder and the trip
meter
R the trip computer
R the curren tconsumption and the range
R the navigation instruction in the Navi menu
R cruise con trol
R SPEEDTRONIC
R DIST RONIC PLUS
R ASSYST PLUS service interval display
X Press the =or; button on the steer-
ing whee ltoselect the Settings menu.
X Press the :or9 button to select the
Inst .cluster submenu.
X Press the abuttontoc onfirm.
X Press the :or9 button to select the
Displa yunit Speed-/odometer func-
tion.
Yo uw ill see the selected setting: km or
miles .
X Press the abutton to save the setting.
Selecting the permanent display function
i Vehicles for the United Kingdom: this
func tion is not available.
The Permanen tdisplay: function allows
yo utoc hoose whether the multifunction dis-
play always shows the outside temperature
or the speed in mph.
X Press the =or; button on the steer-
ing wheel to selec tthe Settings menu.
X Press the :or9 button to selec tthe
Inst .cluster submenu.
X Press the abuttontoc onfirm. 246
Menu
sand submenusOn-board computer and displays
Page 251 of 389
Switching Adaptive Highbeam Assist on/
off
X Press the =or; button on the steer-
ing wheel to select the Settings menu.
X Press the :or9 button to select the
Light submenu.
X Press the abutton to con firm.
X Press the :or9 button to select the
Adaptive Main-bea mAssist: function.
Yo uw ill see the selected setting: Activa‐ted or
Deactivated .
X Press the abutton to save the setting.
Setting the brightness of the ambient
lighting
X Press the =or; button on the steer-
ing wheel to select the Settings menu.
X Press the :or9 button to select the
Light submenu.
X Press the :or9 button to select
Ambien tlight .
Yo uw ill see the selected setting.
X Press the abutton to confirm.
X Press the :or9 button to adjust the
brightness to any level from Off to
Level 5 (bright).
X Press the aor% button to save the
setting.
Setting the ambient lighting colour
X Press the =or; button on the steer-
ing wheel to select the Settings menu.
X Press the :or9 button to select the
Light submenu.
X Press the abutton to confirm.
X Press the :or9 button to select the
Ambien tlight colour function.
X Press the abuttontoc onfirm.
X Press the :or9 button to set the
colou rtoSOLAR ,
NEUTRAL or
POLAR .
X Press the aor% buttontos ave the
setting. Activating/deactivating the surround
lighting and exterior lighting delayed
switch-off
If you have activated the
Surround light‐ ing function and the light switch is set to
Ã,t he followin gfunctions are activated
when it is dark:
R Surround lighting: the exterior lighting
remains lit for 40 seconds after unlocking
with the key. If you start the engine, the
surround lighting is switched off and the
automatic headl ampm ode is activated
(Y page 107).
R Exterior lighting delaye dswitch-off: the
exterior lighting remains lit for 60 seconds
after the engine has been switche doff. If
you close all th edoors, the exterior lighting
goes off after 15 seconds.
If you activate the Surround lighting func-
tion ,the followin glight up depending on the
vehicle' sequipment:
R the side lamps
R the daytim edriving lights
R thes urround lighting in the exterior mirrors
X Press the =or; button on the steer-
ing wheel to select the Settings menu.
X Press the :or9 button to select the
Light submenu.
X Press the abutton to confirm.
X Press the :or9 button to select the
Surround lighting function.
You will see the selected setting: on or
off .
X Press the abutton to save the setting.
Deactivating delayed switch-off of the exte-
rior lighting temporarily:
X Before leaving the vehicle, turn the key to
position 0in the ignition lock.
X Turn the key to position 2in the ignition
lock and back to position 0.
The exterior lighting delayed switch-off is
deactivated. 248
Menus and submenusOn-board computer and displays
Page 252 of 389

Delayed switch-off of the exterio
rlight ing is
reactivate dthe nex ttime yo ustart the
engine.
Activating/deactivating the interior light-
in gd elay ed switch -off
If yo uactivat ethe Interior lighting delay sw. off function, the
interiorlighting
remain sonfor 20 seconds after you rem ove
th ek ey fr om th eignition lock.
X Press the =or; button on the steer-
ing wheel to selec tthe Settings menu.
X Press the :or9 button to selec tthe
Light submenu.
X Press the abutton to confir m.
X Press the :or9 button to select the
Interior lighting dela ysw. off: function.
Yo
uw ill see the selected setting: on or
off .
X Press the abutton to save the setting.
Vehicle Setting permanent SPEEDTRONIC
You can set permanent SPEEDTRONIC
(Y page 174 )using the Limitspeed (win‐ ter tyres) function.
X Press the =or; buttononthe steer-
ing wheel to selec tthe Settings menu.
X Press the :or9 button to selec tthe
Vehicle submenu.
X Press the abutton to confir m.
X Press :or9 to select the Limit spee
d(winter tyres): function.
Yo uw ill see the current setting.
X Press the abutton to confir m.
X Press :or9 to adjust permanent
SPEEDTRONIC in increments of 10
(24 0k m/h to
160 km/h ). The
Off setting
switches permanen tSPEEDTRONIC off.
X Press the abutton to store the entry. Switching th
eautomatic lockin gfeatu re
on/off
If you select the Automatic door lock func-
tion, the vehicle is centrally locked above a
speed of around 15 km/h.
i For further information on the automatic
locking feature, see (Y page 78).
X Press the =or; button on the steer-
ing wheel to select the Settings menu.
X Press the :or9 button to select the
Vehicle submenu.
X Press the abutton to confir m.
X Press the :or9 button to select the
Automati cdoor lock function.
Yo uw ill see the selected setting: on or
off .
X Press the abutton to save the setting.
Activating/deactivating the acoustic
locking confirmation
If you switch on the Acoustic Lock feed‐ back func
tion, an acoustic signal sounds
when you lock the vehicle.
X Press the =or; button on the steer-
ing wheel to select the Settings menu.
X Press the :or9 button to select the
Vehicle submenu.
X Press the abutton to confir m.
X Press the :or9 button to select the
Acoustic Lock feedback: function.
You will see the selected setting: Activa‐ ted or
Deactivated .
X Press the abutton to save the setting.
Activating/deactivating th eradar sensor
system
i Youm ust deactivate the radar senso rsys-
tem in certain countries and near radio
telescope facilities .For further informa-
tion ,see (Y page 380).
When you are close to radi otelescope facili-
ties, the rada rsensor system will be deacti-
vated automatically. Menu
sand submenus
249On-boardcomput er anddisplay s Z
Page 255 of 389
X
Press the :or9 to select the Fold mirror
sinwhen locking: function.
Yo uw ill see the selected setting: on or
off .
X Press the abutton to save the setting.
Resetting to factor ysettings For safety reasons
,not al lfunction sare reset:
the Limit speed (winter tyres) function
in permane ntSPEEDTRONI Ccan only be set
in the Vehicle submenu. If you want to reset
the Daytim edriving lights: fun
ction in
the Light submenu, you must tur
nthe key in
the ignition lock to position 1.
X Press the =or; button on the steer-
ing wheel to selec tthe Settings menu.
X Press the :or9 button to selec tthe
Factor ysetting submenu.
X Press the abuttontoc onfirm.
The Rese tall settings? message
appe ars.
X Pres sthe : or9 button to select
No or
Yes .
X Press the abutton to confir mthe selec-
tion.
If you select Yes ,t
he multifunction display
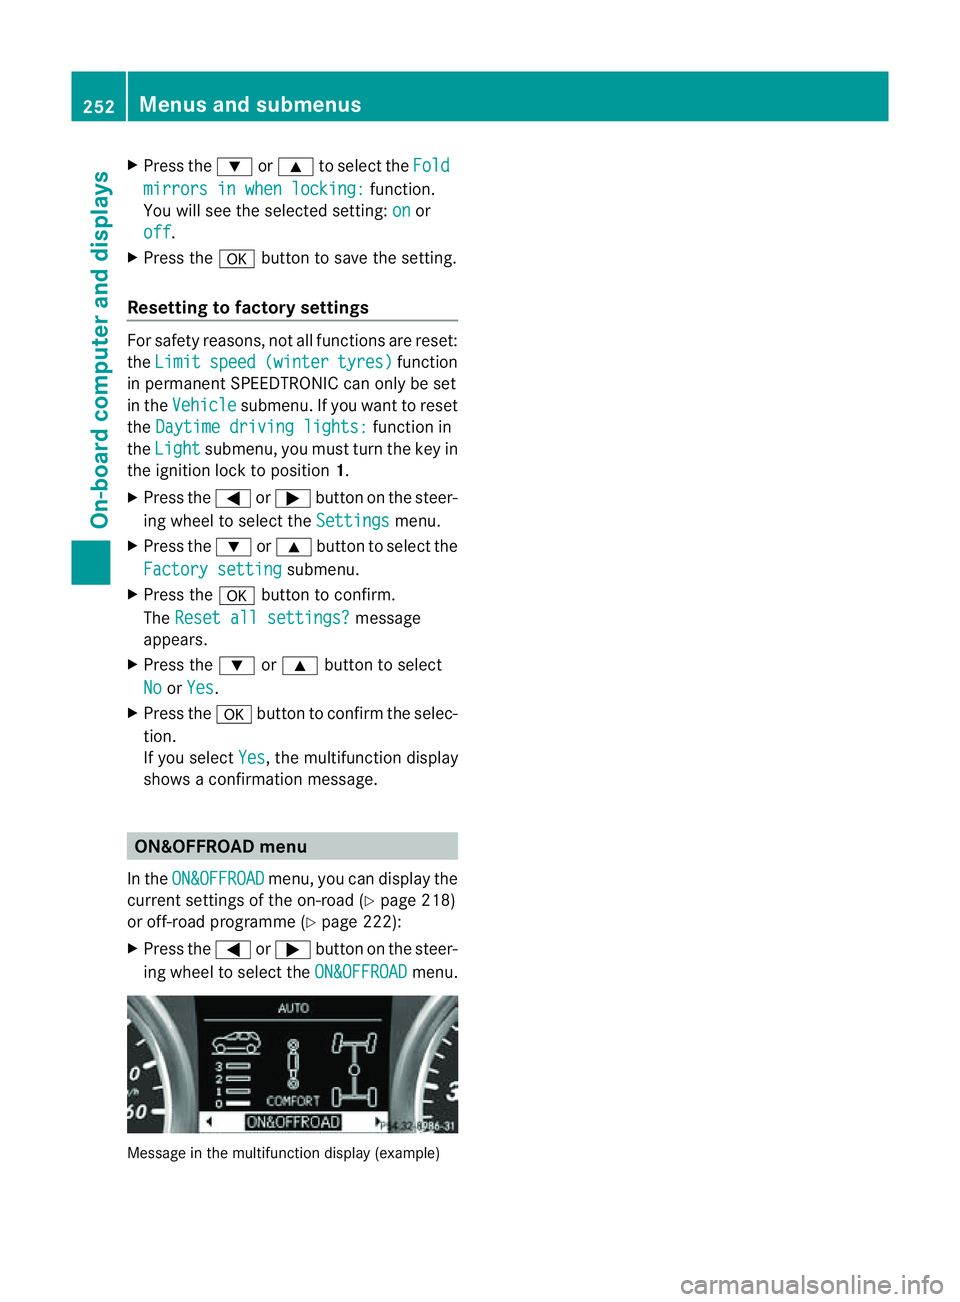
shows aconfirmation message. ON&OFFROAD menu
In the ON&OFFROAD menu, you can display the
curren tsettings of the on-road (Y page 218)
or off-road programm e(Ypage 222):
X Press the =or; button on the steer-
ing wheel to select the ON&OFFROAD menu.
Message in the multifunction display (example)252
Menus and submenusOn-board computer and displays