2011 MERCEDES-BENZ M-CLASS SUV ECO mode
[x] Cancel search: ECO modePage 244 of 389

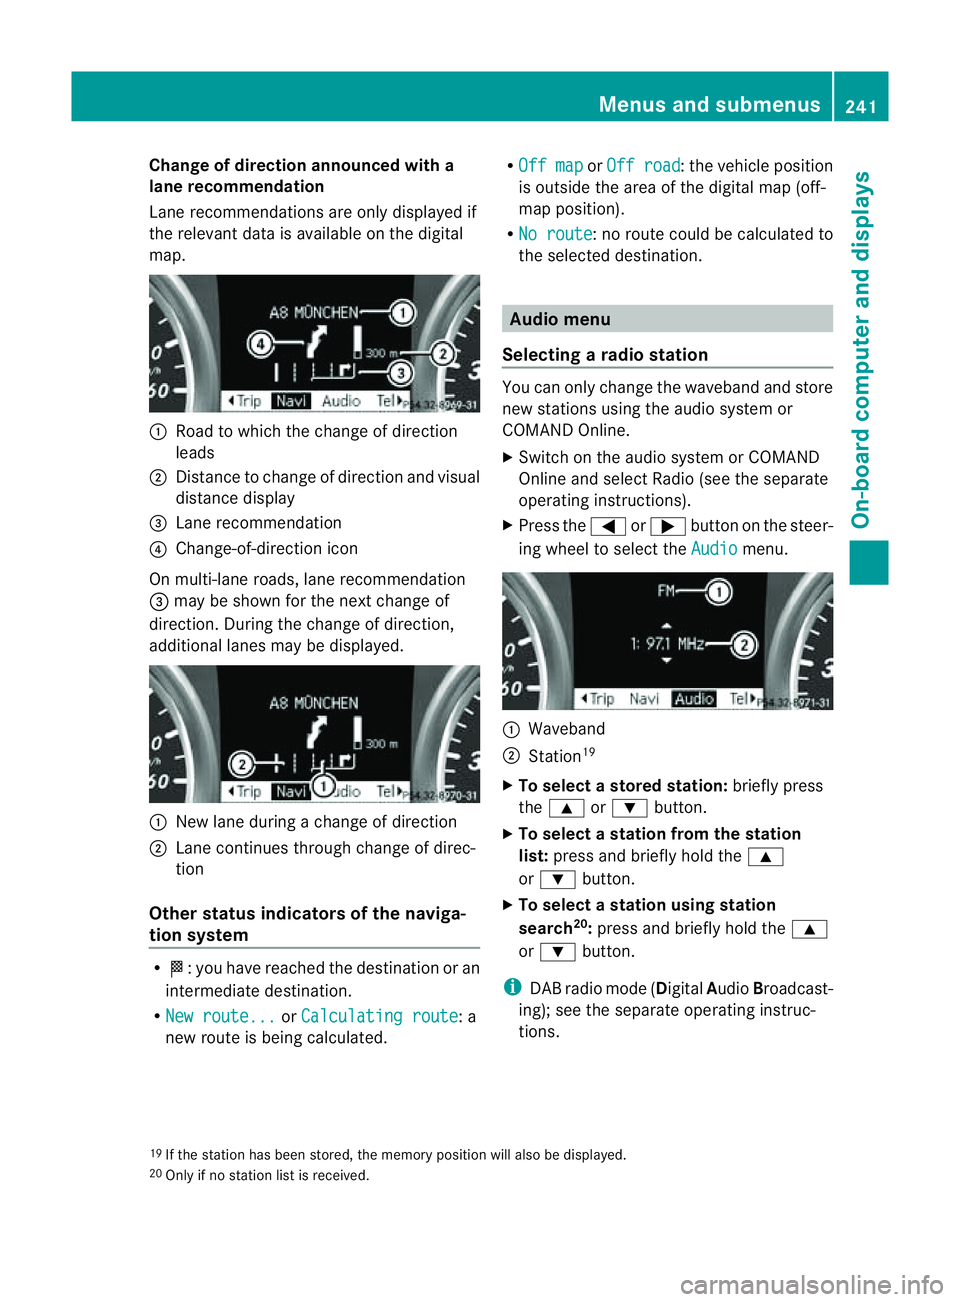
Change of direction announced with a
lane recommend
ation
Lan erecommendations are only displaye dif
the relevan tdata is available on thed igital
map. :
Road to which the change of direction
leads
; Distanc etochange of direction and visual
distanc edisplay
= Lane recommendation
? Change-of-direction icon
On multi-lane roads, lane recommendation
= may be shown for the next change of
direction. Durin gthe change of direction,
additiona llanes may be displ ayed. :
New lane durin gachange of direction
; Lane con tinues throug hchange of direc-
tion
Other sta tusindicators of the naviga-
tion system R
O:y ou have reached the destination or an
intermediate destination.
R Ne wr oute... or
Calculating route :a
new route is being calculated. R
Off map or
Off road :t
he vehicle position
is outside the area of the digital ma p(off-
ma pp osition).
R No route :nor
oute coul dbecalculated to
the selected destination. Audio menu
Selectin garadio station Yo
uc an only change the waveband and store
new stations using the audio system or
COMAND Online.
X Switch on the audio system or COMAND
Online and select Radio (se ethe separate
operating instructions).
X Press the =or; button on the steer-
ing wheel to select the Audio menu.
:
Wav eband
; Station 19
X To selec tastoredstation: brieflypress
the 9 or: button.
X To select astation from the station
list: press and briefl yholdt he 9
or : button.
X To select astatio nusing station
search 20
:press and briefl yholdt he 9
or : button.
i DAB radio mode ( DigitalAudioBroadc ast-
ing); see the separate operating instruc-
tions.
19 If the statio nhas been stored ,the memory po sition will also be displayed.
20 Onl yifnos tation list is received. Menus and submenus
241On-boardcomputer and displays Z
Page 314 of 389

healt
hofothers. Using an exterior aerial takes
into account current scientific discussions
relating to the possibl ehealth risk posed by
electromagnetic fields.
Mercedes-Ben zrecom mends the use of an
approved exterior aerial .This ensures:
R optimal mobile phone reception quality in
the vehicle
R mutua linfluences between the vehicle
electronics and mobil ephones ar emini-
mised
An exterior aerial has the following advan-
tages:
R it conducts the electromagnetic fields gen-
erated by awireless device to the exterior.
R the field strengt hinthe vehicle interior is
lower than in avehicle that does not have
an exterior aerial.
i There are various mobile phone brac kets
that may be fitted to your vehicle ;insome
cases, these ar ecountry-specific.
i Even if your vehicle is equipped with con-
venience telephony, you can connec ta
Blueto oth®
capable mobil ephone to Audio
20 or COMAND Online via the Bluetooth ®
interfac e.
More information on suitabl emobilephones,
mobile phone brackets and on connecting
Bluetooth ®
capable mobile phones to Audio
20 or COMAND Online can be obtained:
R at your Merc edes-Ben zServ iceC entre
R on the Internet at http://www.mercedes-
benz.com/connect
i The functions and service savailab lewhen
you use the phone depend on you rmobile
phone model and service provider. Inserting th
emobile phone X
Open the telephone compartment
(Y page 298).
X If required by the design of the mobile
phone bracket ,instal lthe slidin gadapter
(Y page 312).
X Insert the mobile phone into the mobile
phone bracket (see the separat emobile
phone bracke tinstallatio ninstructions).
If the mobil ephone is inser tedint he mobile
phone bracket ,you can speak to the person
you ar ecalling using the hands-free system.
i On some mobile phone brackets, you first
have to connect the mobile phone via Blue-
tooth ®
to am obile phone bracke t(see the
separate operating inst ructions for the
mobile phone bracke t).
On these mobile phone brackets, the
mobile phone does not hav etobeinserted
into the bracket for you to be able to use
the telephone functions .Inthis case ,the
charging func tion and aerial func tion are
not available.
Operating th emobile phone You can operate the telephone using the
6 and~ button sonthe multifunc tion
steering wheel. You can operate other mobile
phone func tions via the on-boar dcomputer
(Y page 242).
If you tak ethe key out of the ignition lock ,the
mobile phone stay sonb ut you can no longer
use the hands-free system.
If you are making acall and you would like to
take the key out of the ignition lock, first
remove the mobile phone from the bracket.
Otherwise, the call will be ended.
i When amobile phone bracke tisu sed that
is con nected to the mobile phone via Blue-
tooth ®
:ify ou wan ttocontinue acall in
"Private mode", you have to perform the
necessary steps on the mobile phone (see Features
311Stowingandfeatures Z
Page 321 of 389

Usefu
linfor mati on
i This Owner's Manual describes all models
and all standard and optional equipment
available to your vehicle at the time of pub-
lication of the Owner's Manual. Country-
specific deviation sare possible .Please
not ethat your vehicle ma ynot be equipped
with all featur es described. This also
applies to safety-releva ntsystems and
functions.
i Please read the information on qualified
specialist workshops (Y page 24).Engine compartment
Bonnet
Active bonnet (pedestrian protection) Operating principle
i The active bonnet is only available in cer-
tai nc ountries.
The active bonnet can reduce the risk of injury
to pedestrians in certain accident situations.
Raising the active bonnet increases the clear-
anc etoh ard components, such as the engine.
If the active bonnet has been triggered, it is
raised in the area of the bonnet hinges by
abou t100 mm. Th eactive bonnet is trigg ered
by pyrotechnics.
! Once triggered, an active bonnet must be
reset at aqualified specialist workshop,
e.g. aMercedes-Ben zService Centre. The
active bonnet function will then be availa-
ble again. The additional pedestrian pro-
tection provided by the active bonnet will
then be restored.
For the driv etot he workshop, reset the trig-
gere dactive bonnet yourself. After being
reset, the active bonnet rest sinthe area of
the bonnet hinges on the seals, and the bon-
net hinges do not engage. For this reason, we
recommend that you do not exceed amaxi-
mum top spee dof130 km/h on the wa ytothe workshop
.Ifthe active bonnet has been
triggered, pedestrian protection ma ybelimi-
ted.
Resetting G
WARNING
There is arisk of injur yifthe bonnet is open,
even if the engin eisnot running.
Som eengine compone ntsc an become very
hot.
To avoid the risk of burns, only touch those
component sdescribed in the Owner's Manual
and observ ethe relevant safety notes. X
With your hand fla tnear the bonnet hinges
(arrows), push down active bonnet :until
it rests on the seals. G
WARNING
Make sure that nobody can becom etrapped
as you close th ebonnet.
Opening th ebonnet G
WARNING
Do not pull the release lever while the vehicle
is in motion. If you do so, the bonnet may open
up and block your view. G
WARNING
There is arisk of injur yifthe bonnet is open,
even if the engin eisnot running.
Som eengine compone ntsc an become very
hot. 318
Eng
inecompartmentMaintenance and care
Page 335 of 389

Usefu
linfor mati on
i This Owner's Manual describes all models
and all standard and optional equipment
available to your vehicle at the time of pub-
lication of the Owner's Manual. Country-
specific deviation sare possible .Please
not ethat your vehicle ma ynot be equipped
with all featur es described. This also
applies to safety-releva ntsystems and
functions.
i Please read the information on qualified
specialist workshops (Y page 24).Where will
Ifind...? Warning triangle
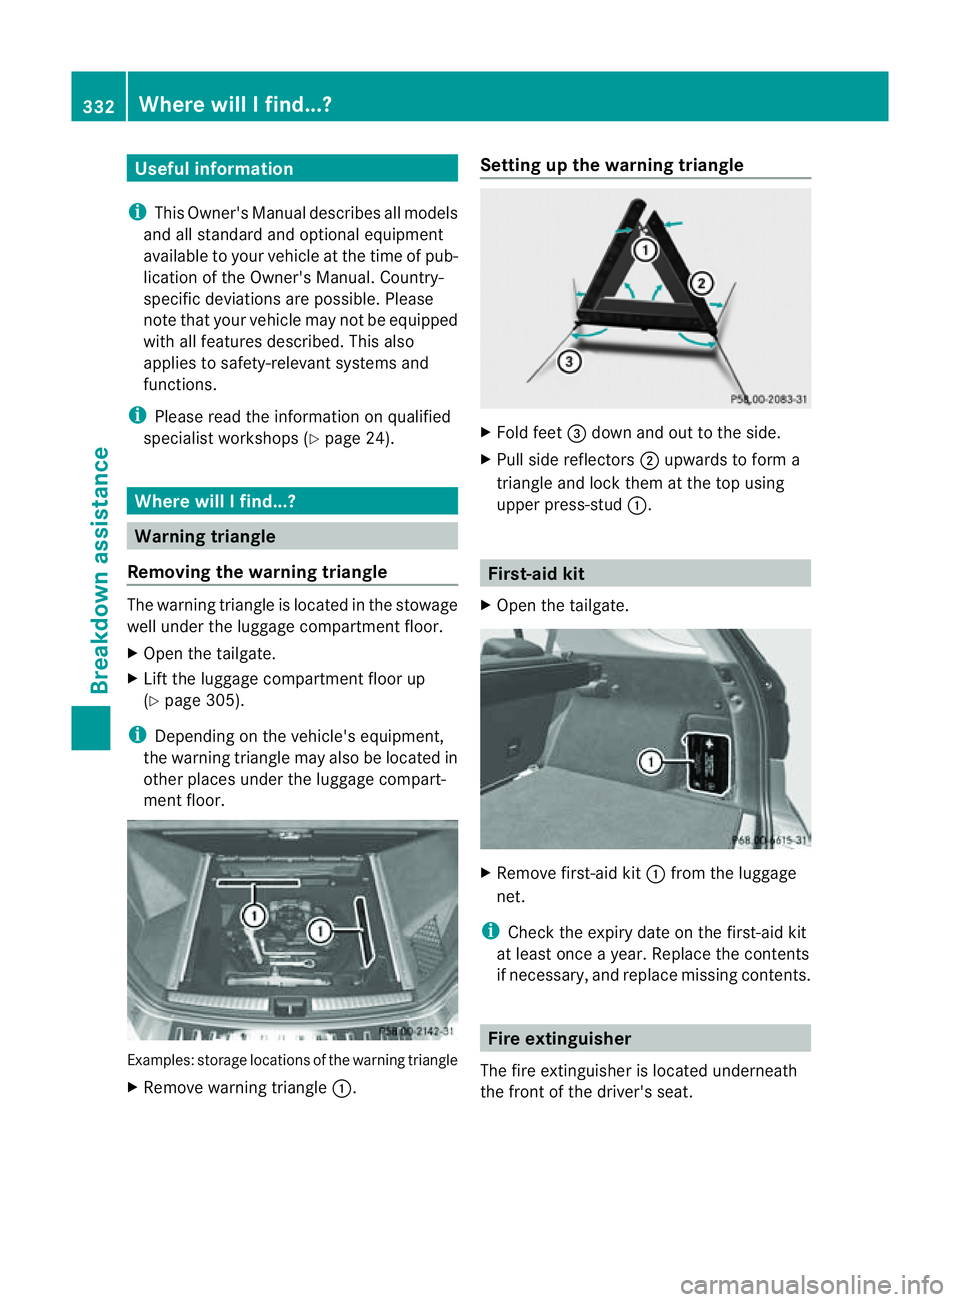
Removing th ewarning triangle Th
ew arnin gtriangle is located in th estowage
well under th eluggage compartmen tfloor.
X Open the tailgate.
X Lif tthe luggage compar tment floor up
(Y page 30 5).
i Dependin gonthe vehi cle's equipment,
the warnin gtriangle may also be located in
other places under the luggag ecompar t-
ment fl oor. Examples: storage loca
tions of the warnin gtriangle
X Remove warnin gtriangle :. Setting up th
ewarnin gtriangle X
Fol dfeet =down and out to the side.
X Pull side reflectors ;upwards to for ma
triangle and lock them at thet op using
upper press-stud :. First-aid kit
X Open the tailgate. X
Remove first-aid kit :from the luggage
net.
i Check the expir ydate on the first-aid kit
at least once ayear. Replace the contents
if necessary, and replace missin gcontents. Fire extinguisher
The fir eextinguisher is locate dunderneath
the front of the driver's seat. 332
Where wil
lIfind...?Breakdown assistance
Page 345 of 389

and transpor
tthe wheel in the luggage
compartment.
or
X Depending on the size of the wheel, you
ma yalso be able to secure the faulty wheel
in the emergenc yspare wheel well. In this
case, you must remove the stowage tray
from the emergency spare wheel well and
store it securely in the luggage compart-
ment.
i When you are driving with the collapsible
emergency spare wheel fitted, the tyre
pressur eloss warnin gsystem or the tyre
pressure monitor cannot function reliably.
Only restart the tyre pressure los swarning
system/tyre pressure monitor when the
defective wheel has been replaced with a
new wheel.
Vehicles with tyre pressure monitor: all fit-
ted wheels must be equipped with func-
tioning sensors. The defective wheel
should no longer be in the vehicle. MOExtended tyres (tyres with run-flat
characteristics)
MOExtended tyres (tyres with run-flat char-
acteristics) allow you to continue driving the
vehicle even when one or more tyres lose all
air pressure.
MOExtended tyres may only be used in con-
junction with the activated tyre pressure loss
warning system or with the tyre pressure
monitor.
The maximum permissible distance which
can be driven in run-flat mode depends on the
load in the vehicle. It is 80 km if the vehicle
is partially laden and 30 km if fully laden.
The maximum permissible distance which
can be driven in run-flat mode is counted from
the moment the tyre pressure loss warning
appears in the multifunction displ ay.
Yo um ust not exceed amaximum spee dof
80 km/h. G
WARNING
Th eh andling characteristics of your vehicle
deteriorate in run-flat mode, for example:
R when cornering
R when braking
R when accelerating rapidly
Adapt your driving style accordingly and avoid
sudden changes in direction and sudden
acceleration, as well as driving over obstacles
(i.e. kerbs, potholes), and driving off-road.
This is particularly the case when the vehicle
is heavily laden.
The maximum permissible distance that can
be driven in run-flat mode depends to alarge
exten tonthe loads placed on the vehicle. It
can be shorter due to high speeds, aheavy
load, sudden changes in direction, the road
surface condition, outside temperature, etc.,
or further if you driv ecarefully and conserva-
tively.
Do not continue to drive in run-flat mode if:
R you hear banging noises.
R the vehicle starts to shake.
R you see smoke and smell rubber.
R ESP ®
is intervening constantly.
R there are tears in the sidewalls of the tyre.
After driving in run-flat mode, you must have
the wheel(s) checked for damage at aquali-
fied specialist workshop which has the nec-
essary specialist knowledg eand tool stocarry
out the work required. The faulty tyre must be
replaced in every case.
Mercedes-Benz recommends that you use a
Mercedes-Benz Service Centr efor this pur-
pose. In particular ,work relevant to safet yor
on safety-related system smust be carried out
at aq ualified specialist workshop.
i Whe nreplacing one or all tyres, make
sure that you only use tyres marked
MOExtended and of the specified size for
the vehicle.
i Vehicles with MOExtended tyres are not
equipped with aTIREFIT kit at th efactory. 342
Flat tyreBreakdown assistance
Page 353 of 389

R
the engine is not running.
R there is abrake syst emmalfunction.
R there isam alfunction in the power supply
or the vehicle' selectrical system.
The power assistance for the steering and the
brake forc ebooster do not work when the
engin eisnot running. You will need more
force to steer and brake, you may have to
depress the brake pedal with maximu mforce.
Before towin gaway ,make sure that the steer-
ing can be moved and is not locked.
If you tow or tow-star tanothe rvehicle, its
weight must not exceed the maximu mper-
missible gross vehicle weight of your vehicle. G
WARNING
The vehicle is braked when the HOL Dfunction
or DISTRONIC PLUS is activated. Therefore,
deactivate HOLD and DISTRONIC PLUS if the
vehicle is to be towed.
It is better to have the vehicle transported
than to have it towed.
! You may tow the vehicle for amaximum
of 50 km. Atowing speed of 50 km/h must
not be exceeded.
For towin gdistances over 50 km, the entire
vehicle must be lifted up and transported.
! Make sure that the electric parkin gbrake
is released. If th eelectric parkin gbrake is
faulty, visit aqualified specialist workshop.
! Only secure the tow rope or towing bar to
the towing eyes. The vehicle may otherwise
be damaged.
! Do not use the towing eye for recovery,
as this could damage the vehicle. If in
doubt, recover the vehicle with acrane.
! When towing, pull awa yslowly and
smoothly. If the trac tivepower is too high,
the vehicles could be damaged.
! To tow vehicles with KEYLESS-GO, use
the key instead of the Star t/Stop button.
Th ea utomatic transmission may otherwise switch to position
Pwhen you open the
driver' sorfront-passenger door which
could damag ethe transmission.
! Vehicles with differential locks: make
sur ethe differential lock sare in automatic
mode. Th edifferential locks must not be
switched on by hand when towing the vehi-
cle. The transmission may otherwise be
damaged.
If the vehicle has suffered transmission dam-
age, have it transported on atransporter or
trailer.
Th ea utomatic transmission must be in posi-
tion Nwhen the vehicle is being towed.
The battery must be connected and charged.
Otherwise, you:
R cannot turn the key in the ignition lock to
position 2
R cannot shift the automatic transmission to
position N
i Before the vehicle is towed, switch off the
automatic locking feature (Y page 249).
You could otherwis ebelockedout when
pushing or towing the vehicle.
Deactivate tow-away protection
(Y page 69) before the vehicle is towed. Fitting/removing the towing eye
Fitting the towing eye Vehicles with
atrailer to whitch: if you intend
to use the vehicle for towing, fold out the ball
coupling and connect the towbar to it
(Y page 228).
X Remove the towing eye from the vehicle
tool kit (Y page 333).
The mountings for the removable towing eyes
are located in the bumpers. They are at the
front and at the rear ,under the covers. 350
Towing and tow-startingBreakdow
nassistance
Page 359 of 389

Usefu
linfor mati on
i This Owner's Manual describes all models
and all standard and optional equipment
available to your vehicle at the time of pub-
lication of the Owner's Manual. Country-
specific deviation sare possible .Please
not ethat your vehicle ma ynot be equipped
with all featur es described. This also
applies to safety-releva ntsystems and
functions.
i Please read the information on qualified
specialist workshops (Y page 24).Important safet
ynotes G
WARNING
Tyres, wheels or accessories whic hhaven ot
been approved by Mercedes- Benz foryour
vehicle or are not used as they should be, can
impair driving safety. As aresult, you could
cause an accident .Befor epurchasing and
using them, enquire about their suitability,
legal stipulations and factory recommenda-
tions at aMercedes-Benz Ser vice Centre.
Modificatio nwork on the brake system and
wheels is not permitted, nor is the use of
spacer plate sorbrake dust shields. This inva-
lidates th eGeneral Operatin gPermit for the
vehicle.
i Further information about tyres and
wheels can be obtained from any
Mercedes-Benz Ser vice Centre. Oper
ation Notes on driving
R While driving, pay attention to vibrations,
noises and unusual handling characteris-
tics ,e.g. pulling to one side. This may indi-
cate that the wheels or tyres are damaged.
If you suspect that atyre is defective,
reduce your speed immediately. Stop the vehicle as soo
naspossible to chec kthe
wheels and tyres for damage. Hidden tyre
damage could also be causing the unusual
handling characteristics. If you fin dno
signs of damage, hav ethe wheels and tyres
examined at aqualified specialist work-
shop, e.g. aMercedes-Ben zService
Cent re.
R When parkin gyour vehicle, make sure that
the tyres do not get deformed by the kerb
or other obstacles. If it is necessary to drive
over kerbs, speed humps or similar eleva-
tions, tr ytodosos lowly and at an obtuse
angle. Otherwise, the tyres, particularly the
sidewalls, can get damaged. Notes on regularly inspecting wheels
and tyres
R Regularly chec kthe wheels and tyres of
your vehicle for damage (e.g. cuts, punctu-
res, tears, bulges on tyres and deformation,
crack sorseverecorrosion on wheels), at
least ever y14d ays, as well as after driving
off-road or on rough roads. Damaged
wheels can cause aloss of tyr epressure.
R Regu larly check th etyre tread depth and
the conditio nofthe tread across the whole
widt hofthe tyr e(Ypage 357). If neces-
sary, tur nthe front wheels to full lock in
orde rtoi nspect the inner sid eofthe tyre
surface.
R All wheels must hav eavalve cap to protect
the valve against dirt and moisture. Do not
fit anything onto the valve (such as tyre
pressure monitorin gsystems) othe rthan
the standar dvalve cap or other valve caps
approved by Mercedes-Ben zfor your vehi-
cle.
R Regularly chec kthe pressur eofall the tyres
including the emergenc yspare wheel or the
spare wheel, particularly prior to long trips,
and correc tthe pressur easnecessary
(Y page 359). 356
OperationWheels and tyres
Page 361 of 389

M+S tyres
At temperature sbelo w+ 7† ,use winter tyres
or all-season tyres .Both types of tyr eare
identified by th eM+S marking.
Onl ywinter tyres bearing the isnowflake
symbol in addition to the M+S marking pro-
vide the best possible grip in wintr yroad con-
ditions. Only these tyres will allow driving
safet ysystems such as ABS and ESP ®
to
function optimally in winter, as thes etyres
have been designed specifically for driving on
snow.
Use M+S tyres of the same make and tread
on all wheels to maintain safe handling char-
acteristics. G
WARNING
M+S tyres with atrea ddepth of less than
4mmm ust be replaced. They are no longer
suitable for winter use and can no longer pro-
vide sufficien tgrip. This could cause you to
lose control of your vehicle and cause an acci-
dent.
Always observe the maximum permissible
speed specified for the M+S tyres you have
fitted.
If you fit M+S tyres which have alower max-
imu mpermissible speed than that of the vehi-
cle, affix an appropriate warning sign in the
driver' sfield of vision. This can be obtained
at aq ualified specialist workshop, e.g. at a
Mercedes-Ben zService Centre.
Under these circumstances, you should also
restrict the maximu mspeed of the vehicle
using permanent SPEEDTRONIC so that it
does not exceed the maximum permissible
speed for the M+S tyres(Y page 174).
When you have fitted the M+S tyres:
X Check the tyr epressures (Y page 359).
X Restart th etyre pressure los swarning sys-
tem (Y page 360). G
WARNING
If you fit the spare wheel when driving with M
+S tyres, bear in mind that driving stability will be impaired due to unstable cornerin
gchar-
acteristic scaused by the different tyres. You
shoul dtherefore adapt your drivin gstyle and
drive carefully.
Have the spare whee lreplaced at the nearest
qualified specialist workshop which has the
necessar yspecialist knowledge and tools to
carry out the work required. Mercedes-Benz
recommends that you use aMercedes-Benz
Ser vice Centre for thi spurpose. In particular,
work relevant to safety or on safety-related
systems must be carried out at aqualified
specialist workshop. Snow chains
For safety reasons ,Mercedes-Benz recom-
mends that you only use snow chain sthat
hav ebeen specially approved for your vehicle
by Mercedes-Benz ,orthat ar eofac orre-
spondin gstandard of quality.
! Vehicle swith the ON&OFFROAD package
or the AIRMATIC package: do not drive in
ADS SPORT mode when drivin gwith snow
chains fitted.
If you intend to fit snow chains, please bear
the following point sinmind:
R it is not permissible to attac hsnow chains
to all wheel-tyre combinations ;see the
information under "Wheel/tyre combina-
tion s"int he "Wheels and tyres" section.
R snow chains must not be fit tedtoe mer-
gency spare wheels ,e.g. a"Minispare"
emergency spar ewheel.
R fit snow chains only in pair sand only to the
rear wheels .Observ ethe manufacturer's
installation instructions.
! Vehicle swith steel wheels: if you wish
to fit snow chains to steel wheels, make
sure that you remove the respective
wheels' hubcaps first .The hubcaps may
otherwise be damaged. 358
Winter operationWheels and tyres