2011 MERCEDES-BENZ M-CLASS SUV driver seat adjustment
[x] Cancel search: driver seat adjustmentPage 50 of 389

resul
tinsevereore ven fata linjuries to the
child and othe roccupants.
R Persons les sthan 1. 50mt all cannot wear
the seat belts correctly. For this reason,
secure persons less than 1.5 0mtall in spe-
cially designed, suitable restraint systems.
R Children less than 1.50 mtall or under 12
years of age cannot wear the seat belts
properly. Therefore, they should always be
secured in asuitable child restraint system
on asuitable vehicle seat. You can find
more information under "Children in the
vehicle" in the "Safety" section of the Own-
er's Manual. Follow the manufac turer's
installatio ninstructions whe nfitting achild
rest raint system.
R Do not secure any objects with aseat belt
if the seat belt is also being used by one of
the vehicle's occupants. G
WAR
NING
The seat belt doe snot offer the intended level
of protection unless the back rest is almost
ver tica l. Under certain circumstances, this
could cause severe or even fatal injuries in the
event of an accident.
Befor estarting ajourney, mak esure that the
seat is properly adjusted and that the back-
rest is almost vertical. G
WARNING
Ad irtyord amaged seat belt or aseat belt that
has been subjected to aload in an accident
or which has been modified no longer offers
the intended level of protection. Un dercertain
cir cumstances, this could caus esever eor
even fatal injuries in the even tofanaccident.
For thi sreason, check regularly that the seat
belts are not damaged or dirty.
Alway shaved am aged sea tbelts or seat belts
that have been subjected to aload in an acci-
dent replaced at aqualified specialist work-
shop. Consult aqualified specialist workshop
which has the necessary specialist knowledge
and tools to carry out the work required.
Mercedes -Benz recommends that you use a Mercedes-Benz Ser
vice Centre for thi spur-
pose.
For safety reasons, Mercedes -Benz recom-
mends that you only use seat belts which have
been approved by Mercedes-Benz for your
vehicle.
Fastening seat belts X
Adjust the seat and mov ethe backrest to
an almost ver tical position (Y page92).
X Pul lthe seat belt smoothly thr oughbelt
sash guide :.
X Without twistin git, guid ethe shoulder sec-
tion of the seat belt across the middle of
your shoulder and the lap section across
your hips.
X Engage belt tongue ;in buckle =.
Seat-belt adjustment :ifnecessary, the
driver' sand front-passenger sea tbelts
automatically adjust to the upper body
(Y page 48).
X If necessary, adjust the seat belt to the
appropriate height (Y page 48).
X If necessary, pull upwards on the shoulder
section of the seat belt to tighten the belt
across your body.
For mor einformation abou treleasing the seat
belt with release button ?,see "Releasing
seat belts" (Y page 48). Occupant safety
47Safety Z
Page 51 of 389

Sea
tbelt adjustment The seat-belt adjustment func
tion adjusts the
driver's and front-passenger seat belt to the
upper body of the occupants.
The belt strap is tighte neds lightly when:
R you engage the belt tongue in the belt
buckle and you then turn the key to position
2 in the ignition lock.
R the key is in position 2in the ignition lock
and you then engage the belt tongue in the
buckle.
The seat-belt adjustment will apply acertain
tightening force if any slack is detected
between the occupant and the seat belt. Do
not hold on to the seat belt tightly while it is
adjusting. You can switc hthe seat-belt
adjustment on and off in the on-boar dcom-
puter (Y page 251).
The seat-belt adjustment is an integra lpart of
the PRE-SAFE ®
convenience function. More
information about PRE-SAFE ®
can be found
in the "PRE-SAFE ®
(preventative occupant
protection)" section (Y page 45).
Belt height adjustment You can adjust the seat belt height on the
driver' sseat and the front-passenger seat. Adjust the height so that the upper part of the
seat belt is routed across the centre of your
shoulder. X
To raise: slide the belt sash guide upwards.
The belt sash guide engages in various posi-
tions.
X To lower: press and hold belt sash guide
release :.
X Slide the belt sash guide downwards.
X Release belt sash guide release :and
mak esure that the belt sash guide has
engaged.
Releasing seat belts X
Press release button ?(Ypage 47) and
guide belt tongue ;back towards belt
sash guide :.
! Make sure that the seat belt is fully rolled
up. Otherwise, the seat belt or belt tongue
will be trapped in the door or in the seat
mechanism. This could damage the door,
the door trim panel and the seat belt. Dam-
aged seat belts can no longer fulfil their
protective function and must be replaced.
Consult aMercedes-Benz Servic eCentre.
Belt warning for driver and front
passenger The
7 seat belt warning lam pint he instru-
men tcluster is areminder for all occupants
to fasten their seat belts. It may light up con-
tinuously or flash. In addition ,there ma ybea
warning tone.
The 7 seat belt warning lamp goes out and
the warning tone ceases when the driver and
the front passenge rhave fastened their seat
belt.
For certain countries only: regardless of
whethe rthe driver or the front passenger
hav efastened their seat belts, the 7seat
belt warning lamp lights up for six seconds
after the engine is started. It then goes out if
the driver and the front passenger have fas-
tened their seat belts.
i For more information on the 7seat
belt warning lamp, see "Warning and indi- 48
Occupant safetySafety
Page 95 of 389

Usefu
linfor mati on
i This Owner's Manual describes all models
and all standard and optional equipment
available to your vehicle at the time of pub-
lication of the Owner's Manual. Country-
specific deviation sare possible .Please
not ethat your vehicle ma ynot be equipped
with all featur es described. This also
applies to safety-releva ntsystems and
functions.
i Please read the information on qualified
specialist workshops (Y page 24).Correct driver'
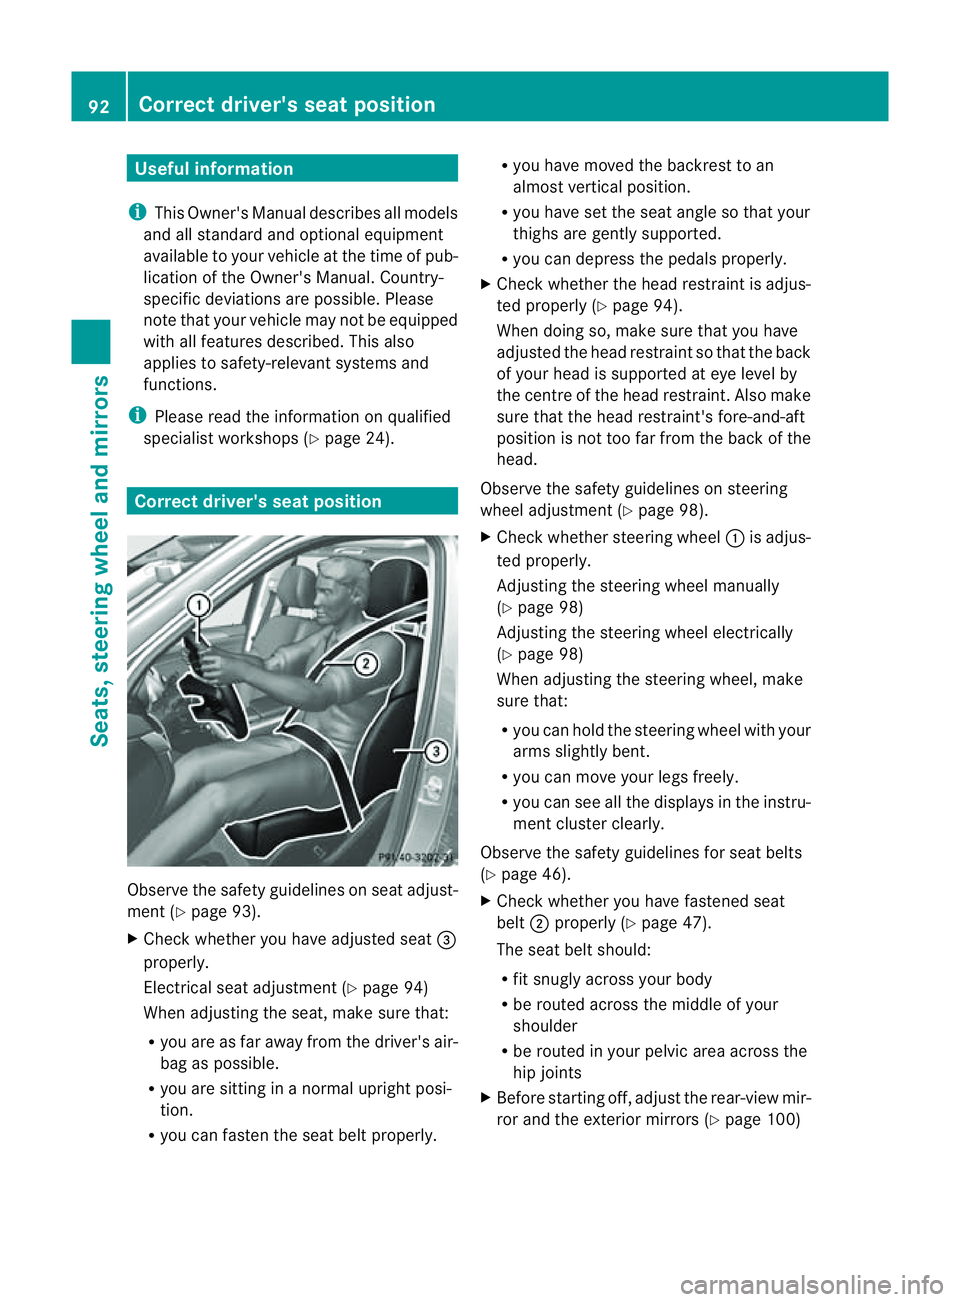
sseatp osition Observ
ethe safety guideli neso nseat adjust-
men t(Ypage 93).
X Chec kwhether you hav eadjusted seat =
properly.
Electrical seat adjustment (Y page 94)
When adjusting the seat, mak esure that:
R you are as far away from the driver' sair-
bag as possible.
R you are sitting in anormal upright posi-
tion.
R you can fasten the seat belt properly. R
you have moved the backrest to an
almost vertical position.
R you have set the seat angle so that your
thighs ar egently supported.
R you can depress the pedals properly.
X Check whether the head restraint is adjus-
ted properly (Y page 94).
When doing so, mak esure that you have
adjusted the head restraint so that the back
of your head is supported at eye level by
the centre of the head restraint .Also make
sure that the head restraint's fore-and-aft
position is not too far from the bac kofthe
head.
Observ ethe safety guidelines on steering
wheel adjustment (Y page 98).
X Chec kwhether steering wheel :is adjus-
ted properly.
Adjusti ngthe steering whee lmanually
(Y page 98)
Adjustin gthe steering wheel electrically
(Y page 98)
When adjustin gthe steering wheel, make
sur ethat:
R you can hold the steering wheel with your
arms slightl ybent.
R you can mov eyour legs freely.
R you can see all the displays in the instru-
men tcluster clearly.
Observe the safety guidelines for seat belts
(Y page 46).
X Check whether you have fastened seat
belt ;properly (Y page 47).
The seat belt should:
R fit snugly across your body
R be routed across the middle of your
shoulder
R be routed in your pelvic area across the
hip joints
X Befor estartin goff, adjus tthe rear-vie wmir-
ror and the exterior mirrors (Y page 100)92
Correct driver's seat positionSeats, steerin
gwhee land mirrors
Page 102 of 389

i
Related topics:
R EASY-ENTRY/EXI Tfeature
(Y page 99)
R Storing setting s(Ypage 103) Steering whee
lheating
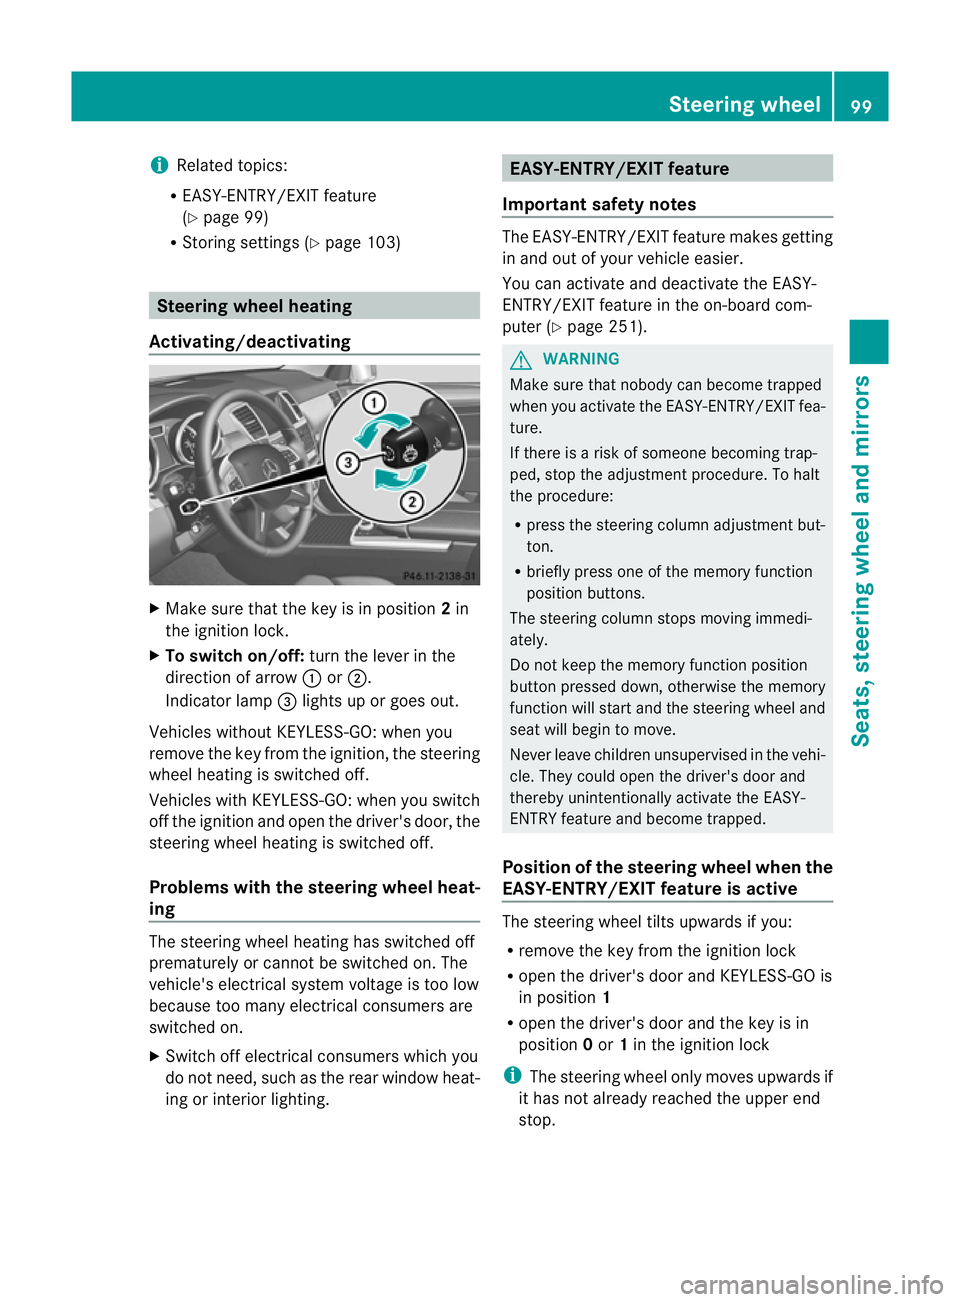
Activating/deactivating X
Mak esuret hat the key is in position 2in
th ei gnition lock.
X To switch on/off: turnthe lever in the
direction of arrow :or;.
Indicato rlamp =lights up or goes out.
Vehicles without KEYLESS-GO: when you
remove the key from the ignition ,the steering
wheel heating is switched off.
Vehicles with KEYL ESS-GO:when you switch
off the ignition and open the driver's door, the
steering wheel heating is switched off.
Problems wit hthe steering whee lheat-
ing The steering wheel heating has switched off
prematurely or cannot be switched on. The
vehicle's electrical system voltage is too low
because too many electrical consumer sare
switche don.
X Switch off electrical consumers which you
do not need ,such as the rear window heat-
ing or interior lighting. EASY-ENTRY/EXIT featu
re
Important safety notes The EASY-ENTRY/EXI
Tfeatur emakes getting
in and out of your vehicle easier.
You can activate and deactivate the EASY-
ENTRY/EXIT feature in the on-board com-
puter (Y page 251). G
WARNING
Make sure that nobody can become trapped
when you activate the EASY-ENTRY/EXI Tfea-
ture.
If there is arisk of someone becoming trap-
ped, stop the adjustment procedure. To halt
the procedure:
R press the steering column adjustment but-
ton.
R briefly press one of the memor yfunction
position buttons.
The steering column stops moving immedi-
ately.
Do not keep the memory function position
button presse ddown, otherwise the memory
function will star tand the steering wheel and
sea twill begin to move.
Never leave children unsupervised in the vehi-
cle. They could open the driver's door and
thereby unintentionally activate the EASY-
ENTRY featur eand become trapped.
Positio nofthe steering whee lwhen the
EAS Y-ENTRY/EXIT featur eisactive The steerin
gwheel tilt supwards if you:
R remove the key from the ignition lock
R open the driver' sdoor and KEYLESS -GOis
in position 1
R open the driver's door and the key is in
position 0or 1in the ignition lock
i The steerin gwheel only moves upwards if
it has not already reached the upper end
stop. Steering wheel
99Seats,steering wheeland mirror s Z
Page 104 of 389

X
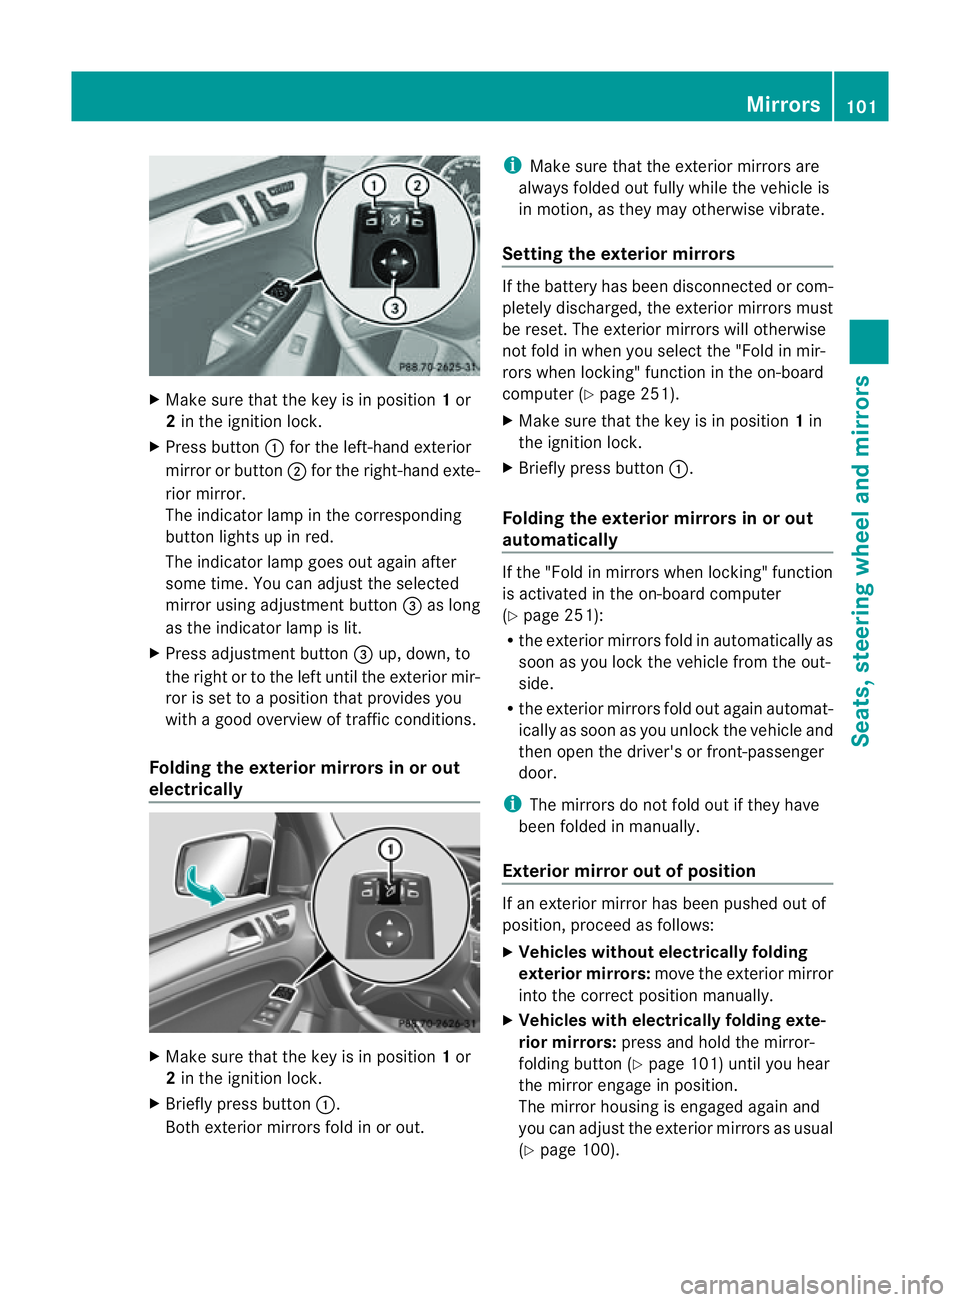
Make sur ethat the key is in position 1or
2 in the ignition lock.
X Press button :for the left-hand exterior
mirror or button ;for the right-hand exte-
rior mirror.
The indicator lam pint he corresponding
button lights up in red.
The indicator lam pgoes out again after
some time. You can adjust the selected
mirror using adjustment button =as long
as the indicator lam pislit.
X Press adjustment button =up, down, to
the right or to the left until the exterior mir-
ror is set to aposition that provides you
with agood overview of traffic conditions.
Folding th eexterior mir rors in or out
electrically X
Make sure that the key is in position 1or
2 in the ignitio nlock.
X Briefl ypres sbutton :.
Both exterior mirrors fold in or out. i
Make sure that the exterior mirrors are
always folded out fully while the vehicle is
in motion, as they may otherwis evibrate.
Setting the exterior mirrors If the battery has been disconnected or com-
pletely discharged, the exterior mirrors must
be reset. The exterior mirrors will otherwise
not fold in when you select the "Fold in mir-
rors when locking" func tion in the on-board
computer (Y page 251).
X Make sure that the key is in position 1in
the ignition lock.
X Briefl ypres sbutton :.
Folding the exterior mirrors in or out
automatically If the "Fold in mirrors when locking" function
is activated in the on-board computer
(Y page 251):
R the exterior mirrors fold in automatically as
soo nasyou lock the vehicle from the out-
side.
R the exterior mirror sfold out again automat-
ically as soon as you unloc kthe vehicle and
then open the driver's or front-passenger
door.
i The mirrors do not fol dout if they have
been folded in manually.
Exterior mirror out of position If an exterior mirror has been pushed out of
position, proceed as follows:
X Vehicles without electrically folding
exterior mirrors: move the exterior mirror
into the correct position manually.
X Vehicles with electrically folding exte-
rior mirrors: press and hold the mirror-
folding button (Y page 101)until you hear
the mirror engage in position.
The mirror housing is engaged agai nand
you can adjus tthe exterior mirrors as usual
(Y page 100). Mir
rors
101Seats ,steeri ngwheel and mirrors Z
Page 105 of 389

Automati
canti-dazzle mirrors G
WA
RNING
If inciden tlight fro mheadlamps is prevented
from striking the sensor in the rear-view mir-
ror ,for instance, by luggage piled too high in
the vehicle, the mirror's automatic anti-dazzle
fun ction will not operate.
Incident light could then blind you. This may
distrac tyou from the traffic condition sand,
as aresult, you may cause an accident.
The rear-view mirror and the exterior mirror
on the driver' sside automatically go into anti-
dazzle mode if the ignition is switched on and
inciden tlight from headlamps strikes the sen-
sor in the rear-view mirror.
The mirror sdonot go int oanti-dazzle mode if
reverse gea risengaged or if the interior light-
ing is switched on. Parking position for the exterior mir-
ror on the front-passenge rside
Setting and storing the parking position You can position the front-passenger side
exterior mirror in such away that you can see
the rear wheel on that side as soon as you
engage revers egear. You can stor ethis posi-
tion. X
Make sur ethat the vehicle is stationary and
that the key is in position 2in the ignition
lock.
X Engage revers egear.
The exterior mirror on the front-passenger
side moves to the preset parkin gposition.
X Use adjustment button =to adjust the
exterior mirror to aposition that allows you
to see the rea rwheel and the kerb.
The parkin gposition is stored.
i If you shift the transmission to anot her
po sition ,the exterior mirror on the front-
passenger side retur nsto the driving posi-
tion.
i You can also store the parking position
using memory button M?.
X Make sure that the key is in position
2in the ignitio nlock.
X With the exterior mirror on the front-
passenger side activa ted, use adjust-
ment button =to adjust the exterior
mirror to aposition which allows you
to see the rea rwheel and the kerb.
X Press memory button M? and one of
the arrow sonadjustment button =
within three seconds.
The parkin gposition is stored if the
exterior mirror does not move.
If the mirror moves out of position ,repeat
the steps.
Calling up astore dparkin gposition set-
ting X
Turn the key to position 2in the ignition
lock.
X Adjus tthe exterior mirror on the front-
passenger side with the correspondin gbut-
ton (Y page 100).
X Engage reverse gear.
The exterior mirror on the front-passenger
side moves to the stored parking position. 102
MirrorsSeats, steerin
gwhee land mirrors