2011 MERCEDES-BENZ M-CLASS SUV ECO mode
[x] Cancel search: ECO modePage 143 of 389
X
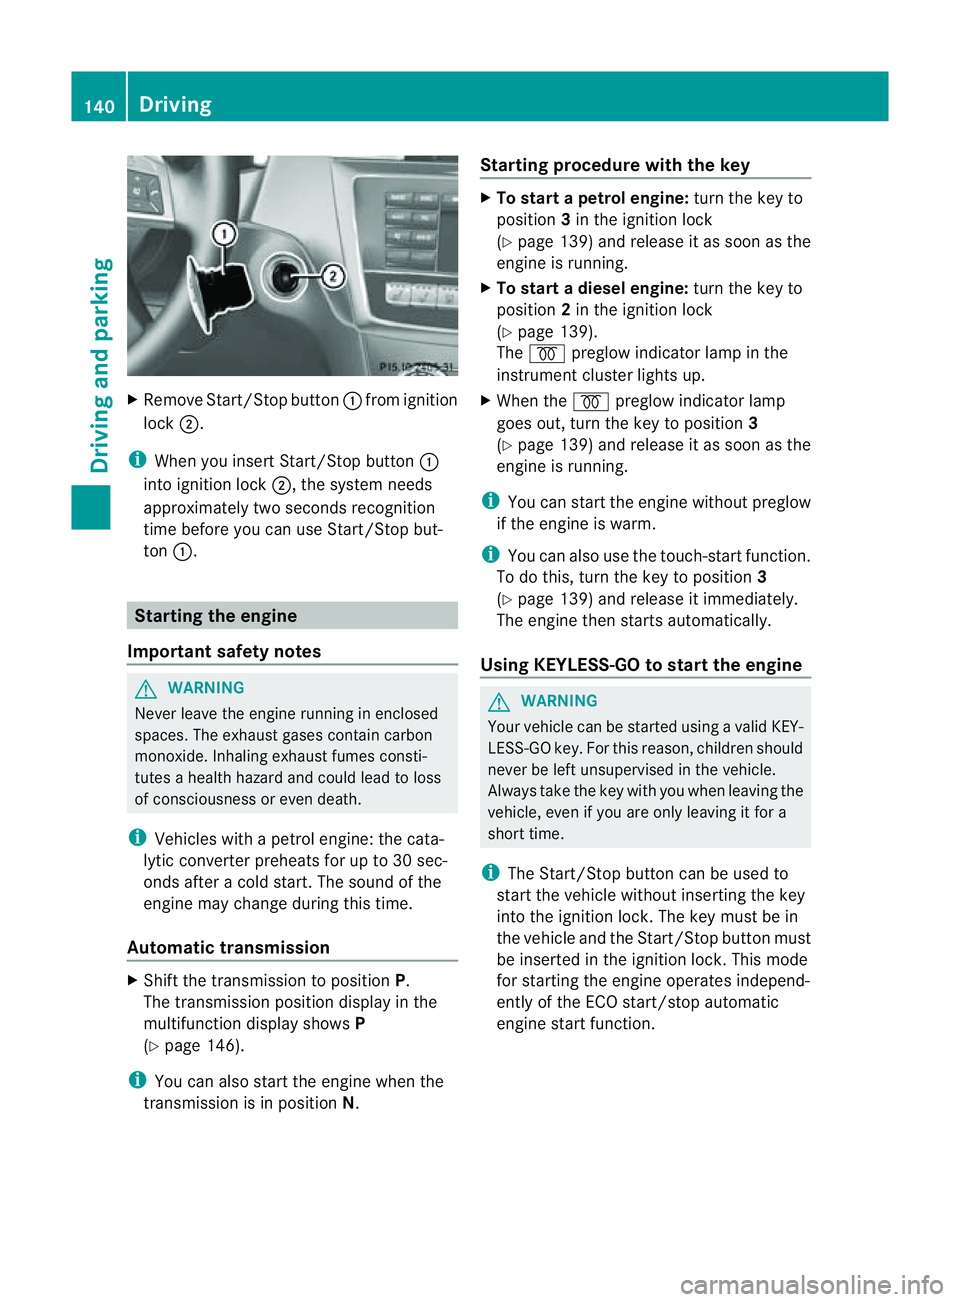
Remov eStart/Stop button :from ig nition
lock ;.
i When you insert Star t/Stopbutton:
int oignition lock ;,thesystem needs
approximately two seconds recognition
time before you ca nuse Star t/Stop but-
ton :. Startin
gthe engine
Important safety notes G
WARNING
Never leav ethe engin erunnin ginenclosed
spaces. The exhaust gase scontai ncarbon
monoxide. Inhalin gexhaust fumes consti-
tutes ahealt hhazard and could lead to loss
of consciousness or eve ndeath.
i Vehicles with apetrol engine: the cata-
lytic conver terp reheats for up to 30 sec-
ond safter acold star t.The sound of the
engin emay change during this time.
Automatic transmission X
Shift the transmission to position P.
The transmission position displ ay inthe
multifunction displa yshows P
(Y page 146).
i You can also star tthe engin ewhen the
transmission is in position N.Sta
rting procedur ewith the key X
To star tapetrol engine: turn the key to
position 3in the ignition lock
(Y page 139 )and releas eita ss oon as the
engin eisrunning.
X To star tadiesel engine: turn the key to
position 2in the ignition lock
(Y page 13 9).
The % preglow indicator lam pinthe
instrumen tcluster lights up.
X When the %preglow indicator lamp
goes out, tur nthe key to position 3
(Y page 139) and release it as soon as the
engin eisrunning.
i You can start the engine without preglow
if the engine is warm.
i You can also use the touch-star tfunction.
To do this, turn the key to position 3
(Y page 139 )and releas eitimmediately.
Th ee ngine then starts automatically.
Using KEYLESS-GO to start the engine G
WARNING
You rvehicle can be star tedu sing avalid KEY-
LESS-GO key. For this reason, children should
never be left unsupervised in the vehicle.
Always take the key with you when leaving the
vehicle, even if you are only leaving it for a
short time.
i The Start/Stop button can be used to
start the vehicle without inserting the key
into the ignition lock. The key must be in
the vehicle and the Start/Stop button must
be inserted in the ignition lock. This mode
for starting the engine operates independ-
ently of the ECO start/stop automatic
engine start function. 140
DrivingDrivin
gand parking
Page 155 of 389
Problems wit
hthe transmission Problem Possible causes/consequences and
M Solutions
Th
et rans mission has
problem sshifting gear. The transmission is losing oil.
X Hav ethe transmission chec kedataq ualified specialist work-
shop, e.g. aMercedes-Benz Servic eCentre, immediately. The acceleration ability
is deteriorating.
The transmission no
longer changes gear. The transmission is in emergency mode.
It is only possible to shift into
secondgear and reverse gear.
X Stop the vehicle.
X Shif tthe transmission to position P.
X Switc hoff th eengine.
X Wait at leas t10seconds befor erestar tingthe engine.
X Shift the transmission to position Dor R.
If D is selected, the transmission shifts into secondgear; ifRis
selected, the transmission shifts into reverse gear.
X Have the transmission checked at aqualified specialist work-
shop, e.g. aMercedes-Benz Servic eCentre, immediately. Refuelling
Important safety notes
G
WARNING
Fuel is highly flammable. Fire, naked flames
and smoking are therefor eprohibite dwhen
handling fuels.
Switch off the engin eand the auxili aryh eating
befor erefuelling. G
WARNING
Do not com einto contact with fuels.
It is hazardous to your health if your skin
comes into direct contact with fuels or you
breath einfuel vapours. G
WARNING
Do not use petrol to refuel vehicles with adie-
sel engine. Do not mix diesel with petrol. This
would result in damage to the fuel system and
engine, which could lead to avehicle fire.
! Do not use petrol to refuel vehicles with a
diesel engine. Do not use diesel to refuel vehicles with
apetrol engine. Even small
amounts of the wron gfuel result in damage
to the fuel system and the engine.
! Do not switch on the ignition if you acci-
dentally refuel with the wrong fuel. Other-
wise, the fuel will enter the fuel lines. Notify
aq ualified specialist worksho pand have
the fuel tank and fuel lines drained com-
pletely. Petro
l(EN 228, DIN 51626)
Fuel grade !
Only refuel using unleaded premium-
grade petrol with at least
95 RON/8 5MON, whic hconform stoEuro-
pean standard EN 228 or an equivalent
specification.
! Do not use the following:
R E85 (petrol with 85% ethanol)
R E10 0(100% ethanol)
R M15 (petro lwith 15% methanol) 152
RefuellingDriving and parking
Page 166 of 389

G
WARNING
Make sure tha tother road user sare not
endang ered by your braking.
Downhill gradients On long and steep downhill gradients, espe-
cially if the vehicle is laden or towing
atrailer,
yo um ust select shift range 1,2or 3in good
time.
i This als oapplies if you have activated
cruise control, SPEEDTRONIC or DIS-
TRONIC PLUS.
This will use the braking effect of the engine,
so less braking will be required to maintain
the speed. This relieves the load on the brake
system and prevents the brakes from over-
heating and wearing too quickly.
Heavy and light loads G
WARNING
Never depress the brak epeda lconti nuously
while the vehicle is in motion, e.g. never cause
the brakes to rub by apply ingc onstant slight
pedal pressure. This causes the brake system
to overheat, increases the brakin gdistance
and can lead to the brakes failing completely.
If the brakes have been subjected to aheavy
load, do not stop the vehicle immediately ,but
drive on for ashort while. This allow sthe air-
flo wtoc ool the brakes mor equickly.
If the brakes have been used only moderately,
you should occasionally test their effective-
ness. To do this, brake more firmly from a
higher speed. This improves the grip of the
brakes.
Wet road surface If driving in heavy rain for
aprolonged period
of time without braking, there may be a
delayed reaction from th ebrake swhen brak-
ing for the first time. This ma yalso occur after
the vehicle has been washed. You have to depress the brake pedal more
firmly. Maintain
agreater distance from the
vehicl einfront.
After driving on awet road or havin gthe vehi-
cle washed, brake firml ywhile paying atten-
tion to the traffic conditions. This will warm
up the brake discs, thereby drying them more
quickly and protectin gthem against corro-
sion.
Limited braking perfo rmance on salt-
treated roads G
WARNING
The layer of salt on the brake discs and the
brake pads/linings may cause adelay in the
braking effect ,resultin ginas ignifican tlyl on-
ger brakin gdistance, which could lead to an
accident.
To avoid this danger, you should:
R occasionally brake carefully, without put-
ting other road users at risk, when you are
drivin gons alted roads. This helps to
remove any salt that may have started to
build up on the brake discs and the brake
pads/linings.
R maintain agreater distance to th evehicle
ahead and driv ewith particular care.
R carefully apply the brakes at the end of a
trip and immediately after commencing a
new trip, so that salt residues are removed
from the brake discs.
New brake pads/linin gs G
WARNING
New brak epads/linings only reach their opti-
mum braking effect after several hundred kil-
ometres of driving. Before this optimum brak-
ing effect is reached, you shoul dcompensate
for the reduced brakin geffect by applying
greate rpressure when braking .This also
applies after the brake discs or the brake
pads/linings hav ebeen replaced.
For safety reasons, Mercedes-Benz recom-
mends that you only have brak epads/linings Driving tips
163Drivingand parking Z
Page 172 of 389

The table shows approach and departure
angles :and ;when the vehicle is loaded
and ready to drive.
For vehicles with steel springs, loaded and
ready to driv emeans: afull tank, all fluids
topped up and the driver is in the vehicle.
On vehicles with the AIRMATI Cpackag eor
the ON&OFFROAD package, load suptothe
maximu mpermissible load have no influence
on approach/departur eangles. :
: 13
;
Steel-sp
rung
vehicles 26
°14 25
°15 25
°16 Vehicles with
th
eA IRMATIC
package Highway level
23° 22°
22°
17 Raised level
28° 27° 27°
Vehicles with
th
eO N&O FF-
ROA Dpackage Highway level
23° 22°
22°
17 Off-roa
dleve l1 26° 25° 25°
Off-road level 2
28° 27° 27°
Off-road level 3
31° 29° 29°
R
Follo wthe lineoff all when driving on slopes
and steep inclines.
R Before driving on extreme uphill and down-
hill gradients ,select th eoff-roa dprogram
(Y page 222) or the LOW RANGE off-road
gear (Y page 223).
R Observ ethe warnings fo roff-roa ddriving
(Y page 166).
R Drive slowly. R
Accelerat egentl yand mak esure that the
wheels are gripping.
R Avoid high engin espeeds, excep twhen
drivin gons andy and muddy routes with
high driving resistance.
R Select ashift range appropriate to the gra-
dient.
R Before tacklin gsteep downhill gradients,
select shift range 1.
Maximum gradient-climbin gcapability On good road surfaces and wit
hthe LOW
RANGE off-road gear selected, the full gradi-
ent -climbing capability is available.
i If the load on the front axle is reduced
when pulling away on asteep uphill slope,
the front wheels have atendency to spin.
4ETS recognises this and brakes the
wheels accordingly. The rear wheel torque
is increased and it is easier to pull away.
Brow of hill When driving up an uphill gradient, slightly
reduc epressure on th eaccelerator immedi-
atel ybefor ereachin gthe brow of the hill.
Make use of the vehicle' sown impetus to
travel over the brow.
This style of driving prevents:
R the vehicle from lifting off the ground on the
brow of ahill
R the vehicle from travelling too quickly down
the other side
Driving downhill R
Driv eslowly.
R Do not drive at an angle down steep
inclines. Steer into the line of fall and drive
with the front wheels aligned straight. Oth-
13
14
15
16
17 Drivin
gtips
169Driving and park ing Z
The ML 25
0BlueTEC 4MATIC model has an approach angle of 25°.
The ML 250 BlueTEC 4MATIC model with AMG bodystyling has an approach angle of 24°.
The ML 250 BlueTEC 4MATIC model has adeparture angle of 24°.
With AMG bodystyling.
The ML 35 04MATI Cmodel has adeparture angle of 23°.
Page 189 of 389
If yo
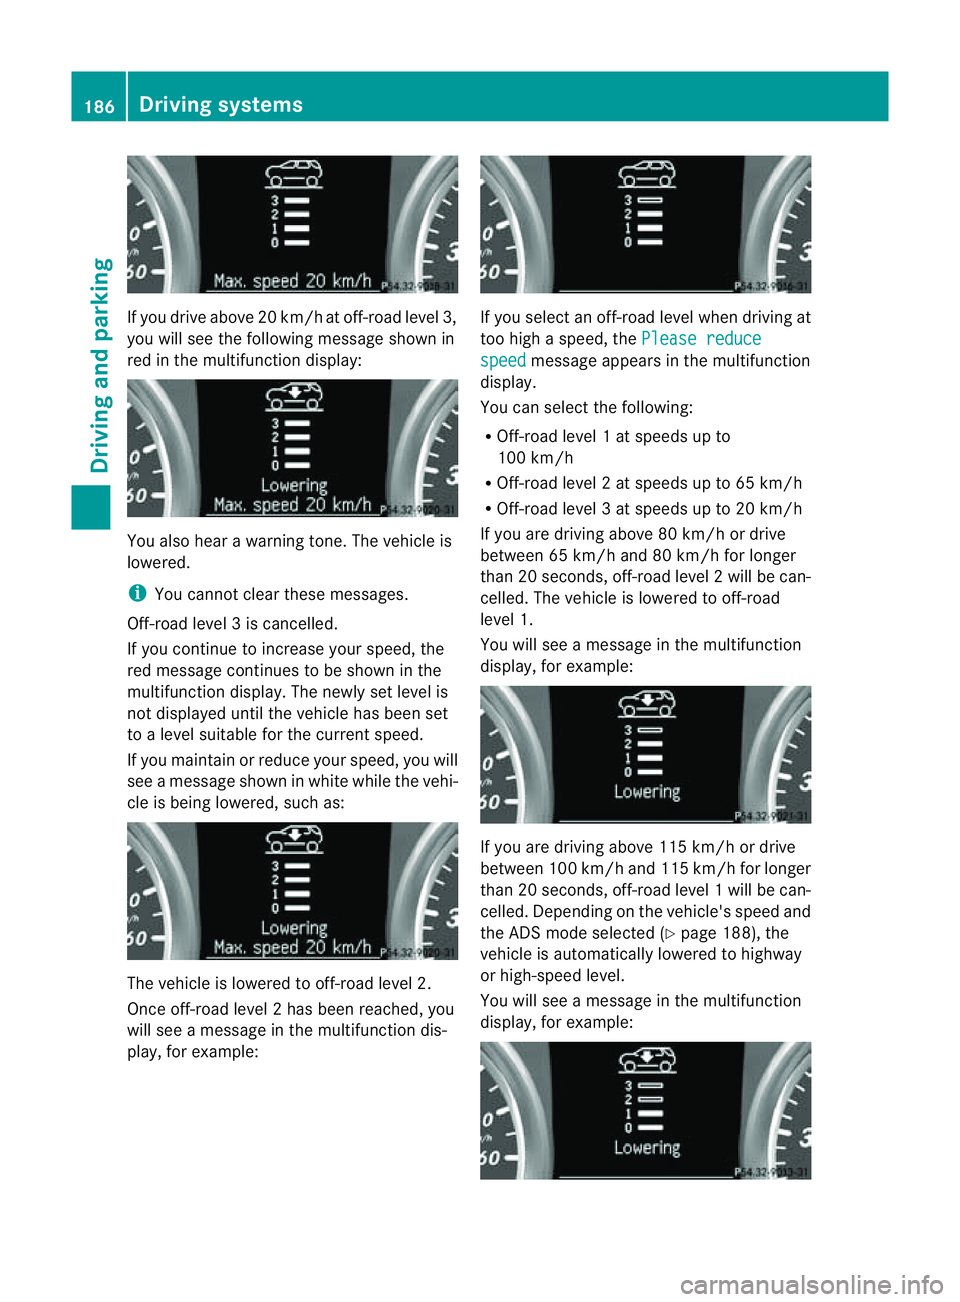
udrive above 20 km/h at off-roa dlevel 3,
you will see the following message shown in
red in the multif unctio ndisplay: You also hear
awarning tone. The vehicle is
lowered.
i You cannot clear these messages.
Off-road level 3iscancelled.
If you continue to increase your speed, the
red message continues to be shown in the
multifunction displ ay.T he newl yset level is
not displayed until the vehicle has been set
to alevel suitable for the curren tspeed.
If you maintain or reduc eyour speed, you will
see amessage shown in white while the vehi-
cle is being lowered, such as: The vehicle is lowered to off-road level 2.
Once off-road level 2has been reached, you
will see amessage in th emultifunction dis-
play, for example: If you sele
ctan off-road level when driving at
too high aspeed, the Please reduce speed message appears in the mult
ifunction
display.
You can select the following:
R Off-road leve l1atspeeds up to
10 0k m/h
R Off-road level 2atspeeds up to 65 km/h
R Off -road leve l3atspeeds up to 20 km/h
If you are drivin gabove 80 km/ hordrive
between 65 km/h and 80 km/h for longer
than 20 seconds ,off-roa dlevel 2will be can-
celled. The vehicle is lowered to off-road
level 1.
You will see amessage in the mul tifunction
display, for example: If you are drivin
gabove 11 5km/ hordrive
betwee n100 km/h and 115 km/h for longer
tha n20s econds ,off-road level 1will be can-
celled. Dependin gonthe vehi cle's speed and
the AD Smode selected (Y page 188), the
vehicle is automatically lowered to highway
or high-speed level.
You will see amessage in the multifunc tion
display, for example: 186
Driving systemsDriving and parking
Page 191 of 389
R
the electrica lsystem in thee ngine com-
partment, the battery or the fuses are tam-
pered with.
R the battery is disconnected.
If you leave the vehicl eorpark it, deactivate
the HOLD function and secure the vehicle
against rolling away.
The electric parking brake secures the vehicle
automatically if the HOLD function is activa-
ted and:
R the driver' sdoor is open and the driver's
seat belt is unfastened.
R the engin eisswitched off, unless it is auto-
matically switched off by the ECO start/
stop func tion.
R as ystem fault occurs.
R the powe rsupply is not sufficient.
On steep uphill or downhill inclines or if there
is am alfunction, the transmission may also
automatically be shifted into position P.AIRMATIC package
General notes AIRMATIC enables
asuspension tuning set-
ting to be selected and regulates the damping
behaviou rand level of your vehicle. The sys-
tem comprises aminimum of two compo-
nents. These are ADS (Adaptive Damping Sys-
tem) (Y page 188 )and level control
(Y page 189) .Your vehicle ma yalso be equip-
ped with the Active Curv eSystem
(Y page 188).
Observe the notes on driving with atrailer
(Y page 226).
ADS (Adaptive Damping System) General notes
ADS adapts th
edamping characteristic sto
the curren toperatin gand driving situation. Thi
sd epends on:
R your drivin gstyle
R the road surface conditions
R the AD Ssetting
R the vehicle level setting
Your selection remains stored even if you
remov ethe key from the igni tion lock. X
Star tthe engine.
Sports tuning
The firmer suspension tunin ginSport mode
ensures even better contact with the road.
Select this mode when employing asporty
drivin gstyle, e.g. on winding country roads.
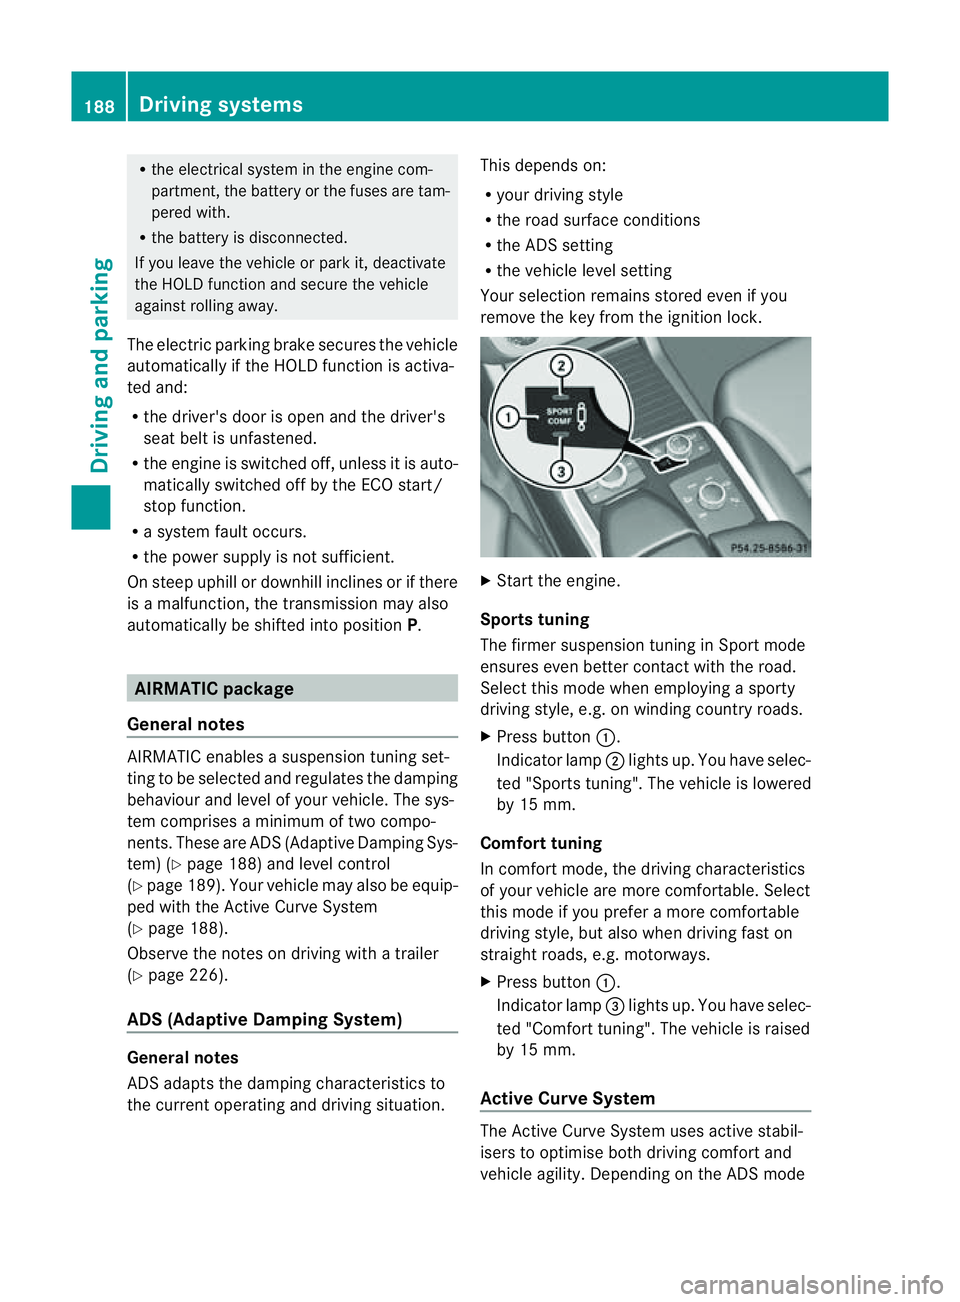
X Press button :.
Indicator lamp ;lights up. You have selec-
ted "Sports tuning". The vehicle is lowered
by 15 mm.
Comfort tuning
In comfort mode, the driving characteristics
of your vehicle are more comfortable. Select
this mode if you prefer amore com fortable
driving style ,but also when drivin gfast on
straight roads, e.g. motorways.
X Press button :.
Indicator lamp =lights up. You have selec-
ted "Comfort tuning". The vehicle is raised
by 15 mm.
Active Curve System The Active Curve System uses activ
estabil-
isers to optimis eboth drivin gcomfort and
vehicle agility. Depending on the AD Smode 188
Driving systemsDriving and parking
Page 201 of 389
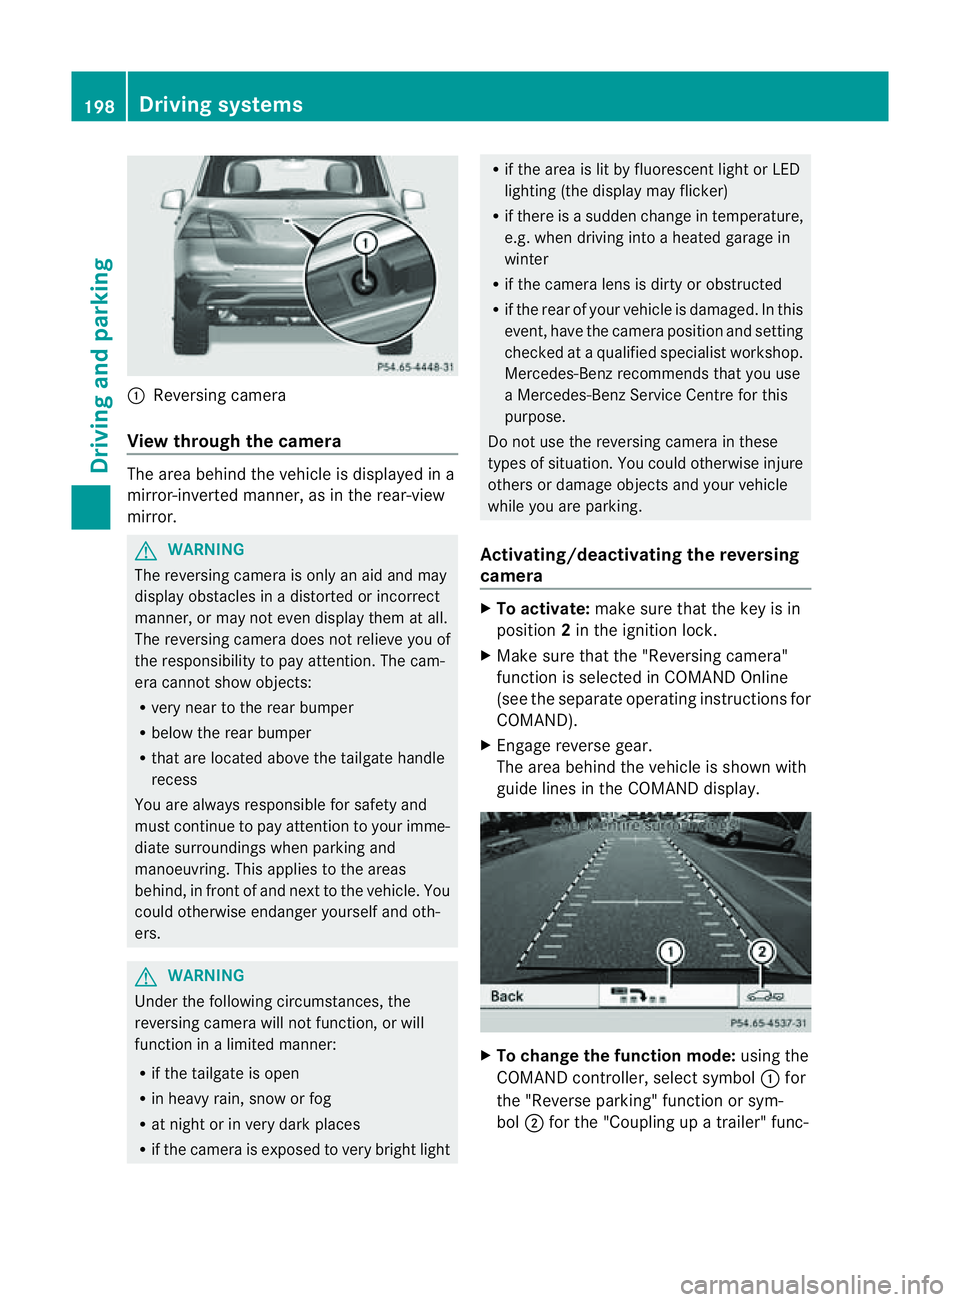
:
Reversin gcamera
View through th ecamera Th
ea rea behind the vehicle is displaye dina
mirror-inverted manner, as in the rea r-view
mirror. G
WARNING
The reversin gcamera is only an aid and may
display obstacles in adistorted or incorrect
manner, or may no teven display them at all.
Th er eversing camera does not relieve you of
the responsibility to pay attention. The cam-
era cannot show objects:
R ver ynear to the rear bumper
R belo wthe rea rbumper
R that are located above the tailgate handle
recess
You are alway sresponsible for safet yand
must continue to pay attentio ntoyourimme-
di at es urroundings when parking and
manoeuvring. This applie stothe areas
behind, in front of and nex ttothe vehicle. You
coul dotherwise endang er yourself and oth-
ers. G
WARNING
Under the following circumstances, the
reversing camera will not function, or will
function in alimited manner:
R if the tailgate is open
R in heavy rain, snow or fog
R at night or in very dark places
R if the camer aisexposed to very brigh tlight R
if the area is lit by fluorescen tlight or LED
lighting (the display may flicker)
R if there is asudden change in temperature,
e.g. when driving into aheated garage in
winter
R if the camera lens is dirt yorobstruc ted
R if the rear of your vehicle is damaged. In this
event ,have the camera positio nand setting
checked at aqualified specialist workshop.
Mercedes-Benz recommends that you use
aM ercedes-Benz Servic eCentr efor this
purpose.
Do not use the reversin gcamera in these
types of situation. You could otherwise injure
others or damage objects and your vehicle
while you are parking.
Activating/deactivating the reversing
camera X
To activate: make sure that the key is in
position 2in the ignition lock.
X Make sure that the "Reversing camera"
function is selected in COMAND Online
(see the separate operating instructions for
COMAND).
X Engage reverse gear.
The area behind the vehicle is shown with
guide lines in the COMAND display. X
To change the function mode: using the
COMAND controller, select symbol :for
the "Reverse parking" function or sym-
bol ;for the "Coupling up atrailer" func- 198
Dri
ving systemsDriving and parking
Page 237 of 389

Usefu
linfor mati on
i This Owner's Manual describes all models
and all standard and optional equipment
available to your vehicle at the time of pub-
lication of the Owner's Manual. Country-
specific deviation sare possible .Please
not ethat your vehicle ma ynot be equipped
with all featur es described. This also
applies to safety-releva ntsystems and
functions.
i Please read the information on qualified
specialist workshops (Y page 24).Important safet
ynotes
You will fin danillustration of th einstrument
cluste rinthe "A taglance "section
(Y page 30). G
WARNING
Only use th eon-bo ardc omputer wh en road
and traffic condition spermit .You would oth-
erwise be distracted and unable to concen-
trate properly on driving, and coul dcause an
accident. G
WARNING
No message swill be displayed if either the
instrument cluster or the multifunction dis-
play is inoperative.
As aresult, you will not be able to see infor-
mation about your driving conditions, such as
speed, outside temperature, warning and indi-
cator lamps, display messages or system fail-
ures. Drivin gcharacteristic smay be impaired.
Adjust your driving style and vehicle speed
accordingly.
Contact aqualified specialist workshop
immediately. G
WARNING
The on-board computer only records and dis-
plays malfunctions and warnings from certain
systems. For this reason, you should always make sure that your vehicle is safe to use. You
could otherwis
ecause an accident by driving
an unsafe vehicle. G
WARNING
The operating safety of your vehicle could be
impaired if maintenance work is carried out
incorrectly. This could cause you to lose con-
trol of your vehicle and cause an accident.
Moreover, the safety systems may no longer
be able to protect you or others as they are
designed to do.
Always have service work carried out at a
qualified specialis tworkshop. Displays and operation
Coolant tempera
tureg auge
Th ec oolant temperatur egauge is in the
instrument cluster on the right-hand side.
Under normal operating conditions and with
the specified coolant level, the coolant tem-
perature may rise to 120 †.
At high outside temperatures and when driv-
ing uphill, the coolant temperature may rise
to the end of the scale. Rev counter
The red band in the rev counter indicates the
engine's overrevvin grange.
! Do not drive in the overrevving range.
Doing so will damage the engine.
The fuel supply is interrupted to protect the
engine when the red band is reached. Outside temperature display
The outside temperature display is in the mul-
tifunction display (Y page 236). G
WARNING
At temperatures just above freezing point, the
street may be icy, especially in wooded areas 234
Displays and operationOn-board computer and displays