2011 MERCEDES-BENZ M-CLASS SUV check engine light
[x] Cancel search: check engine lightPage 170 of 389

safety reasons, get out of the vehicle first
and survey the off-road route.
R chec kthe depth of water before fording
river sand streams.
R loo kout for obstacle ssuch as rocks, holes,
tree stumps and furrows.
R take care when turning on an uphil lor
downhill slope and when turning at sharp
angles. The vehicle could otherwise tip
over.
R always keep the side windows and the pan-
oram asliding sunroof closed during the
journey.
R do not stray from marked routes or paths.
i Information abou tretrofitting special all-
ter rain tyres is available from any
Mercedes-Benz Service Centre. H
Environmental note
Protection of the environmen tisofprimary
importance .Trea tnature with respect.
Observe all prohibiting signs.
Checklist before drivin goff-road X
Engine oi llevel: checkthe engin eoil and
top it up if necessary.
When drivin gonsteep gradients, the oil
level must be sufficiently hig htoensure a
correct oil supply in the vehicle.
X AdBlue ®
tank (BlueTEC vehicl es):check
the fluid leve land, if necessary, refill to the
maximum (13 l) (Y page157).
X Tyre-chang etool kit: check that the jack
is working and make sure you have the
wheelbrace, arobust tow cabl eand afold-
ing spade in the vehicle.
X Wheels and tyres: checkthe tyr etread
depth and tyre pressure.
X Check for damag eand remove any foreign
objects, e.g. small stones, from the
wheels/tyres.
X Repl acea ny missing valve caps. X
Repl aced ented or damaged wheels.
X Wheels: dented or bent wheels can lead to
al oss of tyr epressure and damag etot he
tyr eb ead. Before driving off-road, check
the wheels and replace them if necessary.
Checklist after driving off-road !
If you detect damage to the vehicle after
driving off-road, have the vehicle checked
immediately at aqualified specialist work-
shop.
Driving over rough terrain places greater
demands on your vehicle than driving on nor-
mal roads. After driving off-road, check the
vehicle. This allow syou to detec tdamage
promptly and reduce the risk of an accident
to yourself and other road users.
X Vehicles with the ON&OFFROAD pack-
age: activate the on-road program
(Y page 222).
X Vehicles without the ON&OFFROAD
package: deactivate the on-road program
(Y page 222).
X Deactivate the LOW RANGE off-road gear
(Y page 223).
X Deactivate DSR (Y page 220).
X Lower the vehicle level again to alevel suit-
able to the road conditions, e.g. to the high-
way/high-speed level.
X Clean the headlamps and rear lights and
check for damage.
X Clean the front and rear licence plates.
X Clean the wheels/tyres with awater jet and
remove any foreign objects.
X Clea nthe wheels, wheel arches and the
vehicle underside with awater jet; check
for any foreign objects and damage.
X Check whethe rtwigs or other parts of
plants have become trapped. These
increase the risk of fire and can damage
fuel pipes, brake hose sorthe rubber bel-
lows of the axl ejoint sand propeller shafts.
X After the trip, examine without fail the
entire undercarriage, wheels ,tyres, brakes, Driving tips
167Drivingand park ing Z
Page 213 of 389

the warning onl
yoccurs if the differenc ein
spee dislesst han 12 km/h.
The yellow indicator lamp goes out if reverse
gea rise ngaged. Blind Spot Assist is then
deactivated.
The brightness of the indicator/warning
lamps is adjusted automaticall yaccording to
the ambient light. G
WARNING
Blind Spot Assist is not active at speeds below
30 km/h, and the indicator lamps in the exte-
rior mirrors are yellow. Vehicles in the moni-
toring range are the nnot indicated.
Always pay attention to traffic condition sand
your surroundings .Otherwise, you may fail to
recognis edangers in time, cause an accident
and injure yoursel fand others.
Collisio nwarning
If av ehicle is detected in the mon itoring range
of Blind Spot Assis tand you switch on the turn
signal, adouble warnin gtone sounds. Red
warnin glamp :flashes .Ifthe tur nsignal
remains on, detected vehicles are indicated
by the flashing of red warnin glamp :.T here
ar enof urther warning tones.
Switching on Blind Spot Assist
X On vehicles without anavigation system,
make sure that the Becker ®
MAP PILOT is
connected; see the separate operating
instructions for Audio 20.
X Make sure that the radar senso rsystem
(Y page 249) and Blind Spot Assist
(Y page 245) are activated in the on-board
computer.
X Turn the key to position 2in the ignition
lock.
Warning lamps :ligh tupr ed in the exte-
rior mirror sfor approximately 1. 5seconds
and then tur nyellow.
Trailer towing
If you attach atrailer, make sure that yo uhave
correctly established the electrical connec-
tion. This can be accomplished by checking the trailer lighting
.Blind Spot Assist is then
deactivated. The indicator lamp in the exte-
rior mirrors lights up yellow, and the Blind Spot Assist currentl
yunavailable See Owner's Manual message appe
arsin
the multifunction display.
i You can deactivate the indicato rlamps in
the exterior mirrors.
To do so, switch off Blind Spot Assis tif:
R thek ey is in position 2in the ignition
lock.
R the engine is not running.
R the electrical connection to the trailer
has been established.
Lane Keeping Assist Important safety notes
Lan
eKeeping Assist monitor sthe area in
front of your vehicle by means of acamera at
the top of the windscreen. Lane Keeping
Assis tdetect slane markings on the road and
warns you before you leave your lane unin-
tentionally. :
Lane Keeping Assis tcamera
If you have chose nthe Displa yunit Speed-/odometer (Y
page 246) functio nin
the on-board computer and select km as the
unit of measurement, Active Lane Keeping
Assist is active from speeds of 60 km/h. If
the miles displa
yunit is selected ,the assis-
tance range begin sat40mph. 210
Driving systemsDriving and parking
Page 291 of 389

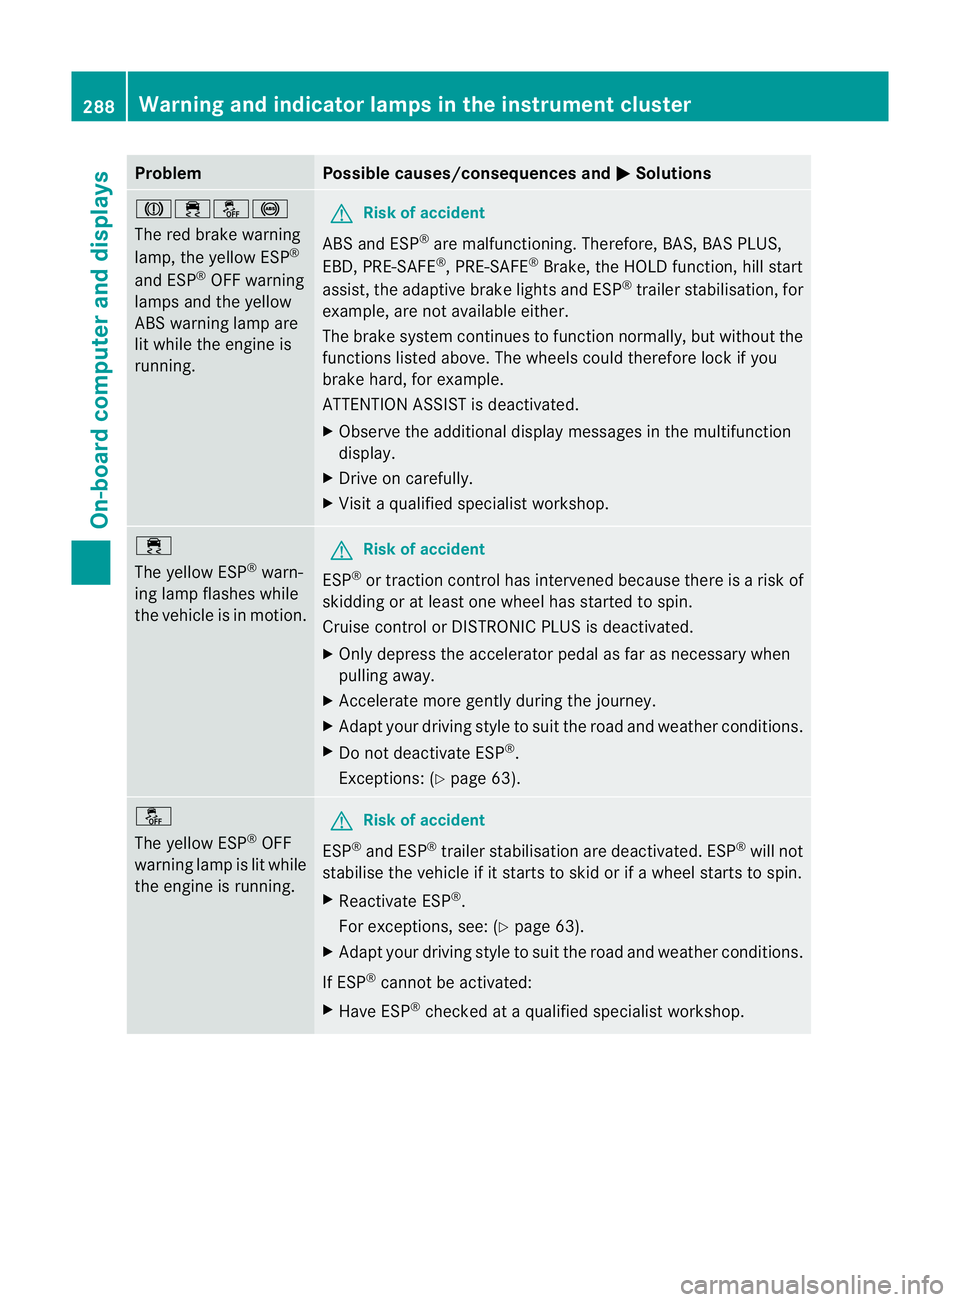
Problem Possible causes/consequences and
M Solutions
J֌!
The red brake warning
lamp, the yellow ESP
®
and ESP ®
OFF warning
lamps and the yellow
AB Sw arning lamp are
lit while the engine is
running. G
Risk of accident
ABS and ESP ®
are malfunctioning. Therefore, BAS ,BAS PLUS,
EBD ,PRE-SAFE ®
,P RE-SAFE ®
Brake, the HOLD function, hill start
assist, the adaptive brake lights and ESP ®
trailer stabilisation, for
example, are not available either.
The brake syste mcontinue stofunction normally, but without the
functions listed above. The wheel scould therefor elock if you
brake hard ,for example.
ATTENTION ASSIS Tisdeactivated.
X Observ ethe additiona ldisplay messages in the multifunction
display.
X Driv eonc arefully.
X Visit aqualified specialist workshop. ÷
The yello
wESP®
warn-
ing lamp flashes while
the vehicle is in motion. G
Risk of accident
ESP ®
or traction control has intervened because there is arisk of
skidding or at least one wheel has started to spin.
Cruise control or DISTRONIC PLU Sisd eactivated.
X Only depress the accelerator pedal as far as necessar ywhen
pulling away.
X Ac celerate more gently during the journey.
X Adapt your drivin gstyle to suit the road and weather conditio ns.
X Do not deactivate ESP ®
.
Exceptions: (Y page 63). å
The yello
wESP®
OFF
warning lamp is lit while
the engine is running. G
Risk of accident
ESP ®
and ESP ®
traile rstabilisatio nare deactivated. ESP ®
will not
stabilis ethe vehicle if it starts to skid or if awheel starts to spin.
X Reactivate ESP ®
.
For exceptions, see: (Y page 63).
X Adap tyour drivin gstyle to suit the road and weather conditio ns.
If ESP ®
cannot be activated:
X Have ESP ®
checked at aqualified specialist workshop. 288
Warnin
gand indicator lam psin the instru ment clusterOn-board computer and displays
Page 293 of 389

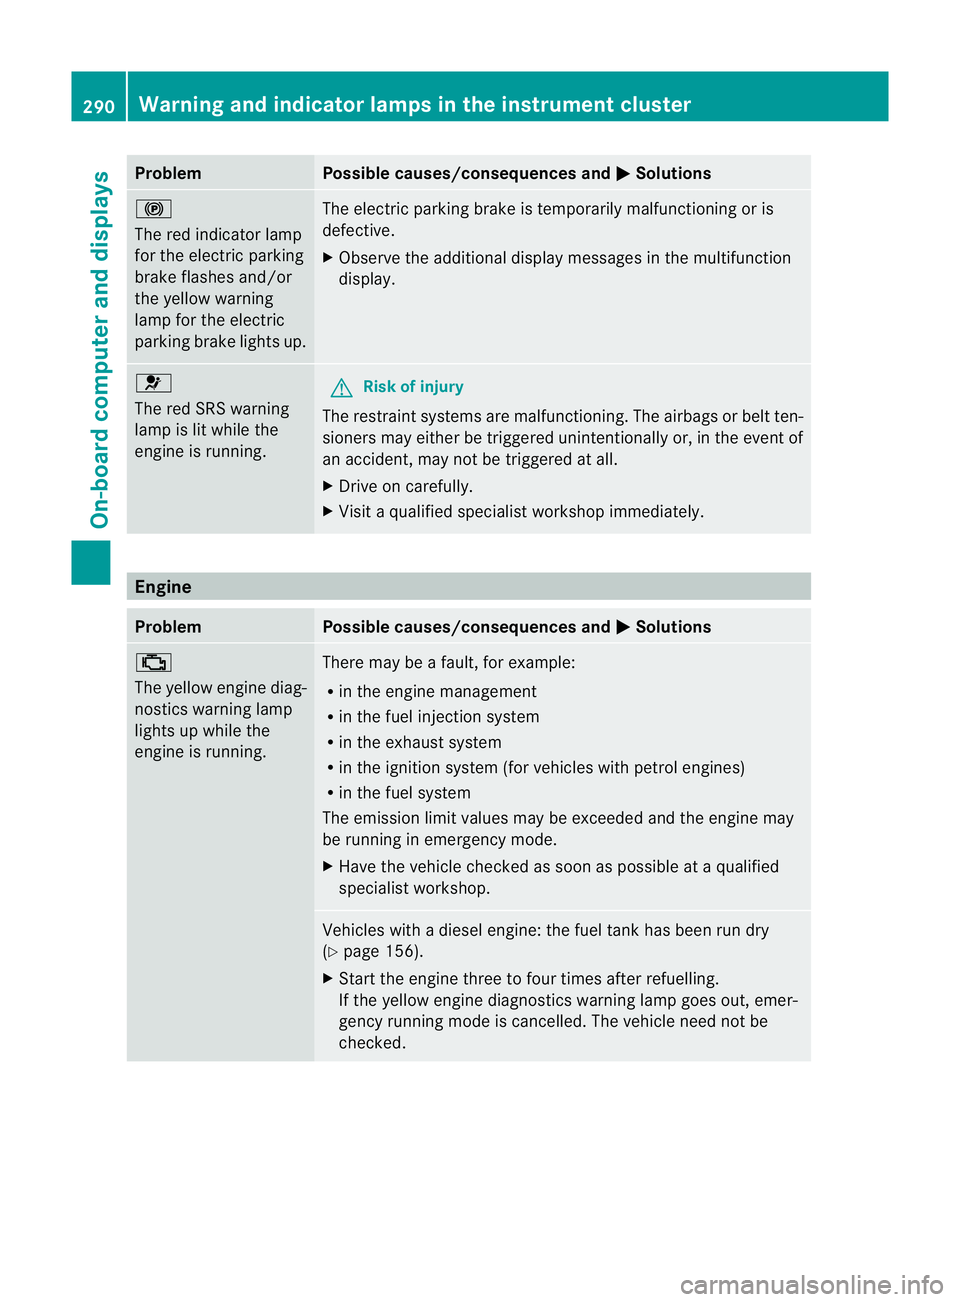
Problem Possible causes/consequences and
M Solutions
!
The red indicator lamp
for the electric parking
brake flashes and/or
the yellow warning
lam pfor the electric
parkin gbrake lights up. Th
ee lectric parkin gbrake is temporaril ymalfunctioning or is
defective.
X Observe the additional display message sint he multifunc tion
display. 6
The red SRS warning
lam
pisl it while the
engine is running. G
Risk of injury
The restrain tsystems are malfunctioning. The airbags or belt ten-
sioners may eithe rbetriggered unintentionall yor, in th eevent of
an accident, may not be triggered at all.
X Drive on carefully.
X Visit aqualified specialist worksho pimmediately. Engine
Problem Possible causes/consequences and
M Solutions
;
Th
ey ellow engine diag-
nostic swarning lamp
lights up while the
engine is running. There may be
afault, for example:
R in the engine management
R in the fuel injection system
R in the exhaust system
R in the ignition system (for vehicles with petrol engines)
R in the fuel system
The emissio nlimit values may be exceeded and the engine may
be running in emergenc ymode.
X Hav ethe vehicle chec kedass oon as possible at aqualified
specialist workshop. Vehicles with
adiesel engine: the fuel tank has been run dry
(Y page 156).
X Star tthe engin ethree to fou rtimes after refuelling.
If the yellow engine diagnostics warnin glamp goes out, emer-
gency running mode is cancelled. The vehicle need not be
checked. 290
Warnin
gand indicator lam psin the instru ment clusterOn-board computer and displays
Page 323 of 389

X
Lower th ebonnet and let it fal lfrom a
heig ht of approx imately 20 cm.
X Check that the bonnet has engaged prop-
erly.
If the bonnet can be raised slightly, it is not
properly engaged. Open it again and close
it with alittle more force. Radiator
i Vehicles with diesel engine: do not
cover the radiator .Don ot use thermal
mats, insec tprotectio ncover sora nything
similar. Doing so can cause the Onboard
Diagnosti csSystem to display inaccurate
values .Some of these values ar elegally
required and must be cor rect. Engine oil
Notes on the oil level Depending on driving style, the vehicle con-
sume samaximum of 0.8 loil per 100 0km.
Th eo il consumption may be higher than this
when the vehicle is new or if you frequently
drive at high engin espeeds.
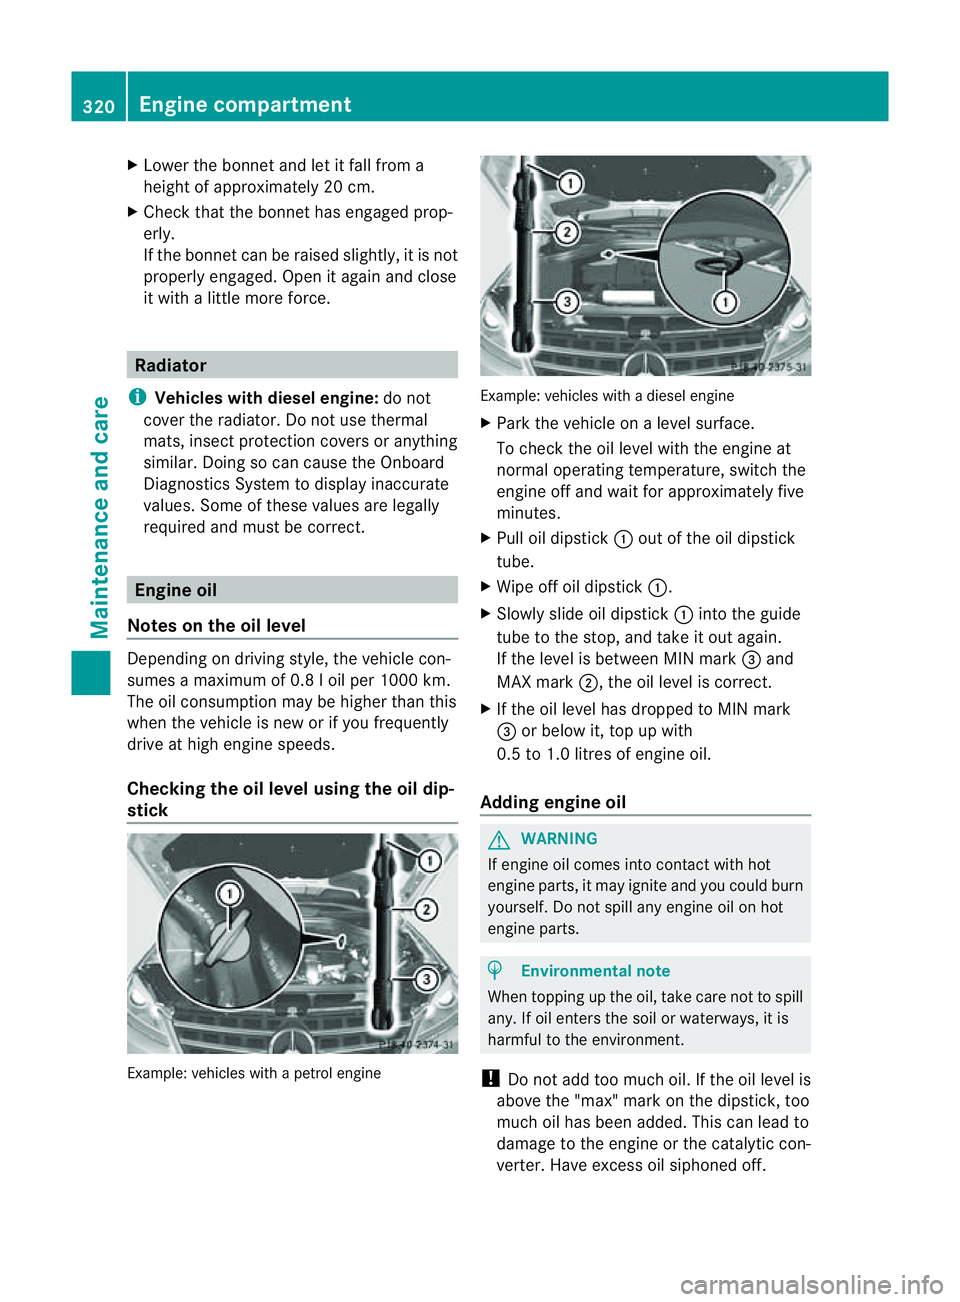
Checking the oil level using the oil dip-
stick Example: vehicles with
apetro lengine Example: vehicle
swithadiesel engine
X Park the vehicle on alevel surface.
To chec kthe oil level with the engin eat
normal operating temperature, switch the
engine off and wait for approximately five
minutes.
X Pull oil dipstick :out of the oil dipstick
tube.
X Wip eoff oi ldipstick :.
X Slowly slide oil dipstick :into the guide
tube to the stop, and take it out again.
If the level is between MIN mark =and
MAX mark ;,the oil level is correc t.
X If th eoil level has dropped to MIN mark
= or below it, top up with
0.5 to 1.0 litres of engine oil.
Adding engine oil G
WARNING
If engine oil comes into contact with hot
engine parts, it may ignite and you could burn
yourself .Donot spill any engin eoil on hot
engine parts. H
Environmental note
When topping up the oil, take care not to spill
any. If oil enters the soil or waterways, it is
harmful to the environment.
! Do not add too much oil. If the oil level is
above the "max" mar konthe dipstick ,too
much oil has been added. This can lead to
damage to the engin eorthe catalytic con-
verter .Have excess oil siphoned off. 320
Eng
inecompartmentMaintenance and care