2011 MERCEDES-BENZ GL350 BlueTEC Diff
[x] Cancel search: DiffPage 209 of 376
Differential lock
General notes
i Differential locks are available only in
vehicles with the Off-Road Pro engineering
package.
Your vehicle is equipped with the following:
R A differential lock for the transfer box: this
controls the balance between the front and
rear axles.
R A differential lock for the rear axle: this
controls the balance between the wheels
and the rear axle.
Differential locks improve the vehicle's
traction. 4ETS ( Y page 67)controls the
balance between the wheels on the front axle.
Information on "Off-road driving"; see
( Y page 173).
Information about the differential and
differential locks
When the vehicle is driving around a curve,
the wheels on the outside of the curve have
to cover a greater distance and therefore
have to turn faster than the wheels on the
inside. The differential, a transmission in the
drive train, balances these different rotational
speeds out, making cornering possible.
The disadvantage of a differential: the wheels
with the least grip are driven the hardest.
Example: one wheel on a driven axle is on a
snow-covered surface and therefore has no
traction. This wheel has the most driving
force, since the differential distributes most
of the force to the wheel with the least
resistance. The wheel on the opposite side of
this axle, which is on a solid surface and could
therefore enable traction, does not have any
driving force. 4ETS eliminates this
disadvantage and ensures good steerability
by braking the spinning wheel automatically
and thereby directing more force to the wheel
that is on a solid surface and can provide
traction.
ESP ®
and 4ETS are traction systems that are
ideally suited to road driving and driving on
easily negotiable off-road terrain. The LOW
RANGE off-road gear also improves off-road
capability.
Difficult off-road conditions require additional
measures, such as locking one or more
differentials. Your vehicle has two differential
locks: one (central) differential lock for the
transfer case and one differential lock for the
rear axle. Both differential locks can be
activated using the selector wheel on the
center console. When the (central)
differential for the transfer case is locked, the
speed of the front wheels is the same as the
speed of the rear wheels. When the
differential for the rear axle is locked, both of
the rear wheels turn at the same speed,
independent of their individual torques. Note
that activating the differential locks
significantly reduces the steerability of the
vehicle.
For your safety, the safety of others and to
prevent damage to the vehicle, the
differential locks must not be activated on
paved roads. Note that the differential
function is necessary when driving on paved
roads and that the differentials must never be
locked on paved roads. Otherwise, the
vehicle can no longer be steered. The
differential locks must therefore only be
activated when driving off-road, and then only
if activating the other driving systems (4ETS,
ESP ®
and LOW RANGE off-road gear) is no
longer sufficient.
Engaging the differential locks
! Drive off slowly when the differential
locks are engaged.
Function or performance tests may only be
performed on a 2-axle dynamometer. If you
wish to operate the vehicle on such a
dynamometer, please consult an
authorized Mercedes-Benz Center
beforehand. You could otherwise damage
the drive train or the brake system.
Off-road driving systems207Driving and parkingBA 164.8 USA, CA Edition B 2011; 1; 2, en-USd2sboikeVersion: 3.0.3.52010-04-21T15:08:44+02:00 - Seite 207Z
Page 210 of 376
Automatic mode
Use automatic mode ; for all driving
situations, including driving off-road or when
fording.
In automatic mode, the differential locks are
engaged and disengaged according to driving
requirements. This guarantees sufficient
traction for most driving situations with
unrestricted vehicle steerability.
XStart the engine.
The differential locks are in automatic
mode. The indicator lamp in selector
wheel : lights up above symbol for
automatic mode ;.
Engaging manually
GWarning!
Never drive on a paved surface with the center
and rear axle differential locks manually
engaged. Ability to steer the vehicle is greatly
reduced when the differential locks are
manually engaged, increasing the risk of an
accident.
For safety reasons, the locks are
automatically released at a vehicle speed
above 31 mph (50 km/h). Nevertheless, you
should only manually lock the differential if
absolutely necessary because engaged locks
will restrict the vehicle drivetrain while
cornering and cause the vehicle to chatter.
This could cause you to lose control of the
vehicle and cause an accident.
! The differential locks must not be
activated when the vehicle is being towed
or while the wheels are spinning.
Only engage the differential locks manually if
traction in automatic mode is insufficient.
At speeds of up to 19 mph (30 km/h), you
can engage the differential locks manually.XStart the engine.XTurn selector wheel : to desired position
= or ?.
The indicator lamp in selector wheel :
lights up at the corresponding symbol.
The engaged differential appears in the
multifunction display:
AThe differential lock for the transfer case
is locked.
If you have not previously selected the off-
road menu ( Y page 220) in the on-board
computer, the message disappears after
about five seconds.
The differential locks are not controlled
automatically. The steerability of the vehicle
is restricted considerably. Drive carefully and
accelerate gently for optimum traction.
! If the differential locks are activated
manually, the wheels scuff on the road
when cornering since the rotation
difference between the wheels is no longer
balanced out.
You can switch back to automatic mode at
any time. For safety reasons, the differential
locks disengage automatically at speeds
above 31 mph (50 km/h). If you stop the
vehicle and switch off the ignition for longer
than ten seconds, the differential locks
switch back to automatic mode.
208Off-road driving systemsDriving and parking
BA 164.8 USA, CA Edition B 2011; 1; 2, en-USd2sboikeVersion: 3.0.3.52010-04-21T15:08:44+02:00 - Seite 208
Page 211 of 376
Message in the multifunction display
Diff. Lock System Overheated -
Wait briefly.
The differential lock system has overheated
and briefly disengaged.XContinue driving.
The differential locks cool off and are soon
available once again.
Towing a trailer
Notes on towing a trailer
Important safety instructions
GWarning!
Failure to use proper equipment and driving
technique can result in a loss of vehicle
control when towing a trailer.
Improper towing or failure to follow the
instructions in this manual can result in
vehicle damage and/or serious personal
injury. Follow the guidelines below carefully
to assure safe trailer operation.
Contact an authorized Mercedes-Benz Center
should you require an explanation of
information contained in this manual.
General information
R Only install an approved trailer coupling on
your vehicle.
Further information on availability and on
installation is available from any authorized
Mercedes-Benz Center.
R The bumpers of your vehicle are not
suitable for installing detachable trailer
couplings.
R Do not install hired trailer couplings or
other detachable trailer couplings on the
bumpers of your vehicle.
R To reduce the risk of damage to the ball
coupling, remove it from the ball coupling
recess when not in use.
Coupling up a trailerGWarning!
While you are coupling or decoupling a trailer,
make sure nobody locks or unlocks the
vehicle and/or opens or closes doors or the
tailgate.
The vehicle’s level could change and you
could endanger yourself and/or others as a
result.
Make sure that you do not operate the ADS
button or the vehicle level control system
when coupling/decoupling the trailer.
Observe the maximum permissible trailer
dimensions (width and length).
Most federal states and all Canadian
provinces require by law:
R safety chains between the towing vehicle
and the trailer. The chains should be cross-
wound under the trailer drawbar. They must
be fastened to the vehicle's trailer
coupling, not to the bumper or the axle.
Allow for enough play in the chains to
facilitate turning tight corners.
R a separate brake system for certain types
of trailer.
R a safety switch for braked trailers. Check
the specific legal requirements applicable
to your federal state.
If the trailer detaches from the towing
vehicle, the safety switch applies the
trailer's brakes.
! Do not connect the trailer's brake system
(if featured) to the hydraulic brake system
of the towing vehicle, as the latter is
equipped with an anti-lock brake system.
Doing so will result in a loss of function of
the brake systems of both the vehicle and
the trailer.
i The vehicle's wiring harness features a
line to the brake indicator lamp.
Towing a trailer209Driving and parkingBA 164.8 USA, CA Edition B 2011; 1; 2, en-USd2sboikeVersion: 3.0.3.52010-04-21T15:08:44+02:00 - Seite 209Z
Page 213 of 376
ROn long and steep gradients that are
difficult to drive down in shift range 1,
switch to the off-road drive program or
engage the LOW GEAR off-road gear.
R When driving downhill, shift to a lower gear
to utilize the engine's braking effect.
Avoid continuous brake application as this
may overheat the vehicle brakes and, if
installed, the trailer brakes.
R If the coolant temperature increases
dramatically while the air-conditioning
system is switched on, switch off the air-
conditioning system.
Coolant heat can additionally be dissipated
by opening the windows and by setting the
blower fan and the interior temperature to
maximum.
R When overtaking, pay particular attention
to the extended length of your vehicle/
trailer combination.
Due to the length of your vehicle/trailer
combination, you will have to travel an
additional distance beyond the vehicle you
are overtaking before returning to the
previous lane.
Decoupling a trailer
GWarning!
While you are coupling or decoupling a trailer,
make sure nobody locks or unlocks the
vehicle and/or opens or closes doors or the
tailgate.
The vehicle’s level could change and you
could endanger yourself and/or others as a
result.
Make sure that you do not operate the ADS
button or the vehicle level control system
when coupling/decoupling the trailer.
XMake sure that the automatic transmission
is set to position P.XApply the vehicle's parking brake.XStart the engine.XClose all doors and the tailgate.XApply the trailer's parking brake.GWarning!
As soon as you disconnect the electrical
connection between the trailer and the
vehicle, the vehicle will lower. To help avoid
personal injury, make sure no one is near the
wheel housing or underneath the vehicle
before the electrical connection is
disconnected.
When you decouple the trailer, the vehicle is
temporarily raised because the springs are
relieved of load. Be especially careful during
this process, as you could otherwise injure
yourself and/or others. Make sure that any
persons remaining in the vehicle do not press
the switches for vehicle level control or the
ADS.
XDetach the trailer cable and decouple the
trailer.XDetach the trailer cable and decouple the
trailer.XSwitch off the engine.
Permissible trailer load and drawbar
noseweight
Weight specifications
The Gross Trailer Weight (GTW) is the
combined weight of the trailer together with
the cargo and equipment loaded on the
trailer. Permissible gross weight: 7500 lb
(3402 kg).
The permissible Trailer drawbar Weight
Rating (TWR) is the maximum weight
permitted on the trailer drawbar: 600 lb
(272 kg) limit for Mercedes-Benz-approved
trailer couplings.
Loading a trailer
R When loading a trailer, please note that
neither the permissible gross trailer weight
nor the permissible Gross Vehicle Weight
Towing a trailer211Driving and parkingBA 164.8 USA, CA Edition B 2011; 1; 2, en-USd2sboikeVersion: 3.0.3.52010-04-21T15:08:44+02:00 - Seite 211Z
Page 216 of 376
Vehicle equipment
i This manual describes all the standard
and optional equipment of your vehicle
which was available at the time of
purchase. Country-specific differences are
possible. Bear in mind that your vehicle
may not feature all functions described
here. This also refers to safety-related
systems and functions.
Important safety notes
You will find an illustration of the instrument
cluster in the "At a glance" section
( Y page 28).
GWarning
A driver's attention to the road and traffic
conditions must always be his/her primary
focus when driving.
For your safety and the safety of others,
selecting features through the multifunction
steering wheel should only be done by the
driver when traffic and road conditions permit
it to be done safely.
Bear in mind that at a speed of just 30 mph
(approximately 50 km/h ), your vehicle is
covering a distance of 44 feet (approximately
14 m) every second.
GWarning!
No messages will be displayed if either the
instrument cluster or the multifunction
display is inoperative.
As a result, you will not be able to see
information about your driving conditions,
such as
R speed
R outside temperature
R warning/indicator lamps
R malfunction/warning messages
R failure of any systems
Driving characteristics may be impaired.
If you must continue to drive, do so with added
caution. Contact an authorized Mercedes-
Benz Center as soon as possible.GWarning
Malfunction and warning messages are only
indicated for certain systems and are
intentionally not very detailed. The
malfunction and warning messages are
simply a reminder with respect to the
operation of certain systems. They do not
replace the owner's and/or driver's
responsibility to maintain the vehicle's
operating safety. Have all required
maintenance and safety checks performed on
the vehicle. Bring the vehicle to an authorized
Mercedes-Benz Center to address the
malfunction and warning messages.
Displays and operation
Tachometer
The red band in the tachometer indicates the
engine's overrevving range.
! Do not drive in the overrevving range, as
this could damage the engine.
The fuel supply is interrupted to protect the
engine when the red band is reached.
Outside temperature display
The outside temperature display is in the
multifunction display.
GWarning!
The outside temperature indicator is not
designed to serve as an ice-warning device
and is therefore unsuitable for that purpose.
Indicated temperatures just above the
freezing point do not guarantee that the road
surface is free of ice. The road may still be icy,
especially in wooded areas or on bridges.
Changes in the outside temperature are
displayed after a short delay.
214Displays and operationOn-board computer and displays
BA 164.8 USA, CA Edition B 2011; 1; 2, en-USd2sboikeVersion: 3.0.3.52010-04-21T15:08:44+02:00 - Seite 214
Page 219 of 376
Menus and submenus
Menu overview
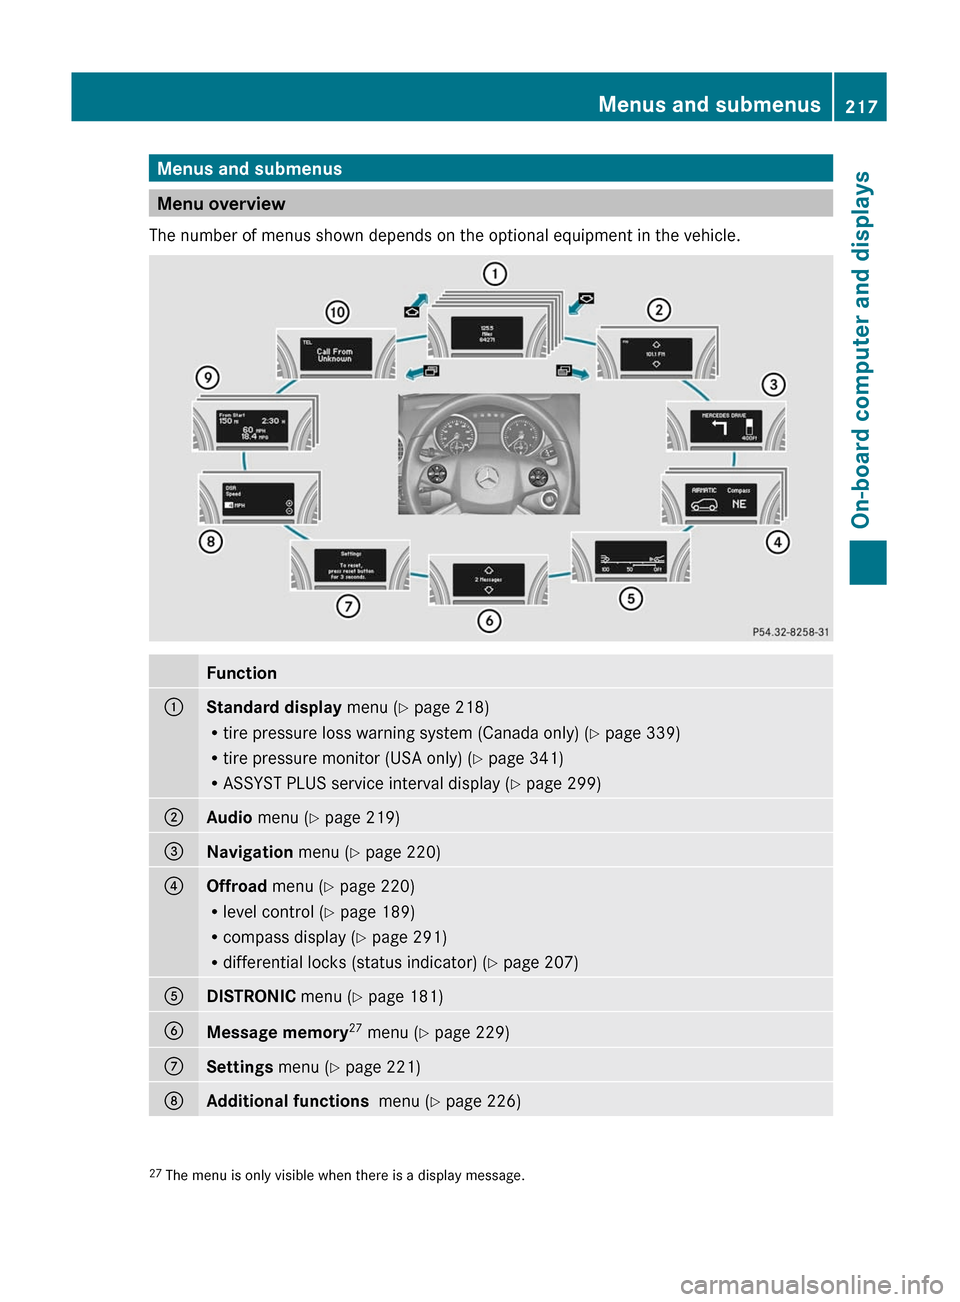
The number of menus shown depends on the optional equipment in the vehicle.
Function:Standard display menu (Y page 218)
R tire pressure loss warning system (Canada only) ( Y page 339)
R tire pressure monitor (USA only) ( Y page 341)
R ASSYST PLUS service interval display ( Y page 299);Audio menu ( Y page 219)=Navigation menu (Y page 220)?Offroad menu (Y page 220)
R level control ( Y page 189)
R compass display ( Y page 291)
R differential locks (status indicator) ( Y page 207)ADISTRONIC menu (Y page 181)BMessage memory 27
menu ( Y page 229)CSettings menu (Y page 221)DAdditional functions menu (Y page 226)27
The menu is only visible when there is a display message.Menus and submenus217On-board computer and displaysBA 164.8 USA, CA Edition B 2011; 1; 2, en-USd2sboikeVersion: 3.0.3.52010-04-21T15:08:44+02:00 - Seite 217Z
Page 222 of 376
XTo select the next/previous track:
briefly press the & or * button.XTo select a track from the track list
(rapid scrolling): press and briefly hold the
& or * button.
The current track will not be displayed in
audio AUX mode ( Auxiliary audio mode:
external audio source connected).
Video DVD operation
XSwitch on COMAND APS and select video
DVD (see the separate operating
instructions).XPress V or U on the steering wheel
to select the Audio menu.
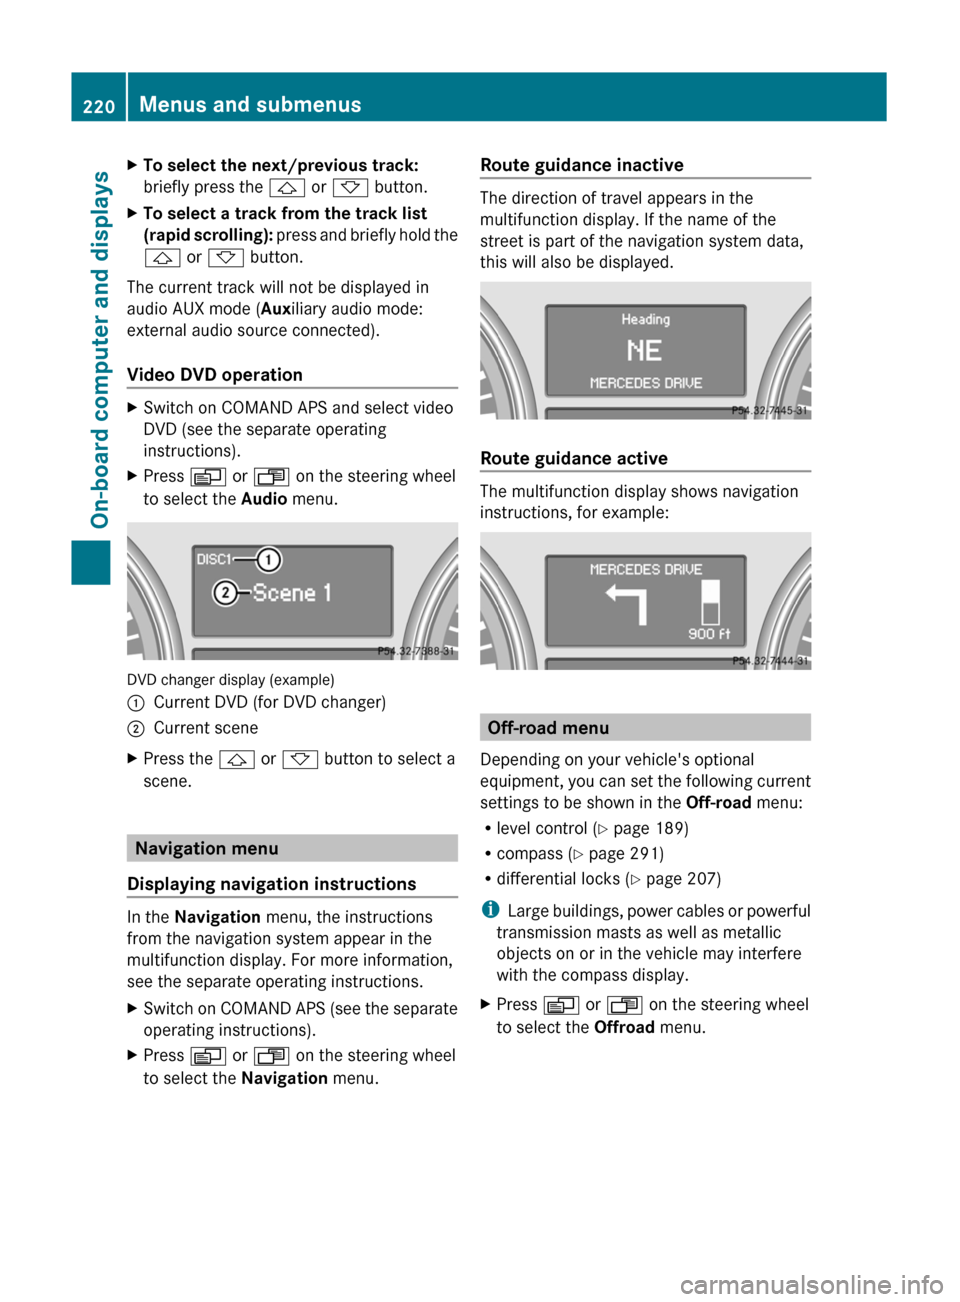
DVD changer display (example)
:Current DVD (for DVD changer);Current sceneXPress the & or * button to select a
scene.
Navigation menu
Displaying navigation instructions
In the Navigation menu, the instructions
from the navigation system appear in the
multifunction display. For more information,
see the separate operating instructions.
XSwitch on COMAND APS (see the separate
operating instructions).XPress V or U on the steering wheel
to select the Navigation menu.Route guidance inactive
The direction of travel appears in the
multifunction display. If the name of the
street is part of the navigation system data,
this will also be displayed.
Route guidance active
The multifunction display shows navigation
instructions, for example:
Off-road menu
Depending on your vehicle's optional
equipment, you can set the following current
settings to be shown in the Off-road menu:
R level control ( Y page 189)
R compass ( Y page 291)
R differential locks ( Y page 207)
i Large buildings, power cables or powerful
transmission masts as well as metallic
objects on or in the vehicle may interfere
with the compass display.
XPress V or U on the steering wheel
to select the Offroad menu.220Menus and submenusOn-board computer and displays
BA 164.8 USA, CA Edition B 2011; 1; 2, en-USd2sboikeVersion: 3.0.3.52010-04-21T15:08:44+02:00 - Seite 220
Page 223 of 376

Example display for vehicles with the Off-Road Pro
engineering package
Settings menu
Introduction
The Settings menu allows you to:
R Restoring the factory settings
R Changing the instrument cluster settings
R Changing the time/date settings 30
R Changing the lighting settings
R Changing the vehicle settings
R Changing the convenience settings
Resetting to factory settings
For safety reasons, the Daytime Running
Lamps function in the Lighting submenu is
only reset if the vehicle is stationary.
XPress V or U on the steering wheel
to select the Settings menu.XPress and hold the . reset button on the
instrument cluster for approximately three
seconds.
A prompt appears in the multifunction
display asking you to confirm by pressing
the . reset button again.XPress the . reset button again.
The settings of most functions are restored
to the factory settings.
or
XIf you want to retain the settings, do not
press the . reset button a second time.
After approximately five seconds, the
Settings menu appears again.XPress V or U to select a different
menu.
Instrument cluster
Selecting the unit of measurement for
distance
This function is only available in Canada.
The Display Unit Speedometer/
Odometer function allows you to choose
whether certain displays appear in km/h or
mph.
The selected unit of measurement for
distance applies to:
R the analog speedometer
R the odometer and the trip odometer
R the trip computer
R the navigation instruction in the
Navigation menu
R DISTRONIC
XPress V or U on the steering wheel
to select the Settings menu.XPress & to call up the selection of
submenus.XPress W or X to select the
Instrument Cluster submenu.XPress & to select Display Unit
Speedometer/Odometer .XPress the W or X button to select
Km or Miles as the unit of measurement for
distance.XPress the &, V or U button to
select a different display.30 This function is not available in vehicles with the navigation module.Menus and submenus221On-board computer and displaysBA 164.8 USA, CA Edition B 2011; 1; 2, en-USd2sboikeVersion: 3.0.3.52010-04-21T15:08:44+02:00 - Seite 221Z