2011 MERCEDES-BENZ GL350 BlueTEC buttons
[x] Cancel search: buttonsPage 17 of 376
Warning lamp ................................. 258
Warning lamp (function) ................... 36
Standard display (on-board
computer) .......................................... 218
Starting the engine Important safety instructions ......... 148
Station
see Radio
Status line (on-board computer)
Multifunction display .....................216
Selecting the display ...................... 222
Steering (display message) .............. 251
Steering wheel Adjusting (electrically) ...................106
Adjusting (manually) ......................106
Buttons (on-board computer) ......... 215
Cleaning ......................................... 304
Important safety instructions ......... 105
Memory function (storing
settings) ......................................... 106
Steering wheel heating ..................106
Storing settings (memory
function) ........................................ 110
Steering wheel heating
Indicator lamp (Malfunction) ..........107
Steering wheel paddle shifters ........ 155
Stowage compartments Armrest (under) ............................. 265
Glove box ....................................... 265
Stowage space
Center console .............................. 265
Center console (rear) .....................266
Cup holders ................................... 277
Important safety information .........264
Submenu (on-board computer)
Convenience .................................. 225
Instrument cluster .........................221
Lighting .......................................... 223
Time/Date ..................................... 222
Vehicle ........................................... 224
Summer opening
see Convenience opening feature
Sun visor ............................................ 278
Supplemental Restraint System see SRS
Surround lighting (on-board
computer) .......................................... 223SUV
(Sport Utility Vehicle) .......................21
Switching off the alarm (ATA) ............ 69
T
Tachometer ........................................ 214
Tailgate Display message ............................ 251
Important safety guidelines .............80
Limiting the opening angle ...............84
Taillight
see Tail lamps
Tank contents
Gauge .............................................. 28
Technical data ................................... 362
GL 350 BlueTEC ............................. 370
GL 450 ........................................... 371
GL 550 ........................................... 371
Tires/wheels ................................. 357
TELEAID
Call priority .................................... 287
Display message ............................ 231
Downloading destinations
(COMAND) ..................................... 287
Emergency call .............................. 284
Important safety notes ..................283
Locating a stolen vehicle ...............288
MB info call button ........................286
Roadside Assistance button ..........285
Self-test ......................................... 283
System .......................................... 283
Vehicle remote unlocking ..............287
Telephone
Accepting a call ............................. 228
Display message ............................ 252
Menu (on-board computer) ............227
Number from the phone book ........ 228
Redialing ........................................ 228
Rejecting/ending a call .................228
Telephone compartment .................. 265
Telescopic rod (EASY-PACK load-
securing kit) ....................................... 272
Temperature Coolant (on-board computer) ......... 218
Displaying the outside
temperature ................................... 218
Index15BA 164.8 USA, CA Edition B 2011; 1; 2, en-USd2sboikeVersion: 3.0.3.52010-04-21T15:08:44+02:00 - Seite 15
Page 35 of 376
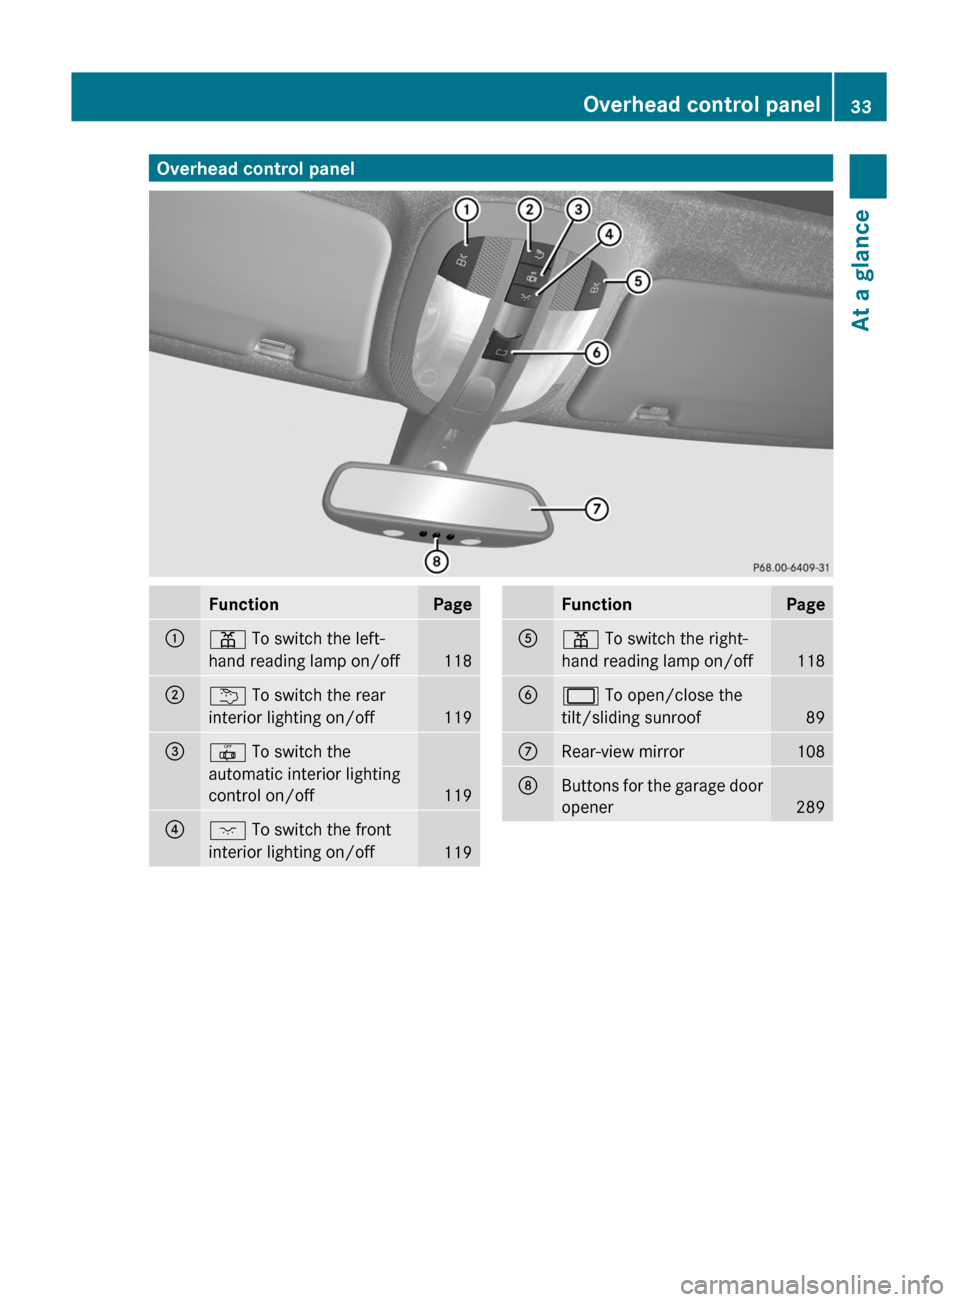
Overhead control panelFunctionPage:p To switch the left-
hand reading lamp on/off
118
;u To switch the rear
interior lighting on/off
119
=| To switch the
automatic interior lighting
control on/off
119
?c To switch the front
interior lighting on/off
119
FunctionPageAp To switch the right-
hand reading lamp on/off
118
B2 To open/close the
tilt/sliding sunroof
89
CRear-view mirror108DButtons for the garage door
opener
289
Overhead control panel33At a glanceBA 164.8 USA, CA Edition B 2011; 1; 2, en-USd2sboikeVersion: 3.0.3.52010-04-21T15:08:44+02:00 - Seite 33
Page 77 of 376

X To unlock the vehicle: touch the inner
surface of the door handle.XTo lock the vehicle: press locking
button :.
If you pull on the handle of the tailgate, only
the cargo compartment of the vehicle is
unlocked.
Changing the settings of the locking
system
You can change the setting of the locking
system in such a way that only the driver's
door and the fuel filler flap are unlocked. This
is useful if you frequently travel on your own.
XTo change the setting: press and hold
down the % and & buttons
simultaneously for approximately six
seconds until the battery check lamp
( Y page 76) flashes twice.
The SmartKey now functions as follows:
XTo unlock the driver's door: press the
% button once.XTo unlock centrally: press the %
button twice.XTo lock centrally: press the & button.
The KEYLESS-GO function is changed as
follows:
XTo unlock the driver's door: touch the
inner surface of the door handle on the
driver's door.XTo unlock centrally: touch the inner
surface of the door handle on the front-
passenger door or the rear door.XTo lock centrally: press locking
button : on one of the door handles.
Restoring the factory settings
XPress the % and & buttons
simultaneously for approximately six
seconds until the battery check lamp
flashes twice.Mechanical key
General notes
If the vehicle can no longer be unlocked with
the SmartKey, use the mechanical key.
If you use the mechanical key to unlock and
open the driver's door, the anti-theft alarm
system will be triggered ( Y page 69).
There are several ways to turn off the alarm:
XPress the % or & button on the
SmartKey.
or
XInsert the SmartKey into the ignition lock.
or
XPress the Start/Stop button in the ignition
lock. The SmartKey must be in the vehicle.
or
XLock or unlock the vehicle using KEYLESS-
GO. The SmartKey must be outside the
vehicle.
Removing the mechanical key
XPush release catch : in the direction of
the arrow and at the same time, remove
mechanical key ; from the SmartKey.
SmartKey battery
Important safety notes
It is advisable to have batteries replaced at a
qualified specialist workshop, e.g. at an
authorized Mercedes-Benz Center.
SmartKey75Opening and closingBA 164.8 USA, CA Edition B 2011; 1; 2, en-USd2sboikeVersion: 3.0.3.52010-04-21T15:08:44+02:00 - Seite 75Z
Page 78 of 376
GWarning
Batteries contain toxic and caustic
substances. For this reason, keep batteries
out of the reach of children.
If a battery has been swallowed, seek medical
help immediately.
GWarning
The SmartKey batteries contain perchlorate
material, which may require special handling
and regard for the environment. Observe
government disposal guidelines. California
residents, see www.dtsc.ca.gov/
HazardousWaste/Perchlorate/
index.cfm .
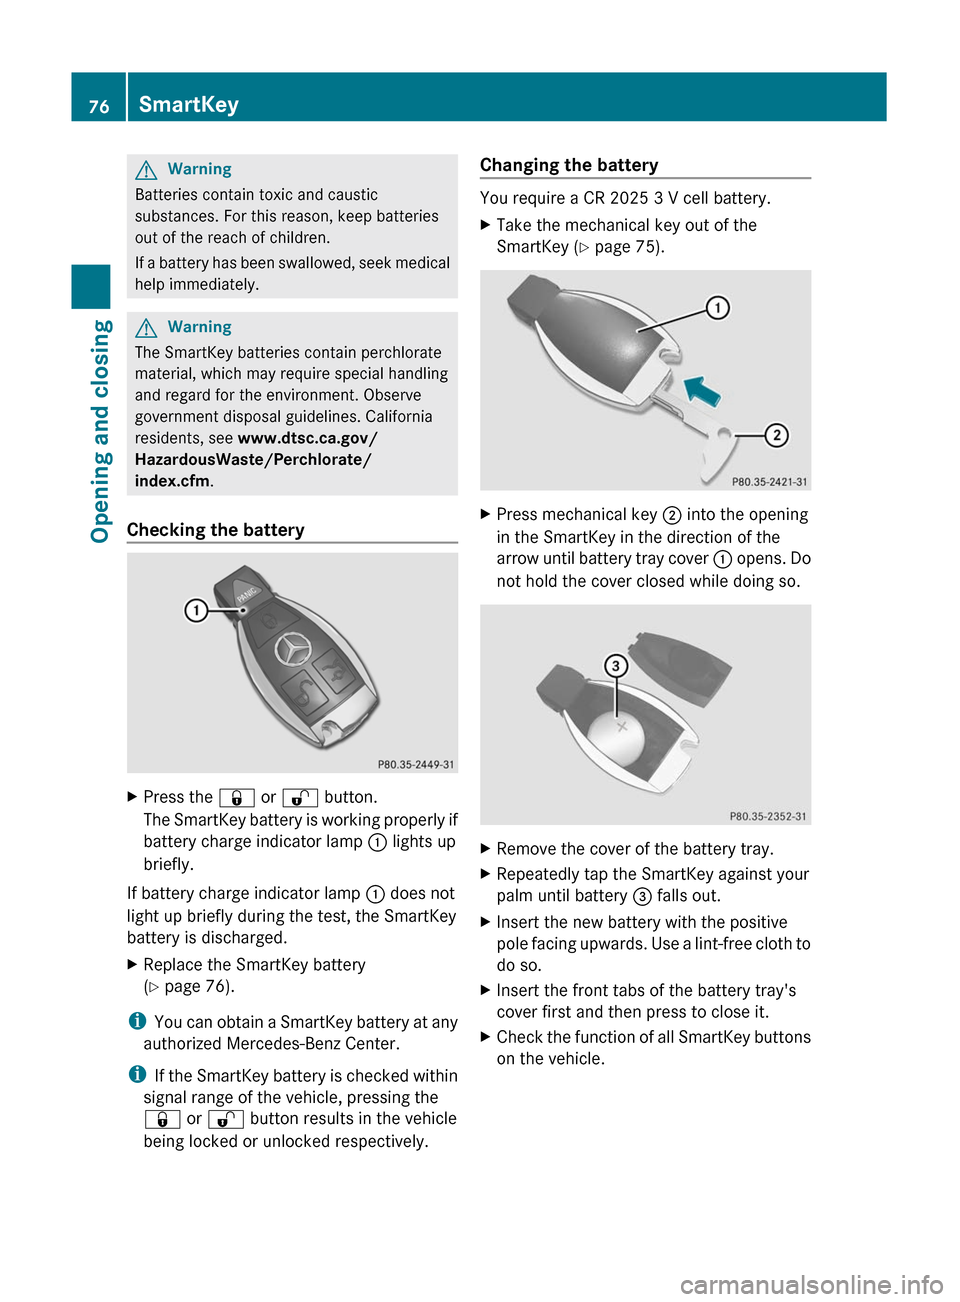
Checking the battery
XPress the & or % button.
The SmartKey battery is working properly if
battery charge indicator lamp : lights up
briefly.
If battery charge indicator lamp : does not
light up briefly during the test, the SmartKey
battery is discharged.
XReplace the SmartKey battery
( Y page 76).
i
You can obtain a SmartKey battery at any
authorized Mercedes-Benz Center.
i If the SmartKey battery is checked within
signal range of the vehicle, pressing the
& or % button results in the vehicle
being locked or unlocked respectively.
Changing the battery
You require a CR 2025 3 V cell battery.
XTake the mechanical key out of the
SmartKey ( Y page 75).XPress mechanical key ; into the opening
in the SmartKey in the direction of the
arrow until battery tray cover : opens. Do
not hold the cover closed while doing so.XRemove the cover of the battery tray.XRepeatedly tap the SmartKey against your
palm until battery = falls out.XInsert the new battery with the positive
pole facing upwards. Use a lint-free cloth to
do so.XInsert the front tabs of the battery tray's
cover first and then press to close it.XCheck the function of all SmartKey buttons
on the vehicle.76SmartKeyOpening and closing
BA 164.8 USA, CA Edition B 2011; 1; 2, en-USd2sboikeVersion: 3.0.3.52010-04-21T15:08:44+02:00 - Seite 76
Page 81 of 376
Unlocking and opening doors from
the inside
You can open a door from inside the vehicle
even if it has been locked, unless the child-
proof locks have been activated (Y page 64).
Open the door only when the traffic
conditions permit.
If the vehicle has been opened with the
SmartKey or KEYLESS-GO key, opening from
inside triggers the anti-theft alarm system.
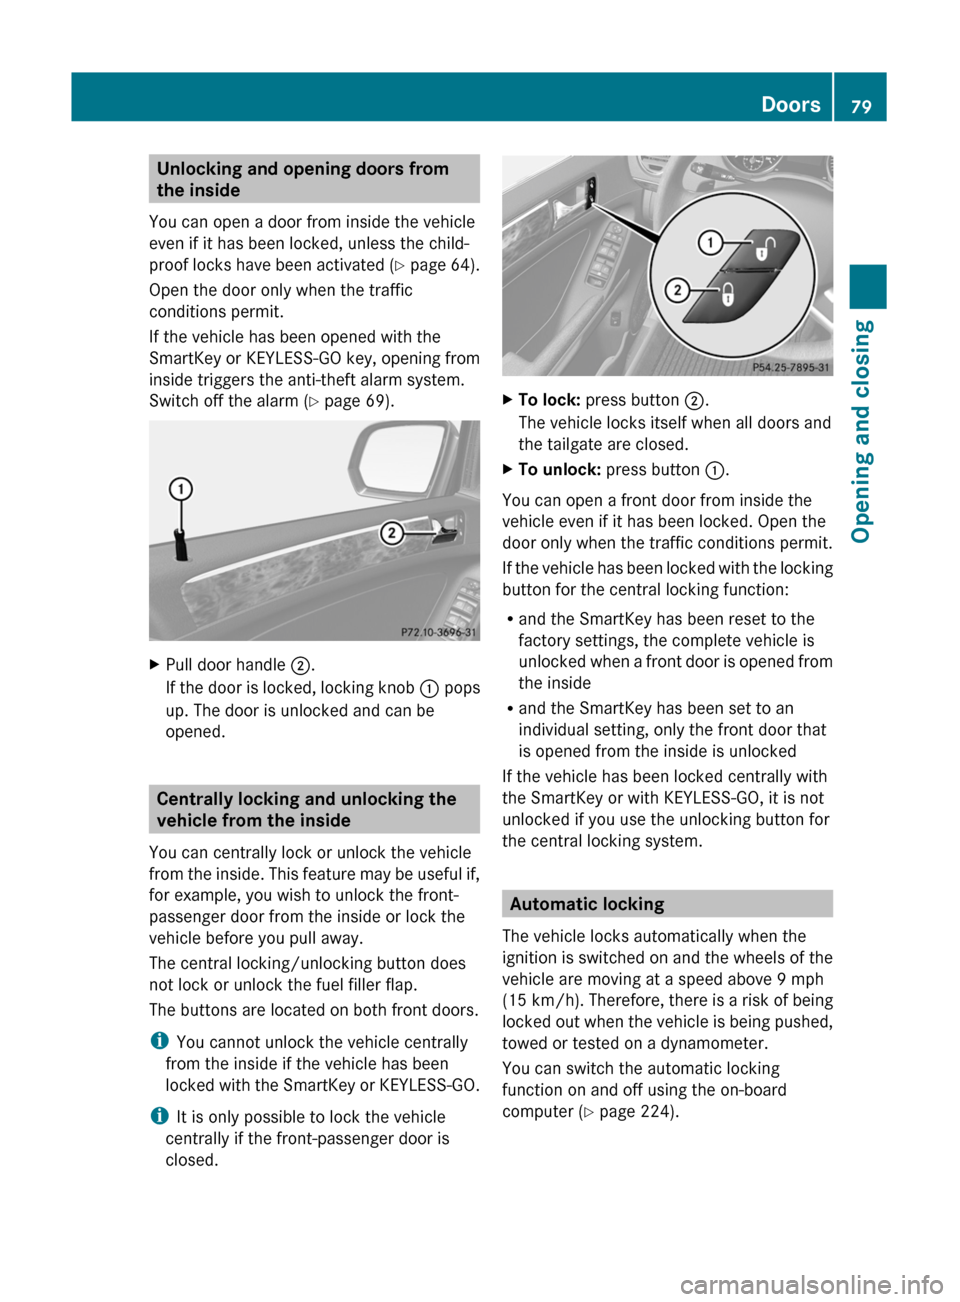
Switch off the alarm ( Y page 69).XPull door handle ;.
If the door is locked, locking knob : pops
up. The door is unlocked and can be
opened.
Centrally locking and unlocking the
vehicle from the inside
You can centrally lock or unlock the vehicle
from the inside. This feature may be useful if,
for example, you wish to unlock the front-
passenger door from the inside or lock the
vehicle before you pull away.
The central locking/unlocking button does
not lock or unlock the fuel filler flap.
The buttons are located on both front doors.
i You cannot unlock the vehicle centrally
from the inside if the vehicle has been
locked with the SmartKey or KEYLESS-GO.
i It is only possible to lock the vehicle
centrally if the front-passenger door is
closed.
XTo lock: press button ;.
The vehicle locks itself when all doors and
the tailgate are closed.XTo unlock: press button :.
You can open a front door from inside the
vehicle even if it has been locked. Open the
door only when the traffic conditions permit.
If the vehicle has been locked with the locking
button for the central locking function:
R and the SmartKey has been reset to the
factory settings, the complete vehicle is
unlocked when a front door is opened from
the inside
R and the SmartKey has been set to an
individual setting, only the front door that
is opened from the inside is unlocked
If the vehicle has been locked centrally with
the SmartKey or with KEYLESS-GO, it is not
unlocked if you use the unlocking button for
the central locking system.
Automatic locking
The vehicle locks automatically when the
ignition is switched on and the wheels of the
vehicle are moving at a speed above 9 mph
(15 km/h) . Therefore, there is a risk of being
locked out when the vehicle is being pushed,
towed or tested on a dynamometer.
You can switch the automatic locking
function on and off using the on-board
computer ( Y page 224).
Doors79Opening and closingBA 164.8 USA, CA Edition B 2011; 1; 2, en-USd2sboikeVersion: 3.0.3.52010-04-21T15:08:44+02:00 - Seite 79Z
Page 107 of 376
The system automatically switches down
from level 2 to level 1 after approximately ten
minutes.
The system automatically switches off
approximately 20 minutes after it is set to
level 1.XMake sure that the key is in position 2 in
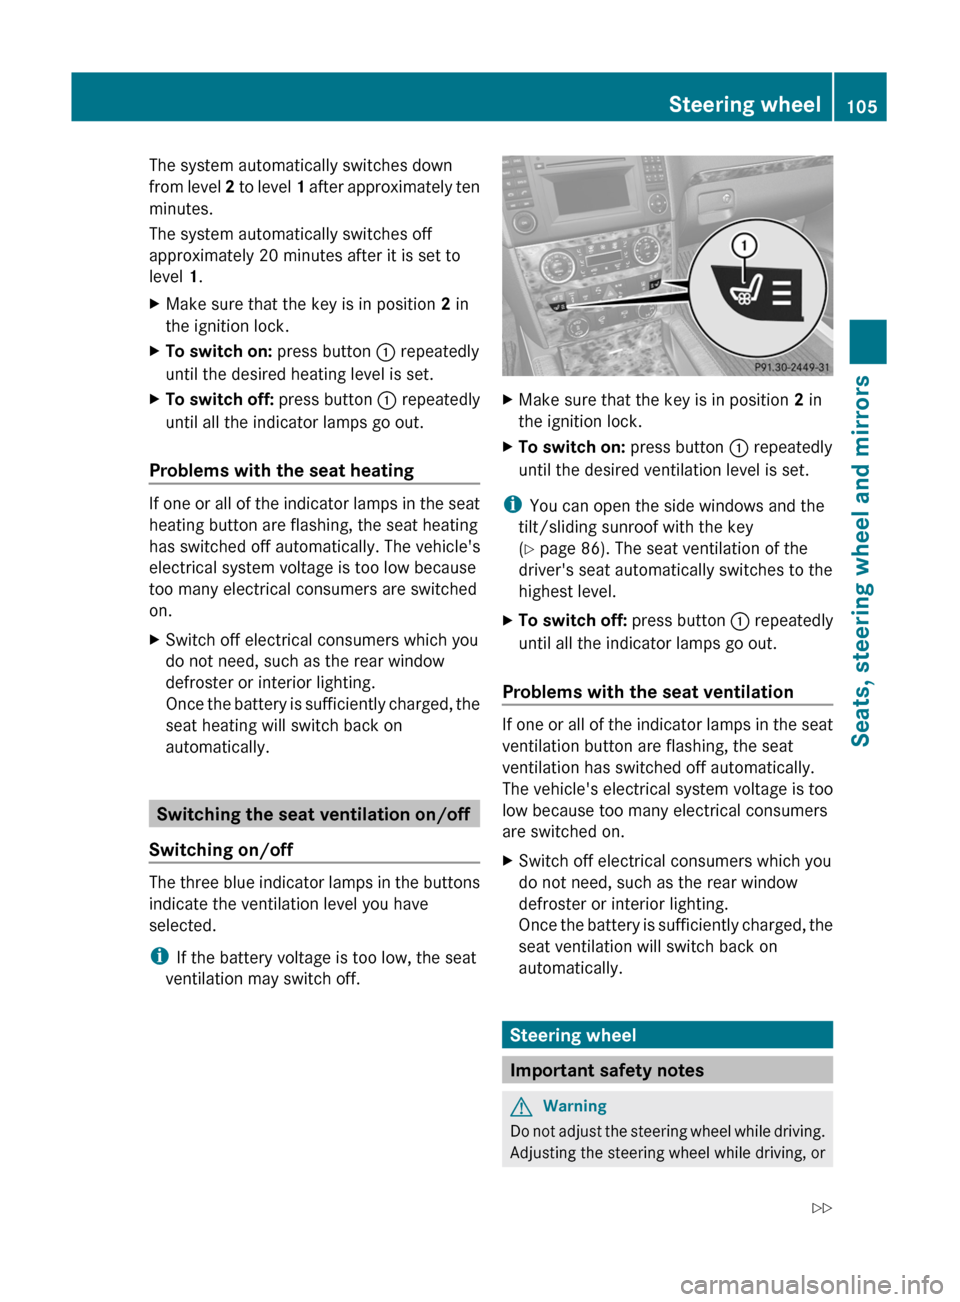
the ignition lock.XTo switch on: press button : repeatedly
until the desired heating level is set.XTo switch off: press button : repeatedly
until all the indicator lamps go out.
Problems with the seat heating
If one or all of the indicator lamps in the seat
heating button are flashing, the seat heating
has switched off automatically. The vehicle's
electrical system voltage is too low because
too many electrical consumers are switched
on.
XSwitch off electrical consumers which you
do not need, such as the rear window
defroster or interior lighting.
Once the battery is sufficiently charged, the
seat heating will switch back on
automatically.
Switching the seat ventilation on/off
Switching on/off
The three blue indicator lamps in the buttons
indicate the ventilation level you have
selected.
i If the battery voltage is too low, the seat
ventilation may switch off.
XMake sure that the key is in position 2 in
the ignition lock.XTo switch on: press button : repeatedly
until the desired ventilation level is set.
i You can open the side windows and the
tilt/sliding sunroof with the key
( Y page 86). The seat ventilation of the
driver's seat automatically switches to the
highest level.
XTo switch off: press button : repeatedly
until all the indicator lamps go out.
Problems with the seat ventilation
If one or all of the indicator lamps in the seat
ventilation button are flashing, the seat
ventilation has switched off automatically.
The vehicle's electrical system voltage is too
low because too many electrical consumers
are switched on.
XSwitch off electrical consumers which you
do not need, such as the rear window
defroster or interior lighting.
Once the battery is sufficiently charged, the
seat ventilation will switch back on
automatically.
Steering wheel
Important safety notes
GWarning
Do not adjust the steering wheel while driving.
Adjusting the steering wheel while driving, or
Steering wheel105Seats, steering wheel and mirrorsBA 164.8 USA, CA Edition B 2011; 1; 2, en-USd2sboikeVersion: 3.0.3.52010-04-21T15:08:44+02:00 - Seite 105Z
Page 109 of 376
Problems with the steering wheel
heating
If the steering wheel heating indicator lamp
on the lower left lever of the steering column
is flashing, the steering wheel heating has
switched off automatically. The vehicle's
electrical system voltage is too low because
too many electrical consumers are switched
on.
XSwitch off electrical consumers which you
do not need, such as the rear window
defroster or interior lighting.
Once the battery is sufficiently charged, the
steering wheel heating will switch back on
automatically.
EASY-ENTRY/EXIT
GWarning
You must make sure no one can become
trapped or injured by the moving steering
wheel when the easy-entry/exit feature is
activated.
To stop steering wheel movement do one of
the following:
R Move steering wheel adjustment stalk.
R Press one of the memory position buttons.
R Press memory button M.
Do not leave children unattended in the
vehicle, or with access to an unlocked vehicle.
Children could open the driver's door and
unintentionally activate the easy-entry/exit
feature, which could result in an accident
and/or serious personal injury.
The EASY-ENTRY/EXIT feature makes getting
in and out of your vehicle easier.
The steering wheel swings upwards when
you:
R remove the key from the ignition lock.
R open the driver's door and KEYLESS-GO is
in position 1
R open the driver's door and the key is in
position 0 or 1 in the ignition lock.
i
The steering wheel only moves upwards if
it has not already reached the upper end
stop.
The steering wheel is moved to the last
selected position when:
R the driver's door is closed, and
R you insert the key into the ignition lock.
or
R in vehicles with KEYLESS-GO, you press the
Start/Stop button once.
When you close the driver's door with the
ignition switched on, the steering wheel is
also automatically moved to the previously
set position.
The last position of the steering wheel is
stored when you switch off the ignition or
when you store the setting with the memory
function ( Y page 110).
You can activate and deactivate the EASY-
ENTRY/EXIT feature in the on-board
computer ( Y page 225).GWarning
Let the system complete the adjustment
procedure before setting the vehicle in
motion. All steering wheel adjustment must
be completed before setting the vehicle in
motion. Driving off with the steering wheel
still adjusting could cause the driver to lose
control of the vehicle.
i If the crash-responsive EASY-EXIT feature
is triggered in an accident, the steering
column will move upwards when the
driver's door is opened. This occurs
irrespective of the position of the key in the
ignition lock. This makes it easier to exit the
vehicle and rescue the occupants.
The crash-responsive EASY-EXIT feature is
only operational after an accident if the
EASY-EXIT/ENTRY feature is activated in
the on-board computer.
Steering wheel107Seats, steering wheel and mirrorsBA 164.8 USA, CA Edition B 2011; 1; 2, en-USd2sboikeVersion: 3.0.3.52010-04-21T15:08:44+02:00 - Seite 107Z
Page 112 of 376
XEngage reverse gear.
The exterior mirror on the front-passenger
side moves to the preset parking position.XUse adjustment button : to adjust the
exterior mirror to a position which allows
you to see the rear wheel and the curb.
The parking position is stored.
i If you shift the transmission to another
position, the exterior mirror on the front-
passenger side returns to the driving
position.
Calling up a stored parking position
setting
XWith the key in position 2 in the ignition
lock and the exterior mirror on the front-
passenger side activated, engage reverse
gear.
The exterior mirror on the front-passenger
side moves to the stored parking position.
The exterior mirror on the front-passenger
side moves back to its original position:
R as soon as you exceed a speed of 6 mph
(10 km/h)
R about ten seconds after you have
disengaged reverse gear
R if you press button = for the exterior
mirror on the driver's side
Memory functions
Storing settings
With the memory function, you can store up
to three different settings, e.g. for three
different people.
The following settings are stored as a single
memory preset:
R position of the seat, backrest and head
restraint
R driver's side: steering wheel position
R driver's side: position of the exterior
mirrors on the driver's and front-passenger
sides
GWarning!
The memory function can still be used when
the key has been removed. For this reason,
children should never be left unsupervised in
the vehicle. They could otherwise become
trapped when adjusting the seat or the
steering wheel.
GWarning!
Only use the memory function on the driver's
side when the vehicle is stationary. You could
otherwise be distracted from the traffic
conditions by the steering wheel and seat
moving of their own accord, and as a result
cause an accident.
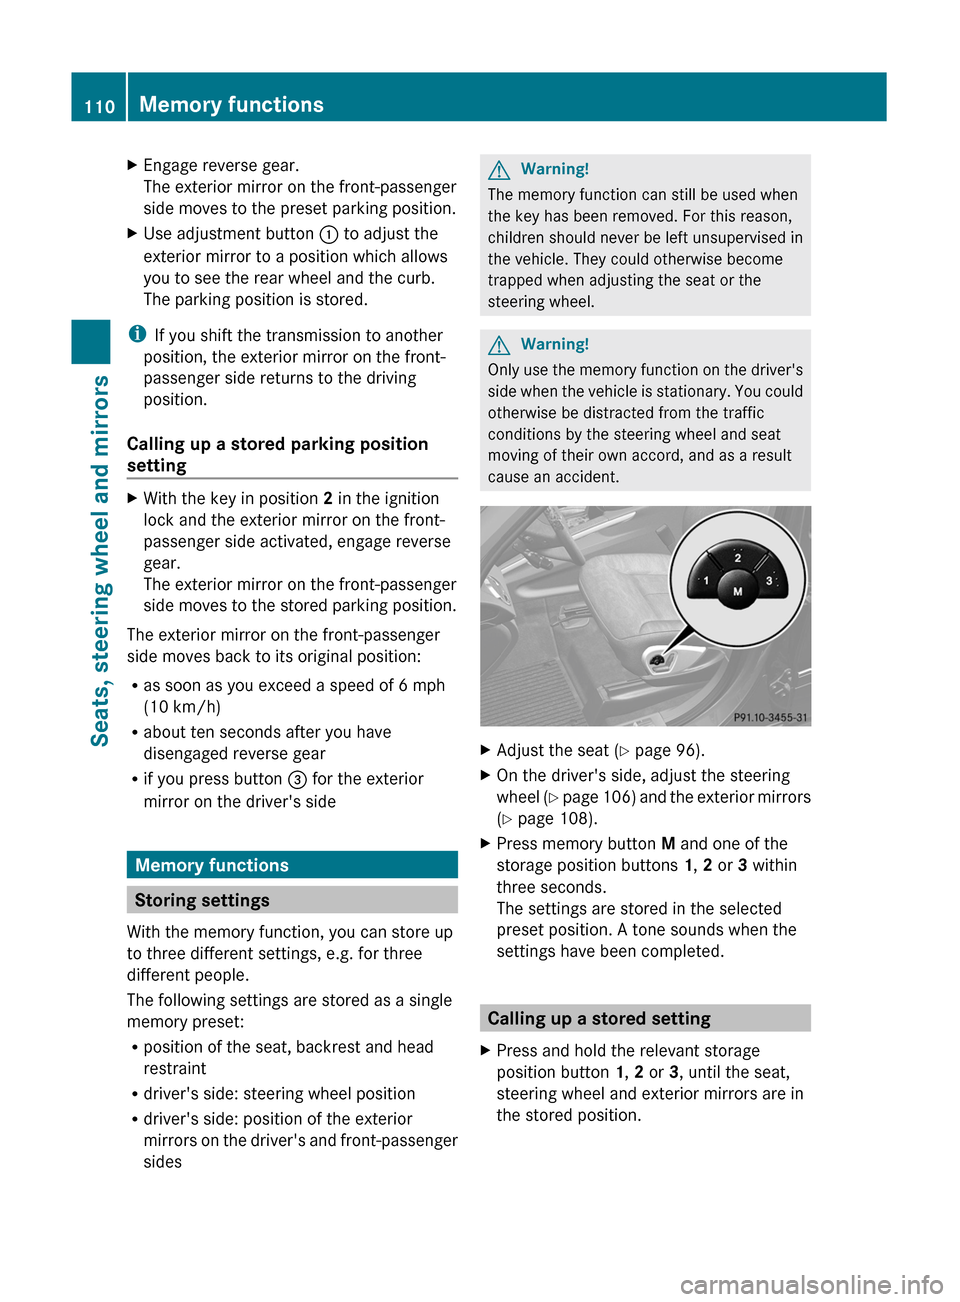
XAdjust the seat ( Y page 96).XOn the driver's side, adjust the steering
wheel (Y page 106) and the exterior mirrors
( Y page 108).XPress memory button M and one of the
storage position buttons 1, 2 or 3 within
three seconds.
The settings are stored in the selected
preset position. A tone sounds when the
settings have been completed.
Calling up a stored setting
XPress and hold the relevant storage
position button 1, 2 or 3, until the seat,
steering wheel and exterior mirrors are in
the stored position.110Memory functionsSeats, steering wheel and mirrors
BA 164.8 USA, CA Edition B 2011; 1; 2, en-USd2sboikeVersion: 3.0.3.52010-04-21T15:08:44+02:00 - Seite 110