2011 MERCEDES-BENZ GL350 BlueTEC buttons
[x] Cancel search: buttonsPage 267 of 376

If so equipped, always use the cargo net when
transporting cargo. The cargo net cannot
secure hard or heavy objects.
Parcel nets cannot secure hard or heavy
objects.
Keep compartment lids closed. This will help
to prevent stored objects from being thrown
about and injuring vehicle occupants during
R braking
R vehicle maneuvers
R an accident
Stowage compartments in the front
Glove box
i Depending on the vehicle equipment,
there is an AUX-IN connection or a Media
Interface installed in the glove box. Media
Interface is a universal interface for mobile
audio equipment, e.g. for an iPod ®
or USB
devices; see separate COMAND APS
operating instructions.
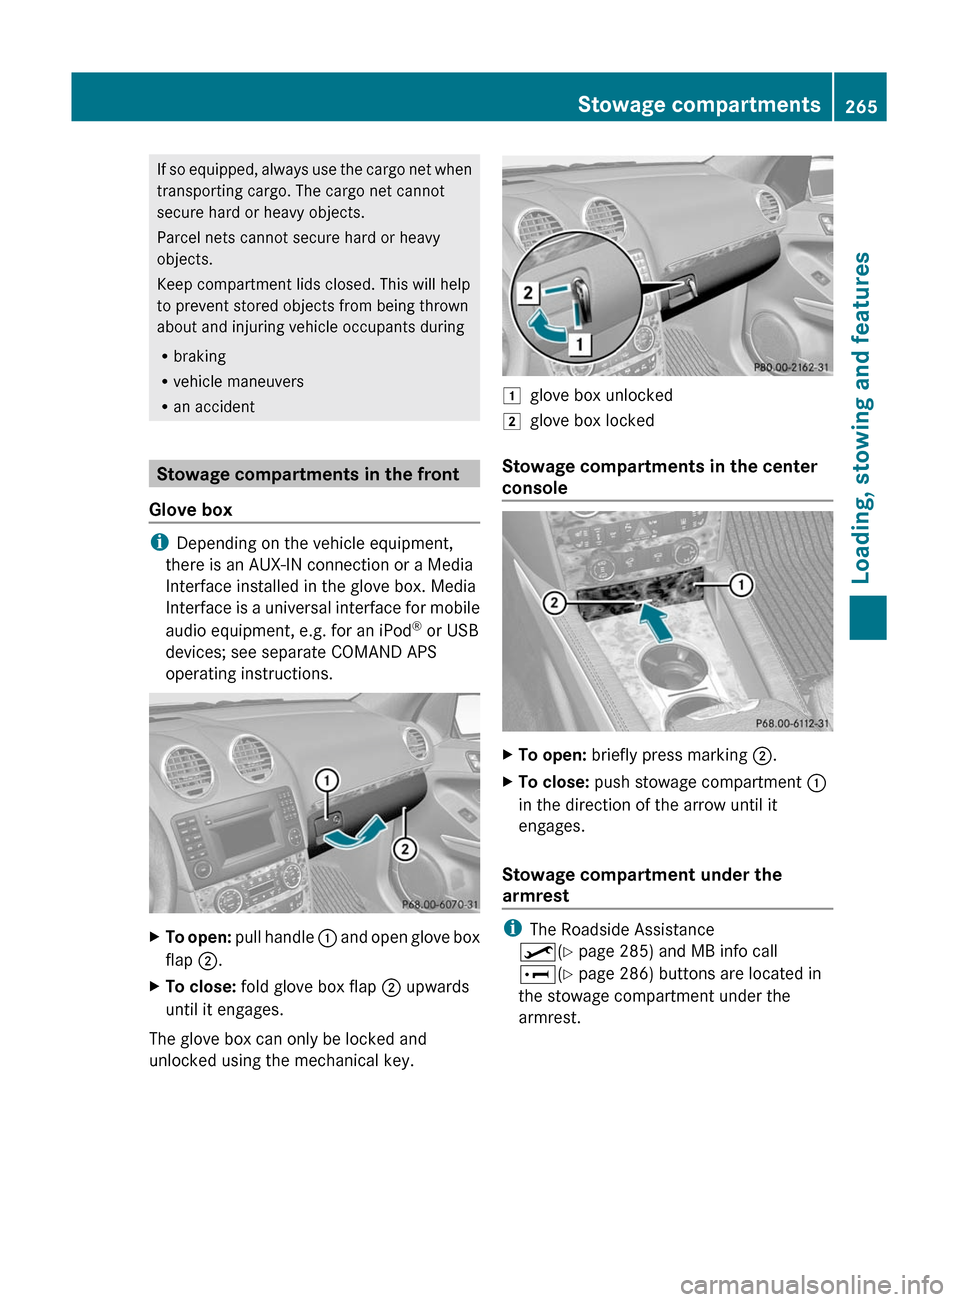
XTo open: pull handle : and open glove box
flap ;.XTo close: fold glove box flap ; upwards
until it engages.
The glove box can only be locked and
unlocked using the mechanical key.
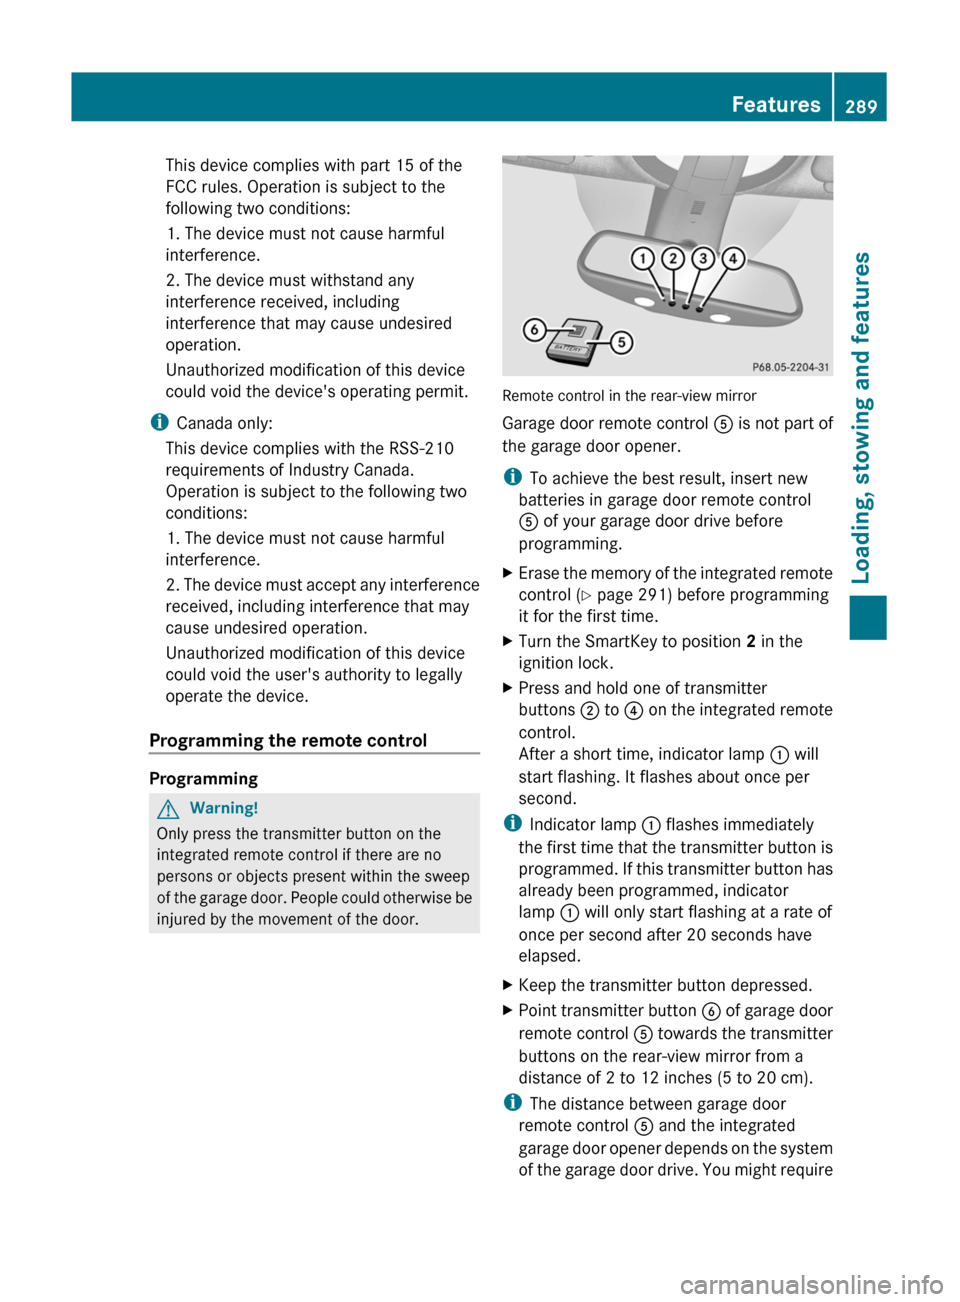
1glove box unlocked2glove box locked
Stowage compartments in the center
console
XTo open: briefly press marking ;.XTo close: push stowage compartment :
in the direction of the arrow until it
engages.
Stowage compartment under the
armrest
i The Roadside Assistance
º (Y page 285) and MB info call
E (Y page 286) buttons are located in
the stowage compartment under the
armrest.
Stowage compartments265Loading, stowing and featuresBA 164.8 USA, CA Edition B 2011; 1; 2, en-USd2sboikeVersion: 3.0.3.52010-04-21T15:08:44+02:00 - Seite 265Z
Page 291 of 376

This device complies with part 15 of the
FCC rules. Operation is subject to the
following two conditions:
1. The device must not cause harmful
interference.
2. The device must withstand any
interference received, including
interference that may cause undesired
operation.
Unauthorized modification of this device
could void the device's operating permit.
i Canada only:
This device complies with the RSS-210
requirements of Industry Canada.
Operation is subject to the following two
conditions:
1. The device must not cause harmful
interference.
2. The device must accept any interference
received, including interference that may
cause undesired operation.
Unauthorized modification of this device
could void the user's authority to legally
operate the device.
Programming the remote control
Programming
GWarning!
Only press the transmitter button on the
integrated remote control if there are no
persons or objects present within the sweep
of the garage door. People could otherwise be
injured by the movement of the door.
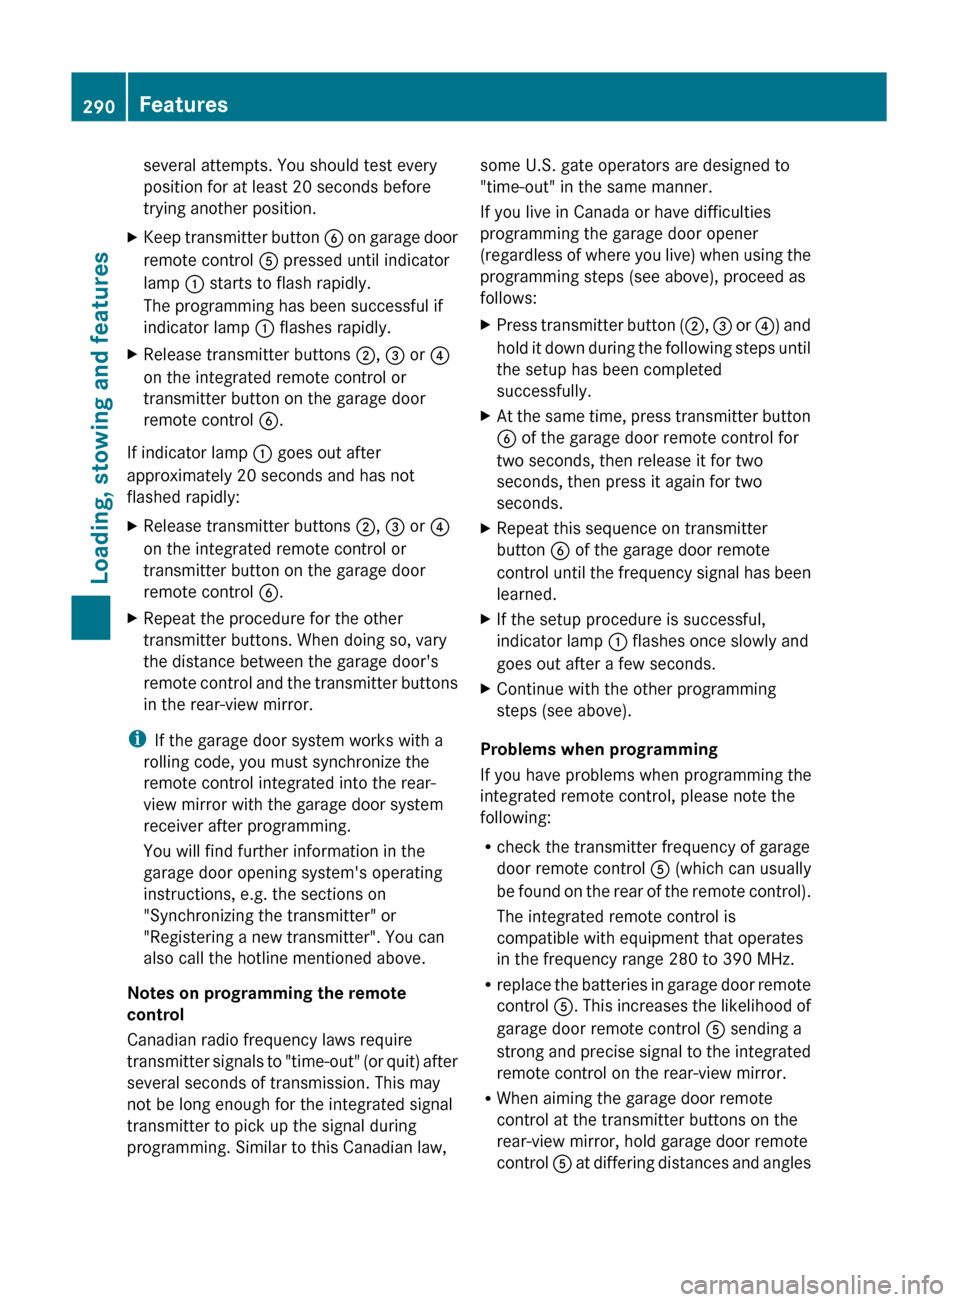
Remote control in the rear-view mirror
Garage door remote control A is not part of
the garage door opener.
i To achieve the best result, insert new
batteries in garage door remote control
A of your garage door drive before
programming.
XErase the memory of the integrated remote
control ( Y page 291) before programming
it for the first time.XTurn the SmartKey to position 2 in the
ignition lock.XPress and hold one of transmitter
buttons ; to ? on the integrated remote
control.
After a short time, indicator lamp : will
start flashing. It flashes about once per
second.
i Indicator lamp : flashes immediately
the first time that the transmitter button is
programmed. If this transmitter button has
already been programmed, indicator
lamp : will only start flashing at a rate of
once per second after 20 seconds have
elapsed.
XKeep the transmitter button depressed.XPoint transmitter button B of garage door
remote control A towards the transmitter
buttons on the rear-view mirror from a
distance of 2 to 12 inches (5 to 20 cm).
i The distance between garage door
remote control A and the integrated
garage door opener depends on the system
of the garage door drive. You might require
Features289Loading, stowing and featuresBA 164.8 USA, CA Edition B 2011; 1; 2, en-USd2sboikeVersion: 3.0.3.52010-04-21T15:08:44+02:00 - Seite 289Z
Page 292 of 376

several attempts. You should test every
position for at least 20 seconds before
trying another position.XKeep transmitter button B on garage door
remote control A pressed until indicator
lamp : starts to flash rapidly.
The programming has been successful if
indicator lamp : flashes rapidly.XRelease transmitter buttons ;, = or ?
on the integrated remote control or
transmitter button on the garage door
remote control B.
If indicator lamp : goes out after
approximately 20 seconds and has not
flashed rapidly:
XRelease transmitter buttons ;, = or ?
on the integrated remote control or
transmitter button on the garage door
remote control B.XRepeat the procedure for the other
transmitter buttons. When doing so, vary
the distance between the garage door's
remote control and the transmitter buttons
in the rear-view mirror.
i If the garage door system works with a
rolling code, you must synchronize the
remote control integrated into the rear-
view mirror with the garage door system
receiver after programming.
You will find further information in the
garage door opening system's operating
instructions, e.g. the sections on
"Synchronizing the transmitter" or
"Registering a new transmitter". You can
also call the hotline mentioned above.
Notes on programming the remote
control
Canadian radio frequency laws require
transmitter signals to "time-out" (or quit) after
several seconds of transmission. This may
not be long enough for the integrated signal
transmitter to pick up the signal during
programming. Similar to this Canadian law,
some U.S. gate operators are designed to
"time-out" in the same manner.
If you live in Canada or have difficulties
programming the garage door opener
(regardless of where you live) when using the
programming steps (see above), proceed as
follows:XPress transmitter button ( ;, = or ?) and
hold it down during the following steps until
the setup has been completed
successfully.XAt the same time, press transmitter button
B of the garage door remote control for
two seconds, then release it for two
seconds, then press it again for two
seconds.XRepeat this sequence on transmitter
button B of the garage door remote
control until the frequency signal has been
learned.XIf the setup procedure is successful,
indicator lamp : flashes once slowly and
goes out after a few seconds.XContinue with the other programming
steps (see above).
Problems when programming
If you have problems when programming the
integrated remote control, please note the
following:
R check the transmitter frequency of garage
door remote control A (which can usually
be found on the rear of the remote control).
The integrated remote control is
compatible with equipment that operates
in the frequency range 280 to 390 MHz.
R replace the batteries in garage door remote
control A. This increases the likelihood of
garage door remote control A sending a
strong and precise signal to the integrated
remote control on the rear-view mirror.
R When aiming the garage door remote
control at the transmitter buttons on the
rear-view mirror, hold garage door remote
control A at differing distances and angles
290FeaturesLoading, stowing and features
BA 164.8 USA, CA Edition B 2011; 1; 2, en-USd2sboikeVersion: 3.0.3.52010-04-21T15:08:44+02:00 - Seite 290
Page 293 of 376

from the transmitter button that you are
programming. Try different angles from a
distance of 2 to 12 inches (5 to 30 cm) or
the same angle from differing distances.
RIf there is another garage door remote
control for the same device, perform the
programming steps again using the remote
control. Before performing these steps,
make sure that new batteries have been
installed in the garage door remote control.
RAlign the antenna cable of the garage door
opener unit. This can improve signal
reception/transmission.
Opening or closing the garage door
Once programmed, the integrated remote
control will assume the function of the garage
door system's remote control. Please also
read the operating instructions for the garage
door system.
XTurn the SmartKey to position 2 in the
ignition lock.
XPress transmitter button ;, = or ? in the
overhead control panel that you have
programmed to operate the garage door.
Garage door system with fixed code:
indicator lamp : lights up continuously.
Garage door system with rolling code:
indicator lamp : flashes briefly and then
lights up for approximately two seconds.
This is repeated for up to 20 seconds.
iThe transmitter will transmit a signal for
as long as the transmitter button is being
pressed. The transmission will be halted
after a maximum of 20 seconds and
indicator lamp : will flash. Press the
transmitter button again, if necessary.
Clearing the remote control memoryXTurn the SmartKey to position 2 in the
ignition lock.
XPress and hold transmitter buttons ;
and ? for approximately 20 seconds until
indicator lamp : flashes rapidly.
The memory is cleared.
iYou should clear the remote control
memory before selling the vehicle.
Compass
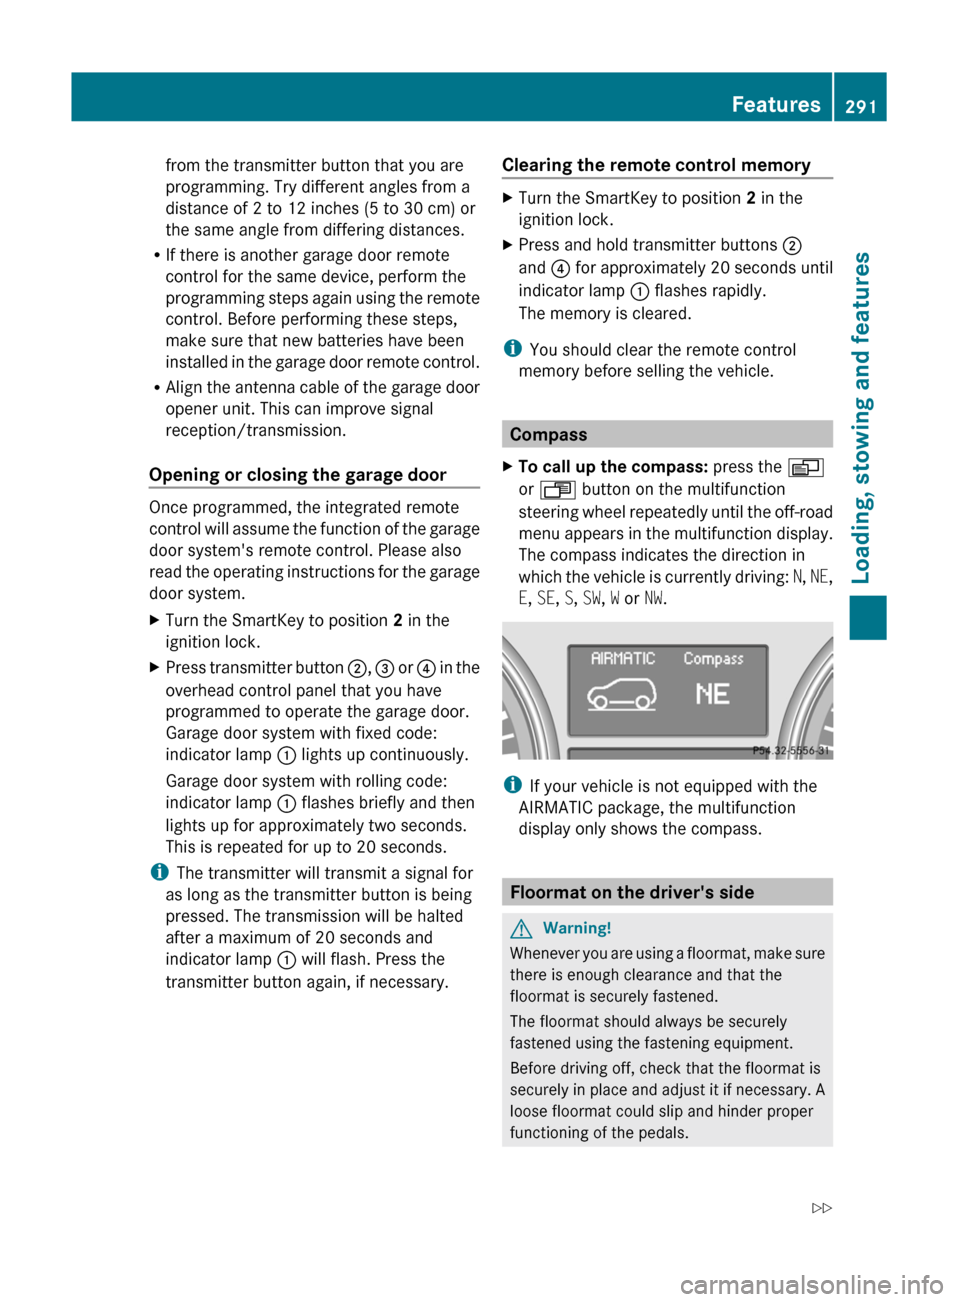
XTo call up the compass: press the V
or U button on the multifunction
steering wheel repeatedly until the off-road
menu appears in the multifunction display.
The compass indicates the direction in
which the vehicle is currently driving: N, NE,
E, SE, S, SW, W or NW.
iIf your vehicle is not equipped with the
AIRMATIC package, the multifunction
display only shows the compass.
Floormat on the driver's side
GWarning!
Whenever you are using a floormat, make sure
there is enough clearance and that the
floormat is securely fastened.
The floormat should always be securely
fastened using the fastening equipment.
Before driving off, check that the floormat is
securely in place and adjust it if necessary. A
loose floormat could slip and hinder proper
functioning of the pedals.
Features291Loading, stowing and featuresBA 164.8 USA, CA Edition B 2011; 1; 2, en-USd2sboikeVersion: 3.0.3.52010-04-21T15:08:44+02:00 - Seite 291Z