2011 MERCEDES-BENZ GL350 BlueTEC Diff
[x] Cancel search: DiffPage 54 of 376
of having to swerve to avoid an obstacle at
a speed above 85 mph (140 km/h).
PRE-SAFE ®
takes the following measures
depending on the hazardous situation
detected:
R the front seat belts are pre-tensioned.
R on vehicles with memory functions: the
front-passenger seat is adjusted if it is in an
unfavorable position under accident
conditions.
R if the vehicle skids, the side windows are
closed so that only a small gap remains.
R on vehicles with sliding sunroof: if the
vehicle skids, the sliding sunroof closes so
that only a small gap remains.
If the hazardous situation passes without
resulting in an accident, PRE-SAFE ®
slackens
the belt pretensioning. All settings made by
PRE-SAFE ®
can then be reversed.
If the seat belts are not released:XMove the backrest or the seat back slightly
until the belt pretensioning is reduced.
The locking mechanism releases.GWarning
Make sure that nobody can become trapped
as you adjust the seat.
! Make sure that there are no objects in the
footwell or behind the seats when resetting
the seats. There is a risk that the seats
and/or the objects could be damaged.
More information about belt adjustment, a
convenience function integrated into PRE-
SAFE ®
, can be found in the "Belt adjustment"
section ( Y page 56).
NECK-PRO head restraints
The NECK-PRO head restraints increase
protection to the driver's and front-
passenger's head and neck. To this end, the
head restraints on the driver's and front-
passenger seats are moved forwards and
upwards in the event of a rear-end collision of
a certain severity. This provides better head
support.GWarning
Do not secure any objects (e.g. coat hangers)
on the NECK-PRO head restraints. Otherwise,
the NECK-PRO head restraints may not
function properly, or in the event of a rear-end
collision may not be able offer the level of
protection they are designed to provide.
If the NECK-PRO head restraints have been
triggered in an accident, you must reset the
NECK-PRO head restraints on the driver’s and
front-passenger seat ( Y page 52).
Otherwise, the additional protection will not
be available in the event of another rear-end
collision. You can recognize when NECK-PRO
head restraints have been triggered by the
fact that they have moved forwards and can
no longer be adjusted.
Resetting triggered NECK-PRO head
restraints
Important safety information
GWarning
For reasons of safety, have the NECK-PRO
head restraints/NECK-PRO luxury head
restraints checked at a Mercedes-Benz
Service Center after a rear-end collision.
GWarning
If you press the NECK-PRO head restraint
cushion backwards, make sure that your
fingers are not trapped between the cushion
and the cover. Failure to observe could result
in injuries.
NECK-PRO head restraints
i Resetting the NECK-PRO head restraints
requires a certain amount of strength. If
you have difficulty resetting the NECK-PRO
head restraints, have this work carried out
at a qualified specialist workshop, e.g. an
authorized Mercedes-Benz Center.
52Occupant safetySafety
BA 164.8 USA, CA Edition B 2011; 1; 2, en-USd2sboikeVersion: 3.0.3.52010-04-21T15:08:44+02:00 - Seite 52
Page 55 of 376
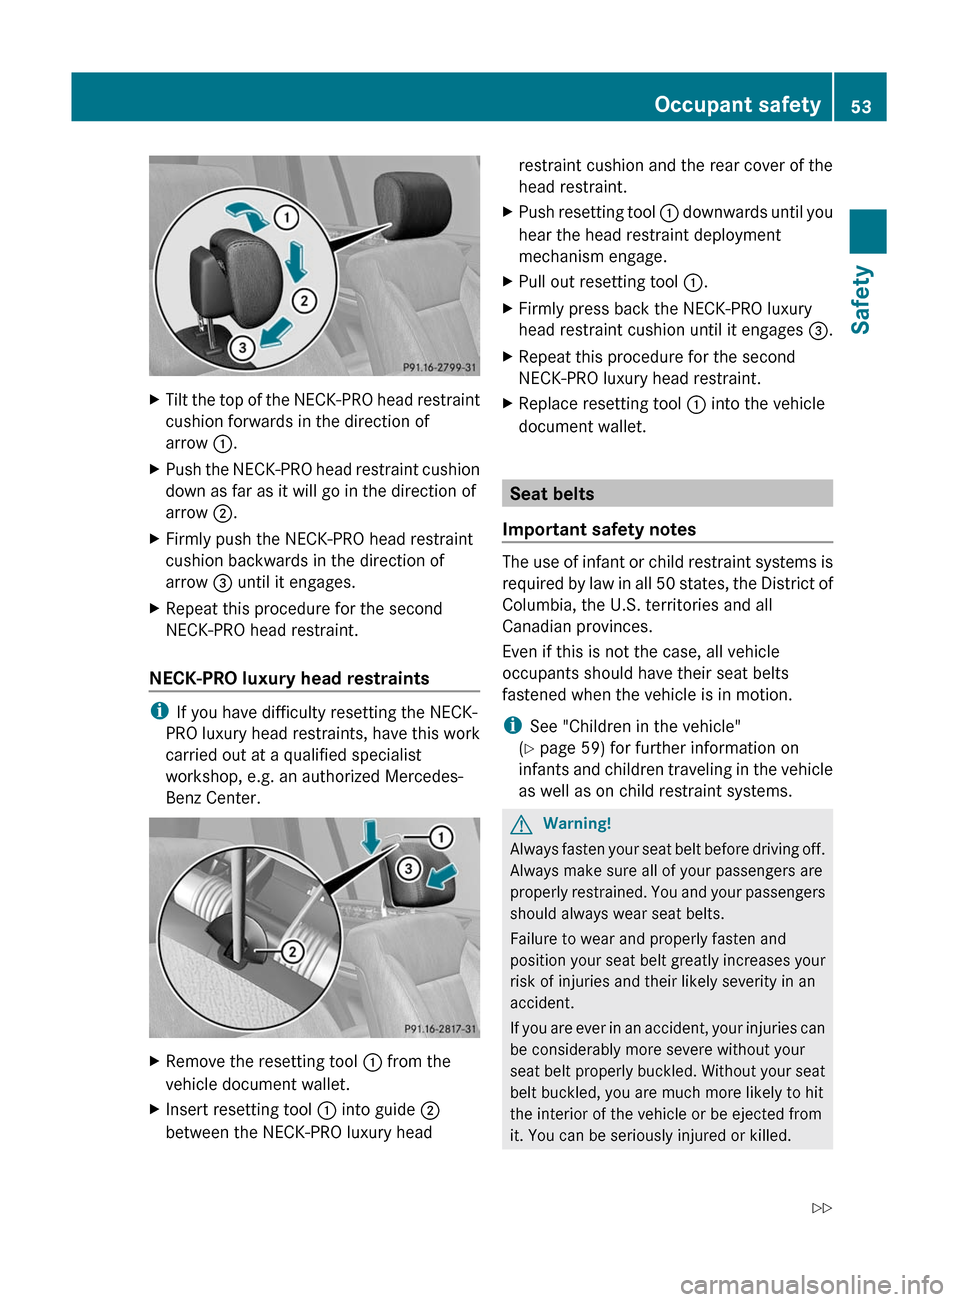
XTilt the top of the NECK-PRO head restraint
cushion forwards in the direction of
arrow :.XPush the NECK-PRO head restraint cushion
down as far as it will go in the direction of
arrow ;.XFirmly push the NECK-PRO head restraint
cushion backwards in the direction of
arrow = until it engages.XRepeat this procedure for the second
NECK-PRO head restraint.
NECK-PRO luxury head restraints
i If you have difficulty resetting the NECK-
PRO luxury head restraints, have this work
carried out at a qualified specialist
workshop, e.g. an authorized Mercedes-
Benz Center.
XRemove the resetting tool : from the
vehicle document wallet.XInsert resetting tool : into guide ;
between the NECK-PRO luxury headrestraint cushion and the rear cover of the
head restraint.XPush resetting tool : downwards until you
hear the head restraint deployment
mechanism engage.XPull out resetting tool :.XFirmly press back the NECK-PRO luxury
head restraint cushion until it engages =.XRepeat this procedure for the second
NECK-PRO luxury head restraint.XReplace resetting tool : into the vehicle
document wallet.
Seat belts
Important safety notes
The use of infant or child restraint systems is
required by law in all 50 states, the District of
Columbia, the U.S. territories and all
Canadian provinces.
Even if this is not the case, all vehicle
occupants should have their seat belts
fastened when the vehicle is in motion.
i See "Children in the vehicle"
( Y page 59) for further information on
infants and children traveling in the vehicle
as well as on child restraint systems.
GWarning!
Always fasten your seat belt before driving off.
Always make sure all of your passengers are
properly restrained. You and your passengers
should always wear seat belts.
Failure to wear and properly fasten and
position your seat belt greatly increases your
risk of injuries and their likely severity in an
accident.
If you are ever in an accident, your injuries can
be considerably more severe without your
seat belt properly buckled. Without your seat
belt buckled, you are much more likely to hit
the interior of the vehicle or be ejected from
it. You can be seriously injured or killed.
Occupant safety53SafetyBA 164.8 USA, CA Edition B 2011; 1; 2, en-USd2sboikeVersion: 3.0.3.52010-04-21T15:08:44+02:00 - Seite 53Z
Page 74 of 376

Vehicle equipment
i This manual describes all the standard
and optional equipment of your vehicle
which was available at the time of
purchase. Country-specific differences are
possible. Bear in mind that your vehicle
may not feature all functions described
here. This also refers to safety-related
systems and functions.
SmartKey
Important safety notes
GWarning!
When leaving the vehicle, always remove the
SmartKey from the starter switch. Always
take the SmartKey with you and lock the
vehicle. Do not leave children unattended in
the vehicle, even if they are secured in a child
restraint system, or with access to an
unlocked vehicle. A child's unsupervised
access to a vehicle could result in an accident
and/or serious personal injury. The children
could
R injure themselves on parts of the vehicle
R be seriously or fatally injured through
excessive exposure to extreme heat or cold
R injure themselves or cause an accident with
vehicle equipment that can be operated
even if the SmartKey is removed from the
starter switch or removed from the vehicle,
such as seat adjustment, steering wheel
adjustment, or the memory function
If children open a door, they could injure other
persons or get out of the vehicle and injure
themselves or be injured by following traffic.
Do not expose the child restraint system to
direct sunlight. The child restraint system's
metal parts, for example, could become very
hot, and the child could be burned by these
parts.
GWarning!
Do not carry heavy or hard objects in the
passenger compartment or cargo
compartment unless they are firmly secured
in place.
Unsecured or improperly positioned cargo
increases a child’s risk of injury in the event
of
R strong braking maneuvers
R sudden changes of direction
R an accident
General information
If you cannot open or lock the vehicle with the
SmartKey, either the battery in the SmartKey
is empty, the SmartKey is faulty, or the vehicle
battery is discharged.
XCheck the battery in the SmartKey and
replace it if necessary ( Y page 76).XUnlock the driver's door using the
mechanical key ( Y page 75).XLock the vehicle using the mechanical key
( Y page 75).XHave the vehicle battery and battery
contacts checked by an authorized
Mercedes-Benz Center.
If the SmartKey is faulty, contact Roadside
Assistance or an authorized Mercedes-Benz
Center.
SmartKey functions
General notes
i USA only:
This device complies with Part 15 of the
FCC regulations. Operation is subject to
the following conditions:
1. This device must not cause any harmful
interference, and
2. This device must be able to
accommodate interference that is
72SmartKeyOpening and closing
BA 164.8 USA, CA Edition B 2011; 1; 2, en-USd2sboikeVersion: 3.0.3.52010-04-21T15:08:44+02:00 - Seite 72
Page 87 of 376
hot, and a child could be burned on these
parts.GWarning!
Do not carry heavy or hard objects in the
passenger or cargo compartment unless they
are firmly secured in place.
Unsecured or improperly positioned cargo
increases a child’s risk of injury in the event
of
R strong braking maneuvers
R sudden changes of direction
R an accident
GWarning!
When opening or closing the windows, make
sure there is no danger of anyone being
harmed by the opening/closing procedure.
The door windows are equipped with the
express operation and automatic reversal
function. If in express operation mode a door
window encounters an obstruction that
blocks its path, the automatic reversal
function will stop the door window and open
it slightly.
The door windows operate differently when
the switch is pulled and held. See the "Closing
when a door window is blocked" section in
this chapter for details.
The closing of a door window can be
immediately halted by releasing the switch or,
if the switch was pulled past the resistance
point and released, by either pressing or
pulling the respective switch.
The closing of the hinged quarter windows can
be immediately halted by pressing or pulling
the switch.
If a window encounters an obstruction that
blocks its path in a circumstance where you
are closing the windows by pressing and
holding button & on the SmartKey or by
pressing and holding the lock button (vehicles
with KEYLESS-GO) on an outside door handle,
the automatic reversal function will not
operate.
Activate the override switch when children
are riding in the back seats of the vehicle. The
children may otherwise injure themselves,
e.g. by becoming trapped in the window
opening.GWarning!
Do not keep any part of your body up against
the window pane when opening a window. The
downward motion of the pane may pull that
part of your body down between the window
pane and the door frame and trap it there. If
there is a risk of entrapment, release the
switch and pull it to close the window.
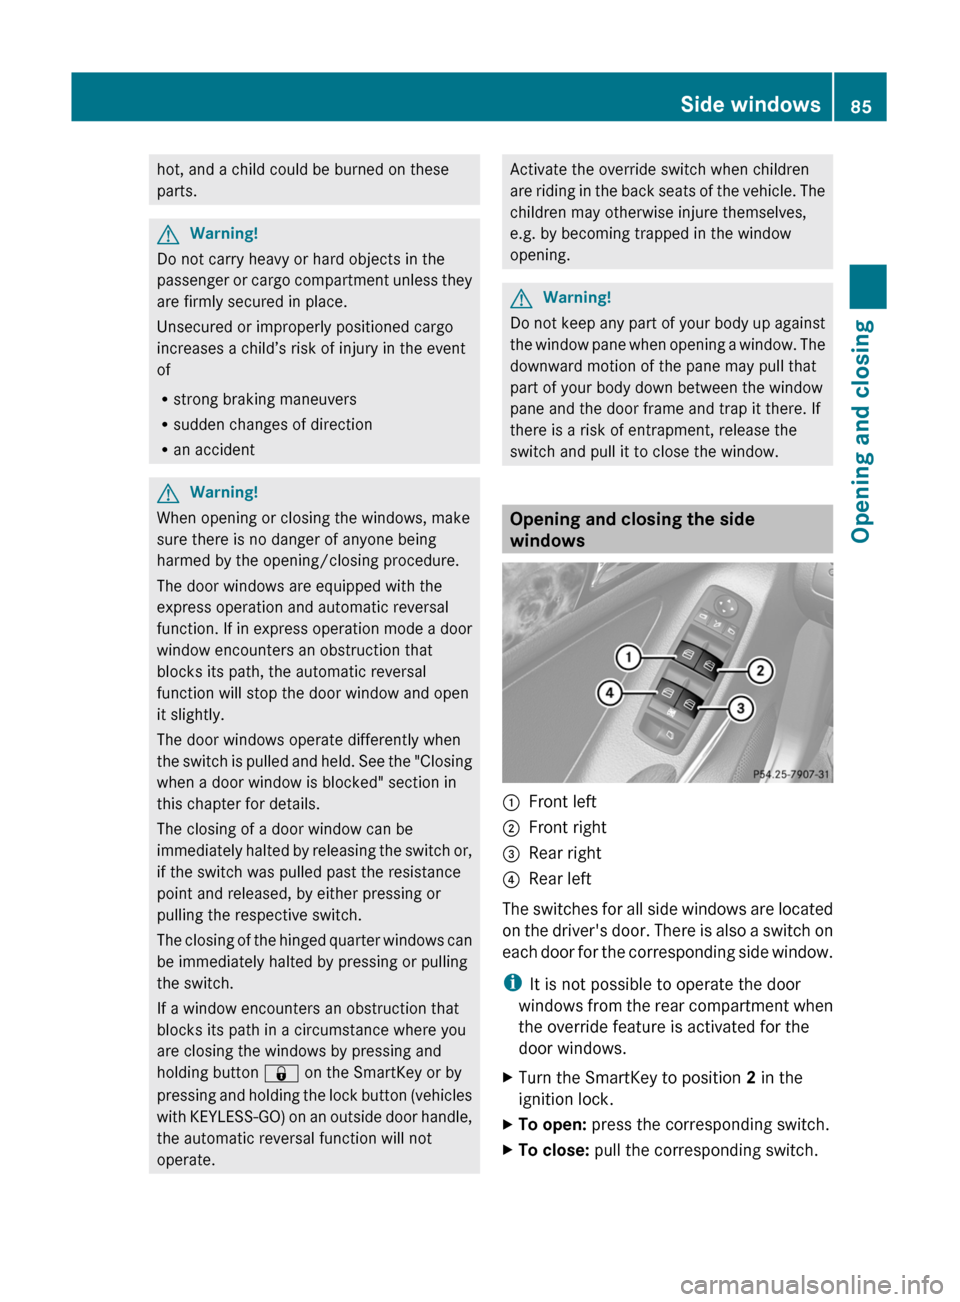
Opening and closing the side
windows
:Front left;Front right=Rear right?Rear left
The switches for all side windows are located
on the driver's door. There is also a switch on
each door for the corresponding side window.
i It is not possible to operate the door
windows from the rear compartment when
the override feature is activated for the
door windows.
XTurn the SmartKey to position 2 in the
ignition lock.XTo open: press the corresponding switch.XTo close: pull the corresponding switch.Side windows85Opening and closingBA 164.8 USA, CA Edition B 2011; 1; 2, en-USd2sboikeVersion: 3.0.3.52010-04-21T15:08:44+02:00 - Seite 85Z
Page 91 of 376
hot, and the child could be burned by these
parts.GWarning!
Do not carry heavy or hard objects in the
passenger or cargo compartment unless they
are firmly secured in place.
Unsecured or improperly positioned cargo
increases a child’s risk of injury in the event
of
R strong braking maneuvers
R sudden changes of direction
R an accident
GWarning!
When opening or closing the tilt/sliding
sunroof, make sure there is no danger of
anyone being harmed by the opening/closing
procedure.
The tilt/sliding sunroof is equipped with the
automatic operation and anti-entrapment
features. If the movement of the tilt/sliding
sunroof is blocked during the closing
procedure, the tilt/sliding sunroof will stop
and open slightly.
The tilt/sliding sunroof operates differently
when the sunroof switch is pressed and held.
See the "Closing when the tilt/sliding sunroof
is blocked" section for details.
The opening/closing procedure of the tilt/
sliding sunroof can be immediately halted by
releasing the sunroof switch or, if the sunroof
switch was moved past the resistance point
and released, by moving the sunroof switch in
any direction.
GWarning!
The tilt/sliding sunroof is made out of glass.
In the event of an accident, the glass may
shatter. This may result in an opening in the
roof.
In a vehicle rollover, occupants not wearing
their seat belts or not wearing them properly
may be thrown out of the opening. Such an
opening also presents a potential for injury for
occupants wearing their seat belts properly as
entire body parts or portions of them may
protrude from the passenger compartment.
! Only open the sliding sunroof if it is free
of snow and ice. Otherwise, malfunctions
may occur.
Do not allow anything to protrude from the
sliding sunroof. Otherwise, the seals could
be damaged.
! If the sliding sunroof cannot be opened or
closed due to a malfunction, contact a
qualified specialist workshop, e.g. an
authorized Mercedes-Benz Center.
! Do not forget that the weather can
change abruptly. Make certain that the
sliding sunroof is closed when you leave the
vehicle. The vehicle electronics can be
damaged if water enters the vehicle
interior.
i Resonance noises can occur in addition
to the usual airflow noises when the sliding
sunroof is open. They are caused by minor
pressure fluctuations in the vehicle interior.
Change the position of the sliding sunroof
or open a side window slightly to reduce or
eliminate these noises.
Operating the sliding sunroof
Opening and closing
i You can still operate the tilt/sliding
sunroof even if you switch off the engine or
remove the SmartKey. This function
remains active for five minutes or until one
of the front doors is opened.
Sliding sunroof89Opening and closingBA 164.8 USA, CA Edition B 2011; 1; 2, en-USd2sboikeVersion: 3.0.3.52010-04-21T15:08:44+02:00 - Seite 89Z
Page 96 of 376
Vehicle equipment
i This manual describes all the standard
and optional equipment of your vehicle
which was available at the time of
purchase. Country-specific differences are
possible. Bear in mind that your vehicle
may not feature all functions described
here. This also refers to safety-related
systems and functions.
Correct driver's seat position
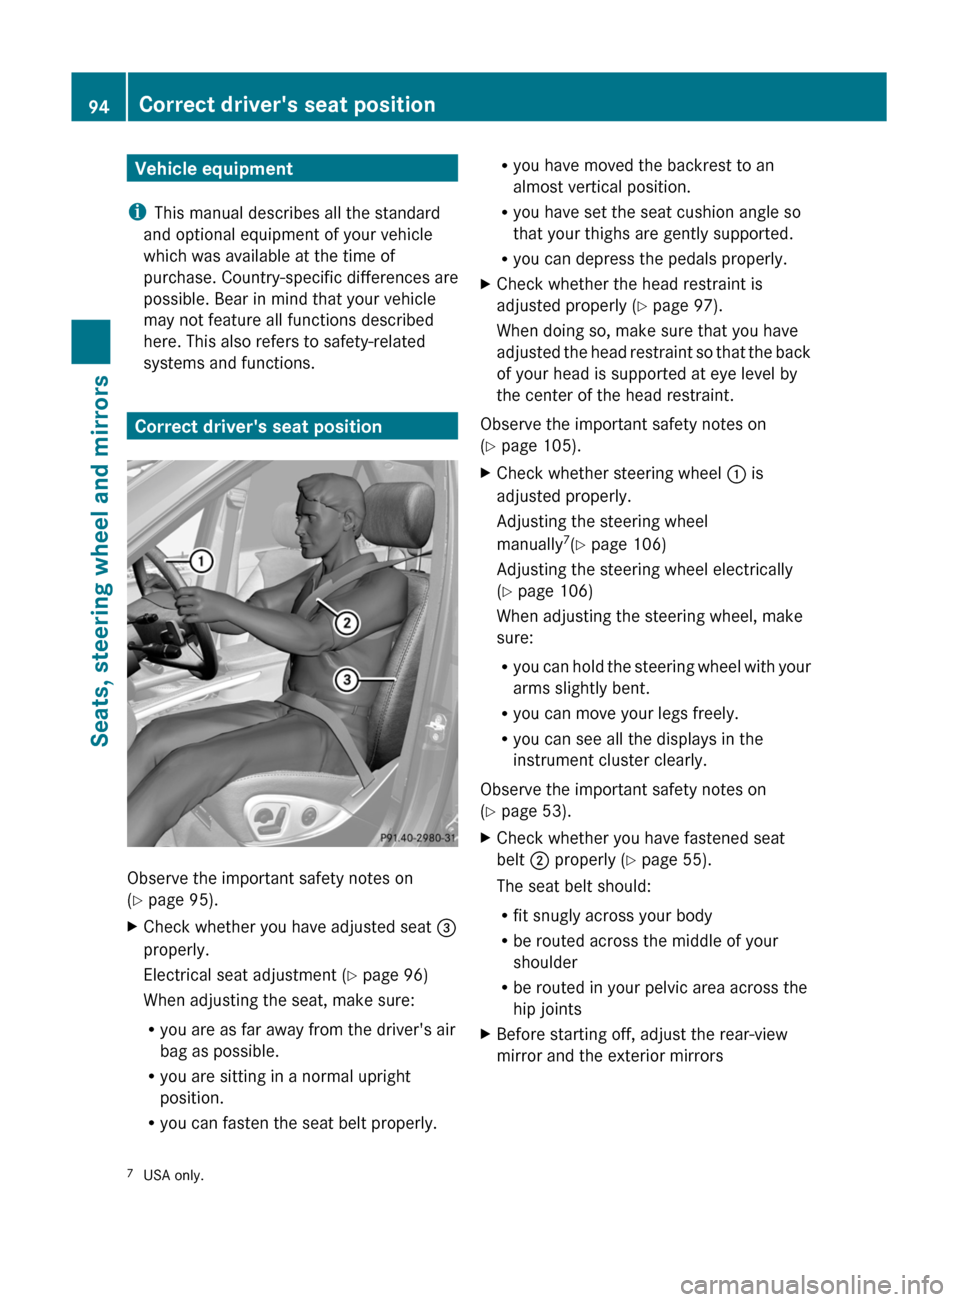
Observe the important safety notes on
( Y page 95).
XCheck whether you have adjusted seat =
properly.
Electrical seat adjustment ( Y page 96)
When adjusting the seat, make sure:
R you are as far away from the driver's air
bag as possible.
R you are sitting in a normal upright
position.
R you can fasten the seat belt properly.Ryou have moved the backrest to an
almost vertical position.
R you have set the seat cushion angle so
that your thighs are gently supported.
R you can depress the pedals properly.XCheck whether the head restraint is
adjusted properly ( Y page 97).
When doing so, make sure that you have
adjusted the head restraint so that the back
of your head is supported at eye level by
the center of the head restraint.
Observe the important safety notes on
( Y page 105).
XCheck whether steering wheel : is
adjusted properly.
Adjusting the steering wheel
manually 7
(Y page 106)
Adjusting the steering wheel electrically
( Y page 106)
When adjusting the steering wheel, make
sure:
R you can hold the steering wheel with your
arms slightly bent.
R you can move your legs freely.
R you can see all the displays in the
instrument cluster clearly.
Observe the important safety notes on
( Y page 53).
XCheck whether you have fastened seat
belt ; properly ( Y page 55).
The seat belt should:
R fit snugly across your body
R be routed across the middle of your
shoulder
R be routed in your pelvic area across the
hip jointsXBefore starting off, adjust the rear-view
mirror and the exterior mirrors7 USA only.94Correct driver's seat positionSeats, steering wheel and mirrors
BA 164.8 USA, CA Edition B 2011; 1; 2, en-USd2sboikeVersion: 3.0.3.52010-04-21T15:08:44+02:00 - Seite 94
Page 112 of 376
XEngage reverse gear.
The exterior mirror on the front-passenger
side moves to the preset parking position.XUse adjustment button : to adjust the
exterior mirror to a position which allows
you to see the rear wheel and the curb.
The parking position is stored.
i If you shift the transmission to another
position, the exterior mirror on the front-
passenger side returns to the driving
position.
Calling up a stored parking position
setting
XWith the key in position 2 in the ignition
lock and the exterior mirror on the front-
passenger side activated, engage reverse
gear.
The exterior mirror on the front-passenger
side moves to the stored parking position.
The exterior mirror on the front-passenger
side moves back to its original position:
R as soon as you exceed a speed of 6 mph
(10 km/h)
R about ten seconds after you have
disengaged reverse gear
R if you press button = for the exterior
mirror on the driver's side
Memory functions
Storing settings
With the memory function, you can store up
to three different settings, e.g. for three
different people.
The following settings are stored as a single
memory preset:
R position of the seat, backrest and head
restraint
R driver's side: steering wheel position
R driver's side: position of the exterior
mirrors on the driver's and front-passenger
sides
GWarning!
The memory function can still be used when
the key has been removed. For this reason,
children should never be left unsupervised in
the vehicle. They could otherwise become
trapped when adjusting the seat or the
steering wheel.
GWarning!
Only use the memory function on the driver's
side when the vehicle is stationary. You could
otherwise be distracted from the traffic
conditions by the steering wheel and seat
moving of their own accord, and as a result
cause an accident.
XAdjust the seat ( Y page 96).XOn the driver's side, adjust the steering
wheel (Y page 106) and the exterior mirrors
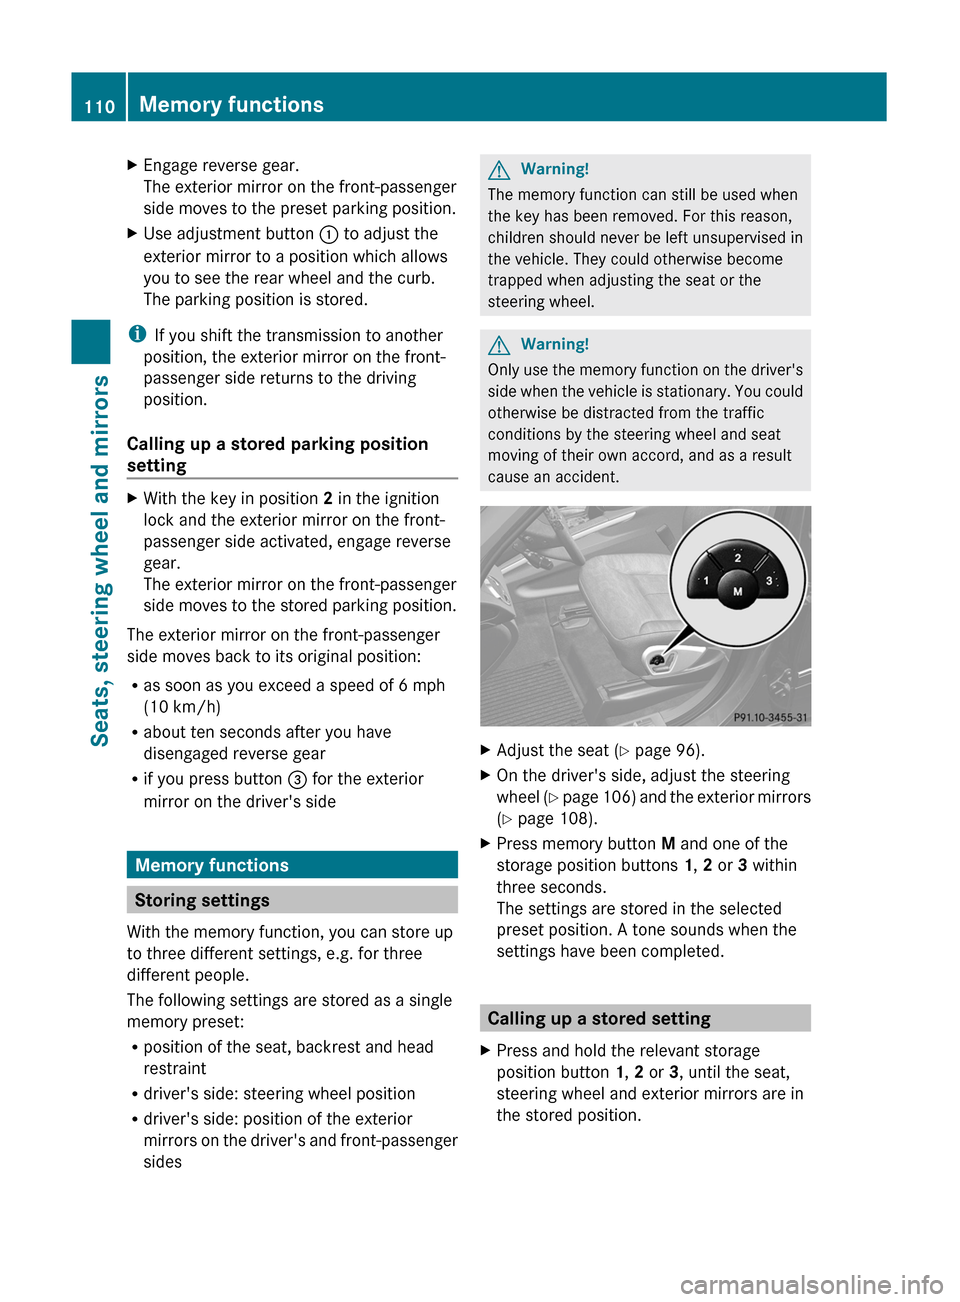
( Y page 108).XPress memory button M and one of the
storage position buttons 1, 2 or 3 within
three seconds.
The settings are stored in the selected
preset position. A tone sounds when the
settings have been completed.
Calling up a stored setting
XPress and hold the relevant storage
position button 1, 2 or 3, until the seat,
steering wheel and exterior mirrors are in
the stored position.110Memory functionsSeats, steering wheel and mirrors
BA 164.8 USA, CA Edition B 2011; 1; 2, en-USd2sboikeVersion: 3.0.3.52010-04-21T15:08:44+02:00 - Seite 110
Page 116 of 376
Vehicle equipment
i This manual describes all the standard
and optional equipment of your vehicle
which was available at the time of
purchase. Country-specific differences are
possible. Bear in mind that your vehicle
may not feature all functions described
here. This also refers to safety-related
systems and functions.
Exterior lighting
Important safety notes
For reasons of safety, Mercedes-Benz
recommends that you drive with the lights
switched on even during the daytime. In some
countries, operation of the headlamps varies
due to legal requirements and self-imposed
obligations. In these countries, the daytime
running lamps are automatically switched on
when the engine is started.
Notes on driving abroad
Converting to symmetrical low beam
when driving abroad: switch the headlamps
to symmetrical low beam in countries in
which traffic drives on the opposite side of the
road to the country where the vehicle is
registered. This prevents oncoming traffic
from being dazzled. Symmetrical lights do not
illuminate as large an area of the edge of the
carriageway.
Have the headlamps converted at a qualified
specialist workshop, e.g. an authorized
Mercedes-Benz Center, as close to the border
as possible before driving in these countries.
Converting to asymmetrical low beam
after returning: have the headlamps
converted back to asymmetrical low beam at
a qualified specialist workshop, e.g. an
authorized Mercedes-Benz Center, as soon as
possible after crossing the border when
returning.
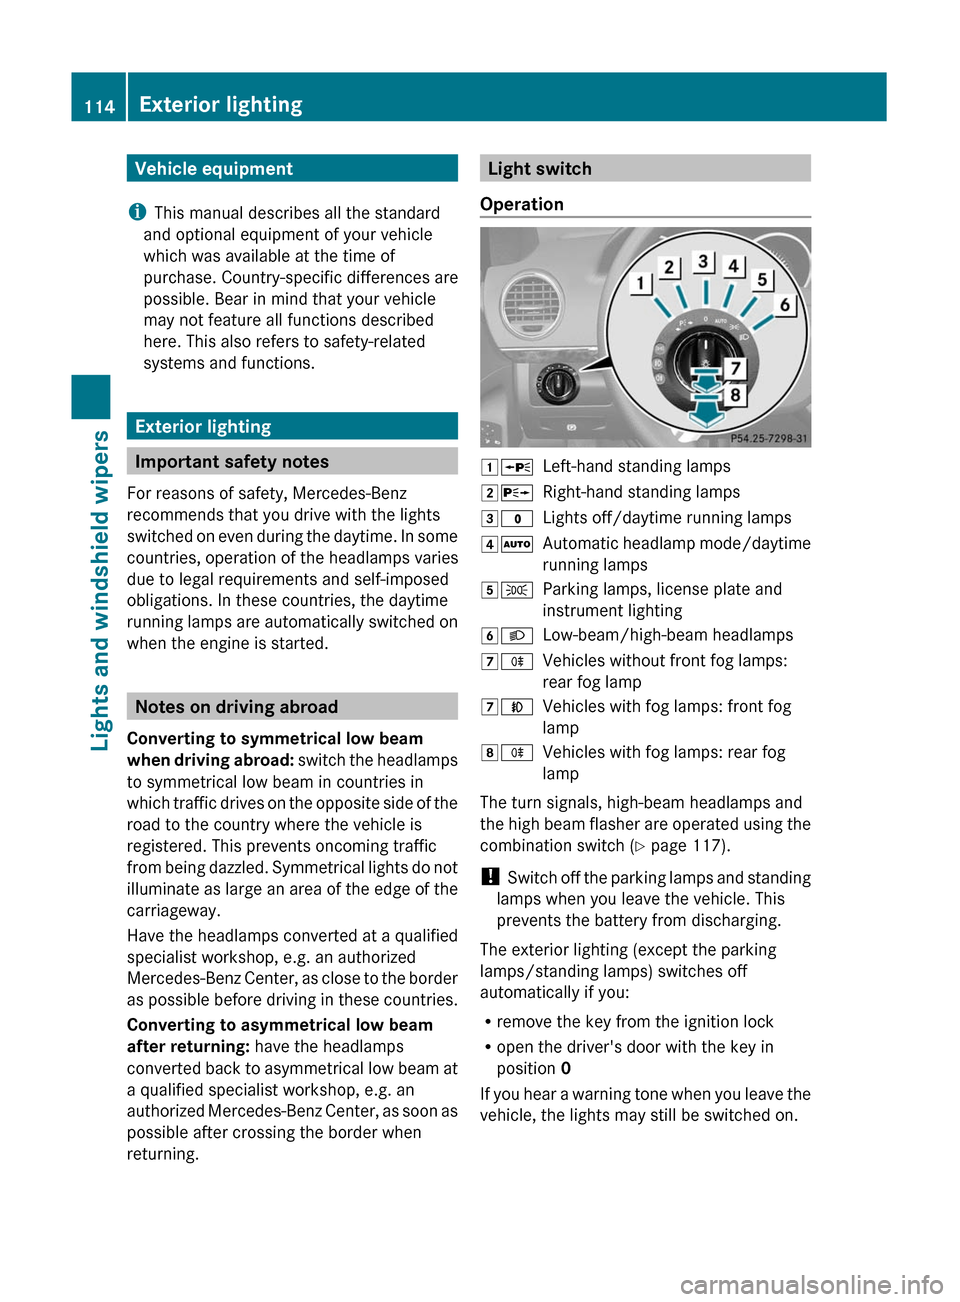
Light switch
Operation1 WLeft-hand standing lamps2XRight-hand standing lamps3$Lights off/daytime running lamps4ÃAutomatic headlamp mode/daytime
running lamps5 TParking lamps, license plate and
instrument lighting6 LLow-beam/high-beam headlamps7RVehicles without front fog lamps:
rear fog lamp7 NVehicles with fog lamps: front fog
lamp8 RVehicles with fog lamps: rear fog
lamp
The turn signals, high-beam headlamps and
the high beam flasher are operated using the
combination switch ( Y page 117).
! Switch off the parking lamps and standing
lamps when you leave the vehicle. This
prevents the battery from discharging.
The exterior lighting (except the parking
lamps/standing lamps) switches off
automatically if you:
R remove the key from the ignition lock
R open the driver's door with the key in
position 0
If you hear a warning tone when you leave the
vehicle, the lights may still be switched on.
114Exterior lightingLights and windshield wipers
BA 164.8 USA, CA Edition B 2011; 1; 2, en-USd2sboikeVersion: 3.0.3.52010-04-21T15:08:44+02:00 - Seite 114