2011 MERCEDES-BENZ GL350 BlueTEC Diff
[x] Cancel search: DiffPage 132 of 376
Vehicle equipment
i This manual describes all the standard
and optional equipment of your vehicle
which was available at the time of
purchase. Country-specific differences are
possible. Bear in mind that your vehicle
may not feature all functions described
here. This also refers to safety-related
systems and functions.
Overview of climate control systems
Important safety notes
GWarning
Severe conditions (e.g. strong air pollution)
may require replacement of the filter before
its scheduled replacement interval. A clogged
filter will reduce the air volume to the interior
and the windows could fog up, impairing
visibility and endangering you and others.
Have a clogged filter replaced as soon as
possible at an authorized Mercedes-Benz
Center.
GWarning
Follow the recommended settings for heating
and cooling given on the following pages.
Otherwise, the windows could fog up,
impairing visibility and endangering you and
others.
Dual-zone automatic climate control/multi-
zone automatic climate control 14
controls the
temperature and the humidity of the vehicle
interior and filters out undesirable
substances from the air.
Dual-zone automatic climate control/multi-
zone automatic climate control 14
is only
operational when the engine is running 15
.
Optimum operation is only achieved when
you drive with the side windows and tilt/
sliding sunroof closed.
i Ventilate the vehicle for a brief period
during warm weather, e.g. using the
convenience opening feature ( Y page 86).
This will speed up the cooling process and
the desired vehicle interior temperature
will be reached more quickly.
i The integrated filter can filter out most
particles of dust and completely filters out
pollen. A clogged filter reduces the amount
of air supplied to the vehicle interior. For
this reason, you should always observe the
interval for replacing the filter, which is
specified in the Service Booklet. As it
depends on environmental conditions, e.g.
heavy air pollution, the interval may be
shorter than stated in the Service Booklet.14 For Canada only.
15 The "residual heat" function can only be switched on/off when the ignition is switched off.130Overview of climate control systemsClimate control
BA 164.8 USA, CA Edition B 2011; 1; 2, en-USd2sboikeVersion: 3.0.3.52010-04-21T15:08:44+02:00 - Seite 130
Page 141 of 376

set. Automatic air distribution remains
activated.
or
XPress one of the M or O buttons.
Automatic air distribution is deactivated.
Air distribution is controlled according to
the position set. Automatic airflow remains
activated.
Setting the temperature
Dual-zone automatic climate control
Different temperatures can be set for the
driver's and front-passenger sides.
XTurn the SmartKey to position 2 in the
ignition lock.XTo increase/reduce: turn controls : and
C clockwise or counter-clockwise
( Y page 131).
Only change the temperature setting in
small increments. Start at 72 ‡ (22 †).
Multi-zone automatic climate control
Climate zones of multi-zone automatic climate
control
You can select different temperature settings
for the driver's and front-passenger sides as
well as for the rear compartment.
XTo increase/reduce the front-
compartment temperature using the front control panel: turn the SmartKey in
the ignition lock to position 2.XTurn thumbwheels : and C16
/E 17
clockwise or counter-clockwise
( Y page 132).
Only change the temperature setting in
small increments. Start at 72 ‡ (22 †).
For USA only:
XTo increase/reduce the rear-
compartment temperature using the
front control panel: turn the SmartKey in
the ignition lock to position 2.XPress the ± button.XTurn control C clockwise or counter-
clockwise ( Y page 132).
Only change the temperature setting in
small increments. Start at 72 ‡ (22 †).
For Canada only:
XTo increase/reduce the rear-
compartment temperature using the
front control panel: turn the SmartKey in
the ignition lock to position 2.XPress the Y button.
The display changes to rear-compartment
climate control.XTurn control E clockwise or counter-
clockwise ( Y page 132).
Only change the temperature setting in
small increments. Start at 72 ‡ (22 †).
i To return to the standard display, press
the Y button.
i The rear display changes to the standard
display automatically after three seconds.
XTo increase/reduce the temperature in
the rear compartment using the rear
control panel: turn the SmartKey in the
ignition lock to position 2.XTurn thumbwheel N16
/R 17
clockwise or
counter-clockwise ( Y page 132).
Only change the temperature setting in
small increments. Start at 72 ‡ (22 †).16 USA only.
17 Canada only.Operating the control systems139Climate controlBA 164.8 USA, CA Edition B 2011; 1; 2, en-USd2sboikeVersion: 3.0.3.52010-04-21T15:08:44+02:00 - Seite 139Z
Page 148 of 376
Vehicle equipment
i This manual describes all the standard
and optional equipment of your vehicle
which was available at the time of
purchase. Country-specific differences are
possible. Bear in mind that your vehicle
may not feature all functions described
here. This also refers to safety-related
systems and functions.
Notes on breaking-in a new vehicle
The first 1000 miles (1500 km)
The more you look after the engine when it is
new, the happier you will be with its
performance in the future.
R Drive at varying vehicle speeds and engine
speeds for the first 1000 miles (1500 km)
for this reason.
R Avoid overstraining the vehicle during this
period, e.g. driving at full throttle.
R Change gear in good time, at the latest
when the tachometer needle is ⅔ of the
way to the red area in the tachometer
display.
R Do not manually shift to a lower gear to
brake the vehicle.
R If possible, do not depress the accelerator
pedal past the point of resistance
(kickdown).
R Only select shift ranges 3, 2 or 1 when
driving slowly, e.g. in mountainous terrain.
After 1000 miles (1500 km), you can increase
the engine speed gradually and bring the
vehicle up to full speed.
i Also, observe these breaking-in notes
when the vehicle's engine, front-axle
transmission or differential have been
replaced.
i Always observe the respective speed
restrictions.
Driving
Important safety notes
GWarning
Make sure absolutely no objects are
obstructing the pedals' range of movement.
Keep the driver's footwell clear of all
obstacles. If there are any floormats or
carpets in the footwell, make sure the pedals
still have sufficient clearance.
During sudden driving or braking maneuvers
the objects could get caught between the
pedals. You could then no longer brake or
accelerate. This could lead to accidents and
injury.
GWarning
On slippery road surfaces, never downshift in
order to obtain braking action. This could
result in drive wheel slip and reduced vehicle
control. Your vehicle's ABS will not prevent
this type of loss of control.
GWarning
It is dangerous to shift the automatic
transmission out of parking position P or
neutral position N if the engine speed is
higher than idle speed. If your foot is not firmly
on the brake pedal, the vehicle could
accelerate quickly forward or in reverse. You
could lose control of the vehicle and hit
someone or something. Only shift into gear
when the engine is idling normally and when
your right foot is firmly on the brake pedal.
! Warm up the engine quickly. Do not use
the engine's full performance until it has
reached operating temperature.
Only shift the automatic transmission to
the desired drive position when the vehicle
is stationary.
Where possible, avoid spinning the drive
wheels when pulling away on slippery
roads. You could otherwise damage the
drive train.
146DrivingDriving and parking
BA 164.8 USA, CA Edition B 2011; 1; 2, en-USd2sboikeVersion: 3.0.3.52010-04-21T15:08:44+02:00 - Seite 146
Page 149 of 376
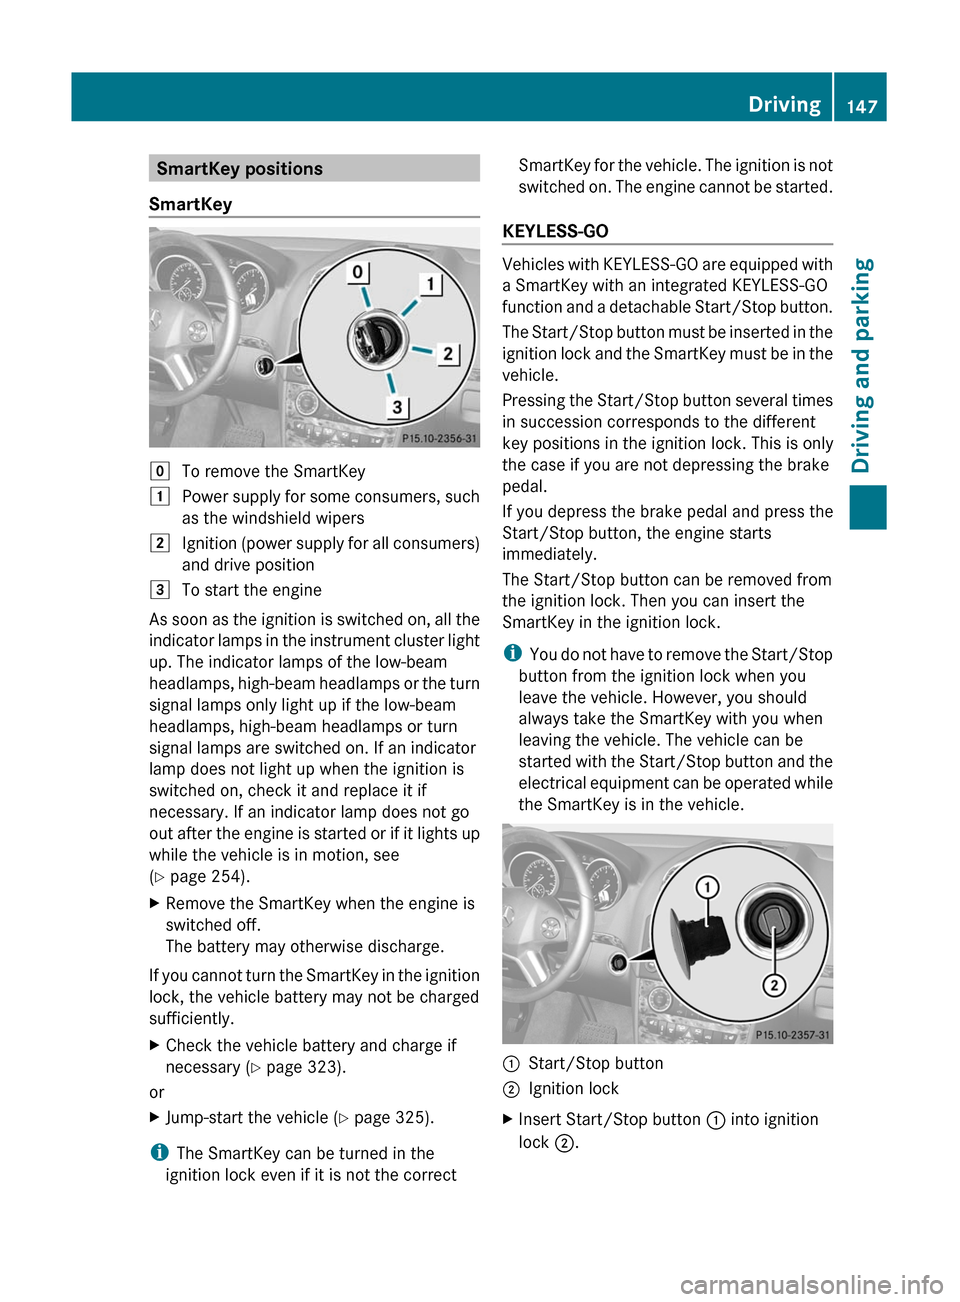
SmartKey positions
SmartKeygTo remove the SmartKey1Power supply for some consumers, such
as the windshield wipers2Ignition (power supply for all consumers)
and drive position3To start the engine
As soon as the ignition is switched on, all the
indicator lamps in the instrument cluster light
up. The indicator lamps of the low-beam
headlamps, high-beam headlamps or the turn
signal lamps only light up if the low-beam
headlamps, high-beam headlamps or turn
signal lamps are switched on. If an indicator
lamp does not light up when the ignition is
switched on, check it and replace it if
necessary. If an indicator lamp does not go
out after the engine is started or if it lights up
while the vehicle is in motion, see
( Y page 254).
XRemove the SmartKey when the engine is
switched off.
The battery may otherwise discharge.
If you cannot turn the SmartKey in the ignition
lock, the vehicle battery may not be charged
sufficiently.
XCheck the vehicle battery and charge if
necessary ( Y page 323).
or
XJump-start the vehicle ( Y page 325).
i
The SmartKey can be turned in the
ignition lock even if it is not the correct
SmartKey for the vehicle. The ignition is not
switched on. The engine cannot be started.
KEYLESS-GO
Vehicles with KEYLESS-GO are equipped with
a SmartKey with an integrated KEYLESS-GO
function and a detachable Start/Stop button.
The Start/Stop button must be inserted in the
ignition lock and the SmartKey must be in the
vehicle.
Pressing the Start/Stop button several times
in succession corresponds to the different
key positions in the ignition lock. This is only
the case if you are not depressing the brake
pedal.
If you depress the brake pedal and press the
Start/Stop button, the engine starts
immediately.
The Start/Stop button can be removed from
the ignition lock. Then you can insert the
SmartKey in the ignition lock.
i You do not have to remove the Start/Stop
button from the ignition lock when you
leave the vehicle. However, you should
always take the SmartKey with you when
leaving the vehicle. The vehicle can be
started with the Start/Stop button and the
electrical equipment can be operated while
the SmartKey is in the vehicle.
:Start/Stop button;Ignition lockXInsert Start/Stop button : into ignition
lock ;.Driving147Driving and parkingBA 164.8 USA, CA Edition B 2011; 1; 2, en-USd2sboikeVersion: 3.0.3.52010-04-21T15:08:44+02:00 - Seite 147Z
Page 173 of 376
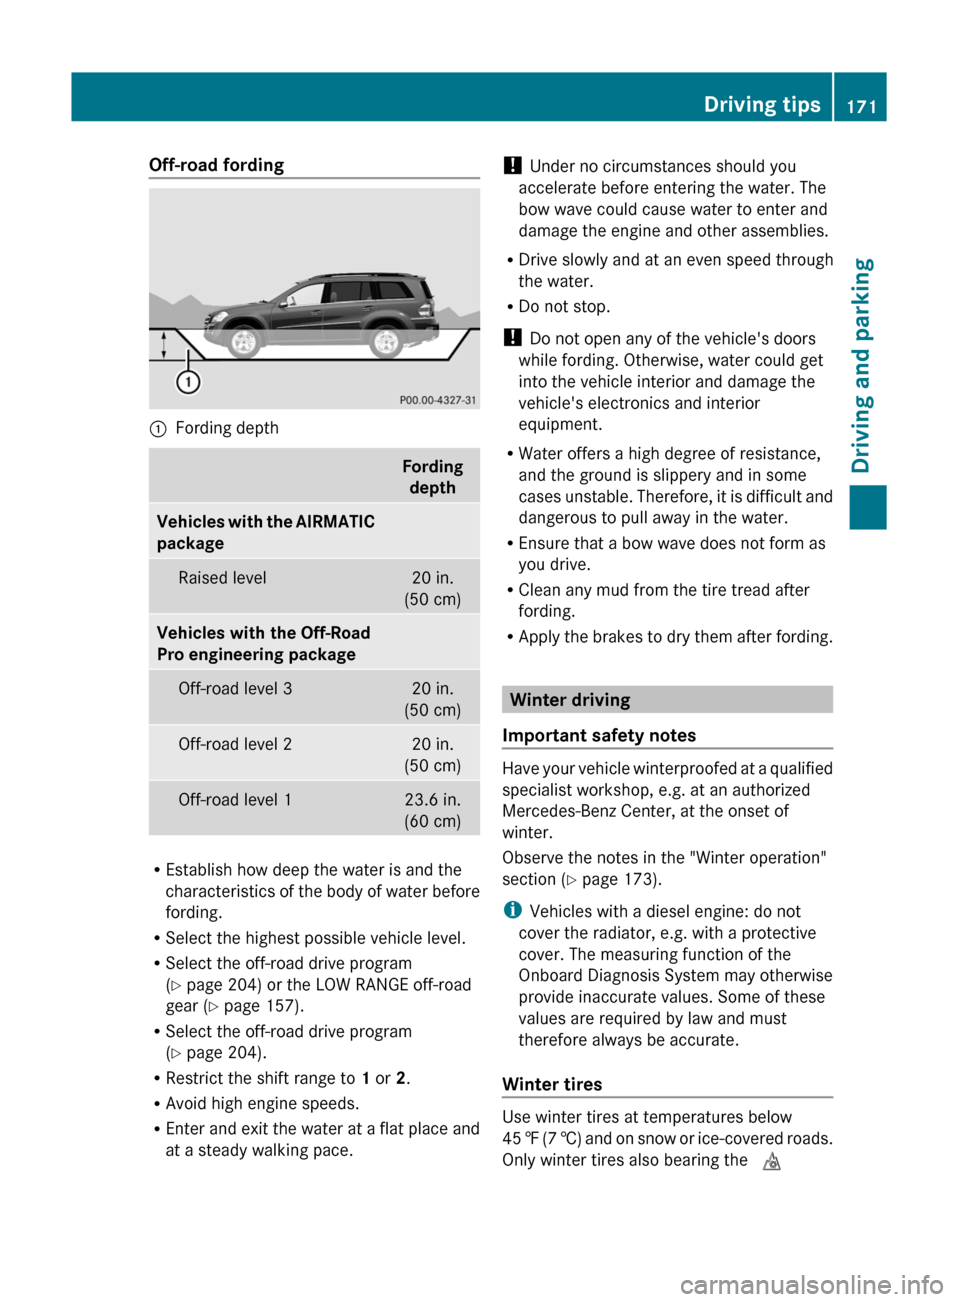
Off-road fording:Fording depthFordingdepthVehicles with the AIRMATIC
packageRaised level20 in.
(50 cm)Vehicles with the Off-Road
Pro engineering packageOff-road level 320 in.
(50 cm)Off-road level 220 in.
(50 cm)Off-road level 123.6 in.
(60 cm)
R Establish how deep the water is and the
characteristics of the body of water before
fording.
R Select the highest possible vehicle level.
R Select the off-road drive program
( Y page 204) or the LOW RANGE off-road
gear ( Y page 157).
R Select the off-road drive program
( Y page 204).
R Restrict the shift range to 1 or 2.
R Avoid high engine speeds.
R Enter and exit the water at a flat place and
at a steady walking pace.
! Under no circumstances should you
accelerate before entering the water. The
bow wave could cause water to enter and
damage the engine and other assemblies.
R Drive slowly and at an even speed through
the water.
R Do not stop.
! Do not open any of the vehicle's doors
while fording. Otherwise, water could get
into the vehicle interior and damage the
vehicle's electronics and interior
equipment.
R Water offers a high degree of resistance,
and the ground is slippery and in some
cases unstable. Therefore, it is difficult and
dangerous to pull away in the water.
R Ensure that a bow wave does not form as
you drive.
R Clean any mud from the tire tread after
fording.
R Apply the brakes to dry them after fording.
Winter driving
Important safety notes
Have your vehicle winterproofed at a qualified
specialist workshop, e.g. at an authorized
Mercedes-Benz Center, at the onset of
winter.
Observe the notes in the "Winter operation"
section ( Y page 173).
i Vehicles with a diesel engine: do not
cover the radiator, e.g. with a protective
cover. The measuring function of the
Onboard Diagnosis System may otherwise
provide inaccurate values. Some of these
values are required by law and must
therefore always be accurate.
Winter tires
Use winter tires at temperatures below
45 ‡ (7 †) and on snow or ice-covered roads.
Only winter tires also bearing the i
Driving tips171Driving and parkingBA 164.8 USA, CA Edition B 2011; 1; 2, en-USd2sboikeVersion: 3.0.3.52010-04-21T15:08:44+02:00 - Seite 171Z
Page 174 of 376

snowflake symbol next to the M+S marking
provide the best-possible grip in wintry road
conditions. Only these tires will allow the ABS
and ESP ®
driving systems to function
optimally in winter, as these tires have been
designed specifically for driving on snow.
Use M+S tires of the same make and tread on
all wheels to maintain safe handling
characteristics.GWarning
M+S tires with a tread depth of less than 1
/ 6
inch (4 mm) must be replaced. They are no
longer suitable for winter operation.
Always observe the maximum permissible
speed specified for the M+S tires you have
installed.
Once you have installed the winter tires:
XCheck the tire pressures ( Y page 339).XRestart the tire pressure monitor
( Y page 341).GWarning
If you use your spare wheel when M+S tires
are fitted on the other wheels, be aware that
the difference in tire characteristics may very
well impair turning stability and that overall
driving stability may be reduced. Adapt your
driving style accordingly.
Have the spare wheel replaced by a regular
road wheel with an M+S tire at the nearest
authorized Mercedes-Benz Center.
Snow chains
For safety reasons, Mercedes-Benz
recommends that you only use snow chains
which have been specially approved for your
vehicle by Mercedes-Benz, or are of a
corresponding standard of quality.
! Vehicles with the Adaptive Damping
System (ADS): do not drive in ADS SPORT
mode if snow chains have been mounted.
The vehicle may otherwise be damaged.
! There is not enough space for snow
chains on some wheel sizes. Observe the
information under "Tires and wheels" in the
"Technical Data" section to avoid damage
to the vehicle or the wheels.
R Only use snow chains when driving on an
area completely covered by snow. Do not
exceed the maximum permissible speed of
30 mph (50 km/h). Remove the snow
chains as soon as possible when you are no
longer driving on snow-covered roads.
R Local regulations may restrict the use of
snow chains. Applicable regulations must
be observed if you wish to mount snow
chains.
R Snow chains must not be mounted on
emergency spare wheels.
If you intend to mount snow chains, please
bear the following points in mind:
R you may not attach snow chains to all
wheel-tire combinations; see the "Tires and
wheels" section in the "Technical data"
chapter.
R mount snow chains only in pairs and only
on the rear wheels. Observe the
manufacturer's installation instructions.
! If snow chains are mounted on the front
wheels, the snow chains could grind
against the bodywork or components of the
chassis. This could result in damage to the
vehicle or the tires.
! Vehicles with steel wheels
If you wish to mount snow chains to steel
wheels, make sure that you remove the
respective wheels' hubcaps first. The
hubcaps may otherwise be damaged.
i You may wish to deactivate
ESP ®
(Y page 66) when pulling away with
snow chains installed. This way you can
allow the wheels to spin in a controlled
manner, achieving an increased driving
force (cutting action).172Driving tipsDriving and parking
BA 164.8 USA, CA Edition B 2011; 1; 2, en-USd2sboikeVersion: 3.0.3.52010-04-21T15:08:44+02:00 - Seite 172
Page 176 of 376
GWarning!
Please be aware that by raising the vehicle
level, the center of gravity also rises.
Therefore, always ensure that the vehicle
level is as low as possible. With higher ride
height the ESP ®
may activate earlier in certain
situations.
GWarning!
Do not reduce the tire inflation pressure
before driving through sand. However, if you
do so, remember to correct the tire inflation
pressure before continuing your trip. Driving
with reduced tire inflation pressure increases
the risk of losing control of the vehicle and
rolling over.
General information
Read this section before driving your vehicle
off-road. Practice by traveling over more
gentle off-road terrain first.
Familiarize yourself with the characteristics
of your vehicle and the gear change process
before driving through difficult terrain.
The following driving systems are specially
adapted to off-road driving:
R off-road drive program (vehicles without
the Off-Road Pro engineering package)
( Y page 204)
R LOW RANGE off-road gear ( Y page 157)
R off-road ABS ( Y page 66)
R off-road 4ETS ( Y page 67)
R off-road ESP ®
(Y page 68)
R hill start assist
R differential locks ( Y page 207)
R DSR (Downhill Speed Regulation)
( Y page 203)
Observe the following notes:
R stop your vehicle and, if necessary, select
the off-road drive program (Y page 204) or
the LOW RANGE off-road gear
( Y page 157) before driving off-road.
R select a vehicle level that is suitable for the
terrain. Make sure there is always sufficient
ground clearance to prevent damage to the
vehicle.
R activate the differential lock if necessary.
R make sure that items of luggage and cargo
are stowed safely and are well secured
( Y page 268).
R always keep the engine running and in gear
when driving on a downhill gradient.
Activate DSR ( Y page 203).
R always keep the doors, tailgate, windows
and the tilt/sliding sunroof closed while the
vehicle is in motion.
R adapt the speed to suit the terrain
conditions. The more uneven, worn or
steeper the terrain is, the slower you should
drive.
R drive slowly and at an even speed through
the water. Ensure that a bow wave does not
form as you drive.
R drive with extreme care on unfamiliar off-
road routes where visibility is poor. For
safety reasons, get out of the vehicle first
and survey the off-road route.
R look out for obstacles, such as rocks, holes,
tree stumps and furrows.
R check the depth of water before fording
rivers and streams.
R do not stop in water and do not switch the
engine off.
R drive quickly on sand to overcome the
rolling resistance. Otherwise, the vehicle
could dig itself into the sand.
R do not jump with the vehicle. This
interrupts the vehicle's traction.
R always keep the engine running and in gear
when driving on slopes.
R do not shift the automatic transmission to
transmission position N.174Driving tipsDriving and parking
BA 164.8 USA, CA Edition B 2011; 1; 2, en-USd2sboikeVersion: 3.0.3.52010-04-21T15:08:44+02:00 - Seite 174
Page 177 of 376

Check list before driving off-roadXEngine oil level: check the engine oil and
top it up if necessary.
The oil supply can only be guaranteed on
steep slopes if the engine oil level is
sufficient.
! If the engine oil warning lamp lights up
while the vehicle is in motion, stop the
vehicle in a safe place as soon as possible.
Check the engine oil level. The engine oil
warning lamp warning must not be ignored.
Continuing the journey while the symbol is
displayed could lead to engine damage.
XWheel-changing tool kit: check that the
jack is working and make sure you have the
wheelbrace, a robust tow cable and a
folding spade in the vehicle.XWheels and tires: check the tire tread
depth and tire pressure. A table with the
recommended tire pressures can be found
on the B-pillar on the driver's side of your
vehicle.XCheck for damage and remove any foreign
objects, e.g. small stones, from the
wheels/tires.XReplace any missing valve caps.XReplace dented or damaged wheels.XWheels: dented or deformed wheels could
result in a loss of tire pressure and damage
the tire bead. Therefore, check the wheels
before driving off-road and replace them if
necessary.
Check list after driving off-road
GWarning
If you feel a sudden significant vibration or
ride disturbance, or you suspect that possible
damage to your vehicle has occurred, you
should turn on the hazard warning flashers,
carefully slow down, and drive with caution to
an area which is a safe distance from the road.
Inspect the tires and the vehicle underbody
for possible damage. If the vehicle appears
unsafe, have the vehicle towed to the nearest
authorized Mercedes-Benz Center or tire
dealer for repairs.
Driving over rough terrain places greater
demands on your vehicle than driving on
normal roads. After driving off-road, check
the vehicle. This allows you to detect damage
promptly and reduce the risk of an accident
to yourself and other road users.XDeactivate the off-road drive program
( Y page 204) or the LOW RANGE off-road
gear ( Y page 157).XDeactivate DSR ( Y page 203).XSet the differential lock setting to AUTO on
the selector wheel ( Y page 207).XLower the vehicle level again to a level
suitable to the road conditions, e.g. to the
highway/high-speed level.XClean the headlamps and rear lights and
check for damage.XClean the front and rear license plates.XClean the wheels/tires, wheel arch and the
underbody with a water jet. Check for
damage and remove any foreign objects.XAfter the trip, examine without fail the
entire undercarriage, wheels, tires, brakes,
bodywork structure, steering, chassis and
exhaust system for damage.XCheck whether twigs or other parts of
plants have become trapped. These
increase the risk of fire and can damage
fuel pipes, brake hoses or the rubber
bellows of the axle joints and propeller
shafts.XAfter driving for extended periods across
sand, mud, gravel, water or in similarly dirty
conditions, have the brake discs, wheels,
brake pads/linings and axle joints checked
and cleaned.XIf you detect strong vibrations after off-road
travel, check for foreign objects in the
wheels and drive train and remove them ifDriving tips175Driving and parkingBA 164.8 USA, CA Edition B 2011; 1; 2, en-USd2sboikeVersion: 3.0.3.52010-04-21T15:08:44+02:00 - Seite 175Z