2011 MERCEDES-BENZ GL350 BlueTEC page 310
[x] Cancel search: page 310Page 28 of 376

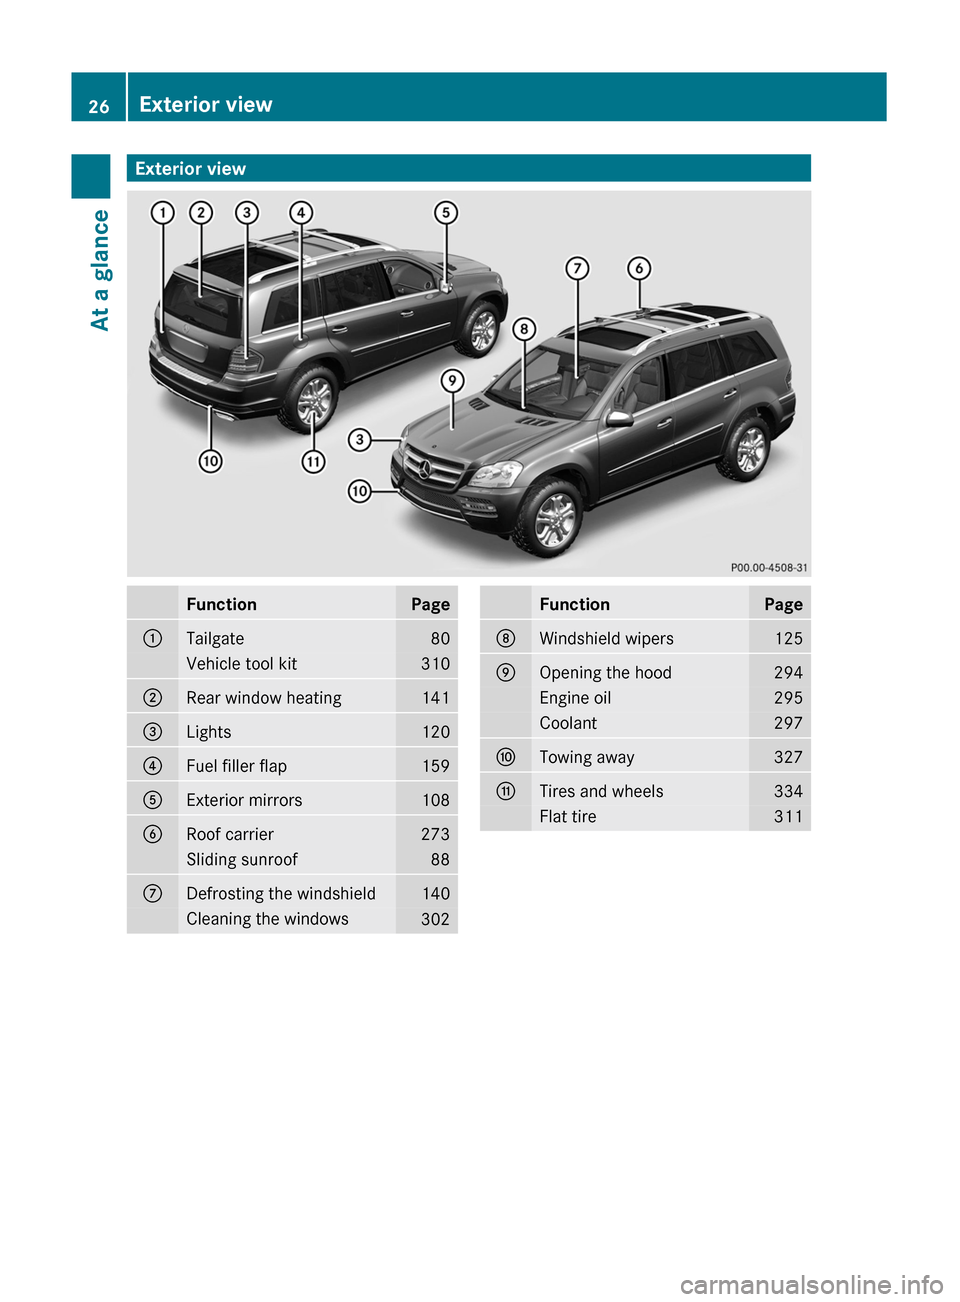
Exterior viewFunctionPage:Tailgate80Vehicle tool kit310;Rear window heating141=Lights120?Fuel filler flap159AExterior mirrors108BRoof carrier273Sliding sunroof88CDefrosting the windshield140Cleaning the windows302FunctionPageDWindshield wipers125EOpening the hood294Engine oil295Coolant297FTowing away327GTires and wheels334Flat tire31126Exterior viewAt a glance
BA 164.8 USA, CA Edition B 2011; 1; 2, en-USd2sboikeVersion: 3.0.3.52010-04-21T15:08:44+02:00 - Seite 26
Page 92 of 376

Overhead control panel
:To raise;To open=To closeXSwitch on the ignition.XPush or pull the 2 switch in the
corresponding direction.
i If you press the 2 switch beyond the
point of resistance, an automatic opening/
closing process is started in the
corresponding direction. You can stop
automatic operation by pressing again.
Automatic opening/raising is only available
if the tilt/sliding sunroof is in the closed
position.
You can open/close the cover for the
sunblind manually when the tilt/sliding
sunroof is raised/closed.
Resetting
Reset the tilt/sliding sunroof if it does not
open smoothly, or if the battery has been
disconnected or has become discharged.
! Contact a qualified specialist workshop if
the tilt/sliding sunroof cannot be closed
fully or reset.
XRemove the SmartKey from the ignition
lock or turn to position 0 (KEYLESS-GO).XRemove the fuse for the tilt/sliding sunroof
from the main fuse box. To find out where
the fuse is located, refer to the fuse
allocation chart in the vehicle tool kit
( Y page 310).XReinsert the fuse.XSwitch on the ignition.XRaise the tilt/sliding sunroof fully at the
rear ( Y page 89).XKeep the 2 switch pressed for another
second.XMake sure that the tilt/sliding sunroof can
be opened or closed fully again using the
opening/closing process ( Y page 89).XIf the tilt/sliding sunroof can be raised fully
at the rear it is set correctly. If this is not
the case, you must repeat the previously
described steps.
Problems with the sliding sunroof
Problem: the sunroof cannot be closed
and you cannot see the cause.
GWarning!
You could be severely or even fatally injured
when closing the sliding sunroof with
increased closing force or if the anti-
entrapment feature is deactivated. Make sure
that nobody can become trapped when
closing the sliding sunroof.
If the sliding sunroof is obstructed during
closing:
XImmediately after the sliding sunroof
blocks, pull the 2 switch in the
overhead control panel down to the point
of resistance and hold it until the sliding
sunroof is closed.
The sliding sunroof is closed with increased
force.
If the sliding sunroof is obstructed during
closing again:
XImmediately after the sliding sunroof
blocks, pull the 2 switch in the
overhead control panel down to the point
of resistance and hold it until the sliding
sunroof is closed.
The sliding sunroof is closed without the
anti-entrapment feature.90Sliding sunroofOpening and closing
BA 164.8 USA, CA Edition B 2011; 1; 2, en-USd2sboikeVersion: 3.0.3.52010-04-21T15:08:44+02:00 - Seite 90
Page 166 of 376

! AdBlue ®
is not a additive and must not be
added to the diesel tank. If AdBlue ®
is
added to the diesel tank this could damage
the engine.
i If you are adding between maintenance
intervals, add approximately 1 gallon (3.8 l)
of AdBlue ®
to the AdBlue ®
tank. 1 gallon
(3.8 l) of AdBlue ®
is approximately
2 AdBlue ®
refill bottles.
Further information about
AdBlue ®
(Y page 367).
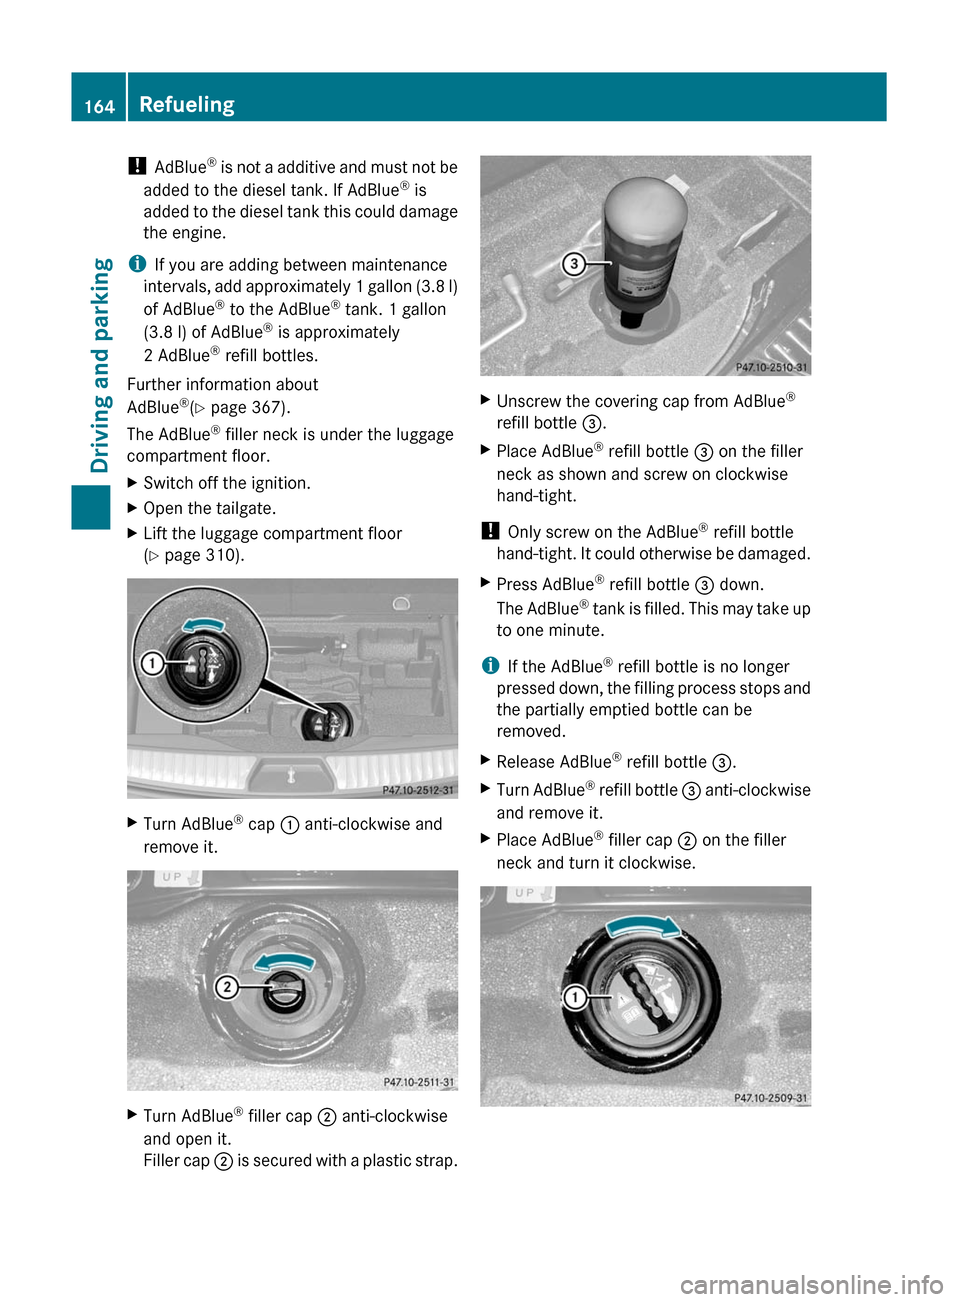
The AdBlue ®
filler neck is under the luggage
compartment floor.XSwitch off the ignition.XOpen the tailgate.XLift the luggage compartment floor
( Y page 310).XTurn AdBlue ®
cap : anti-clockwise and
remove it.XTurn AdBlue ®
filler cap ; anti-clockwise
and open it.
Filler cap ; is secured with a plastic strap.XUnscrew the covering cap from AdBlue ®
refill bottle =.XPlace AdBlue ®
refill bottle = on the filler
neck as shown and screw on clockwise
hand-tight.
! Only screw on the AdBlue ®
refill bottle
hand-tight. It could otherwise be damaged.
XPress AdBlue ®
refill bottle = down.
The AdBlue ®
tank is filled. This may take up
to one minute.
i If the AdBlue ®
refill bottle is no longer
pressed down, the filling process stops and
the partially emptied bottle can be
removed.
XRelease AdBlue ®
refill bottle =.XTurn AdBlue ®
refill bottle = anti-clockwise
and remove it.XPlace AdBlue ®
filler cap ; on the filler
neck and turn it clockwise.164RefuelingDriving and parking
BA 164.8 USA, CA Edition B 2011; 1; 2, en-USd2sboikeVersion: 3.0.3.52010-04-21T15:08:44+02:00 - Seite 164
Page 275 of 376

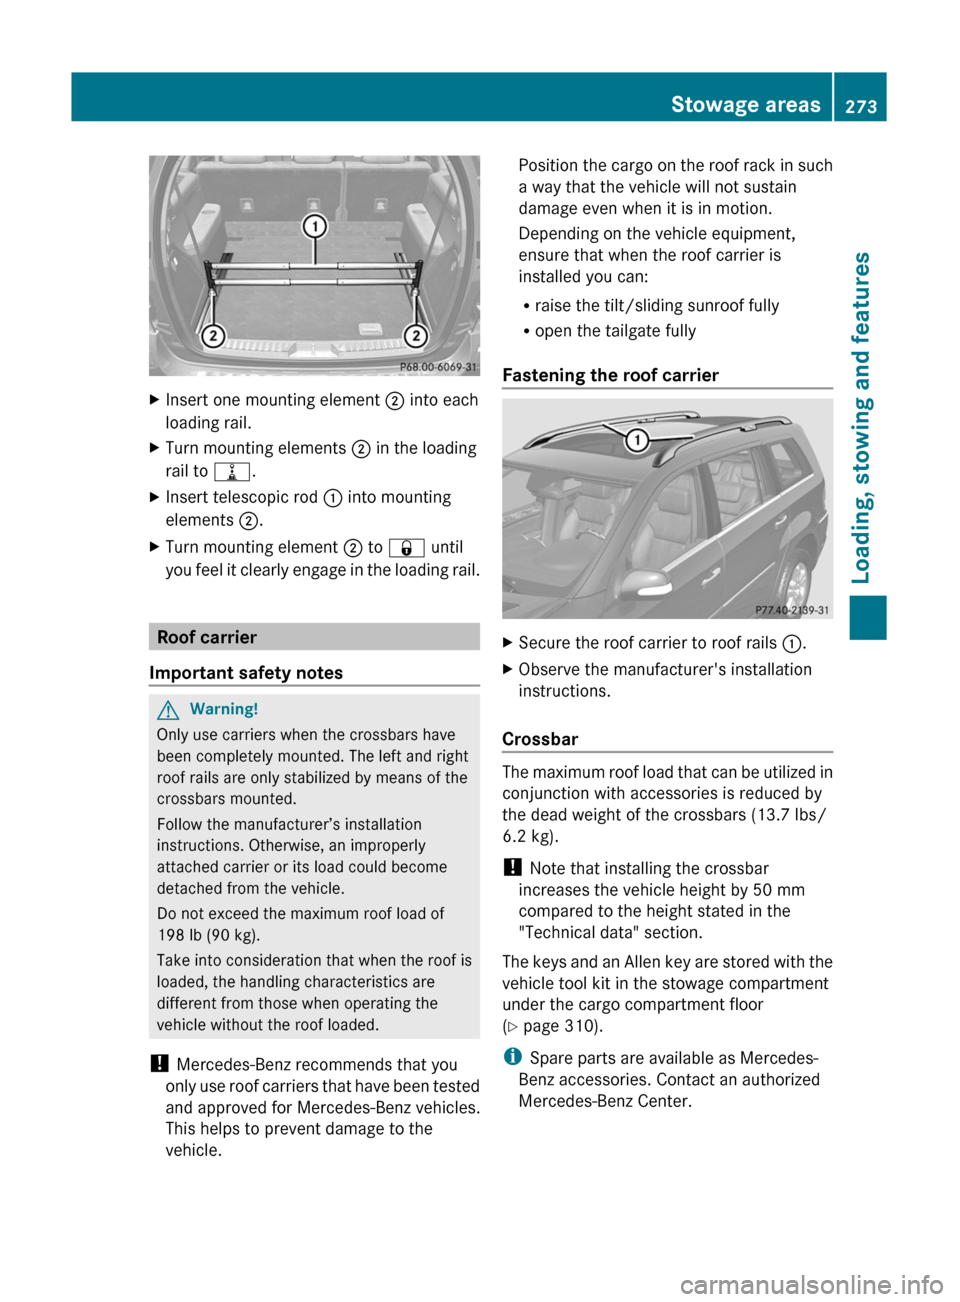
XInsert one mounting element ; into each
loading rail.XTurn mounting elements ; in the loading
rail to =.XInsert telescopic rod : into mounting
elements ;.XTurn mounting element ; to & until
you feel it clearly engage in the loading rail.
Roof carrier
Important safety notes
GWarning!
Only use carriers when the crossbars have
been completely mounted. The left and right
roof rails are only stabilized by means of the
crossbars mounted.
Follow the manufacturer’s installation
instructions. Otherwise, an improperly
attached carrier or its load could become
detached from the vehicle.
Do not exceed the maximum roof load of
198 lb (90 kg).
Take into consideration that when the roof is
loaded, the handling characteristics are
different from those when operating the
vehicle without the roof loaded.
! Mercedes-Benz recommends that you
only use roof carriers that have been tested
and approved for Mercedes-Benz vehicles.
This helps to prevent damage to the
vehicle.
Position the cargo on the roof rack in such
a way that the vehicle will not sustain
damage even when it is in motion.
Depending on the vehicle equipment,
ensure that when the roof carrier is
installed you can:
R raise the tilt/sliding sunroof fully
R open the tailgate fully
Fastening the roof carrierXSecure the roof carrier to roof rails :.XObserve the manufacturer's installation
instructions.
Crossbar
The maximum roof load that can be utilized in
conjunction with accessories is reduced by
the dead weight of the crossbars (13.7 lbs/
6.2 kg).
! Note that installing the crossbar
increases the vehicle height by 50 mm
compared to the height stated in the
"Technical data" section.
The keys and an Allen key are stored with the
vehicle tool kit in the stowage compartment
under the cargo compartment floor
( Y page 310).
i Spare parts are available as Mercedes-
Benz accessories. Contact an authorized
Mercedes-Benz Center.
Stowage areas273Loading, stowing and featuresBA 164.8 USA, CA Edition B 2011; 1; 2, en-USd2sboikeVersion: 3.0.3.52010-04-21T15:08:44+02:00 - Seite 273Z
Page 312 of 376

Vehicle tool kit
Notes
The vehicle tool kit can be found in the
stowage well under the cargo compartment
floor.
i Vehicles without a spare wheel are not
equipped at the factory with the tools
needed to change a wheel, e.g. a jack or lug
wrench. Some tools for changing a wheel
are specific to the vehicle. To obtain tools
approved for your vehicle, visit a qualified
specialist workshop, e.g. an authorized
Mercedes-Benz Center.
Folding the cargo compartment floor up
XPress release handle ; in the direction of
the arrow.XLift cargo compartment floor : up by
release handle ;.XFold out hook = on the underside of the
cargo compartment floor.XAttach hook = to upper seal ? in the
cargo compartment.
Vehicles with a TIREFIT kit
XLift the cargo compartment floor up
( Y page 310).:Jack;Towing eye=Ratchet ring spanner?Alignment boltAFuse allocation chartBFolding wheel chockCLug wrench
Vehicles with a "Minispare" emergency
spare wheel
XLift the cargo compartment floor up
( Y page 310).310Where will I find...?Roadside assistance
BA 164.8 USA, CA Edition B 2011; 1; 2, en-USd2sboikeVersion: 3.0.3.52010-04-21T15:08:44+02:00 - Seite 310
Page 313 of 376

:Alignment bolt;Towing eye=Lug wrench?Ratchet ring spannerAVelcro fastenerBJackCWheel boltsDFolding wheel chockEFuse allocation chartFStowage well
"Minispare" emergency spare wheel
The "Minispare" emergency spare wheel can
be found in the stowage well under the cargo
compartment floor.
XLift the trunk floor up ( Y page 310).XTake out the jack.XTurn emergency spare wheel retainer :
counter-clockwise and remove it.XRemove insert =.XRemove "Minispare" emergency spare
wheel ;.
For further information on changing a wheel
and mounting the spare wheel, see
( Y page 316).
Flat tire
Preparing the vehicle
Your vehicle could be equipped with a
"Minispare" emergency spare wheel or the
MOExtended run-flat system( Y page 321).
i Vehicle preparation is not necessary on
vehicles with the MOExtended run-flat
system.
i Vehicles featuring the MOExtended run-
flat system are not equipped with the
TIREFIT kit at the factory. It is therefore
recommended that you additionally equip
your vehicle with the TIREFIT kit if you
mount tires that do not feature run-flat
properties, e.g. winter tires. You can obtain
a TIREFIT kit from an authorized Mercedes-
Benz Center, for example.
XMake sure that highway level is
selected 41
(Y page 189).XStop the vehicle as far away as possible
from traffic on solid, non-slippery and level
ground.XSwitch on the hazard warning lamps.XFirmly depress the parking brake.XBring the front wheels into the straight-
ahead position.XMove the DIRECT SELECT lever to P.XSwitch off the engine.41
Vehicles with air suspension.Flat tire311Roadside assistanceBA 164.8 USA, CA Edition B 2011; 1; 2, en-USd2sboikeVersion: 3.0.3.52010-04-21T15:08:44+02:00 - Seite 311Z
Page 314 of 376

XVehicles without KEYLESS-GO: remove
the key from the ignition lock.
XVehicles with KEYLESS-GO: open the
driver's door.
The on-board electronics have status 0,
which is the same as the key having been
removed.
XVehicles with KEYLESS-GO: remove the
Start/Stop button from the ignition lock
(Y page 147).
XAll occupants must get out of the vehicle.
Make sure that they are not endangered as
they get out of the vehicle.
XMake sure that no one is near the danger
area whilst a wheel is being changed.
Anyone who is not directly assisting in the
wheel change should, for example, stand
behind the barrier.
XGet out of the vehicle. Pay attention to
traffic conditions when doing so.
XClose the driver's door.
iOnly operate the electric air pump using
the socket in the footwell of the 2nd row of
seats (Y page 281), even if the ignition is
turned off.
An emergency cut-off ensures that the on-
board voltage does not drop too low. If the
on-board voltage is too low, power to the
sockets is automatically cut-off. This
ensures that there is sufficient power to
start the engine.
TIREFIT kit
Using the TIREFIT kit
You can use the TIREFIT kit to seal small
punctures, particularly those in the tire tread.
You can use TIREFIT at outside temperatures
down to -4 ‡ (-20 †).
GWarning
TIREFIT is a limited repair device. TIREFIT
cannot be used for cuts or punctures larger
than approximately 0.16 in (4 mm) and tire
damage caused by driving with extremely low
tire inflation pressure, or on a flat tire, or a
damaged wheel.
Do not drive the vehicle under such
circumstances.
Contact the nearest authorized Mercedes-
Benz Center for assistance or call roadside
assistance.
XDo not remove any foreign objects which
have penetrated the tire, e.g. screws or
nails.
XRemove the TIREFIT kit, the accompanying
"max. 80 km/h" sticker and the electric air
pump from the stowage well underneath
the trunk floor (Y page 310).
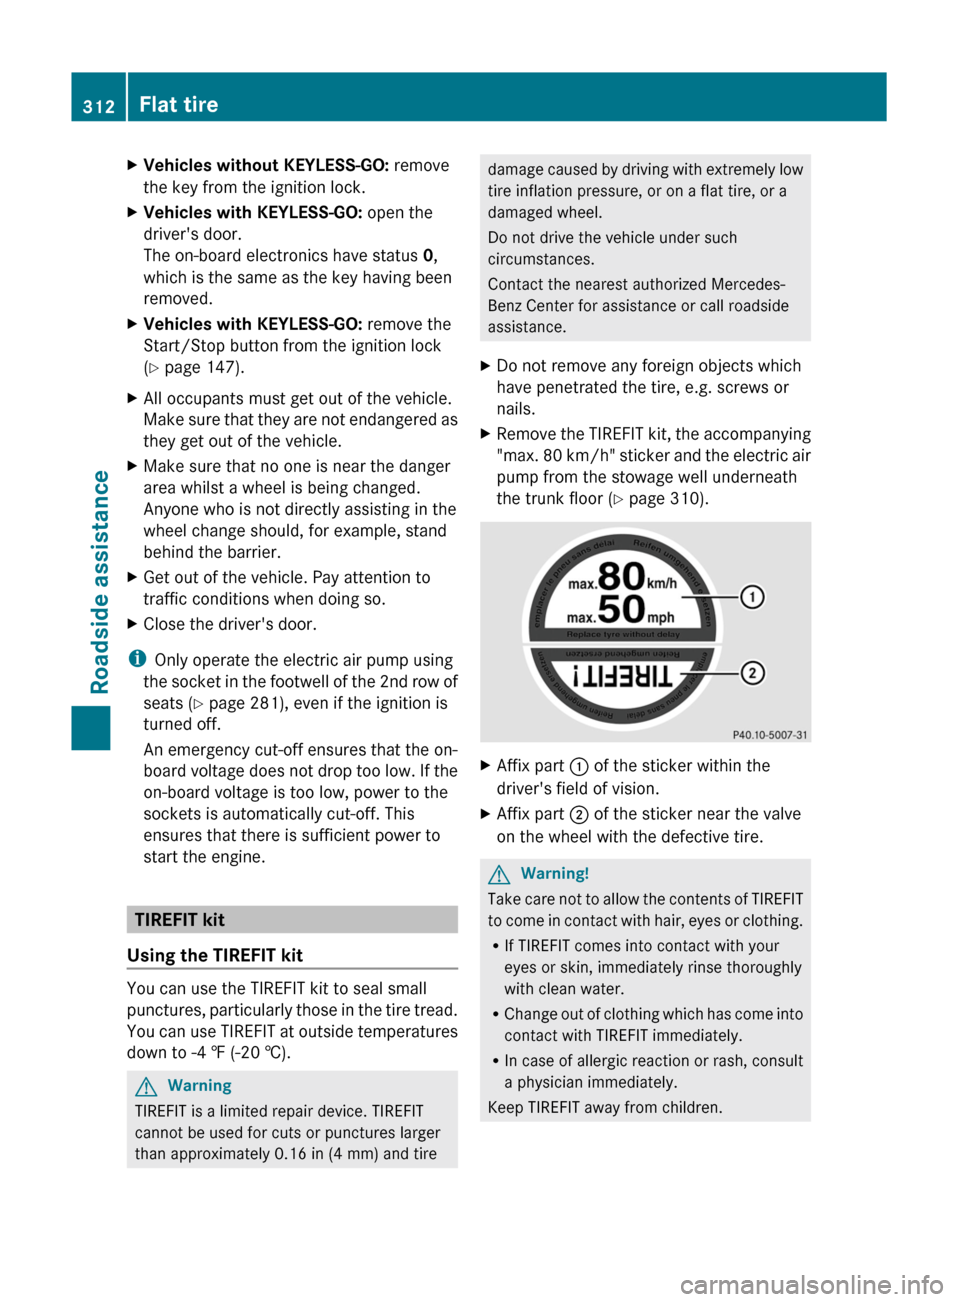
XAffix part : of the sticker within the
driver's field of vision.
XAffix part ; of the sticker near the valve
on the wheel with the defective tire.
GWarning!
Take care not to allow the contents of TIREFIT
to come in contact with hair, eyes or clothing.
RIf TIREFIT comes into contact with your
eyes or skin, immediately rinse thoroughly
with clean water.
RChange out of clothing which has come into
contact with TIREFIT immediately.
RIn case of allergic reaction or rash, consult
a physician immediately.
Keep TIREFIT away from children.
312Flat tireRoadside assistance
BA 164.8 USA, CA Edition B 2011; 1; 2, en-USd2sboikeVersion: 3.0.3.52010-04-21T15:08:44+02:00 - Seite 312
Page 319 of 376

lug wrench, consult an authorized
Mercedes-Benz Center.
XPrepare the vehicle as described
(Y page 311).
XIf a trailer is coupled to the vehicle,
uncouple it.
XRemove the following items from the
stowage well under the trunk floor:
Rthe emergency spare wheel42
Rthe lug wrench
Rthe folding wheel chock
Rthe jack
Rthe ratchet ring spanner
Rthe alignment bolt
Rthe wheel bolts for the emergency spare
wheel
XSecure the vehicle to prevent it from rolling
away.
Securing the vehicle to prevent it from
rolling away
GWarning
Only jack up the vehicle on level ground or on
slight inclines/declines. The vehicle could
otherwise fall off the jack and injure you or
others.
If your vehicle is equipped with a wheel chock,
it can be found in the vehicle tool kit
(Y page 310).
The folding wheel chock is an additional
securing measure to prevent the vehicle from
rolling away, for example when changing a
wheel.
XFold both plates upwards :.XFold out lower plate ;.XGuide the lugs on the lower plate fully into
openings in base plate =.
Securing the vehicle on level ground
XOn level ground: place chocks or other
suitable items under the front and rear of
the wheel that is diagonally opposite the
wheel you wish to change.
Securing the vehicle on slight downhill gradients
42Vehicles with an emergency spare wheel.Flat tire317Roadside assistanceBA 164.8 USA, CA Edition B 2011; 1; 2, en-USd2sboikeVersion: 3.0.3.52010-04-21T15:08:44+02:00 - Seite 317Z