2011 MERCEDES-BENZ G-CLASS remote control
[x] Cancel search: remote controlPage 10 of 288

Exterior viewOverview .......................................... 24
F
First-aid kit ......................................... 229
Flat tire Changing a wheel/mounting the
spare wheel ................................... 232
Preparing the vehicle .....................232
Raising the vehicle .........................233
Floormat ............................................. 211
Front fog lamp (display message) ... 173
Fuel Additives ........................................ 278
Notes ............................................. 277
Premium-grade unleaded gasoline . 278
Refueling ........................................ 131
Specifications ................................ 278
Troubleshooting ............................. 134
Fuel/water separator ....................... 220
Fuel consumption Notes ............................................. 136
Fuel filler cap (display message) ..... 178
Fuel filler flap Emergency release ........................133
Opening/closing ............................ 132
Fuel filter
Display message ............................ 178
Fuel level
Calling up the range (on-board
computer) ...................................... 167
Fuse allocation chart ........................ 243
Fuse box Battery case ................................... 244
Dashboard ..................................... 243
Front-passenger footwell ...............243
Transmission tunnel ....................... 244
Fuse extractor ................................... 243
Fuses Dashboard fuse box .......................243
Fuse allocation chart .....................243
Fuse box in the front-passenger
footwell .......................................... 243
Fuse box in the transmission
tunnel ............................................ 244
In the battery case .........................244
Notes ............................................. 242
G
Garage door opener Clearing the memory .....................211
Notes ............................................. 208
Opening/closing the garage door ..210
Programming the remote control ...209
Gear or selector lever (cleaning
guidelines) ......................................... 225
Genuine Mercedes-Benz parts ......... 274
Genuine wood trim and trim strips
(cleaning instructions) ...................... 225
Glove box ........................................... 193
Gradient-climbing capability
(maximum) ......................................... 146
GTW (Gross Trailer Weight)
(definition) ......................................... 267
H
Hazard warning lamps ........................ 93
Headlamp cleaning system ................ 93
Adding washer fluid .......................218
Notes ............................................. 281
Headlamp delayed switch-off
see Exterior lighting delayed switch-off
Headlamp protection grille .............. 100
Headlamps Cleaning ......................................... 224
Misting up ........................................ 94
Headlamps (automatic) ...................... 91
Head restraints Adjusting (angle) .............................. 79
Adjusting (rear) ................................ 80
Installing/removing (rear) ................80
Luxury .............................................. 80
Resetting (front) ............................... 80
see NECK-PRO head restraints
Heating
see Climate control ........................ 106
High beam flasher ............................... 93
high-mounted brake lamp Display message ............................ 173
Hill start assist .................................. 118
Hood Closing ........................................... 215
Display message ............................ 181
Opening ......................................... 214
8IndexProCarManuals.com
Page 13 of 288
Operating safetyImportant safety note ......................19
Operating system
see On-board computer
Outside temperature
Calling up (on-board computer) .....160
Display ........................................... 157
Overhead control panel
Overview .......................................... 30
Override feature
Rear side windows ...........................54
P
Paint code number ............................ 275
Paintwork (cleaning instructions) ... 222
Panic alarm .......................................... 54
Parking ............................................... 134
Parking aid Exterior mirror on the front-
passenger side ................................. 87
Rear view camera .......................... 152
Parking brake .................................... 135
Display message ............................ 171
see Parking brake ..........................139
Parking lamp (display message) ...... 174
Parking lock releasing manually .........................126
Parking position
Exterior mirror on the front-
passenger side ................................. 87
Pedals ................................................. 136
Permanent four-wheel drive see 4MATIC
Permissible gross vehicle weight
rating .................................................. 256
Plastic trim (cleaning instructions) . 225
Power washers .................................. 222
Product information ............................ 17
Programming SmartKeys ....................................... 63
Pulling away
Automatic transmission .................118
R
Radio Changing stations (on-board
computer) ...................................... 160
see separate operating instructions
Range (on-board computer) ............. 167
Rear bench seat Folding forward .............................. 195
Rear compartment
Setting the air vents ......................113
Rear door
Display message ............................ 181
Opening/closing .............................. 69
Rear fog lamp (display message) ..... 173
Rear seat bench Folding into an upright position .....195
Rear view camera
Function/notes ............................. 152
Rear view camera (cleaning
instructions) ...................................... 224
Rear-view mirror Adjusting ......................................... 85
Dipping (automatic) .........................87
Rear window heating ........................ 111
Malfunction .................................... 111
Rear window wiper ........................... 102
Refueling ............................................ 131
Remote control Programming (garage door
opener) .......................................... 209
Reporting
Malfunctions relevant to safety ........ 20
Reserve fuel
Display message ............................ 178
Warning lamp ................................. 188
Residual heat
Switching on/off ........................... 112
Restraint systems
see SRS
Roadside Assistance (breakdown) .... 18
Roof carrier ........................................ 197
Roof lining and carpets (cleaning
guidelines) ......................................... 226
Route see Route guidance (on-board
computer) Index11ProCarManuals.com
Page 16 of 288
System .......................................... 202
Vehicle remote unlocking ..............206
Telephone
Menu (on-board computer) ............167
Telephone compartment .................. 193
Temperature Coolant .......................................... 156
Displaying the outside
temperature ................................... 160
Outside temperature ...................... 157
Setting (climate control) ................109
Theft deterrent locking system
Immobilizer ...................................... 59
Tilt/sliding sunroof
see Sliding sunroof
Tire pressure
Calling up (on-board computer) .....253
Checking ........................................ 252
Checking manually ........................253
Display message ............................ 179
Maximum ....................................... 252
Notes ............................................. 250
Recommended ............................... 249
Tire pressure monitoring system
Function/notes ............................. 253
Restarting ...................................... 255
Warning lamp ................................. 189
Tires
Aspect ratio (definition) .................268
Average weight of the vehicle
occupants (definition) ....................267
Bar (definition) ............................... 266
Characteristics .............................. 266
Checking ........................................ 246
Definition of terms .........................266
Direction of rotation ......................270
Distribution of the vehicle
occupants (definition) ....................269
DOT, Tire Identification Number
(TIN) ............................................... 265
DOT (Department of
Transportation) (definition) ............266
GAWR (Gross Axle Weight Rating)
(definition) ..................................... 267
GTW (Gross Trailer Weight)
(definition) ..................................... 267
GVW (Gross Vehicle Weight)
(definition) ..................................... 267GVWR (Gross Vehicle Weight
Rating) (definition) .........................267
Increased vehicle weight due to
optional equipment (definition) ......267
Kilopascal (kPa) (definition) ...........268
Labeling (overview) ........................262
Load bearing index (definition) ......269
Load index ..................................... 265
Load index (definition) ...................268
Maximum loaded vehicle weight
(definition) ..................................... 267
Maximum load on a tire
(definition) ..................................... 268
Maximum permissible tire
pressure (definition) ....................... 268
Maximum tire load .........................260
Maximum tire load (definition) .......268
Optional equipment weight
(definition) ..................................... 268
PSI (pounds per square inch)
(definition) ..................................... 268
Replacing ....................................... 269
Service life ..................................... 248
Sidewall (definition) .......................268
Speed index (definition) .................267
Storing ........................................... 270
Structure and characteristics
(definition) ..................................... 266
Technical data ............................... 272
Temperature .................................. 262
TIN (Tire Identification Number)
(definition) ..................................... 269
Tire bead (definition) ......................268
Tire pressure (definition) ................268
Tire pressures (recommended) ......267
Tire size designation, load-bearing
capacity, speed index ....................263
Tire tread ....................................... 247
Tire tread (definition) .....................268
Total load limit (definition) .............269
Traction ......................................... 261
Traction (definition) .......................269
Tread wear ..................................... 261
TWR (permissible trailer drawbar
noseweight) (definition) .................269
Uniform Tire Quality Grading
Standards ...................................... 26114IndexProCarManuals.com
Page 210 of 288
XTo swing up and secure: swing the brush
guard up to stop joint ? and hold it in
place.
The pins of quick-release fasteners ;
need to engage in the openings in lock =.XLock quick-release fasteners ; on both
sides using wrench :.
!
Make sure that the pins of the quick-
release fasteners are securely engaged in
the lock on both sides.
Garage door opener
Important safety notes
You can use the HomeLink ®
garage door
opener integrated into the rear-view mirror to
operate up to three different gate/garage
door opener systems.
i Certain garage door drives are
incompatible with the integrated garage
door opener. If you experience difficulties
programming the integrated garage door
opener, contact an authorized Mercedes-
Benz Center. You can also contact the
following service hotlines:
R USA: Mercedes-Benz Customer
Assistance Center under
1-800-FOR-MERCedes
R Canada: Customer Service under
1-800-387-0100
GWarning
Before programming the integrated remote
control to a garage door opener or gate
operator, make sure people and objects are
out of the way of the device to prevent
potential harm or damage. When
programming a garage door opener, the door
moves up or down. When programming a gate
operator, the gate opens or closes.
Do not use the integrated remote control with
any garage door opener that lacks safety stop
and reverse features as required by U.S.
federal safety standards (this includes any
garage door opener model manufactured
before April 1, 1982). A garage door that
cannot detect an object - signaling the door
to stop and reverse - does not meet current
U.S. federal safety standards.
When programming a garage door opener,
park vehicle outside the garage.
Do not run the engine while programming the
integrated remote control. Inhalation of
exhaust gas is hazardous to your health. All
exhaust gas contains carbon monoxide (CO),
and inhaling it can cause unconsciousness
and possible death. All exhaust gas contains
carbon monoxide (CO), and inhaling it can
cause unconsciousness and possible death.
i USA only:
This device complies with part 15 of the
FCC requirements. Operation is subject to
the following two conditions:
1. The device must not cause harmful
interference.
2. The device must withstand any
interference received, including
interference that may cause undesired
operation.
Unauthorized modification of this device
could void the device's operating permit.
i Canada only:
This device complies with the RSS-210
requirements of Industry Canada.
Operation is subject to the following two
conditions:
1. The device must not cause harmful
interference.
2. The device must withstand any
interference received, including
interference that may cause undesired
operation.
Unauthorized modification of this device
could void the user's authority to legally
operate the device.208FeaturesLoading, stowing and features
ProCarManuals.com
Page 211 of 288
Programming the remote control
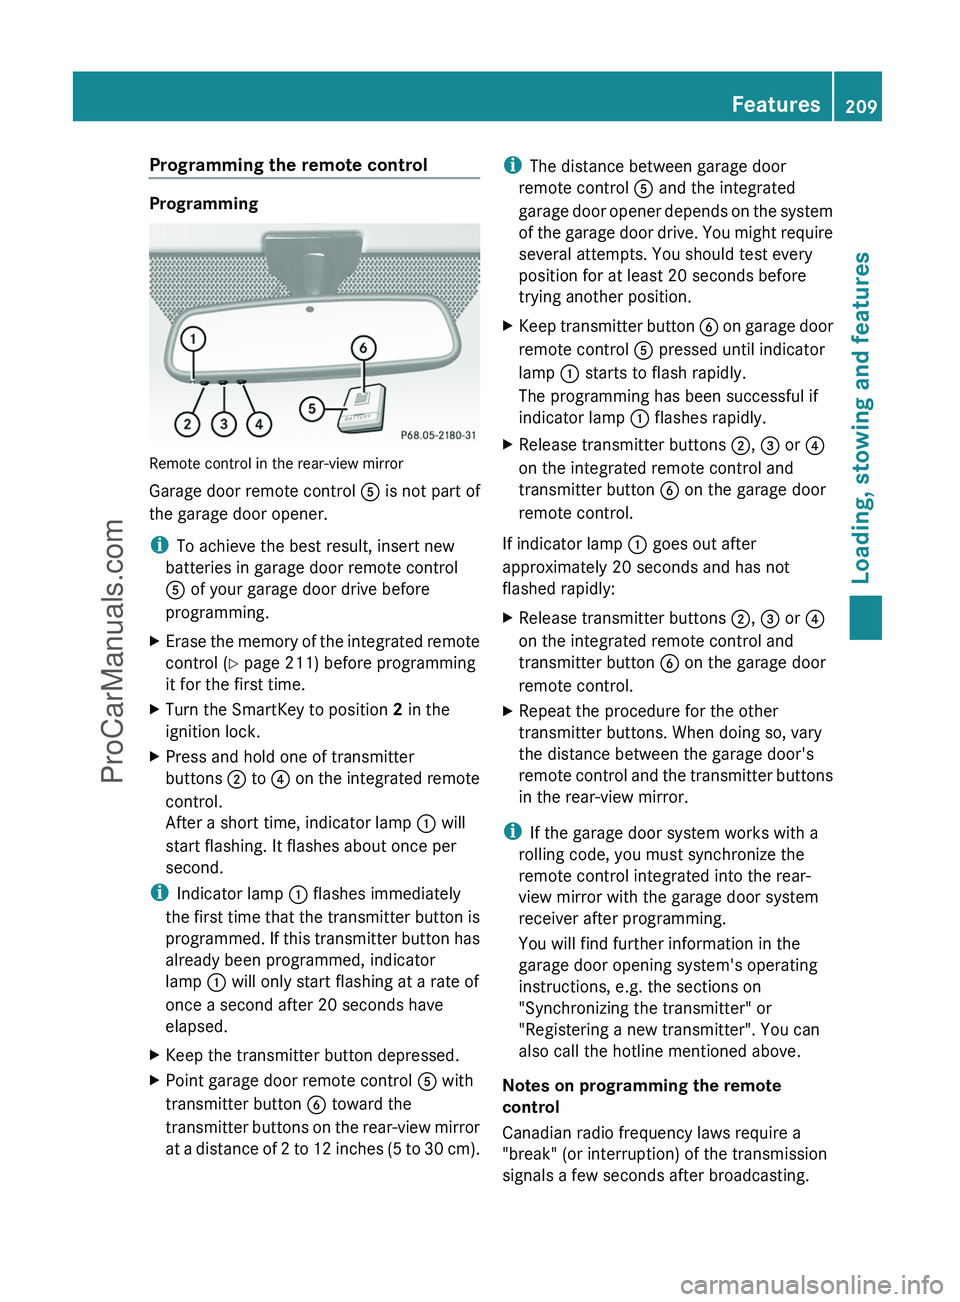
Programming
Remote control in the rear-view mirror
Garage door remote control A is not part of
the garage door opener.
i To achieve the best result, insert new
batteries in garage door remote control
A of your garage door drive before
programming.
XErase the memory of the integrated remote
control ( Y page 211) before programming
it for the first time.XTurn the SmartKey to position 2 in the
ignition lock.XPress and hold one of transmitter
buttons ; to ? on the integrated remote
control.
After a short time, indicator lamp : will
start flashing. It flashes about once per
second.
i Indicator lamp : flashes immediately
the first time that the transmitter button is
programmed. If this transmitter button has
already been programmed, indicator
lamp : will only start flashing at a rate of
once a second after 20 seconds have
elapsed.
XKeep the transmitter button depressed.XPoint garage door remote control A with
transmitter button B toward the
transmitter buttons on the rear-view mirror
at a distance of 2 to 12 inches (5 to 30 cm).i The distance between garage door
remote control A and the integrated
garage door opener depends on the system
of the garage door drive. You might require
several attempts. You should test every
position for at least 20 seconds before
trying another position.XKeep transmitter button B on garage door
remote control A pressed until indicator
lamp : starts to flash rapidly.
The programming has been successful if
indicator lamp : flashes rapidly.XRelease transmitter buttons ;, = or ?
on the integrated remote control and
transmitter button B on the garage door
remote control.
If indicator lamp : goes out after
approximately 20 seconds and has not
flashed rapidly:
XRelease transmitter buttons ;, = or ?
on the integrated remote control and
transmitter button B on the garage door
remote control.XRepeat the procedure for the other
transmitter buttons. When doing so, vary
the distance between the garage door's
remote control and the transmitter buttons
in the rear-view mirror.
i If the garage door system works with a
rolling code, you must synchronize the
remote control integrated into the rear-
view mirror with the garage door system
receiver after programming.
You will find further information in the
garage door opening system's operating
instructions, e.g. the sections on
"Synchronizing the transmitter" or
"Registering a new transmitter". You can
also call the hotline mentioned above.
Notes on programming the remote
control
Canadian radio frequency laws require a
"break" (or interruption) of the transmission
signals a few seconds after broadcasting.
Features209Loading, stowing and featuresZProCarManuals.com
Page 212 of 288
Therefore, these signals may not last long
enough for the integrated remote control to
recognize the signal during programming.
Comparable with Canadian law, some U.S.
garage door openers also have a built-in
"interruption".
If you live in Canada or have difficulties
programming the garage door opener
(regardless of where you live) when using the
programming steps (see above), proceed as
follows:XPress transmitter button ( ;, = or ?) and
hold it down during the following steps until
the setup has been completed
successfully.XAt the same time, press transmitter button
B of the garage door remote control for
two seconds, then release it for two
seconds, then press it again for two
seconds.XRepeat this sequence on transmitter
button B of the garage door remote
control until the frequency signal has been
saved.XIf the setup procedure is successful,
indicator lamp : flashes once slowly and
goes out after a few seconds.XContinue with the other programming
steps (see above).
Problems when programming
If you have problems when programming the
integrated remote control, please note the
following:
R check the transmitter frequency of garage
door remote control A (which can usually
be found on the rear of the remote control).
The integrated remote control is
compatible with devices that operate at
frequencies between 280 and 390 MHz.
R replace the batteries in garage door remote
control A. This increases the likelihood of
garage door remote control A sending a
strong and precise signal to the integrated
remote control on the rear-view mirror.
R when programming, hold garage door
remote control A at varying distances and
angles from the transmitter button which
you are programming. Try different angles
at a distance between 2 and 12 inches (5
to 30 cm) or the same angle at varying
distances.
R if there is another garage door remote
control for the same device, perform the
programming steps again using that garage
door opener. Before performing these
steps, make sure that new batteries have
been installed in the garage door remote
control.
R align the antenna cable of the garage door
opener unit. This can improve signal
reception/transmission.
Opening/closing the garage door
Once programmed, the integrated remote
control will assume the function of the garage
door system's remote control. Please also
read the operating instructions for the garage
door system.
XTurn the SmartKey to position 2 in the
ignition lock.XPress transmitter button ;, = or ? on
the integrated remote control in the rear-
view mirror that is programmed to operate
the garage door.
Garage door system with fixed code:
indicator lamp : lights up continuously.
Garage door system with rolling code:
indicator lamp : flashes briefly and then
lights up for approximately two seconds.
This is repeated for up to 20 seconds.
i The transmitter will transmit a signal for
as long as the transmitter button is being
pressed. The transmission will be halted
after a maximum of 20 seconds and
indicator lamp : will flash. Press the
transmitter button again, if necessary.
210FeaturesLoading, stowing and features
ProCarManuals.com
Page 213 of 288
Clearing the remote control memoryXTurn the SmartKey to position 2 in the
ignition lock.XPress and hold transmitter buttons ;
and ? for approximately 20 seconds until
indicator lamp : flashes rapidly.
The memory is cleared.
i You should clear the remote control
memory before selling the vehicle.
Floormat on the driver's side
GWarning!
Whenever you are using a floormat, make sure
there is enough clearance and that the
floormat is securely fastened.
The floormat should always be securely
fastened using the fastening equipment.
Before driving off, check that the floormat is
securely in place and adjust it if necessary. A
loose floormat could slip and hinder proper
functioning of the pedals.
Do not place several floormats on top of each
other as this may impair pedal movement.
Features211Loading, stowing and featuresZProCarManuals.com